如果团队要继续使用自己现有的源代码管理做法,可以使用 GitHub Actions 自动将自己的 GitHub 存储库与其应用程序配置存储同步。 这样,可以照常对配置文件进行更改,同时获得应用程序配置优势,比如:
• 在代码之外集中配置
• 更新配置,而无需重新部署整个应用
• 与 Azure 应用服务和 Functions 等服务集成。
GitHub Actions 工作流在 GitHub 存储库中定义自动化流程。 “Azure 应用程序配置同步”操作在源存储库有更改后,触发更新应用程序配置实例。 它使用存储库的 /.github/workflows/ 路径中的 YAML (.yml) 文件来定义步骤和参数。 可以在推送、审阅应用程序配置文件或设置其分支后触发配置更新,就像对应用代码所做的那样。
若要深入了解 GitHub 工作流和操作,请参阅这篇 GitHub 文档。
在存储库中启用 GitHub Actions
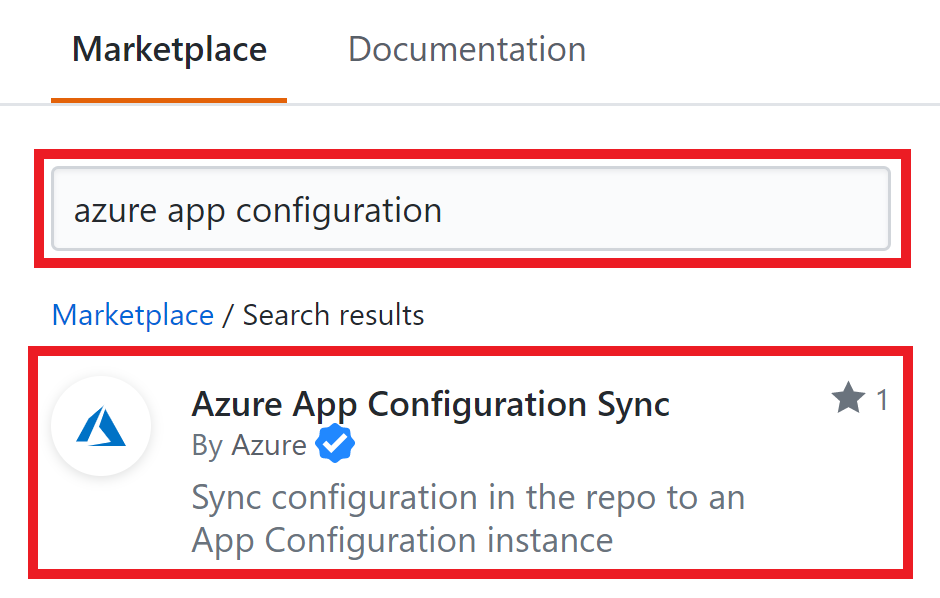
若要开始使用此 GitHub 操作,请转到存储库,然后选择“操作”选项卡。选择“新建工作流”,然后“自己设置工作流”。 最后,在市场中搜索“Azure 应用配置同步”。

在推送后同步配置文件
此操作在有更改推送到 appsettings.json 后同步 Azure 应用程序配置文件。 在开发人员将更改推送到 appsettings.json 后,“应用程序配置同步”操作使用新值来更新应用程序配置实例。
此工作流的第一部分指定这一操作在包含 appsettings.json 的推送推送到主分支后触发 。 第二部分列出了在此操作触发后立即运行的作业。 此操作使用作为机密存储在存储库中的连接字符串来签出相关文件,并更新应用程序配置实例。 若要详细了解如何在 GitHub 中使用机密,请参阅这篇关于如何创建和使用加密机密的 GitHub 文章。
on:
  push:
    branches:
      - 'main'
    paths:
      - 'appsettings.json'

jobs:
  syncconfig:
    runs-on: ubuntu-latest
    steps:
      # checkout done so that files in the repo can be read by the sync
      - uses: actions/checkout@v1
      - uses: azure/appconfiguration-sync@v1
        with:
          configurationFile: 'appsettings.json'
          format: 'json'
          # Replace <ConnectionString> with the name of the secret in your
          # repository
          connectionString: ${{ secrets.<ConnectionString> }}
          separator: ':'
使用严格同步
默认情况下,GitHub 操作没有启用严格模式;也就是说,同步只会将配置文件中的键值添加到应用程序配置实例(而不会删除键值对)。 启用严格模式意味着,从应用程序配置实例中删除配置文件中没有的键值对,以便与配置文件保持一致。 若要从多个源进行同步,或结合使用 Azure Key Vault 与应用程序配置,不妨使用不同的前缀或标签来进行严格同步,以免擦除掉其他文件的中配置设置(见下面的示例)。
on:
  push:
    branches:
      - 'main'
    paths:
      - 'appsettings.json'

jobs:
  syncconfig:
    runs-on: ubuntu-latest
    steps:
      # checkout done so that files in the repo can be read by the sync
      - uses: actions/checkout@v1
      - uses: azure/appconfiguration-sync@v1
        with:
          configurationFile: 'appsettings.json'
          format: 'json'
          # Replace <ConnectionString> with the name of the secret in your
          # repository
          connectionString: ${{ secrets.<ConnectionString> }}
          separator: ':'
          label: 'Label'
          prefix: 'Prefix:'
          strict: true
在一个操作中同步多个文件
如果配置位于多个文件中,可以使用下面的模式,以在任何一个文件被修改时触发同步。 此模式使用 glob 库 https://www.npmjs.com/package/glob 。 请注意,如果你的配置文件名称包含逗号,则可以使用反斜杠来转义逗号。
on:
  push:
    branches:
      - 'main'
    paths:
      - 'appsettings.json'
      - 'appsettings2.json'

jobs:
  syncconfig:
    runs-on: ubuntu-latest
    steps:
      # checkout done so that files in the repo can be read by the sync
      - uses: actions/checkout@v1
      - uses: azure/appconfiguration-sync@v1
        with:
          configurationFile: '{appsettings.json,appsettings2.json}'
          format: 'json'
          # Replace <ConnectionString> with the name of the secret in your repository
          connectionString: ${{ secrets.<ConnectionString> }}
          separator: ':'
按前缀或标签同步
如果在同步操作中指定前缀或标签,则只会同步特定集。 这对于对多个文件使用严格同步非常重要。 根据配置的设置方式,可以将前缀或标签与每个文件关联,然后可以分别同步每个前缀或标签,这样就不会覆盖任何内容。 通常,前缀用于不同的应用程序或服务,标签用于不同的环境。
按前缀同步:
on:
  push:
    branches:
      - 'main'
    paths:
      - 'appsettings.json'

jobs:
  syncconfig:
    runs-on: ubuntu-latest
    steps:
      # checkout done so that files in the repo can be read by the sync
      - uses: actions/checkout@v1
      - uses: azure/appconfiguration-sync@v1
        with:
          configurationFile: 'appsettings.json'
          format: 'json'
          # Replace <ConnectionString> with the name of the secret in your repository
          connectionString: ${{ secrets.<ConnectionString> }}
          separator: ':'
          prefix: 'Prefix::'
按标签同步:
on:
  push:
    branches:
      - 'main'
    paths:
      - 'appsettings.json'

jobs:
  syncconfig:
    runs-on: ubuntu-latest
    steps:
      # checkout done so that files in the repo can be read by the sync
      - uses: actions/checkout@v1
      - uses: azure/appconfiguration-sync@v1
        with:
          configurationFile: 'appsettings.json'
          format: 'json'
          # Replace <ConnectionString> with the name of the secret in your repository
          connectionString: ${{ secrets.<ConnectionString> }}
          separator: ':'
          label: 'Label'
使用动态标签同步
下面的操作在每个同步中插入一个动态标签,以确保每个同步都能被唯一标识,并可便于代码更改映射到配置更改。
此工作流的第一部分指定这一操作在包含 appsettings.json 的推送推送到主分支后触发 。 第二部分运行作业,以根据提交哈希为配置更新创建唯一标签。 然后,此作业使用新值和此更新的唯一标签来更新应用程序配置实例。
on:
  push:
    branches:
      - 'main'
    paths:
      - 'appsettings.json'

jobs:
  syncconfig:
    runs-on: ubuntu-latest
    steps:
      # Creates a label based on the branch name and the first 8 characters
      # of the commit hash
      - id: determine_label
        run: echo ::set-output name=LABEL::"${GITHUB_REF#refs/*/}/${GITHUB_SHA:0:8}"
      # checkout done so that files in the repo can be read by the sync
      - uses: actions/checkout@v1
      - uses: azure/appconfiguration-sync@v1
        with:
          configurationFile: 'appsettings.json'
          format: 'json'
          # Replace <ConnectionString> with the name of the secret in your
          # repository
          connectionString: ${{ secrets.<ConnectionString> }}
          separator: ':'
          label: ${{ steps.determine_label.outputs.LABEL }}
结合使用 Azure Key Vault 与 GitHub 操作
如果结合使用 Azure Key Vault 与 AppConfiguration,开发人员应使用两个单独的文件,它们通常是 appsettings.json 和 secretreferences.json。 secretreferences.json 包含密钥保管库机密的 URL。
{ "mySecret": "{"uri":"https://myKeyVault.vault.azure.cn/secrets/mySecret"}" }
然后,可以将 GitHub 操作配置为,对 appsettings.json 执行严格同步,随后对 secretreferences.json 执行非严格同步。 下面的示例在任何一个文件更新时触发同步:
on:
  push:
    branches:
      - 'main'
    paths:
      - 'appsettings.json'
      - 'secretreferences.json'

jobs:
  syncconfig:
    runs-on: ubuntu-latest
    steps:
      # checkout done so that files in the repo can be read by the sync
      - uses: actions/checkout@v1
      - uses: azure/appconfiguration-sync@v1
        with:
          configurationFile: 'appsettings.json'
          format: 'json'
          # Replace <ConnectionString> with the name of the secret in your repository
          connectionString: ${{ secrets.<ConnectionString> }}
          separator: ':'
          strict: true
      - uses: azure/appconfiguration-sync@v1
        with:
          configurationFile: 'secretreferences.json'
          format: 'json'
          # Replace <ConnectionString> with the name of the secret in your repository
          connectionString: ${{ secrets.<ConnectionString> }}
          separator: ':'
          contentType: 'application/vnd.microsoft.appconfig.keyvaultref+json;charset=utf-8'
使用最大深度限制 GitHub 操作
嵌套 JSON 特性的默认行为是平展整个对象。 下面的 JSON 定义了此键值对:
| 密钥 | 值 |
|---|---|
| Object:Inner:InnerKey | InnerValue |
{ "Object":
    { "Inner":
        {
        "InnerKey": "InnerValue"
        }
    }
}
若要将嵌套对象作为推送到配置实例的值,可以使用 depth 值在适当的深度处停止平展。
on:
  push:
    branches:
      - 'main'
    paths:
      - 'appsettings.json'

jobs:
  syncconfig:
    runs-on: ubuntu-latest
    steps:
      # checkout done so that files in the repo can be read by the sync
      - uses: actions/checkout@v1
      - uses: azure/appconfiguration-sync@v1
        with:
          configurationFile: 'appsettings.json'
          format: 'json'
          # Replace <ConnectionString> with the name of the secret in your
          # repository
          connectionString: ${{ secrets.<ConnectionString> }}
          separator: ':'
          depth: 2
假设 depth 值为 2,上面的示例现在返回以下键值对:
| 密钥 | 值 |
|---|---|
| Object:Inner | {"InnerKey":"InnerValue"} |
了解操作输入
输入参数指定了操作在运行时期间使用的数据。 下表列出了“应用程序配置同步”接受的输入参数,以及每个参数应使用的值。 若要详细了解 GitHub Actions 的操作输入,请参阅 GitHub 的文档。
注意
输入 ID 不区分大小写。
| 输入名称 | 必需? | 值 |
|---|---|---|
| configurationFile | 是 | 存储库中配置文件的相对路径。 glob 模式受支持,并且可以包含多个文件。 |
| format | 是 | 配置文件的文件格式。 有效格式为:JSON、YAML、属性。 |
| connectionString | 是 | 应用程序配置实例的读/写连接字符串。 连接字符串应作为机密存储在 GitHub 存储库中,并且只有机密名称才能在工作流中使用。 |
| separator | 是 | 将配置文件平展为键值对时使用的分隔符。 有效值为:. , ; : - _ __ / |
| 前缀 | 否 | 要添加到键的开头的前缀。 |
| label | 否 | 设置键值对时使用的标签。 如果没有指定,则使用 null 标签。 |
| strict | 否 | 确定是否启用严格模式的布尔值。 默认值是 False。 |
| depth | 否 | 平展配置文件的最大深度。 depth 必须为正数。 默认没有最大深度。 |
| 标记 | 否 | 指定在键值对上设置的标记。 格式应为以下形状的 JSON 对象的字符串化形式:{ [propertyName: string]: string; }。每个属性名/值对都变成一个标记。 |
后续步骤
在本文中,你学习了 GitHub 操作“应用程序配置同步”,以及如何使用此操作来自动更新应用程序配置实例。 若要了解 Azure 应用程序配置如何响应键值对更改,请继续阅读下一篇文章。