本快速入门介绍如何将 Bicep 模块发布到专用模块注册表,以及如何从 Bicep 文件调用模块。 专用模块注册表使你可以在组织中共享 Bicep 模块。 有关详细信息,请参阅为 Bicep 模块创建专用注册表。
先决条件
如果没有 Azure 订阅,可在开始前创建一个试用帐户。
要使用模块注册表,必须具有 Bicep CLI 版本 0.4.1008 或更高版本。 若要与 Azure CLI 一同使用,还必须安装 Azure CLI 2.31.0 或更高版本;若要与 Azure PowerShell 一同使用,还必须安装 Azure PowerShell 7.0.0 或更高版本 。
Bicep 注册表托管在 Azure 容器注册表 (ACR) 上。 若要创建一个注册表,请参阅快速入门:使用 Bicep 文件创建容器注册表。
若要设置环境以进行 Bicep 开发,请参阅安装 Bicep 工具。 完成这些步骤后,你将具有 Visual Studio Code 和 Bicep 扩展,或 Visual Studio 和 Bicep 扩展。
创建 Bicep 模块
模块是一个从另一个 Bicep 文件部署的 Bicep 文件。 任何 Bicep 文件都可以用作模块。 可以在本快速入门中使用以下 Bicep 文件。 它创建存储帐户:
@minLength(3)
@maxLength(11)
param storagePrefix string

@allowed([
  'Standard_LRS'
  'Standard_GRS'
  'Standard_RAGRS'
  'Premium_LRS'

])
param storageSKU string = 'Standard_LRS'
param location string

var uniqueStorageName = '${storagePrefix}${uniqueString(resourceGroup().id)}'

resource stg 'Microsoft.Storage/storageAccounts@2025-06-01' = {
  name: uniqueStorageName
  location: location
  sku: {
    name: storageSKU
  }
  kind: 'StorageV2'
  properties: {
    supportsHttpsTrafficOnly: true
  }
}

output storageEndpoint object = stg.properties.primaryEndpoints
将 Bicep 文件另存为 storage.bicep。
发布模块
如果没有 Azure 容器注册表 (ACR),请参阅先决条件创建一个。 需要 ACR 的登录服务器名称。 登录服务器名称的格式为:<registry-name>.azurecr.cn。 获取登录服务器名称:
az acr show --resource-group <resource-group-name> --name <registry-name> --query loginServer
使用以下语法将 Bicep 文件作为模块发布到专用模块注册表。
az bicep publish --file storage.bicep --target br:exampleregistry.azurecr.cn/bicep/modules/storage:v1 --documentationUri https://www.contoso.com/exampleregistry.html
在前面的示例中,./storage.bicep 是要发布的 Bicep 文件。 如果需要,请更新文件路径。 模块路径具有以下语法:
br:<registry-name>.azurecr.cn/<file-path>:<tag>
- br 是 Bicep 注册表的架构名称。
- file-path 在 Azure 容器注册表中称作 。 file-path 可以包含由 字符分隔的段。 如果注册表中不存在此文件路径,则创建此文件路径。
- tag 用于指定模块的版本。
若要验证已发布的模块,可以列出 ACR 存储库:
az acr repository list --name <registry-name> --output table
调用模块
若要调用模块,请在 Visual Studio Code 中创建新的 Bicep 文件。 在新的 Bicep 文件中,输入以下行。
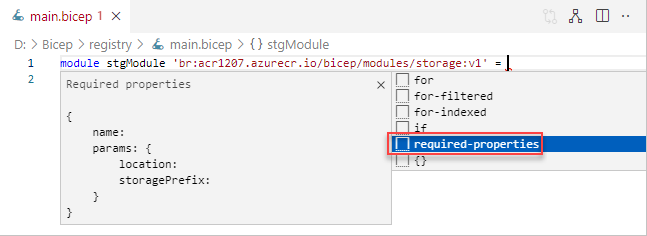
module stgModule 'br:<registry-name>.azurecr.cn/bicep/modules/storage:v1'
将 <registry-name> 替换为 ACR 注册表名称。 将模块还原到本地缓存需要一小段时间。 模块还原后,模块路径下的红色卷线将消失。 在行的末尾添加 = 和一个空格,然后选择“required-properties”,如以下屏幕截图所示。 模块结构将自动填充。
以下示例是已完成的 Bicep 文件。
@minLength(3)
@maxLength(11)
param namePrefix string
param location string = resourceGroup().location

module stgModule 'br:ace1207.azurecr.cn/bicep/modules/storage:v1' = {
  name: 'stgStorage'
  params: {
    location: location
    storagePrefix: namePrefix
  }
}
在本地保存 Bicep 文件,然后使用 Azure CLI 或 Azure PowerShell 部署 Bicep 文件:
resourceGroupName = "{provide-a-resource-group-name}"
templateFile="{provide-the-path-to-the-bicep-file}"

az group create --name $resourceGroupName --location chinaeast

az deployment group create --resource-group $resourceGroupName --template-file $templateFile
在 Azure 门户中,验证存储帐户已成功创建。
清理资源
如果不再需要本文中创建的 Azure 资源,请使用 Azure CLI 或 Azure PowerShell 模块删除快速入门资源组。
resourceGroupName = "{provide-the-resource-group-name}"

az group delete --name $resourceGroupName