出于多种原因,你可能希望将现有 Azure 资源从一个区域移到另一个区域。 你可能想要:
- 利用新的 Azure 区域。
- 部署仅在特定区域可用的功能和服务。
- 满足内部策略和治理要求。
- 与公司合并和收购保持一致
- 满足容量计划要求。
Log Analytics 工作区的迁移计划必须包括使用 Log Analytics 工作区记录数据的任何资源的迁移。
Log Analytics 工作区本身不支持将工作区数据从一个区域迁移到另一区域和关联设备。 相反,必须在目标区域中新建 Log Analytics 工作区,并在新工作区中重新配置设备和设置。
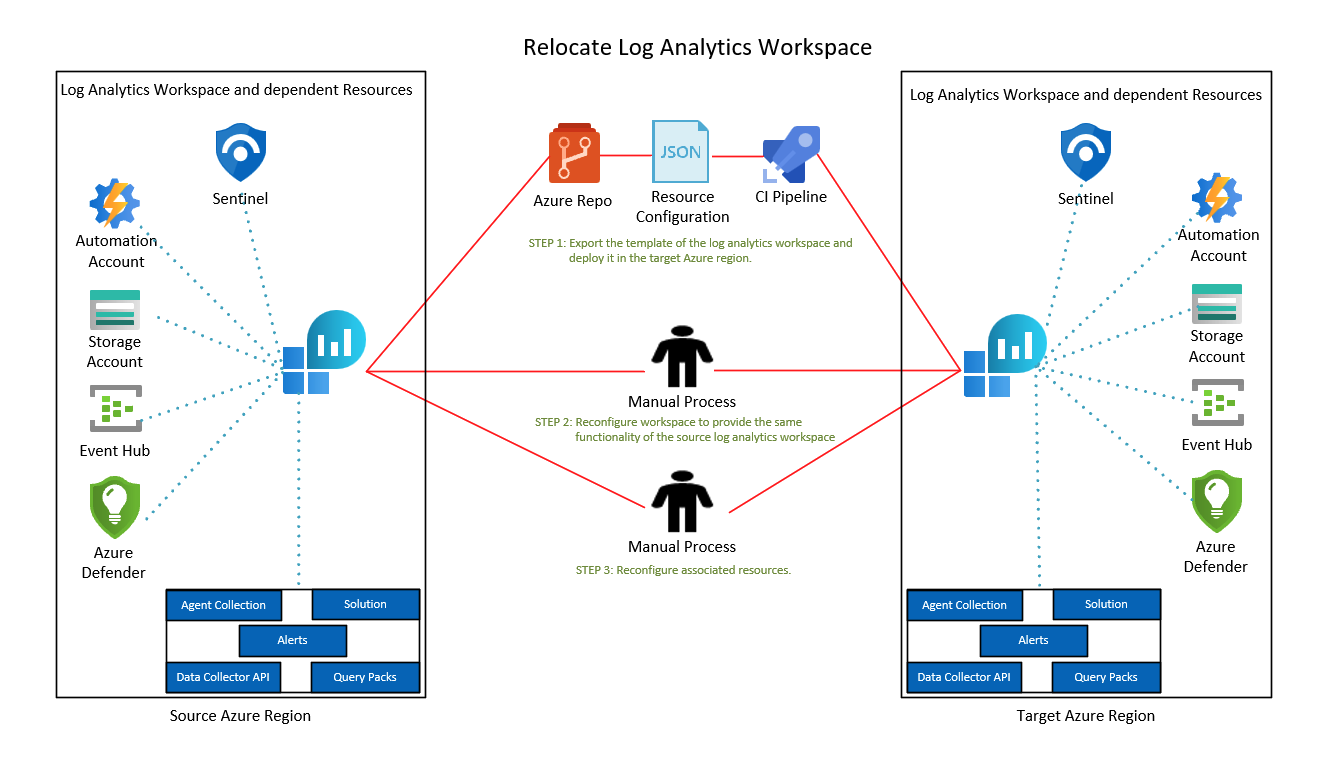
下图演示了 Log Analytics 工作区的重定位模式。 红色流线表示目标实例的重新部署,包括数据移动以及更新域和端点。
先决条件
若要将工作区配置导出到某个可部署到另一个区域的模板,你需要具有 Log Analytics 参与者或监视参与者角色或权限更高的角色。
查明当前关联到你的工作区的所有资源,包括:
在工作区中输入日志,并查询心跳表以列出连接的代理。
Heartbeat
| summarize by Computer, Category, OSType, _ResourceId
诊断设置:资源可以将日志发送到 Azure 诊断或工作区中的专用表。 进入工作区中的“日志”,对将数据发送到 表的资源运行以下查询
AzureDiagnostics:AzureDiagnostics | where TimeGenerated > ago(12h) | summarize by ResourceProvider , ResourceType, Resource | sort by ResourceProvider, ResourceType对将数据发送到专用表的资源运行此查询:
search * | where TimeGenerated > ago(12h) | where isnotnull(_ResourceId) | extend ResourceProvider = split(_ResourceId, '/')[6] | where ResourceProvider !in ('microsoft.compute', 'microsoft.security') | extend ResourceType = split(_ResourceId, '/')[7] | extend Resource = split(_ResourceId, '/')[8] | summarize by tostring(ResourceProvider) , tostring(ResourceType), tostring(Resource) | sort by ResourceProvider, ResourceType已安装的解决方案:在工作区导航窗格中选择“旧的解决方案”,以查看已安装的解决方案列表。
链接服务:工作区可能有链接到从属资源(例如 Azure 自动化帐户、存储帐户或专用群集)的链接服务。 请从你的工作区中删除链接服务。 在目标工作区中手动重新配置它们。
你可以检查你的工作区中是否使用了 scheduledQueryRules API 来发出警报。 也可以在目标工作区中手动配置警报。
查询包:一个工作区可以与多个查询包相关联。 若要标识工作区中的查询包,请在工作区导航窗格中选择“日志”,在左侧窗格中选择“查询”,然后选择搜索框右边的省略号 。 右侧将打开一个包含所选查询包的对话框。 如果查询包与要移动的工作区位于同一资源组中,可以将其包含在此迁移中。
验证你的 Azure 订阅是否允许在目标区域中创建 Log Analytics 工作区。
准备
以下过程展示了如何使用资源管理器模板为移动操作准备工作区和资源。
注释
并非所有资源都可以通过模板导出。 在目标区域创建工作区后,需要单独配置这些资源。
登录到 Azure 门户,然后选择“资源组”。
找到包含你的工作区的资源组并选择它。
若要查看警报资源,请选中“显示隐藏类型”复选框。
选择“类型”筛选器。 选择“Log Analytics 工作区”、“解决方案”、“SavedSearches”、“microsoft.insights/scheduledqueryrules”、“defaultQueryPack”,以及你拥有的其他与工作区相关的资源(例如自动化帐户) 。 然后,选择应用。
选择工作区、解决方案、保存的搜索、警报、查询包和你拥有的其他与工作区相关的资源(例如自动化帐户)。 然后选择工具栏上的“导出模板”。
注释
无法使用模板导出 Microsoft Sentinel。 你需要将 Sentinel 加入到目标工作区。
选择工具栏中的“部署”,以编辑和准备用于部署的模板。
选择工具栏中的“编辑参数”,以在联机编辑器中打开 parameters.json 文件。
若要编辑参数,请更改
value下的parameters属性。 下面是一个示例:{ "$schema": "https://schema.management.azure.com/schemas/2019-04-01/deploymentParameters.json#", "contentVersion": "1.0.0.0", "parameters": { "workspaces_name": { "value": "my-workspace-name" }, "workspaceResourceId": { "value": "/subscriptions/resource-id/resourceGroups/resource-group-name/providers/Microsoft.OperationalInsights/workspaces/workspace-name" }, "alertName": { "value": "my-alert-name" }, "querypacks_name": { "value": "my-default-query-pack-name" } } }在编辑器中选择“保存”。
编辑模板
选择工具栏中的“编辑模板”,以在联机编辑器中打开 template.json 文件。
若要编辑将在其中部署 Log Analytics 工作区的目标区域,请在联机编辑器中更改
location下的resources属性。若要获取区域位置代码,请参阅 Azure 中的数据驻留。 区域代码是不带空格的区域名称。
如果模板中存在链接服务资源 (
microsoft.operationalinsights/workspaces/linkedservices),请将其删除。 应在目标工作区中手动重新配置这些资源。以下示例模板包括工作区、保存的搜索、解决方案、警报和查询包:
{
  "$schema": "https://schema.management.azure.com/schemas/2019-04-01/deploymentTemplate.json#",
  "contentVersion": "1.0.0.0",
  "parameters": {
    "workspaces_name": {
      "type": "String"
    },
    "workspaceResourceId": {
      "type": "String"
    },
    "alertName": {
      "type": "String"
    },
    "querypacks_name": {
      "type": "String"
    }
  },
  "variables": {},
  "resources": [
    {
      "type": "microsoft.operationalinsights/workspaces",
      "apiVersion": "2020-08-01",
      "name": "[parameters('workspaces_name')]",
      "location": "chinanorth3",
      "properties": {
        "sku": {
          "name": "pergb2018"
        },
        "retentionInDays": 30,
        "features": {
          "enableLogAccessUsingOnlyResourcePermissions": true
        },
        "workspaceCapping": {
          "dailyQuotaGb": -1
        },
        "publicNetworkAccessForIngestion": "Enabled",
        "publicNetworkAccessForQuery": "Enabled"
      }
    },
    {
      "type": "Microsoft.OperationalInsights/workspaces/savedSearches",
      "apiVersion": "2020-08-01",
      "name": "[concat(parameters('workspaces_name'), '/2b5112ec-5ad0-5eda-80e9-ad98b51d4aba')]",
      "dependsOn": [
        "[resourceId('Microsoft.OperationalInsights/workspaces', parameters('workspaces_name'))]"
      ],
      "properties": {
        "category": "VM Monitoring",
        "displayName": "List all versions of curl in use",
        "query": "VMProcess\n| where ExecutableName == \"curl\"\n| distinct ProductVersion",
        "tags": [],
        "version": 2
      }
    },
    {
      "type": "Microsoft.OperationsManagement/solutions",
      "apiVersion": "2015-11-01-preview",
      "name": "[concat('Updates(', parameters('workspaces_name'))]",
      "location": "chinanorth3",
      "dependsOn": [
        "[resourceId('microsoft.operationalinsights/workspaces', parameters('workspaces_name'))]"
      ],
      "plan": {
        "name": "[concat('Updates(', parameters('workspaces_name'))]",
        "promotionCode": "",
        "product": "OMSGallery/Updates",
        "publisher": "Microsoft"
      },
      "properties": {
        "workspaceResourceId": "[resourceId('microsoft.operationalinsights/workspaces', parameters('workspaces_name'))]",
        "containedResources": [
          "[concat(resourceId('microsoft.operationalinsights/workspaces', parameters('workspaces_name')), '/views/Updates(', parameters('workspaces_name'), ')')]"
        ]
      }
    }
    {
      "type": "Microsoft.OperationsManagement/solutions",
      "apiVersion": "2015-11-01-preview",
      "name": "[concat('VMInsights(', parameters('workspaces_name'))]",
      "location": "chinanorth3",
      "plan": {
        "name": "[concat('VMInsights(', parameters('workspaces_name'))]",
        "promotionCode": "",
        "product": "OMSGallery/VMInsights",
        "publisher": "Microsoft"
      },
      "properties": {
        "workspaceResourceId": "[resourceId('microsoft.operationalinsights/workspaces', parameters('workspaces_name'))]",
        "containedResources": [
          "[concat(resourceId('microsoft.operationalinsights/workspaces', parameters('workspaces_name')), '/views/VMInsights(', parameters('workspaces_name'), ')')]"
        ]
      }
    },
    {
      "type": "microsoft.insights/scheduledqueryrules",
      "apiVersion": "2021-08-01",
      "name": "[parameters('alertName')]",
      "location": "chinanorth3",
      "properties": {
        "displayName": "[parameters('alertName')]",
        "severity": 3,
        "enabled": true,
        "evaluationFrequency": "PT5M",
        "scopes": [
          "[parameters('workspaceResourceId')]"
        ],
        "windowSize": "PT15M",
        "criteria": {
          "allOf": [
            {
              "query": "Heartbeat | where computer == 'my computer name'",
              "timeAggregation": "Count",
              "operator": "LessThan",
              "threshold": 14,
              "failingPeriods": {
                "numberOfEvaluationPeriods": 1,
                "minFailingPeriodsToAlert": 1
              }
            }
          ]
        },
        "autoMitigate": true,
        "actions": {}
      }
    },
    {
      "type": "Microsoft.OperationalInsights/querypacks",
      "apiVersion": "2019-09-01-preview",
      "name": "[parameters('querypacks_name')]",
      "location": "chinanorth3",
      "properties": {}
    },
    {
      "type": "Microsoft.OperationalInsights/querypacks/queries",
      "apiVersion": "2019-09-01-preview",
      "name": "[concat(parameters('querypacks_name'), '/00000000-0000-0000-0000-000000000000')]",
      "dependsOn": [
        "[resourceId('Microsoft.OperationalInsights/querypacks', parameters('querypacks_name'))]"
      ],
      "properties": {
        "displayName": "my-query-name",
        "body": "my-query-text",
        "related": {
          "categories": [],
          "resourceTypes": [
              "microsoft.operationalinsights/workspaces"
          ]
        },
        "tags": {
          "labels": []
        }
      }
    }
  ]
}
在在线编辑器中选择“保存”。
重新部署
选择“订阅”以选择将在其中部署目标工作区的订阅。
选择“资源组”以选择将在其中部署目标工作区的资源组。 可以选择“新建”,为目标工作区创建一个新的资源组。
验证“区域”是否设置为要将网络安全组部署到的目标位置。
选择“查看 + 创建”按钮来验证模板。
选择“创建”,将工作区和所选资源部署到目标区域。
工作区(包括所选资源)现已部署在目标区域中。 你可以完成工作区中的剩余配置,使功能与原始工作区相匹配。
- 连接代理:使用任意可用选项(包括数据收集规则)在虚拟机和虚拟机规模集上配置所需的代理,并将新的目标工作区指定为目标。
- 诊断设置:更新标识的资源中的诊断设置,并将目标工作区作为目标。
- 配置数据收集器 API:配置数据收集器 API 实例以将数据发送到目标工作区。
- 配置警报规则:如果未从模板导出警报,则需要在目标工作区中手动配置它们。
确保新数据不会引入到原始工作区。 在原始工作区中运行以下查询,并确保迁移后未进行任何数据引入:
search *
| where TimeGenerated > ago(12h)
| summarize max(TimeGenerated) by Type
数据源连接到目标工作区后,引入的数据存储在目标工作区中。 旧数据保留在原始工作区中,并受保留策略的约束。 可以执行跨工作区查询。 如果为两个工作区分配了相同的名称,请在该工作区引用中使用限定名称 (subscriptionName/resourceGroup/componentName)。
以下是跨具有相同名称的两个工作区的查询示例:
union
  workspace('subscription-name1/<resource-group-name1/<original-workspace-name>')Update,
  workspace('subscription-name2/<resource-group-name2/<target-workspace-name>').Update,
| where TimeGenerated >= ago(1h)
| where UpdateState == "Needed"
| summarize dcount(Computer) by Classification
弃用
如果要丢弃源工作区,请删除导出的资源或包含这些资源的资源组:
在 Azure 门户中选择目标资源组。
在“概述”页面上:
- 如果为此部署创建了新的资源组,请选择工具栏上的“删除资源组”以删除该资源组。
- 如果模板已部署到现有资源组,请选择使用该模板部署的资源,然后选择工具栏上的“删除”以删除所选资源。
清除
在将新数据引入新工作区时,原始工作区中的旧数据仍可用于查询,并受工作区中定义的保留策略的约束。 如果需要使用旧数据来跨工作区查询,建议保留原始工作区。
如果不再需要访问原始工作区中的旧数据:
- 在 Azure 门户中选择原始资源组。
- 选择要删除的任何资源,然后选择工具栏上的“删除”。