可以使用 Windows 或 Linux 计算机安装 Azure CLI 来管理 Azure Stack Hub。 本文指导你完成安装和设置 Azure CLI 的步骤。
安装 Azure CLI
登录到开发工作站并安装 CLI。 Azure Stack Hub 需要版本 2.0 或更高版本的 Azure CLI。
可以使用安装 Azure CLI 一文中所述的步骤 安装 CLI 。
若要验证安装是否成功,请打开终端或命令提示符窗口并运行以下命令:
az --version应会看到计算机上安装的 Azure CLI 版本和其他依赖库。
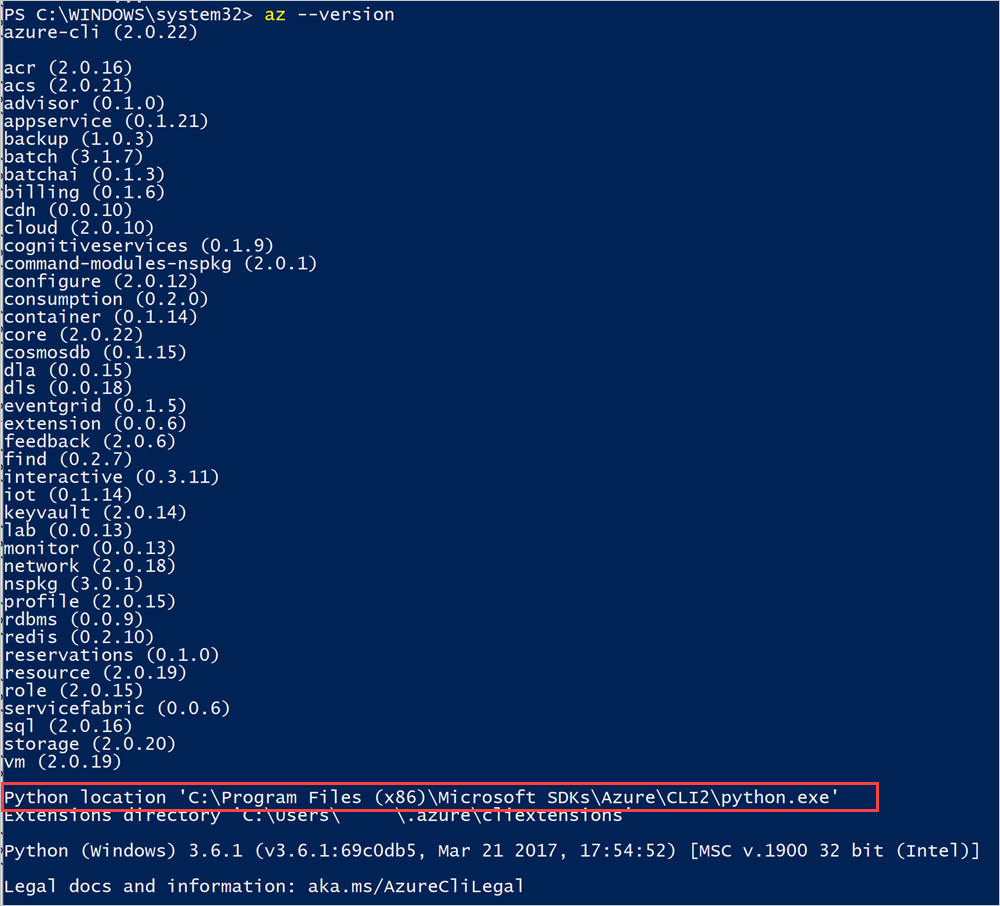
记下 CLI 的 Python 位置。
添加证书
导出并导入已断开连接集成系统的 Azure Stack Hub 证书。 对于连接的集成系统,证书已公开签名,此步骤不是必需的。
使用 Azure CLI 进行连接
本部分将引导您设置 CLI,前提是您使用 Microsoft Entra ID 作为身份管理服务,并且在 Windows 计算机上使用 CLI。
连接到 Azure Stack Hub
通过运行
az cloud register命令注册 Azure Stack Hub 环境。 在登录az login之前,必须将 Azure CLI 配置为面向 Azure Stack Hub 实例,而不是默认的 Azure 公有云。 首先,使用az cloud register命令注册 Azure Stack Hub 环境并定义其终结点,以便 CLI 知道在何处发送请求。 之后,可以设置环境,然后使用az login进行身份验证。注册环境。 运行
az cloud register时使用以下参数:价值 示例: DESCRIPTION 环境名称 AzureStackUser 对于用户环境,请使用 AzureStackUser。 如果您是操作人员,请指定AzureStackAdmin。资源管理器端点 https://management.contoso.partner.onmschina.cn集成系统中的 ResourceManagerUrl 为: https://management.<region>.<fqdn>/。 如果对集成系统终结点有疑问,请联系云作员。存储终结点 local.contoso.partner.onmschina.cn 对于集成系统,请使用适用于系统的终结点。 KeyVault 后缀 .vault.contoso.partner.onmschina.cn 对于集成系统,请使用适用于系统的终结点。 终结点 active directory graph 资源 ID https://graph.chinacloudapi.cn/ Active Directory 资源 ID。 az cloud register ` -n <environmentname> ` --endpoint-resource-manager "https://management.<region>.<fqdn>" ` --suffix-storage-endpoint "<fqdn>" ` --suffix-keyvault-dns ".vault.<fqdn>"有关详细信息,请参阅 Azure CLI 参考文档中的 register 命令 。
使用以下命令设置活动环境。
az cloud set -n <environmentname>将环境配置更新为使用 Azure Stack Hub 特定的 API 版本配置文件。 若要更新配置,请运行以下命令:
az cloud update --profile 2020-09-01-hybrid使用
az login命令登录到 Azure Stack Hub 环境。可以使用用户凭据或云运营商提供给你的服务主体(SPN)登录到 Azure Stack Hub 环境。
- 以 用户身份登录:
可以直接在
az login命令中指定用户名和密码,或使用浏览器进行身份验证。 如果帐户启用了多重身份验证,则必须使用浏览器进行身份验证:az login -u "user@contoso.partner.onmschina.cn" -p 'Password123!' --tenant contoso.partner.onmschina.cn注释
如果用户帐户已启用多重身份验证,请使用
az login该命令而不提供-u参数。 运行此命令可提供一个 URL 和一个必须用于进行身份验证的代码。以 服务主体身份登录:
在登录之前, 请通过 Azure 门户或 CLI 创建服务主体 并为其分配角色。 现在,使用以下命令登录:
az login `
  --tenant <Azure Active Directory Tenant name. `
            For example: myazurestack.partner.onmschina.cn> `
  --service-principal `
     -u <Application Id of the Service Principal> `
     -p <Key generated for the Service Principal>
请验证您的环境是否已正确设置,并确认该环境是否为活动云环境:
az cloud list --output table应当看到环境被列出,并且“IsActive”为
true。 例如:IsActive Name Profile ---------- ----------------- ----------------- False AzureCloud 2020-09-01-hybrid False AzureChinaCloud latest False AzureUSGovernment latest False AzureGermanCloud latest True AzureStackUser 2020-09-01-hybrid
测试连接性
设置所有内容后,使用 CLI 在 Azure Stack Hub 中创建资源。 例如,可以为应用创建资源组并添加 VM。 使用以下命令创建名为“MyResourceGroup”的资源组:
az group create -n MyResourceGroup -l local
如果资源组已成功创建,则上一个命令输出新创建的资源的以下属性:
{
  "id": "/subscriptions/aaaa0a0a-bb1b-cc2c-dd3d-eeeeee4e4e4e/resourceGroups/RGCL11",
  "location": "local",
  "name": "RGCLI1",
  " properties ": {
    "provisioningState": "Succeeded"
  },
  "tags ": null
}
一般已知问题
大多数问题的一般解决方法是使用 az rest 使用当前 Azure Stack 上下文的命令,为与问题关联的命令发出 REST API 调用。 只要这些问题是由 Azure CLI 而不是 Azure Stack Hub 资源提供程序或其他 Azure Stack Hub 服务引起的,以下问题列表中的解决方法通常会针对其他 Azure CLI 问题进行调整。
Microsoft图形问题
这些是适用于 Azure Stack Hub 的 Azure CLI 2.40.0 或更高版本的已知 Microsoft Graph 问题。 这主要影响 AD FS 环境,因为它们不支持 Microsoft Graph。
az keyvault create与 Microsoft Graph 交互。 下面是 AD FS 的示例解决方法。 解决方法主要使用 Azure AD Graph 检索用户信息,例如objectId而不是 Microsoft Graph。# First, sign into Azure CLI account you want to create the Key Vault from. # TODO: change the principal name to name of principal you want to create the key vault with. $principalNameLike = "CloudUser*" # TODO: change location to your preference. $location = "local" $aadGraph = az cloud show --query endpoints.activeDirectoryGraphResourceId --output tsv $tenantId = az account show --query tenantId --output tsv if ($aadGraph[-1] -ne '/') { $aadGraph += '/' } $userObject = az rest --method get --url "${aadGraph}${tenantId}/users?api-version=1.6" ` | ConvertFrom-Json ` | Select-Object -ExpandProperty value ` | Where-Object {$_.userPrincipalName -like $principalNameLike} $body = '{ "location": "' + $location + '", "properties": { "tenantId": "' + $tenantId + '", "sku": { "family": "A", "name": "standard" }, "accessPolicies": [ { "tenantId": "' + $tenantId + '", "objectId": "' + $userObject.objectId + '", "permissions": { "keys": [ "get", "create", "delete", "list", "update", "import", "backup", "restore", "recover" ], "secrets": [ "get", "list", "set", "delete", "backup", "restore", "recover" ], "certificates": [ "get", "list", "delete", "create", "import", "update", "managecontacts", "getissuers", "listissuers", "setissuers", "deleteissuers", "manageissuers", "recover" ], "storage": [ "get", "list", "delete", "set", "update", "regeneratekey", "setsas", "listsas", "getsas", "deletesas" ] } } ], "enabledForDeployment": true, "enabledForTemplateDeployment": true } }' $body | Out-File -FilePath (Join-Path -Path "." -ChildPath "body.json") $resourceGroupName = "testrg123" az group create -n $resourceGroupName -l $location $armEndpoint = az cloud show --query endpoints.resourceManager --output tsv if ($armEndpoint[-1] -ne '/') { $armEndpoint += '/' } $subscriptionId = az account show --query id --output tsv $keyVaultName = "testkv123" az rest --method put --url "${armEndpoint}subscriptions/${subscriptionId}/resourceGroups/${resourceGroupName}/providers/Microsoft.KeyVault/vaults/${keyVaultName}?api-version=2016-10-01" --body `@body.json # OPTIONAL: test access to the Key Vault. # az keyvault secret set --name MySecretName --vault-name $keyVaultName --value MySecret有关 Key Vault REST API 的详细信息, 请参阅 Key Vault REST API 参考。
其他问题
以下是不限于特定版本或 Azure CLI 版本范围的问题。
az role assignment create由于旧 API 问题,Azure Stack Hub 的 Azure CLI 当前不支持此功能。 Microsoft Entra ID 或 AD FS 都需要下面所述的解决方案。# First, sign into account with access to the resource that is being given access or a role to another user. # TODO: change the principal name to name of principal you want to assign the role to. $principalNameLike = "CloudUser*" # TODO: change role name to your preference. $roleName = "Owner" # TODO: change location to your preference. $location = "local" $aadGraph = az cloud show --query endpoints.activeDirectoryGraphResourceId --output tsv $tenantId = az account show --query tenantId --output tsv if ($aadGraph[-1] -ne '/') { $aadGraph += '/' } $userObject = az rest --method get --url "${aadGraph}${tenantId}/users?api-version=1.6" ` | ConvertFrom-Json ` | Select-Object -ExpandProperty value ` | Where-Object {$_.userPrincipalName -like $principalNameLike} $roleDefinitionId = az role definition list --query "[?roleName=='${roleName}'].id" --output tsv $body = @{ properties = @{ roleDefinitionId = $roleDefinitionId principalId = $userObject.objectId } } $body | ConvertTo-Json | Out-File -FilePath (Join-Path -Path "." -ChildPath "body.json") $resourceGroupName = "testrg123" az group create -n $resourceGroupName -l $location $armEndpoint = az cloud show --query endpoints.resourceManager --output tsv if ($armEndpoint[-1] -ne '/') { $armEndpoint += '/' } $scope = az group show --name $resourceGroupName --query id --output tsv $guid = (New-Guid).ToString() az rest --method put --url "${armEndpoint}${scope}/providers/Microsoft.Authorization/roleAssignments/${guid}?api-version=2015-07-01" --body `@body.json # OPTIONAL: test access to the resource group, or use the portal. # az login -u <assigned user name> -p <assigned user password> --tenant $tenantId # Test a resource creation command in the resource group: # az network dns zone create -g $resourceGroupName -n "www.mysite.com"有关角色分配 REST API 的详细信息, 请参阅角色分配文章。