Microsoft Entra ID 的托管标识让你的群集可以访问其他受 Microsoft Entra 保护的资源,如 Azure Key Vault。 标识由 Azure 平台托管,且无需预配或轮换任何机密。
本文介绍如何在群集上添加和删除托管标识。 有关托管标识的详细信息,请参阅托管标识概述。
注意
如果跨订阅或租户迁移 Azure 数据资源管理器群集,则 Azure 数据资源管理器的托管标识不会按预期方式运行。 应用需要获取新的标识,可以通过 删除系统分配的标识 ,然后 添加系统分配的标识来获取该标识。 还需要更新下游资源的访问策略以使用新标识。
有关基于以前的 SDK 版本的代码示例,请参阅存档的文章。
托管标识类型
可以授予 Azure 数据资源管理器群集两种类型的标识:
添加系统分配的标识
分配一个系统分配的标识,该标识与群集关联,并且在删除群集时会被删除。 一个群集只能有一个系统分配的标识。 使用系统分配的标识创建群集时,需要在群集上设置附加属性。 使用 Azure 门户、C# 或资源管理器模板添加系统分配的标识,如以下部分所述。
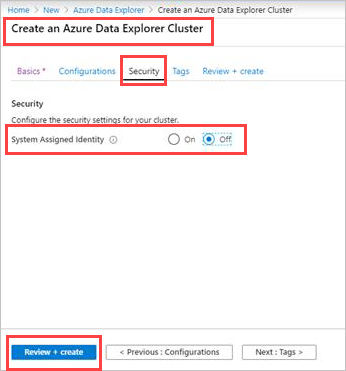
使用 Azure 门户添加系统分配的标识
登录到 Azure 门户。
新建 Azure 数据资源管理器群集
创建 Azure 数据资源管理器群集
在 “安全 ”选项卡中,在 “系统分配的标识”下,选择“ 打开”。 若要删除系统分配的标识,请选择“关闭”。
选择“下一步: 标记 >”或“查看 + 创建”,创建此群集。
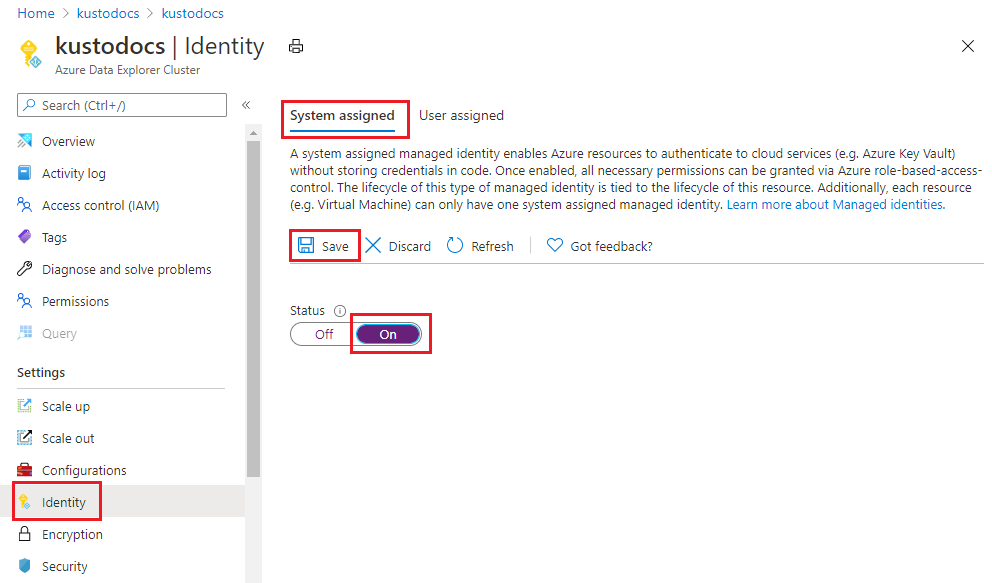
现有的 Azure 数据资源管理器群集
打开现有的 Azure 数据资源管理器群集。
在门户的左窗格中选择 “设置>标识 ”。
在 “标识 ”窗格中,在 “系统分配 ”选项卡下:
- 将“状态”滑块移到“打开”。
- 选择“保存”。
- 在弹出窗口中,选择“ 是”。
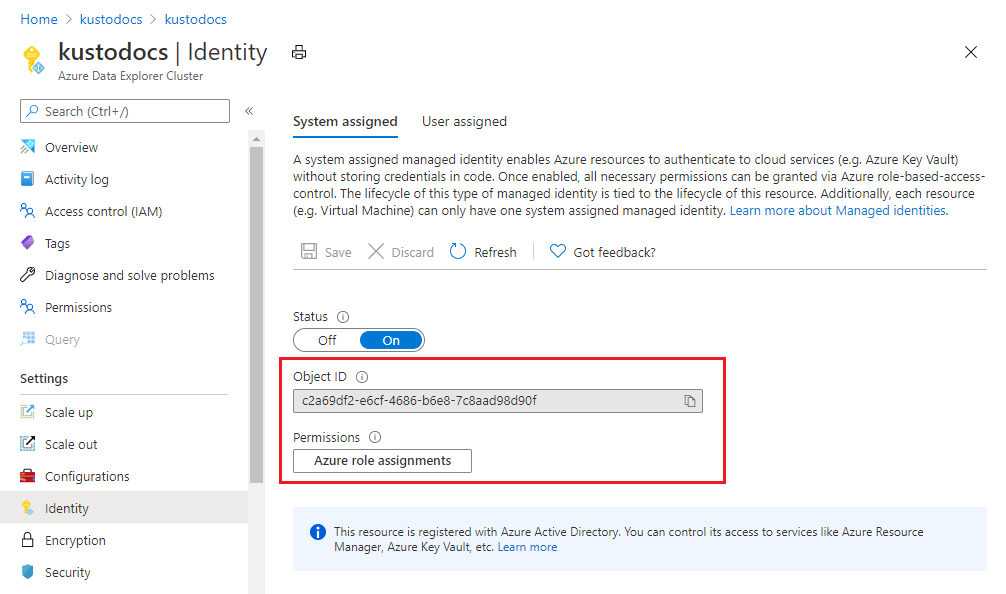
几分钟后,屏幕显示:
- 对象 ID - 用于客户管理的密钥
- 权限 - 选择相关角色分配
使用 C# 添加系统分配的标识
先决条件
若要使用 Azure 数据资源管理器 C# 客户端设置托管标识,请执行以下操作:
创建或更新群集
使用 Identity 属性创建或更新群集:
var tenantId = "xxxxxxxx-xxxxx-xxxx-xxxx-xxxxxxxxx"; //Directory (tenant) ID
var clientId = "xxxxxxxx-xxxxx-xxxx-xxxx-xxxxxxxxx"; //Application ID
var clientSecret = "PlaceholderClientSecret"; //Client Secret
var subscriptionId = "xxxxxxxx-xxxxx-xxxx-xxxx-xxxxxxxxx";
var credentials = new ClientSecretCredential(tenantId, clientId, clientSecret);
var resourceManagementClient = new ArmClient(credentials, subscriptionId);
var resourceGroupName = "testrg";
var subscription = await resourceManagementClient.GetDefaultSubscriptionAsync();
var resourceGroup = (await subscription.GetResourceGroupAsync(resourceGroupName)).Value;
var clusters = resourceGroup.GetKustoClusters();
var clusterName = "mykustocluster";
var clusterData = new KustoClusterData(
    location: AzureLocation.chinaeast2,
    sku: new KustoSku(KustoSkuName.StandardE8adsV5, KustoSkuTier.Standard) { Capacity = 5 }
) { Identity = new ManagedServiceIdentity(ManagedServiceIdentityType.SystemAssigned) };
await clusters.CreateOrUpdateAsync(WaitUntil.Completed, clusterName, clusterData);
运行以下命令,检查是否成功使用身份创建或更新群集:
clusterData = (await clusters.GetAsync(clusterName)).Value.Data;
如果结果包含ProvisioningStateSucceeded值,则群集已创建或更新,并具有以下属性:
var principalGuid = clusterData.Identity.PrincipalId.GetValueOrDefault();
var tenantGuid = clusterData.Identity.TenantId.GetValueOrDefault();
PrincipalId 和 TenantId 已替换为 GUID。
TenantId 属性指示标识所属的 Microsoft Entra 租户。
PrincipalId 是群集的新标识的唯一标识符。 在 Microsoft Entra ID 中,服务主体的名称与你为应用服务或 Azure Functions 实例提供的名称相同。
使用 Azure 资源管理器模板添加系统分配的标识
可以使用 Azure 资源管理器模板自动部署 Azure 资源。 若要详细了解如何部署到 Azure 数据资源管理器,请参阅使用 Azure 资源管理器模板创建 Azure 数据资源管理器群集和数据库。
添加系统分配的类型时,告知 Azure 为群集创建和管理标识。 可以通过在资源定义中包含以下属性来创建具有标识的任何类型 Microsoft.Kusto/clusters 资源:
{
   "identity": {
      "type": "SystemAssigned"
   }
}
例如:
{
   "identity": {
      "type": "SystemAssigned",
      "tenantId": "<TENANTID>",
      "principalId": "<PRINCIPALID>"
   }
}
注意
一个群集可同时具有系统分配的标识和用户分配的标识。
type 属性将为 SystemAssigned,UserAssigned
创建群集时,它具有以下附加属性:
{
    "identity": {
        "type": "SystemAssigned",
        "tenantId": "<TENANTID>",
        "principalId": "<PRINCIPALID>"
    }
}
<TENANTID> 和 <PRINCIPALID> 已替换为 GUID。
TenantId 属性指示标识所属的 Microsoft Entra 租户。
PrincipalId 是群集的新标识的唯一标识符。 在 Microsoft Entra ID 中,服务主体的名称与你为应用服务或 Azure Functions 实例提供的名称相同。
删除系统分配的标识
删除系统分配的标识时,还会从 Microsoft Entra ID 中删除它。 删除群集资源时,系统分配的标识也会自动从 Microsoft Entra ID 中删除。 可以通过禁用该功能来删除系统分配的标识。 使用 Azure 门户、C# 或资源管理器模板删除系统分配的标识,如以下部分所述。
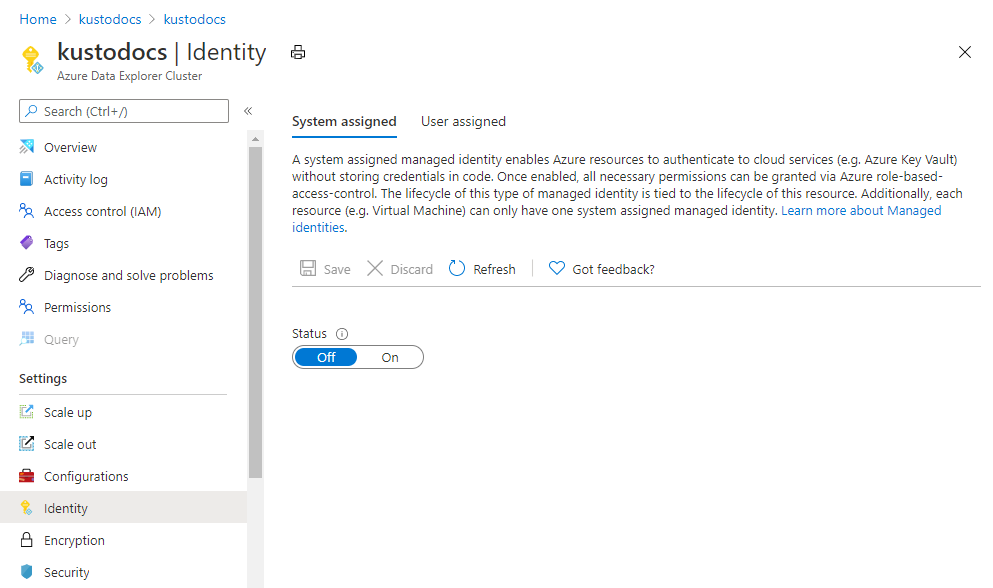
使用 Azure 门户删除系统分配的标识
登录到 Azure 门户。
在门户的左窗格中选择 “设置>标识 ”。
在 “标识 ”窗格中,在 “系统分配 ”选项卡下:
- 将“状态”滑块移到“关闭”。
- 选择“保存”。
- 在弹出窗口中选择“是”,禁用系统分配的标识。 “ 标识 ”窗格还原为与添加系统分配的标识之前相同的条件。
使用 C# 删除系统分配的身份
运行以下代码以删除系统分配的标识:
var cluster = (await clusters.GetAsync(clusterName)).Value;
var clusterPatch = new KustoClusterPatch(clusterData.Location)
{
    Identity = new ManagedServiceIdentity(ManagedServiceIdentityType.None)
};
await cluster.UpdateAsync(WaitUntil.Completed, clusterPatch);
使用 Azure 资源管理器模板删除系统分配的标识
运行以下代码以删除系统分配的标识:
{
   "identity": {
      "type": "None"
   }
}
注意
如果群集同时具有系统分配的标识和用户分配的标识,则删除系统分配的标识后,该 type 属性为 UserAssigned。
添加用户分配的标识
将用户分配的托管标识分配给群集。 一个群集可拥有多个用户分配的标识。 若要创建具有用户分配标识的群集,需要在群集上设置附加属性。 使用 Azure 门户、C# 或资源管理器模板添加用户分配的标识,如以下部分所述。
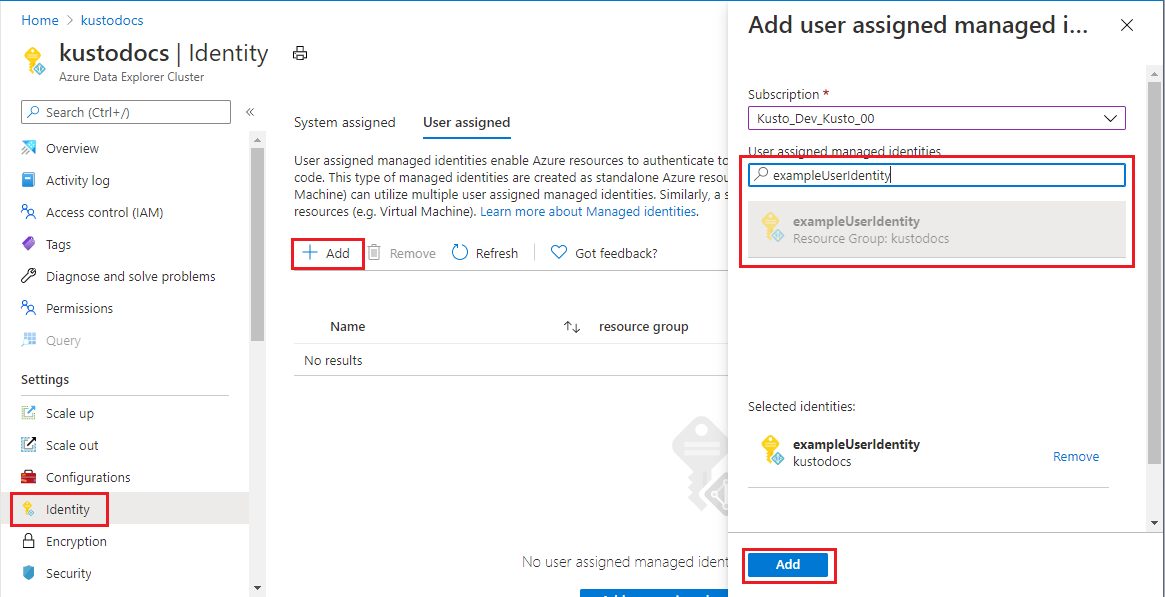
使用 Azure 门户添加用户分配的标识
登录到 Azure 门户。
创建用户分配的托管标识资源。
打开现有的 Azure 数据资源管理器群集。
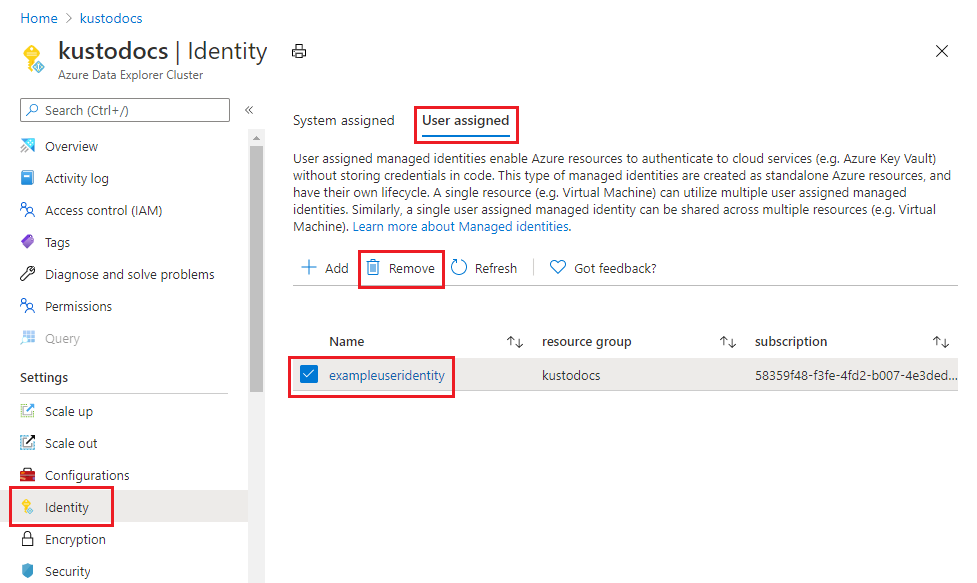
在门户的左窗格中,选择“设置”“标识”。
在“用户分配”选项卡中,选择“添加” 。
搜索之前创建的标识并选择它。 选择 添加 。
使用 C# 添加用户分配的标识
先决条件
若要使用 Azure 数据资源管理器 C# 客户端设置托管标识,请执行以下操作:
创建或更新群集
使用 Identity 属性创建或更新群集:
var tenantId = "xxxxxxxx-xxxxx-xxxx-xxxx-xxxxxxxxx"; //Directory (tenant) ID
var clientId = "xxxxxxxx-xxxxx-xxxx-xxxx-xxxxxxxxx"; //Application ID
var clientSecret = "PlaceholderClientSecret"; //Client Secret
var subscriptionId = "xxxxxxxx-xxxxx-xxxx-xxxx-xxxxxxxxx";
var credentials = new ClientSecretCredential(tenantId, clientId, clientSecret);
var resourceManagementClient = new ArmClient(credentials, subscriptionId);
var resourceGroupName = "testrg";
var subscription = await resourceManagementClient.GetDefaultSubscriptionAsync();
var resourceGroup = (await subscription.GetResourceGroupAsync(resourceGroupName)).Value;
var clusters = resourceGroup.GetKustoClusters();
var clusterName = "mykustocluster";
var userIdentityResourceId = new ResourceIdentifier($"/subscriptions/{subscriptionId}/resourceGroups/{resourceGroupName}/providers/Microsoft.ManagedIdentity/userAssignedIdentities/<identityName>");
var clusterData = new KustoClusterData(
    location: AzureLocation.chinaeast2,
    sku: new KustoSku(KustoSkuName.StandardE8adsV5, KustoSkuTier.Standard) { Capacity = 5 }
)
{
    Identity = new ManagedServiceIdentity(ManagedServiceIdentityType.UserAssigned)
    {
        UserAssignedIdentities = { { userIdentityResourceId, new UserAssignedIdentity() } }
    }
};
await clusters.CreateOrUpdateAsync(WaitUntil.Completed, clusterName, clusterData);
运行以下命令,检查是否成功使用身份创建或更新群集:
clusterData = (await clusters.GetAsync(clusterName)).Value.Data;
如果结果包含ProvisioningStateSucceeded值,则群集已创建或更新,并具有以下属性:
var userIdentity = clusterData.Identity.UserAssignedIdentities[userIdentityResourceId];
var principalGuid = userIdentity.PrincipalId.GetValueOrDefault();
var clientGuid = userIdentity.ClientId.GetValueOrDefault();
PrincipalId 是 Microsoft Entra 管理使用的标识的唯一标识符。
ClientId 是应用程序的新标识的唯一标识符,用于指定在运行时调用期间使用哪个标识。
使用 Azure 资源管理器模板添加用户分配的标识
可以使用 Azure 资源管理器模板自动部署 Azure 资源。 若要详细了解如何部署到 Azure 数据资源管理器,请参阅使用 Azure 资源管理器模板创建 Azure 数据资源管理器群集和数据库。
可以通过在资源定义中包含以下属性来创建具有用户分配标识的任何类型 Microsoft.Kusto/clusters 资源。 将 <RESOURCEID> 替换为所需标识的资源 ID:
{
   "identity": {
      "type": "UserAssigned",
      "userAssignedIdentities": {
         "<RESOURCEID>": {}
      }
   }
}
例如:
{
    "apiVersion": "2019-09-07",
    "type": "Microsoft.Kusto/clusters",
    "name": "[variables('clusterName')]",
    "location": "[resourceGroup().location]",
    "identity": {
        "type": "UserAssigned",
        "userAssignedIdentities": {
            "[resourceId('Microsoft.ManagedIdentity/userAssignedIdentities', variables('identityName'))]": {}
        }
    },
    "dependsOn": [
        "[resourceId('Microsoft.ManagedIdentity/userAssignedIdentities', variables('identityName'))]"
    ]
}
创建群集时,它具有以下附加属性:
{
   "identity": {
      "type": "UserAssigned",
      "userAssignedIdentities": {
         "<RESOURCEID>": {
            "principalId": "<PRINCIPALID>",
            "clientId": "<CLIENTID>"
         }
      }
   }
}
PrincipalId 是 Microsoft Entra 管理使用的标识的唯一标识符。
ClientId 是应用程序的新标识的唯一标识符,用于指定在运行时调用期间使用哪个标识。
注意
一个群集可同时具有系统分配的标识和用户分配的标识。 在这种情况下,请将 type 属性设置为 SystemAssigned,UserAssigned.
从群集中删除用户分配的托管标识
使用 Azure 门户、C# 或资源管理器模板删除用户分配的标识,如以下部分所述。
使用 Azure 门户删除用户分配的托管标识
登录到 Azure 门户。
在门户的左窗格中选择 “设置>标识 ”。
选择“用户分配”选项卡。
搜索之前创建的标识并选择它。 选择“删除” 。
在弹出窗口中,选择“是”,删除用户分配的标识。 “ 标识 ”窗格还原为与添加用户分配标识之前相同的条件。
使用 C# 删除用户分配的身份
运行以下代码以删除用户分配的标识:
var cluster = (await clusters.GetAsync(clusterName)).Value;
var clusterUpdate = new KustoClusterPatch(clusterData.Location)
{
    Identity = new ManagedServiceIdentity(ManagedServiceIdentityType.UserAssigned)
    {
        UserAssignedIdentities = { { userIdentityResourceId, null } }
    }
};
await cluster.UpdateAsync(WaitUntil.Completed, clusterUpdate);
使用 Azure 资源管理器模板删除用户分配的标识
运行以下代码以删除用户分配的标识:
{
   "identity": {
      "type": "UserAssigned",
      "userAssignedIdentities": {
         "<RESOURCEID>": null
      }
   }
}
注意
- 将标识的值设置为 null 以删除它们。 此操作不会影响其他现有身份。
- 设置
type 属性为 None 以移除所有用户分配的标识。
- 如果群集同时具有系统分配的标识和用户分配的标识,请将
type 属性设置为 SystemAssigned,UserAssigned 要删除的标识,或将其设置为 SystemAssigned 删除所有用户分配的标识。
相关内容