模块标识和模块孪生 类似于 Azure IoT 中心设备标识和设备孪生,但提供更精细的粒度。 虽然 Azure IoT 中心设备标识和设备孪生使后端应用程序能够配置设备并提供设备条件的可见性,但模块标识和模块孪生为设备的各个组件提供这些功能。 在具有多个组件(如操作系统设备或固件设备)的设备上,它允许每个组件的隔离配置和特定条件。
注释
本文中所述的功能仅在 IoT 中心的标准层中可用。 有关基本层和标准/免费 IoT 中心层的详细信息,请参阅 为解决方案选择正确的 IoT 中心层和大小。
本文末尾有两个 C 应用:
CreateIdentities:创建设备标识、模块标识和关联的安全密钥来连接设备和模块客户端。
UpdateModuleTwinReportedProperties:将更新的模块孪生、报告的属性发送到 IoT 中心。
注释
有关可用于生成设备和后端应用的 SDK 工具的详细信息,请参阅 Azure IoT SDK 。
先决条件
最新的 Azure IoT C SDK。
获取 IoT 中心连接字符串
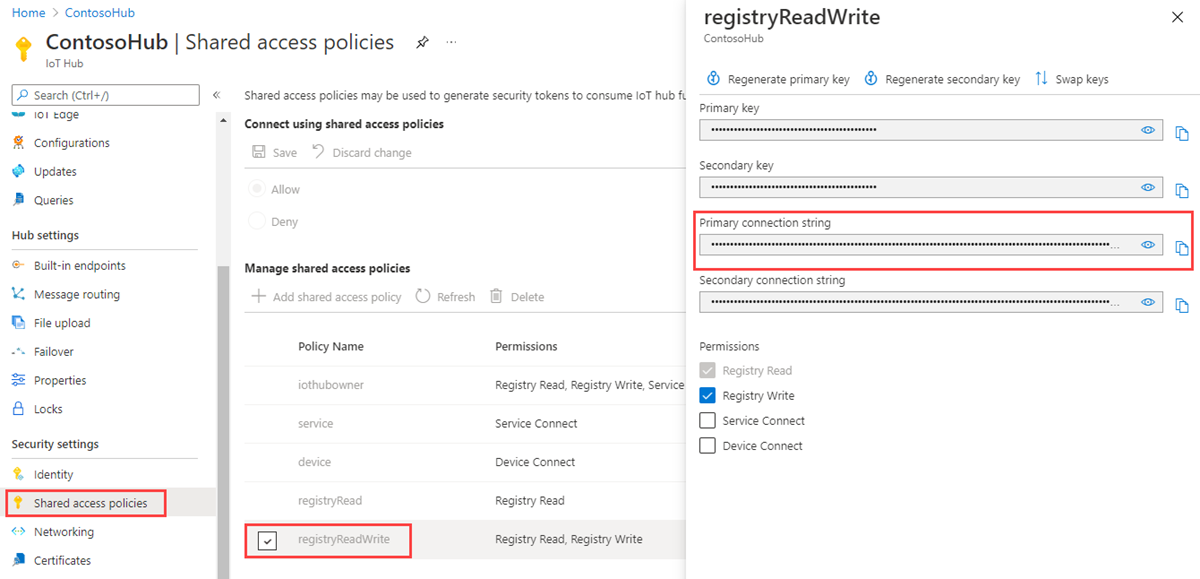
在本文中,你将创建一个后端服务,用于在标识注册表中添加设备,然后将模块添加到该设备。 服务需要 注册表写入 权限。 默认情况下,每个 IoT 中心都是使用名为 registryReadWrite 的共享访问策略创建的,该策略授予此权限。
若要获取 registryReadWrite 策略的 IoT 中心连接字符串,请执行以下步骤:
在 Azure 门户中,选择 资源组。 选择中心所在的资源组,然后从资源列表中选择中心。
在中心的左侧窗格中,选择 “共享访问策略”。
从策略列表中,选择 registryReadWrite 策略。
复制“主连接字符串”并保存该值。

有关 IoT 中心共享访问策略和权限的详细信息,请参阅 访问控制和权限。
在 IoT 中心创建设备标识和模块标识
在本部分中,你将创建一个 C 应用,用于在 IoT 中心的标识注册表中创建设备标识和模块标识。 设备或模块无法连接到 IoT 中心,除非它在标识注册表中具有条目。 有关详细信息,请参阅了解 IoT 中心的标识注册表。 运行此控制台应用时,它将为设备和模块生成唯一的 ID 和密钥。 设备和模块使用这些值在将设备到云的消息发送到 IoT 中心时标识自身。 ID 是区分大小写的。
将以下代码添加到 C 文件:
#include <stdio.h>
#include <stdlib.h>

#include "azure_c_shared_utility/crt_abstractions.h"
#include "azure_c_shared_utility/threadapi.h"
#include "azure_c_shared_utility/platform.h"

#include "iothub_service_client_auth.h"
#include "iothub_registrymanager.h"

static const char* hubConnectionString ="[your hub's connection string]"; // modify

static void createDevice(IOTHUB_REGISTRYMANAGER_HANDLE
  iotHubRegistryManagerHandle, const char* deviceId)
{
    IOTHUB_REGISTRY_DEVICE_CREATE_EX deviceCreateInfo;
    IOTHUB_REGISTRYMANAGER_RESULT result;

    (void)memset(&deviceCreateInfo, 0, sizeof(deviceCreateInfo));
    deviceCreateInfo.version = 1;
    deviceCreateInfo.deviceId = deviceId;
    deviceCreateInfo.primaryKey = "";
    deviceCreateInfo.secondaryKey = "";
    deviceCreateInfo.authMethod = IOTHUB_REGISTRYMANAGER_AUTH_SPK;

    IOTHUB_DEVICE_EX deviceInfoEx;
    memset(&deviceInfoEx, 0, sizeof(deviceInfoEx));
    deviceInfoEx.version = 1;

    // Create device
    result = IoTHubRegistryManager_CreateDevice_Ex(iotHubRegistryManagerHandle,
      &deviceCreateInfo, &deviceInfoEx);
    if (result == IOTHUB_REGISTRYMANAGER_OK)
    {
        (void)printf("IoTHubRegistryManager_CreateDevice: Device has been created successfully: deviceId=%s, primaryKey=%s\n", deviceInfoEx.deviceId, deviceInfoEx.primaryKey);
    }
    else if (result == IOTHUB_REGISTRYMANAGER_DEVICE_EXIST)
    {
        (void)printf("IoTHubRegistryManager_CreateDevice: Device already exists\n");
    }
    else if (result == IOTHUB_REGISTRYMANAGER_ERROR)
    {
        (void)printf("IoTHubRegistryManager_CreateDevice failed\n");
    }
    // You will need to Free the returned device information after it was created
    IoTHubRegistryManager_FreeDeviceExMembers(&deviceInfoEx);
}

static void createModule(IOTHUB_REGISTRYMANAGER_HANDLE iotHubRegistryManagerHandle, const char* deviceId, const char* moduleId)
{
    IOTHUB_REGISTRY_MODULE_CREATE moduleCreateInfo;
    IOTHUB_REGISTRYMANAGER_RESULT result;

    (void)memset(&moduleCreateInfo, 0, sizeof(moduleCreateInfo));
    moduleCreateInfo.version = 1;
    moduleCreateInfo.deviceId = deviceId;
    moduleCreateInfo.moduleId = moduleId;
    moduleCreateInfo.primaryKey = "";
    moduleCreateInfo.secondaryKey = "";
    moduleCreateInfo.authMethod = IOTHUB_REGISTRYMANAGER_AUTH_SPK;

    IOTHUB_MODULE moduleInfo;
    memset(&moduleInfo, 0, sizeof(moduleInfo));
    moduleInfo.version = 1;

    // Create module
    result = IoTHubRegistryManager_CreateModule(iotHubRegistryManagerHandle, &moduleCreateInfo, &moduleInfo);
    if (result == IOTHUB_REGISTRYMANAGER_OK)
    {
        (void)printf("IoTHubRegistryManager_CreateModule: Module has been created successfully: deviceId=%s, moduleId=%s, primaryKey=%s\n", moduleInfo.deviceId, moduleInfo.moduleId, moduleInfo.primaryKey);
    }
    else if (result == IOTHUB_REGISTRYMANAGER_DEVICE_EXIST)
    {
        (void)printf("IoTHubRegistryManager_CreateModule: Module already exists\n");
    }
    else if (result == IOTHUB_REGISTRYMANAGER_ERROR)
    {
        (void)printf("IoTHubRegistryManager_CreateModule failed\n");
    }
    // You will need to Free the returned module information after it was created
    IoTHubRegistryManager_FreeModuleMembers(&moduleInfo);
}

int main(void)
{
    (void)platform_init();

    const char* deviceId = "myFirstDevice";
    const char* moduleId = "myFirstModule";
    IOTHUB_SERVICE_CLIENT_AUTH_HANDLE iotHubServiceClientHandle = NULL;
    IOTHUB_REGISTRYMANAGER_HANDLE iotHubRegistryManagerHandle = NULL;

    if ((iotHubServiceClientHandle = IoTHubServiceClientAuth_CreateFromConnectionString(hubConnectionString)) == NULL)
    {
        (void)printf("IoTHubServiceClientAuth_CreateFromConnectionString failed\n");
    }
    else if ((iotHubRegistryManagerHandle = IoTHubRegistryManager_Create(iotHubServiceClientHandle)) == NULL)
    {
        (void)printf("IoTHubServiceClientAuth_CreateFromConnectionString failed\n");
    }
    else
    {
        createDevice(iotHubRegistryManagerHandle, deviceId);
        createModule(iotHubRegistryManagerHandle, deviceId, moduleId);
    }

    if (iotHubRegistryManagerHandle != NULL)
    {
        (void)printf("Calling IoTHubRegistryManager_Destroy...\n");
        IoTHubRegistryManager_Destroy(iotHubRegistryManagerHandle);
    }

    if (iotHubServiceClientHandle != NULL)
    {
        (void)printf("Calling IoTHubServiceClientAuth_Destroy...\n");
        IoTHubServiceClientAuth_Destroy(iotHubServiceClientHandle);
    }

    platform_deinit();
    return 0;
}
此应用创建 ID 为 myFirstDevice 的设备标识,并在设备 myFirstDevice 下创建 ID 为 myFirstModule 的模块标识。 (如果标识注册表中已存在该模块 ID,则代码只是检索现有的模块信息。然后,应用会显示该标识的主键。 在模拟模块应用中使用此密钥连接到 IoT 中心。
注释
IoT 中心标识注册表仅存储设备和模块标识,以实现对 IoT 中心的安全访问。 标识注册表存储用作安全凭据的设备 ID 和密钥。 标识注册表还为每个设备存储一个启用/禁用标志,这个标志可以用于禁用该设备的访问。 如果应用程序需要存储其他特定于设备的元数据,则应使用特定于应用程序的存储。 模块标识没有启用/禁用标志。 有关详细信息,请参阅 IoT 中心开发人员指南。
使用 C 设备 SDK 更新模块孪生
在本部分中,将在模拟设备上创建一个 C 应用,用于更新模块孪生报告属性。
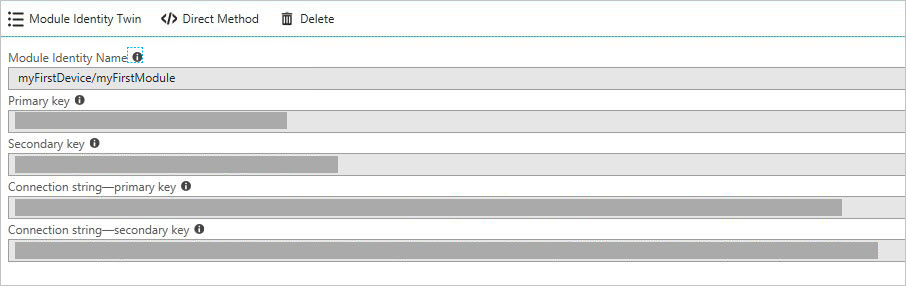
获取模块连接字符串 -- 只需登录到 Azure 门户即可。 导航到 IoT 中心并单击“IoT 设备”。 找到 myFirstDevice,打开它,你会看到 myFirstModule 已成功创建。 复制模块连接字符串。 下一步需要用到它。
创建 UpdateModuleTwinReportedProperties 应用
将以下内容添加到 C 文件:
#include <stdio.h>
#include <stdlib.h>

#include "azure_c_shared_utility/crt_abstractions.h"
#include "azure_c_shared_utility/threadapi.h"
#include "azure_c_shared_utility/platform.h"

#include "iothub_service_client_auth.h"
#include "iothub_devicetwin.h"

const char* deviceId = "bugbash-test-2";
const char* moduleId = "module-id-1";
static const char* hubConnectionString ="[your hub's connection string]"; // modify
const char* testJson = "{\"properties\":{\"desired\":{\"integer_property\": b-1234, \"string_property\": \"abcd\"}}}";

int main(void)
{
    (void)platform_init();

    IOTHUB_SERVICE_CLIENT_AUTH_HANDLE iotHubServiceClientHandle = NULL;
    IOTHUB_SERVICE_CLIENT_DEVICE_TWIN_HANDLE iothubDeviceTwinHandle = NULL;

    if ((iotHubServiceClientHandle = IoTHubServiceClientAuth_CreateFromConnectionString(moduleConnectionString)) == NULL)
    {
        (void)printf("IoTHubServiceClientAuth_CreateFromConnectionString failed\n");
    }
    else if ((iothubDeviceTwinHandle = IoTHubDeviceTwin_Create(iotHubServiceClientHandle)) == NULL)
    {
        (void)printf("IoTHubServiceClientAuth_CreateFromConnectionString failed\n");
    }
    else
    {
        char *result = IoTHubDeviceTwin_UpdateModuleTwin(iothubDeviceTwinHandle, deviceId, moduleId, testJson);
        printf("IoTHubDeviceTwin_UpdateModuleTwin returned %s\n", result);
    }

    if (iothubDeviceTwinHandle != NULL)
    {
        (void)printf("Calling IoTHubDeviceTwin_Destroy...\n");
        IoTHubDeviceTwin_Destroy(iothubDeviceTwinHandle);
    }

    if (iotHubServiceClientHandle != NULL)
    {
        (void)printf("Calling IoTHubServiceClientAuth_Destroy...\n");
        IoTHubServiceClientAuth_Destroy(iotHubServiceClientHandle);
    }

    platform_deinit();
    return 0;
}
此代码示例演示如何检索模块孪生并更新报告的属性。
在设备端获取更新
除了上述代码,还可以添加以下代码块,以获取设备上的孪生更新消息。
#include <stdio.h>
#include <stdlib.h>

#include "azure_c_shared_utility/crt_abstractions.h"
#include "azure_c_shared_utility/macro_utils.h"
#include "azure_c_shared_utility/threadapi.h"
#include "azure_c_shared_utility/platform.h"
#include "iothub_module_client_ll.h"
#include "iothub_client_options.h"
#include "iothub_message.h"

// The protocol you wish to use should be uncommented
//
//#define SAMPLE_MQTT
//#define SAMPLE_MQTT_OVER_WEBSOCKETS
#define SAMPLE_AMQP
//#define SAMPLE_AMQP_OVER_WEBSOCKETS
//#define SAMPLE_HTTP

#ifdef SAMPLE_MQTT
    #include "iothubtransportmqtt.h"
#endif // SAMPLE_MQTT
#ifdef SAMPLE_MQTT_OVER_WEBSOCKETS
    #include "iothubtransportmqtt_websockets.h"
#endif // SAMPLE_MQTT_OVER_WEBSOCKETS
#ifdef SAMPLE_AMQP
    #include "iothubtransportamqp.h"
#endif // SAMPLE_AMQP
#ifdef SAMPLE_AMQP_OVER_WEBSOCKETS
    #include "iothubtransportamqp_websockets.h"
#endif // SAMPLE_AMQP_OVER_WEBSOCKETS
#ifdef SAMPLE_HTTP
    #include "iothubtransporthttp.h"
#endif // SAMPLE_HTTP

/* Paste in the your iothub connection string  */
static const char* connectionString = "[Fill in connection string]";

static bool g_continueRunning;
#define DOWORK_LOOP_NUM     3

static void deviceTwinCallback(DEVICE_TWIN_UPDATE_STATE update_state, const unsigned char* payLoad, size_t size, void* userContextCallback)
{
    (void)userContextCallback;

    printf("Device Twin update received (state=%s, size=%zu): %s\r\n",
        MU_ENUM_TO_STRING(DEVICE_TWIN_UPDATE_STATE, update_state), size, payLoad);
}

static void reportedStateCallback(int status_code, void* userContextCallback)
{
    (void)userContextCallback;
    printf("Device Twin reported properties update completed with result: %d\r\n", status_code);

    g_continueRunning = false;
}

void iothub_module_client_sample_device_twin_run(void)
{
    IOTHUB_CLIENT_TRANSPORT_PROVIDER protocol;
    IOTHUB_MODULE_CLIENT_LL_HANDLE iotHubModuleClientHandle;
    g_continueRunning = true;

    // Select the Protocol to use with the connection
#ifdef SAMPLE_MQTT
    protocol = MQTT_Protocol;
#endif // SAMPLE_MQTT
#ifdef SAMPLE_MQTT_OVER_WEBSOCKETS
    protocol = MQTT_WebSocket_Protocol;
#endif // SAMPLE_MQTT_OVER_WEBSOCKETS
#ifdef SAMPLE_AMQP
    protocol = AMQP_Protocol;
#endif // SAMPLE_AMQP
#ifdef SAMPLE_AMQP_OVER_WEBSOCKETS
    protocol = AMQP_Protocol_over_WebSocketsTls;
#endif // SAMPLE_AMQP_OVER_WEBSOCKETS
#ifdef SAMPLE_HTTP
    protocol = HTTP_Protocol;
#endif // SAMPLE_HTTP

    if (platform_init() != 0)
    {
        (void)printf("Failed to initialize the platform.\r\n");
    }
    else
    {
        if ((iotHubModuleClientHandle = IoTHubModuleClient_LL_CreateFromConnectionString(connectionString, protocol)) == NULL)
        {
            (void)printf("ERROR: iotHubModuleClientHandle is NULL!\r\n");
        }
        else
        {
            bool traceOn = true;
            const char* reportedState = "{ 'device_property': 'new_value'}";
            size_t reportedStateSize = strlen(reportedState);

            (void)IoTHubModuleClient_LL_SetOption(iotHubModuleClientHandle, OPTION_LOG_TRACE, &traceOn);

            // Check the return of all API calls when developing your solution. Return checks omitted for sample simplification.

            (void)IoTHubModuleClient_LL_SetModuleTwinCallback(iotHubModuleClientHandle, deviceTwinCallback, iotHubModuleClientHandle);
            (void)IoTHubModuleClient_LL_SendReportedState(iotHubModuleClientHandle, (const unsigned char*)reportedState, reportedStateSize, reportedStateCallback, iotHubModuleClientHandle);

            do
            {
                IoTHubModuleClient_LL_DoWork(iotHubModuleClientHandle);
                ThreadAPI_Sleep(1);
            } while (g_continueRunning);

            for (size_t index = 0; index < DOWORK_LOOP_NUM; index++)
            {
                IoTHubModuleClient_LL_DoWork(iotHubModuleClientHandle);
                ThreadAPI_Sleep(1);
            }

            IoTHubModuleClient_LL_Destroy(iotHubModuleClientHandle);
        }
        platform_deinit();
    }
}

int main(void)
{
    iothub_module_client_sample_device_twin_run();
    return 0;
}
后续步骤
若要继续开始使用 IoT 中心并探索其他 IoT 方案,请参阅: