模块标识和模块孪生 类似于 Azure IoT 中心设备标识和设备孪生,但提供更精细的粒度。 虽然 Azure IoT 中心设备标识和设备孪生使后端应用程序能够配置设备并提供设备条件的可见性,但模块标识和模块孪生为设备的各个组件提供这些功能。 在具有多个组件(如操作系统设备或固件设备)的功能性设备上,允许为每个组件提供独立的配置和条件设置。
注释
本文中所述的功能仅在 IoT 中心的标准层中可用。 有关基本层和标准/免费 IoT 中心层的详细信息,请参阅 为解决方案选择正确的 IoT 中心层和大小。
本文末尾有两个 Node.js 应用:
CreateIdentities:创建设备标识、模块标识和关联的安全密钥来连接设备和模块客户端。
UpdateModuleTwinReportedProperties:将模块孪生的更新报告属性发送到 IoT 中心。
注释
有关可用于生成设备和后端应用的 SDK 工具的详细信息,请参阅 Azure IoT SDK 。
先决条件
获取 IoT 中心连接字符串
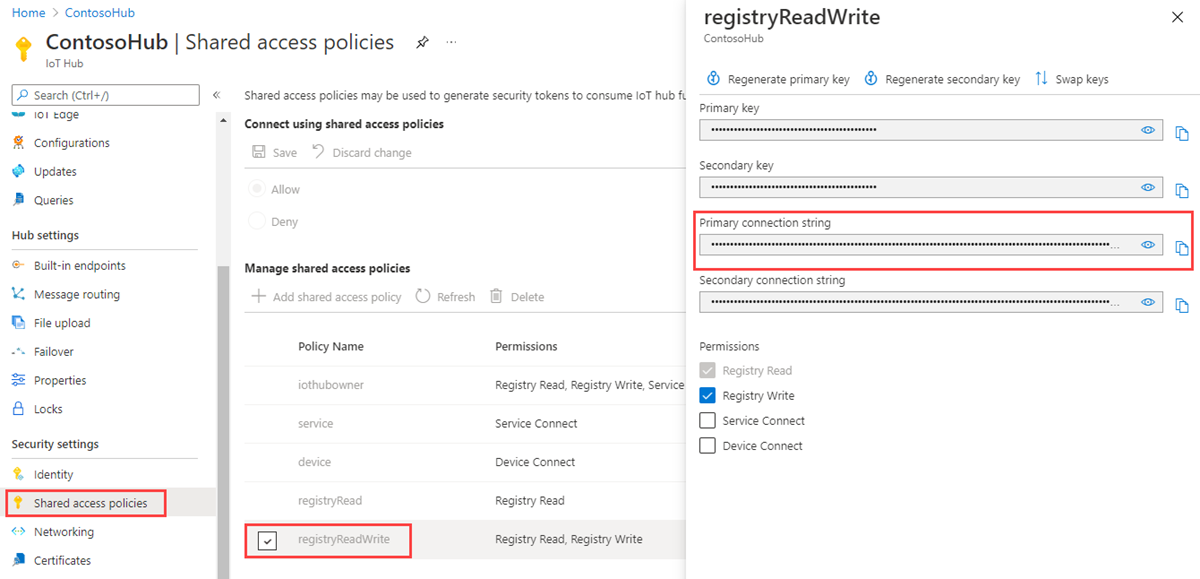
在本文中,你将创建一个后端服务,用于在标识注册表中添加设备,然后将模块添加到该设备。 服务需要 注册表写入 权限。 默认情况下,每个 IoT 中心都是使用名为 registryReadWrite 的共享访问策略创建的,该策略授予此权限。
若要获取 registryReadWrite 策略的 IoT 中心连接字符串,请执行以下步骤:
在 Azure 门户中,选择 资源组。 选择中心所在的资源组,然后从资源列表中选择中心。
在中心的左侧窗格中,选择 “共享访问策略”。
从策略列表中,选择 registryReadWrite 策略。
复制“主连接字符串”并保存该值。

有关 IoT 中心共享访问策略和权限的详细信息,请参阅 访问控制和权限。
在 IoT 中心创建设备标识和模块标识
在本部分中,你将创建一个 Node.js 应用,用于在 IoT 中心的标识注册表中创建设备标识和模块标识。 设备或模块无法连接到 IoT 中心,除非它在标识注册表中具有条目。 有关详细信息,请参阅了解 IoT 中心的标识注册表。 运行此控制台应用时,它将为设备和模块生成唯一的 ID 和密钥。 ID 和密钥区分大小写。 设备和模块使用这些值在将设备到云的消息发送到 IoT 中心时标识自身。
创建用于保存代码的目录。
在该目录中,首先运行 npm init -y 以创建默认值为空的 package.json。 这是您的代码的项目文件。
运行 npm install -S azure-iothub@modules-preview,在 node_modules 子目录中安装服务 SDK。
注释
子目录名称 node_modules 中的单词 module 用于表示“Node.js 库”。 此处的术语与 IoT 中心模块无关。
在目录中创建以下 .js 文件。 将其命名为add.js。 复制并粘贴中心连接字符串和中心名称。
var Registry = require('azure-iothub').Registry;
var uuid = require('uuid');
// Copy/paste your connection string and hub name here
var serviceConnectionString = '<hub connection string from portal>';
var hubName = '<hub name>.azure-devices.cn';
// Create an instance of the IoTHub registry
var registry = Registry.fromConnectionString(serviceConnectionString);
// Insert your device ID and moduleId here.
var deviceId = 'myFirstDevice';
var moduleId = 'myFirstModule';
// Create your device as a SAS authentication device
var primaryKey = new Buffer(uuid.v4()).toString('base64');
var secondaryKey = new Buffer(uuid.v4()).toString('base64');
var deviceDescription = {
  deviceId: deviceId,
  status: 'enabled',
  authentication: {
    type: 'sas',
    symmetricKey: {
      primaryKey: primaryKey,
      secondaryKey: secondaryKey
    }
  }
};

// First, create a device identity
registry.create(deviceDescription, function(err) {
  if (err) {
    console.log('Error creating device identity: ' + err);
    process.exit(1);
  }
  console.log('device connection string = "HostName=' + hubName + ';DeviceId=' + deviceId + ';SharedAccessKey=' + primaryKey + '"');

  // Then add a module to that device
  registry.addModule({ deviceId: deviceId, moduleId: moduleId }, function(err) {
    if (err) {
      console.log('Error creating module identity: ' + err);
      process.exit(1);
    }

    // Finally, retrieve the module details from the hub so we can construct the connection string
    registry.getModule(deviceId, moduleId, function(err, foundModule) {
      if (err) {
        console.log('Error getting module back from hub: ' + err);
        process.exit(1);
      }
      console.log('module connection string = "HostName=' + hubName + ';DeviceId=' + foundModule.deviceId + ';ModuleId='+foundModule.moduleId+';SharedAccessKey=' + foundModule.authentication.symmetricKey.primaryKey + '"');
      process.exit(0);
    });
  });
});
此应用创建 ID 为 myFirstDevice 的设备标识,并在设备 myFirstDevice 下创建 ID 为 myFirstModule 的模块标识。 (如果标识注册表中已存在该模块 ID,则代码只是检索现有的模块信息。然后,应用会显示该标识的主键。 在模拟模块应用中使用此密钥连接到 IoT 中心。
使用节点 add.js运行此命令。 它将为设备标识提供连接字符串,为模块标识提供另一个连接字符串。
注释
IoT 中心标识注册表仅存储设备和模块标识,以实现对 IoT 中心的安全访问。 标识注册表存储用作安全凭据的设备 ID 和密钥。 身份注册表同时为每个设备存储一个启用/禁用标志,您可以用来禁用该设备的访问。 如果应用程序需要存储其他特定于设备的元数据,则应使用特定于应用程序的存储。 模块标识没有启用/禁用状态标志。 有关详细信息,请参阅 IoT 中心开发人员指南中的 IoT 中心标识注册表。
使用 Node.js 设备 SDK 更新模块孪生体
在本部分中,将在模拟设备上创建一个更新模块孪生报告属性的 Node.js 应用。
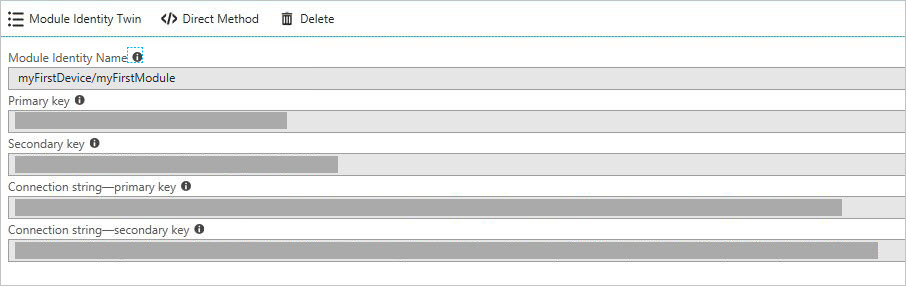
获取模块连接字符串 - 登录到 Azure 门户。 导航到 IoT 中心并单击“IoT 设备”。 找到 myFirstDevice,打开它,你会看到 myFirstModule 已成功创建。 复制模块连接字符串。 下一步需要用到它。
与在上述步骤中执行的作类似,请为设备代码创建一个目录,并使用 NPM 初始化它并安装设备 SDK(npm install -S azure-iot-device-amqp@modules-preview)。
注释
npm install 命令可能会感觉很慢。 请耐心等待,它正在从包存储库中下载大量代码。
注释
如果看到错误信息显示:npm ERR! 注册表错误解析 json,这是可以忽略的。 如果看到错误显示 npm ERR! 注册表错误解析 JSON,可以放心忽略。
创建名为 twin.js的文件。 复制并粘贴模块标识字符串。
var Client = require('azure-iot-device').Client;
var Protocol = require('azure-iot-device-amqp').Amqp;
// Copy/paste your module connection string here.
var connectionString = '<insert module connection string here>';
// Create a client using the Amqp protocol.
var client = Client.fromConnectionString(connectionString, Protocol);
client.on('error', function (err) {
  console.error(err.message);
});
// connect to the hub
client.open(function(err) {
  if (err) {
    console.error('error connecting to hub: ' + err);
    process.exit(1);
  }
  console.log('client opened');
// Create device Twin
  client.getTwin(function(err, twin) {
    if (err) {
      console.error('error getting twin: ' + err);
      process.exit(1);
    }
    // Output the current properties
    console.log('twin contents:');
    console.log(twin.properties);
    // Add a handler for desired property changes
    twin.on('properties.desired', function(delta) {
        console.log('new desired properties received:');
        console.log(JSON.stringify(delta));
    });
    // create a patch to send to the hub
    var patch = {
      updateTime: new Date().toString(),
      firmwareVersion:'1.2.1',
      weather:{
        temperature: 72,
        humidity: 17
      }
    };
    // send the patch
    twin.properties.reported.update(patch, function(err) {
      if (err) throw err;
      console.log('twin state reported');
    });
  });
});
现在,使用命令 节点 twin.js运行此命令。
F:\temp\module_twin>node twin.js然后,你将看到:
client opened
twin contents:
{ reported: { update: [Function: update], '$version': 1 },
  desired: { '$version': 1 } }
new desired properties received:
{"$version":1}
twin state reported
后续步骤
若要继续开始使用 IoT 中心并探索其他 IoT 方案,请参阅: