使用 Azure IoT 中心来计划和跟踪更新数百万台设备的作业。 使用作业可以:
- 更新所需属性
- 更新标记
- 调用直接方法
从概念上讲,作业封装了其中一个动作,并跟踪根据设备双胞胎查询所定义的一组设备的执行进度。 例如,后端应用可以使用一个作业,通过设备双胞查询,在 10,000 台设备上调用重启方法,并安排在未来的某个时间执行。 然后,当每个设备接收和执行重新启动方法时,该应用程序可以跟踪进度。
在以下文章中详细了解每项功能:
设备孪生和属性:设备孪生的入门,了解和使用 IoT 中心的设备孪生
注释
本文中所述的功能仅在 IoT 中心的标准层中可用。 有关基本层和标准/免费 IoT 中心层的详细信息,请参阅 为解决方案选择正确的 IoT 中心层和大小。
本文介绍如何创建两个 Node.js 应用:
一个 Node.js 模拟设备应用 ,simDevice.js,它实现一个名为 lockDoor 的直接方法,该方法可由后端应用调用。
Node.js 控制台应用 scheduleJobService.js,用于创建两个作业。 一个作业调用 lockDoor 直接方法,另一个作业将所需的属性更新发送到多个设备。
注释
有关可用于生成设备和后端应用的 SDK 工具的详细信息,请参阅 Azure IoT SDK 。
先决条件
已注册的设备。 在 Azure 门户中注册一个。
Node.js 版本 10.0.x 或更高版本。 准备开发环境 描述了如何在 Windows 或 Linux 上为本文安装 Node.js。
确保已在防火墙中打开端口 8883。 本文中的设备示例使用通过端口 8883 进行通信的 MQTT 协议。 某些企业和教育网络环境中可能会阻止此端口。 有关解决此问题的详细信息和方法,请参阅“连接到 IoT 中心”(MQTT)。
创建模拟设备应用
在本部分中,你将创建一个 Node.js 控制台应用,该应用响应由云调用的直接方法,这会触发模拟 lockDoor 方法。
创建名为 simDevice 的新空文件夹。 在 simDevice 文件夹中,在命令提示符处使用以下命令创建 package.json 文件。 接受所有默认值:
npm init在 simDevice 文件夹中的命令提示符处运行以下命令,安装 azure-iot-device Device SDK 包和 azure-iot-device-mqtt 包:
npm install azure-iot-device azure-iot-device-mqtt --save使用文本编辑器,在 simDevice 文件夹中创建新的 simDevice.js 文件。
在 simDevice.js 文件的开头添加以下“require”语句:
'use strict';

var Client = require('azure-iot-device').Client;
var Protocol = require('azure-iot-device-mqtt').Mqtt;
添加 connectionString 变量并将其用于创建 客户端 实例。 将
{yourDeviceConnectionString}占位符值替换为之前复制的设备连接字符串。var connectionString = '{yourDeviceConnectionString}'; var client = Client.fromConnectionString(connectionString, Protocol);添加以下函数来处理 lockDoor 方法。
var onLockDoor = function(request, response) {

    // Respond the cloud app for the direct method
    response.send(200, function(err) {
        if (err) {
            console.error('An error occurred when sending a method response:\n' + err.toString());
        } else {
            console.log('Response to method \'' + request.methodName + '\' sent successfully.');
        }
    });

    console.log('Locking Door!');
};
添加以下代码以注册 lockDoor 方法的处理程序。
client.open(function(err) {
     if (err) {
         console.error('Could not connect to IotHub client.');
     }  else {
         console.log('Client connected to IoT Hub. Register handler for lockDoor direct method.');
         client.onDeviceMethod('lockDoor', onLockDoor);
     }
});
保存并关闭 simDevice.js 文件。
注释
为简单起见,本文不实现重试策略。 在生产代码中,应实施重试策略(如指数退避),如暂时 性故障处理一文中所述。
获取 IoT 中心连接字符串
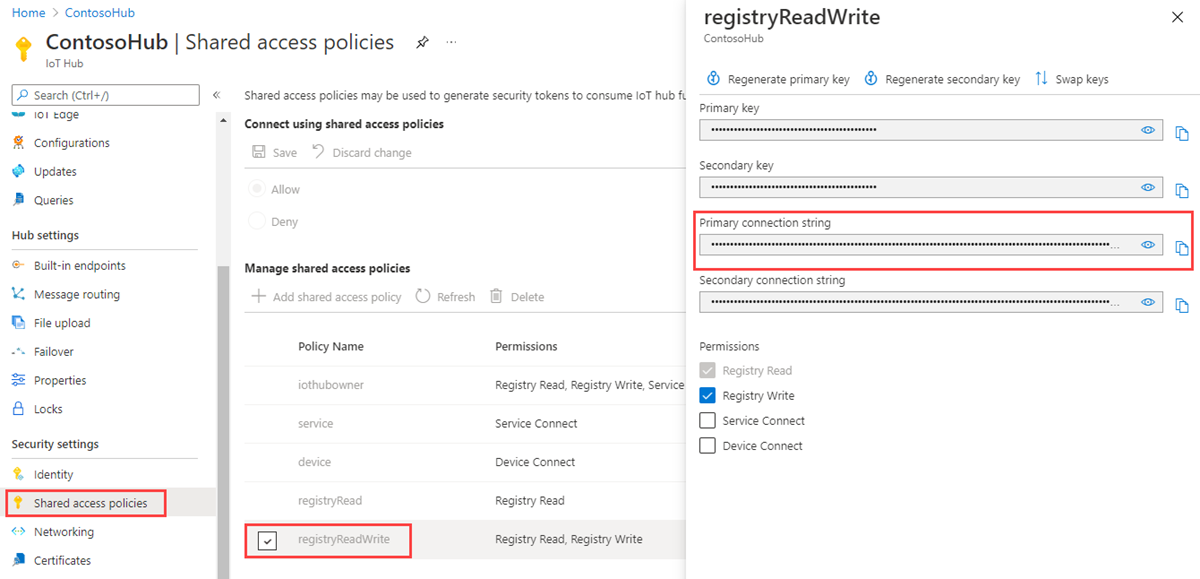
在本文中,你将创建一个后端服务,该服务计划作业以在设备上调用直接方法,计划作业以更新设备孪生,并监视每个作业的进度。 若要执行这些作,服务需要 注册表读取 和 注册表写入 权限。 默认情况下,每个 IoT 中心都是使用名为 registryReadWrite 的共享访问策略创建的,该策略授予这些权限。
若要获取 registryReadWrite 策略的 IoT 中心连接字符串,请执行以下步骤:
在 Azure 门户中,选择 资源组。 选择中心所在的资源组,然后从资源列表中选择中心。
在中心的左侧窗格中,选择 “共享访问策略”。
从策略列表中,选择 registryReadWrite 策略。
复制“主连接字符串”并保存该值。

有关 IoT 中心共享访问策略和权限的详细信息,请参阅 访问控制和权限。
计划用于调用直接方法并更新设备孪生属性的作业
在本部分中,你将创建一个 Node.js 控制台应用,该应用使用直接方法在设备上启动远程 lockDoor 并更新设备孪生的属性。
创建名为 scheduleJobService 的新空文件夹。 在 scheduleJobService 文件夹中,在命令提示符处使用以下命令创建 package.json 文件。 接受所有默认值:
npm init在 scheduleJobService 文件夹中的命令提示符处运行以下命令,安装 azure-iothub Device SDK 包和 azure-iot-device-mqtt 包:
npm install azure-iothub uuid --save使用文本编辑器,在 scheduleJobService 文件夹中创建新的 scheduleJobService.js 文件。
在 scheduleJobService.js 文件的开头添加以下“require”语句:
'use strict';

var uuid = require('uuid');
var JobClient = require('azure-iothub').JobClient;
添加以下变量声明。 将
{iothubconnectionstring}占位符值替换为在 获取 IoT 中心连接字符串中复制的值。 如果注册的设备与 myDeviceId 不同,请确保在查询条件中更改该设备。var connectionString = '{iothubconnectionstring}'; var queryCondition = "deviceId IN ['myDeviceId']"; var startTime = new Date(); var maxExecutionTimeInSeconds = 300; var jobClient = JobClient.fromConnectionString(connectionString);添加用于监视作业执行的以下函数:
function monitorJob (jobId, callback) {
    var jobMonitorInterval = setInterval(function() {
        jobClient.getJob(jobId, function(err, result) {
        if (err) {
            console.error('Could not get job status: ' + err.message);
        } else {
            console.log('Job: ' + jobId + ' - status: ' + result.status);
            if (result.status === 'completed' || result.status === 'failed' || result.status === 'cancelled') {
            clearInterval(jobMonitorInterval);
            callback(null, result);
            }
        }
        });
    }, 5000);
}
添加以下代码以计划调用设备方法的作业:
var methodParams = {
    methodName: 'lockDoor',
    payload: null,
    responseTimeoutInSeconds: 15 // Timeout after 15 seconds if device is unable to process method
};

var methodJobId = uuid.v4();
console.log('scheduling Device Method job with id: ' + methodJobId);
jobClient.scheduleDeviceMethod(methodJobId,
                            queryCondition,
                            methodParams,
                            startTime,
                            maxExecutionTimeInSeconds,
                            function(err) {
    if (err) {
        console.error('Could not schedule device method job: ' + err.message);
    } else {
        monitorJob(methodJobId, function(err, result) {
            if (err) {
                console.error('Could not monitor device method job: ' + err.message);
            } else {
                console.log(JSON.stringify(result, null, 2));
            }
        });
    }
});
添加以下代码以安排任务以更新设备孪生体:
var twinPatch = {
   etag: '*',
   properties: {
       desired: {
           building: '43',
           floor: 3
       }
   }
};

var twinJobId = uuid.v4();

console.log('scheduling Twin Update job with id: ' + twinJobId);
jobClient.scheduleTwinUpdate(twinJobId,
                            queryCondition,
                            twinPatch,
                            startTime,
                            maxExecutionTimeInSeconds,
                            function(err) {
    if (err) {
        console.error('Could not schedule twin update job: ' + err.message);
    } else {
        monitorJob(twinJobId, function(err, result) {
            if (err) {
                console.error('Could not monitor twin update job: ' + err.message);
            } else {
                console.log(JSON.stringify(result, null, 2));
            }
        });
    }
});
保存并关闭 scheduleJobService.js 文件。
运行应用程序
现在可以运行应用程序了。
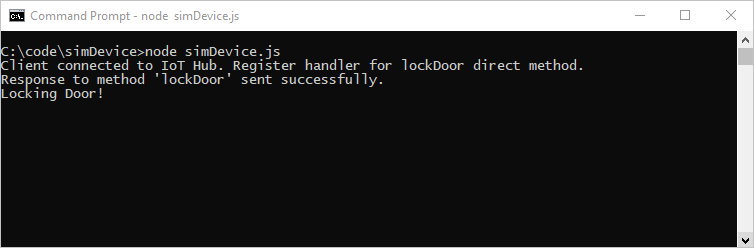
在 simDevice 文件夹中的命令提示符处,运行以下命令开始侦听重新启动直接方法。
node simDevice.js在 scheduleJobService 文件夹中的命令提示符处,运行以下命令以触发作业锁定门并更新孪生体
node scheduleJobService.js你将在控制台中看到对直接方法和作业状态的设备响应。
下面显示了对直接方法的设备响应:
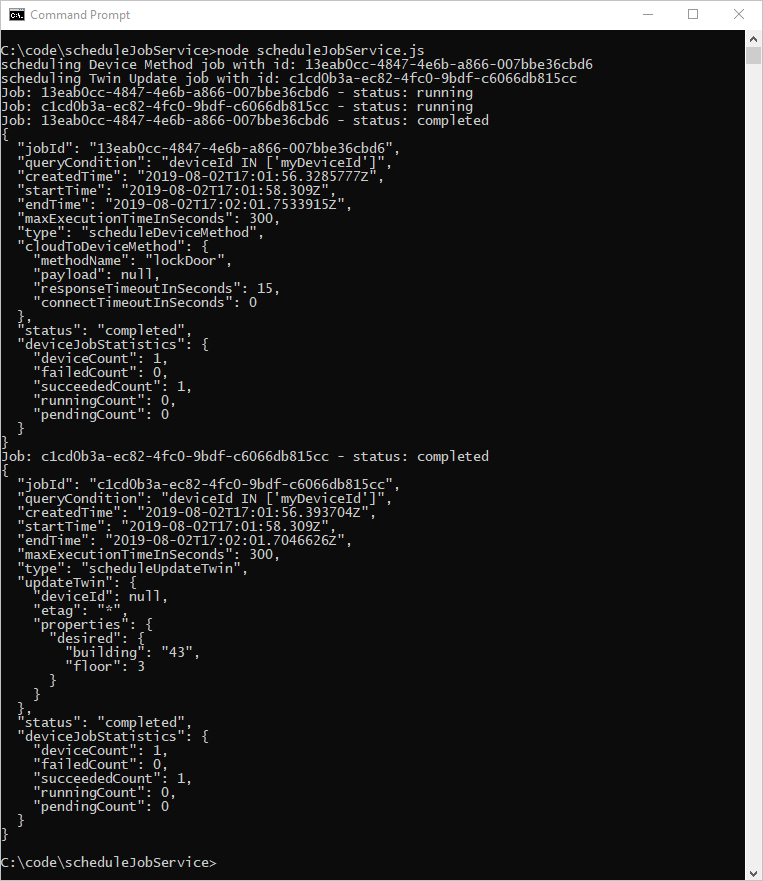
下面显示了用于直接方法和设备孪生更新的服务调度作业,以及已运行完成的作业:
后续步骤
在本文中,你计划作业运行直接方法并更新设备孪生的属性。
若要继续开始使用 IoT 中心和设备管理模式(如远程无线固件更新),请参阅 文章:如何执行固件更新。