适用范围: Azure CLI ml 扩展 v2(最新版)Python SDK azure-ai-ml v2(最新版)
本文介绍如何根据指标和计划配置自动缩放来管理部署中的资源使用情况。 自动缩放过程可以自动运行正确的资源量来处理应用程序上的负载。
Azure 机器学习中的联机终结点通过与 Azure Monitor 中的自动缩放功能集成来支持自动缩放。 有关 Azure Monitor 中的自动缩放设置的详细信息,请参阅 Microsoft.Insights 自动缩放设置。
Azure Monitor 自动缩放允许设置规则,以在满足规则条件时触发一个或多个自动缩放操作。 可以根据指标(如 CPU 使用率、计划(如高峰时段)或两者的组合进行缩放。 有关详细信息,请参阅 Azure 中的自动缩放概述。
可以通过 Azure 机器学习工作室使用 REST API、Azure 资源管理器、Azure CLI v2、Python SDK v2 或 Azure 门户来管理自动缩放。
先决条件
- 具有已部署终结点的 Azure 机器学习工作区。 有关详细信息,请参阅使用在线终结点部署机器学习模型并为其评分。
- 使用
azure-mgmt-monitor 安装的 Python SDK pip install azure-mgmt-monitor 包。
- 允许进行此操作的任何内置或自定义角色为管理自动缩放的标识分配的
microsoft.insights/autoscalesettings/write权限。 有关详细信息,请参阅管理用户和角色。
定义自动缩放配置文件
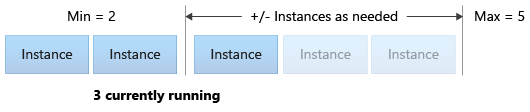
若要为联机终结点实现自动缩放,请启用自动缩放设置,然后定义指定最小、最大值和默认规模集容量的默认自动缩放配置文件。 以下过程启用自动缩放,并设置最小、最大和默认缩放容量的虚拟机(VM)实例数。
如果尚未为 Azure CLI 设置默认值,请运行以下命令以避免为订阅、工作区和资源组重复指定值。
az account set --subscription <subscription ID>
az configure --defaults workspace=<Azure Machine Learning workspace name> group=<resource group>
设置终结点和部署名称:
# set your existing endpoint name
ENDPOINT_NAME=your-endpoint-name
DEPLOYMENT_NAME=blue
- 获取部署和终结点的 Azure 资源管理器 ID:
# ARM id of the deployment
DEPLOYMENT_RESOURCE_ID=$(az ml online-deployment show -e $ENDPOINT_NAME -n $DEPLOYMENT_NAME -o tsv --query "id")
# ARM id of the deployment. todo: change to --query "id"
ENDPOINT_RESOURCE_ID=$(az ml online-endpoint show -n $ENDPOINT_NAME -o tsv --query "properties.\"azureml.onlineendpointid\"")
# set a unique name for autoscale settings for this deployment. The below will append a random number to make the name unique.
AUTOSCALE_SETTINGS_NAME=autoscale-$ENDPOINT_NAME-$DEPLOYMENT_NAME-`echo $RANDOM
- 创建自动扩缩配置文件:
az monitor autoscale create --name $AUTOSCALE_SETTINGS_NAME --resource $DEPLOYMENT_RESOURCE_ID --min-count 2 --max-count 5 --count 2
有关详细信息,请参阅 az 显示器自动缩放参考。
导入必要的模块:
from azure.ai.ml import MLClient
from azure.identity import DefaultAzureCredential, InteractiveBrowserCredential
from azure.mgmt.monitor import MonitorManagementClient
from azure.mgmt.monitor.models import AutoscaleProfile, ScaleRule, MetricTrigger, ScaleAction, Recurrence, RecurrentSchedule
import random
import datetime
为工作区、终结点和部署定义变量:
subscription_id = "<YOUR-SUBSCRIPTION-ID>"
resource_group = "<YOUR-RESOURCE-GROUP>"
workspace = "<YOUR-WORKSPACE>"

endpoint_name = "<YOUR-ENDPOINT-NAME>"
deployment_name = "blue"
获取 Azure 机器学习和 Azure Monitor 客户端:
try:
    credential = DefaultAzureCredential()
    credential.get_token("https://management.chinacloudapi.cn/.default")
except Exception:
    credential = InteractiveBrowserCredential()
ml_client = MLClient(
    credential, subscription_id, resource_group, workspace
)

mon_client = MonitorManagementClient(
    credential, subscription_id
)
获取终结点和部署对象:
deployment = ml_client.online_deployments.get(
    deployment_name, endpoint_name
)

endpoint = ml_client.online_endpoints.get(
    endpoint_name
)
创建自动伸缩设置,并新建一个名为my_scale_settings的配置文件:
# Set a unique name for autoscale settings for this deployment. The following code appends a random number to create a unique name.
autoscale_settings_name = f"autoscale-{endpoint_name}-{deployment_name}-{random.randint(0,1000)}"

mon_client.autoscale_settings.create_or_update(
    resource_group,
    autoscale_settings_name,
    parameters = {
        "location" : endpoint.location,
        "target_resource_uri" : deployment.id,
        "profiles" : [
            AutoscaleProfile(
                name="my-scale-settings",
                capacity={
                    "minimum" : 2,
                    "maximum" : 5,
                    "default" : 2
                },
                rules = []
            )
        ]
    }
)
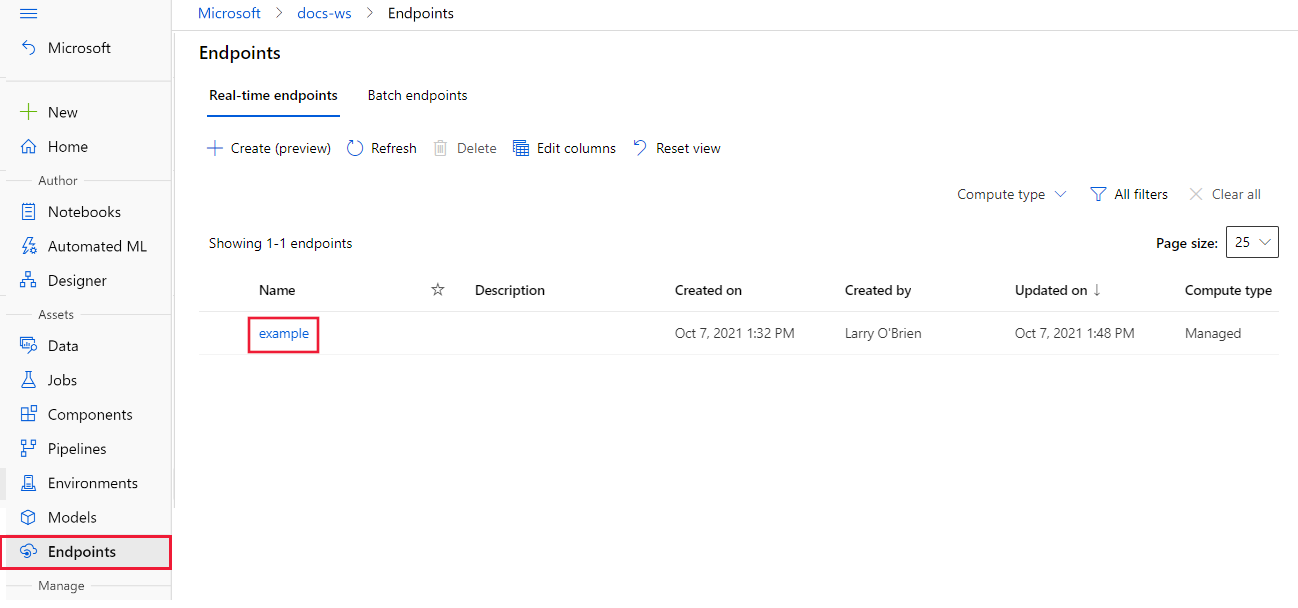
在 Azure 机器学习工作室的工作区中,从左侧菜单中选择 “终结点 ”。
从可用终结点列表中选择要配置的终结点。
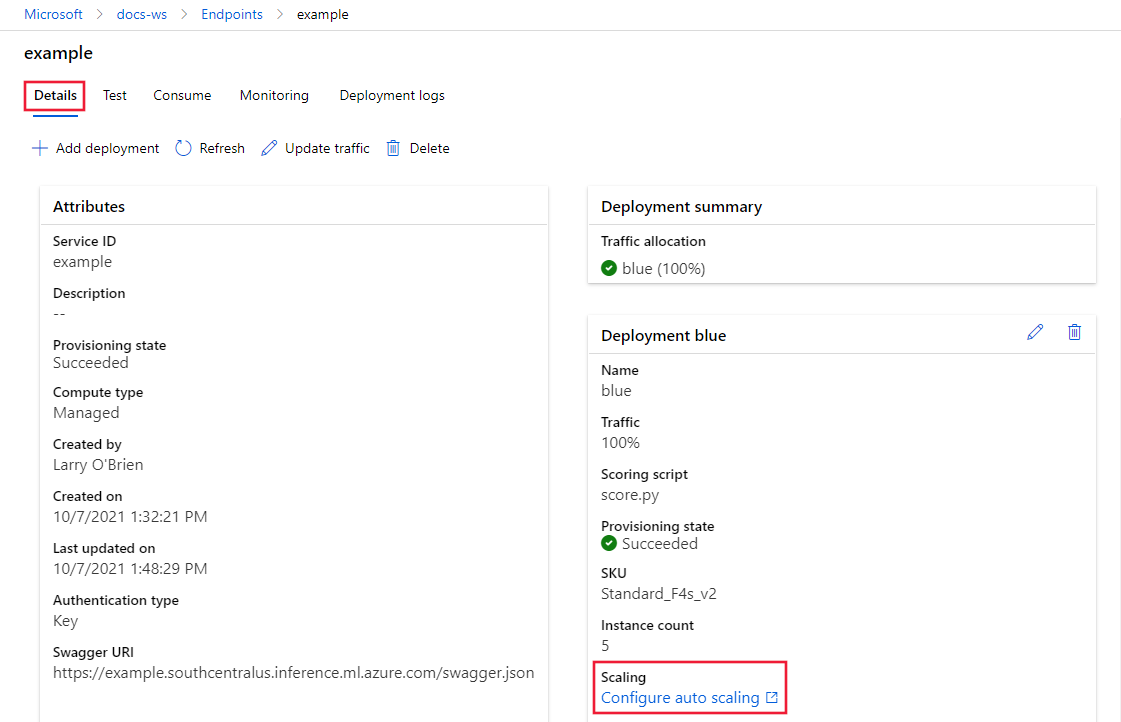
在所选终结点的“详细信息”选项卡上,向下滚动并选择“缩放”下的“配置自动缩放”链接。
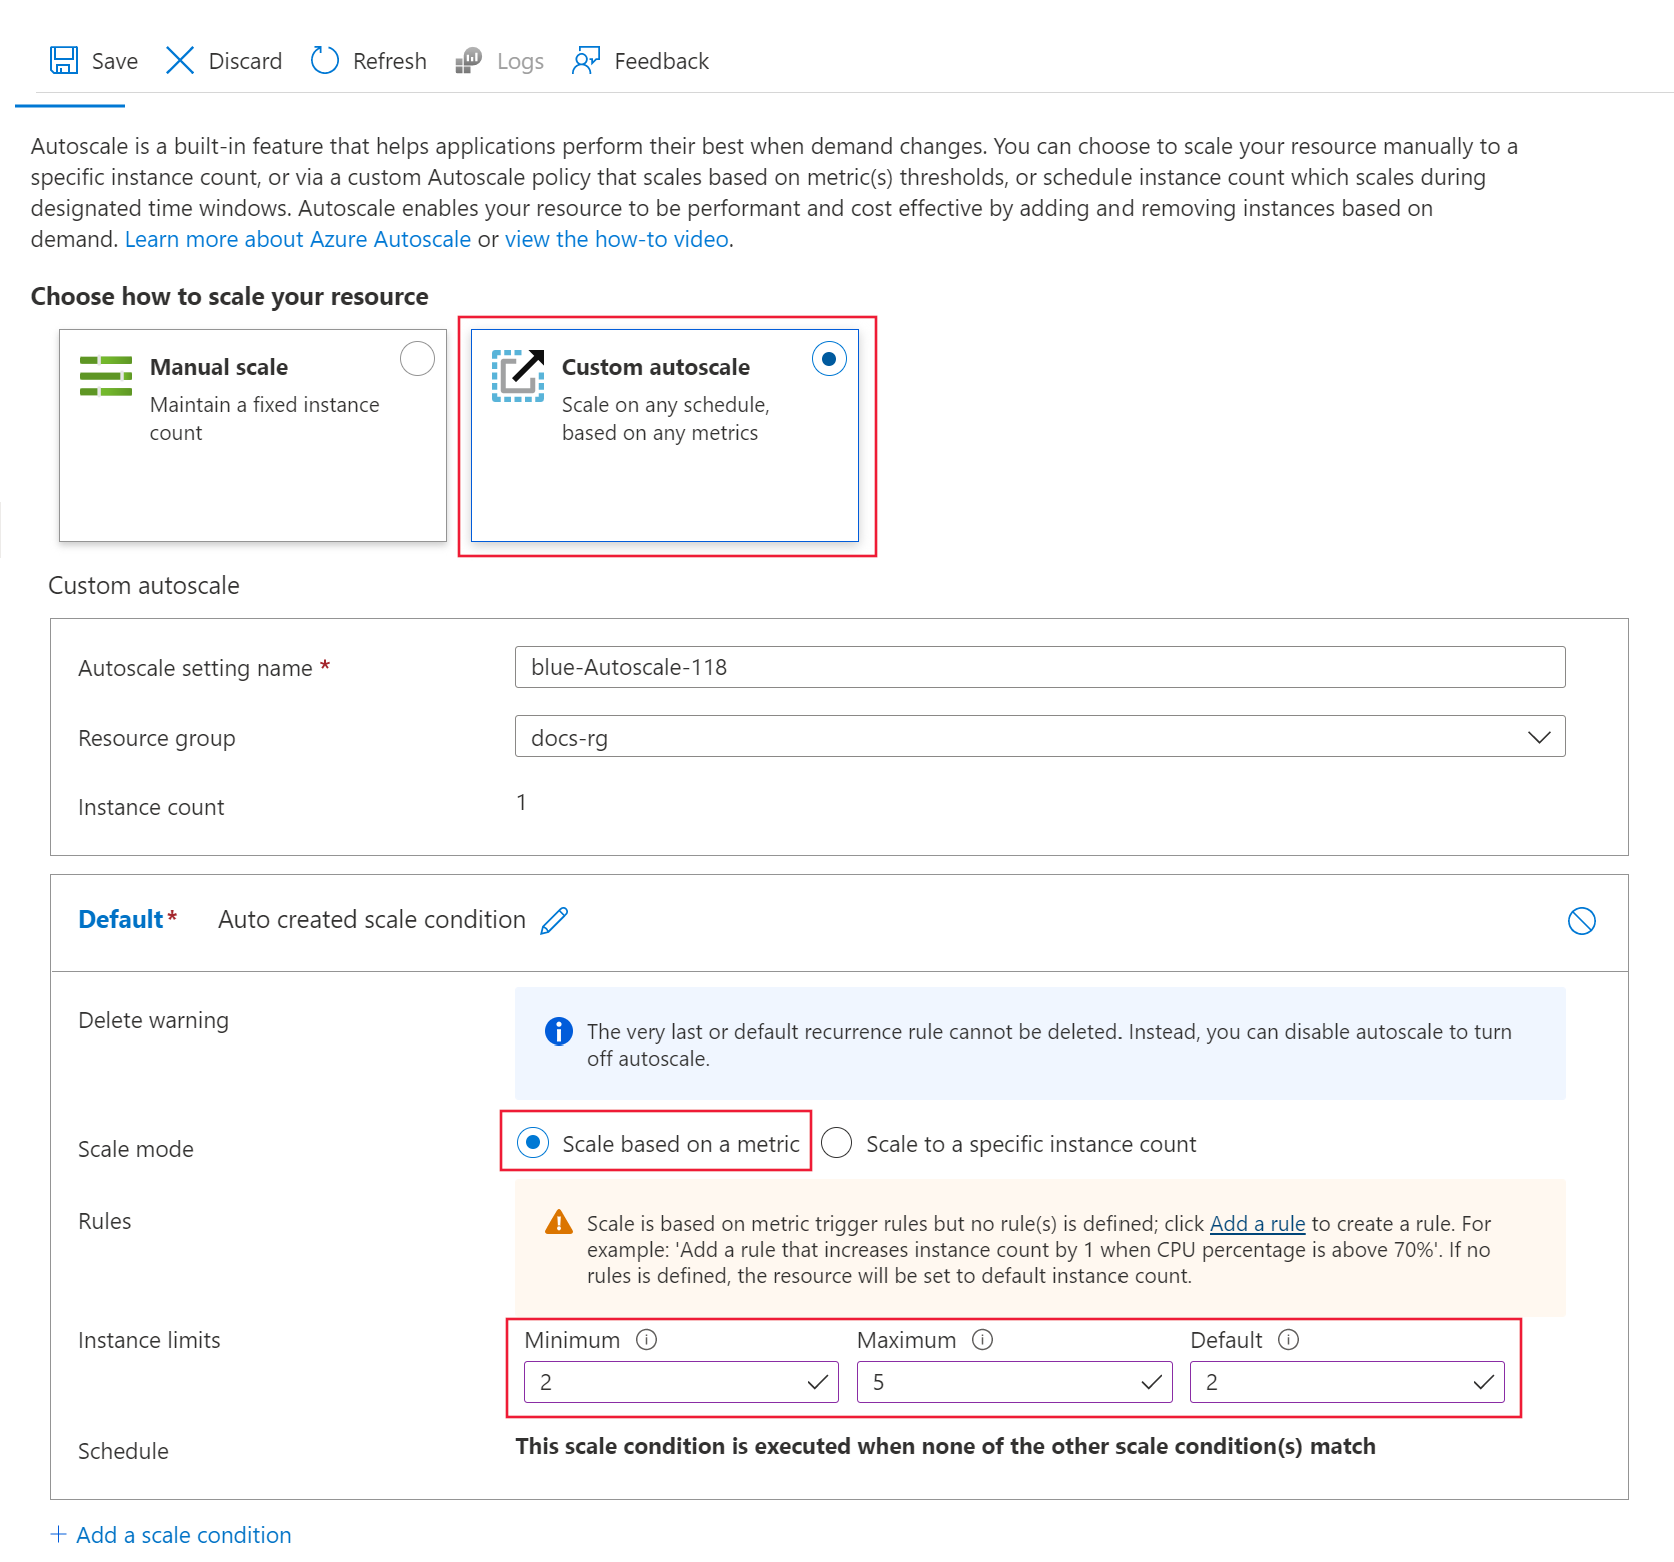
此时会打开部署的 Azure 门户 缩放 页。 在此页上,选择“选择如何缩放资源”下的“自定义自动缩放”。
在默认配置文件窗格中,选择根据指标缩放。
在 实例限制下,将 最小值 设置为 2、 最大值 设置为 5, 默认值 设置为 2。
在页面顶部选择“保存”。
基于部署指标创建横向扩展规则
常见的横向扩展规则会在平均 CPU 负载较高时增加 VM 实例数。 以下示例演示如果 CPU 的平均负载在五分钟内超过 70%,如何最多分配两个额外节点。
az monitor autoscale rule create --autoscale-name $AUTOSCALE_SETTINGS_NAME --condition "CpuUtilizationPercentage > 70 avg 5m" --scale out 2
该规则是 my-scale-settings 配置文件的一部分,其中 autoscale-name 与配置文件的 name 部分匹配。 参数的值 condition 指示当 VM 实例的平均 CPU 消耗量超过 70% 5 分钟时,规则将触发。 满足条件时,自动缩放会再分配两个 VM 实例。
有关详细信息,请参阅 az 显示器自动缩放 Azure CLI 语法参考。
创建规则定义:
rule_scale_out = ScaleRule(
    metric_trigger = MetricTrigger(
        metric_name="CpuUtilizationPercentage",
        metric_resource_uri = deployment.id,
        time_grain = datetime.timedelta(minutes = 1),
        statistic = "Average",
        operator = "GreaterThan",
        time_aggregation = "Last",
        time_window = datetime.timedelta(minutes = 5),
        threshold = 70
    ),
    scale_action = ScaleAction(
        direction = "Increase",
        type = "ChangeCount",
        value = 2,
        cooldown = datetime.timedelta(hours = 1)
    )
)
此规则是指参数 CPUUtilizationpercentage、metric_name 和 time_window 中 time_aggregation 值的最近 5 分钟平均值。 当指标的值大于 70 的 threshold 时,部署将再分配两个 VM 实例。
更新 my-scale-settings 配置文件以包含此规则。
mon_client.autoscale_settings.create_or_update(
    resource_group,
    autoscale_settings_name,
    parameters = {
        "location" : endpoint.location,
        "target_resource_uri" : deployment.id,
        "profiles" : [
            AutoscaleProfile(
                name="my-scale-settings",
                capacity={
                    "minimum" : 2,
                    "maximum" : 5,
                    "default" : 2
                },
                rules = [
                    rule_scale_out
                ]
            )
        ]
    }
)
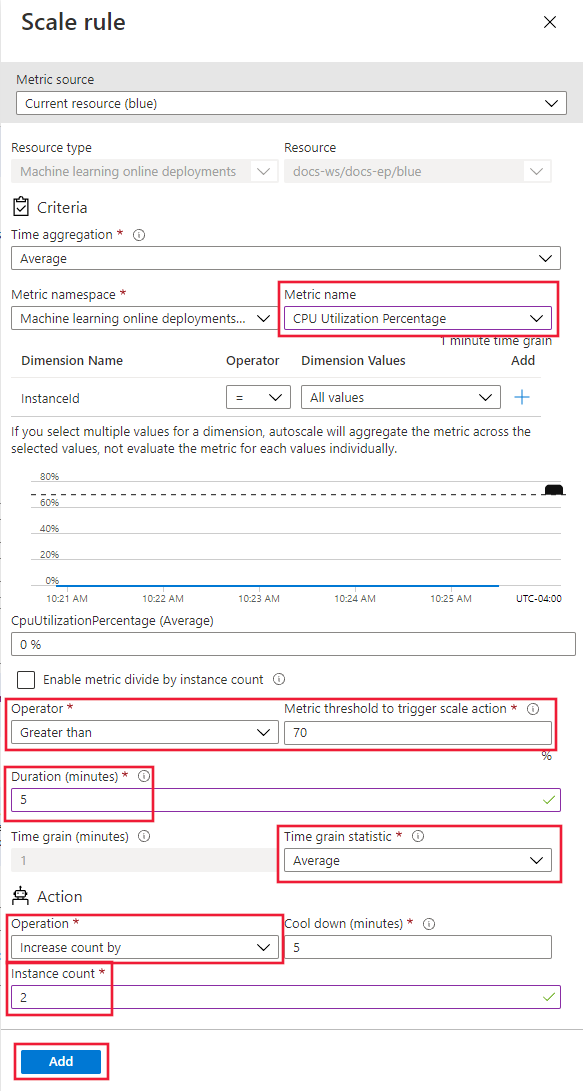
在“缩放”页“默认配置文件”中,选择“规则”部分中的“添加规则”链接。
在“缩放规则”页上,配置以下值:
-
指标名称:选择“CPU 使用率百分比”。
-
运算符:选择 大于。
-
指标阈值:设置为 70。
-
持续时间(分钟):设置为 5。
-
时间粒度统计信息:选择“平均”。
-
操作:选择“增加计数”。
-
实例计数:设置为 2。
选择 并添加。
在 “缩放 ”页上,选择“ 保存”。
基于部署指标创建缩容规则
当平均 CPU 负载较轻时,横向扩展规则可以减少 VM 实例数。 以下示例演示如何在 CPU 负载持续小于 30% 达到 5 分钟时释放一个节点,将节点数减少到至少两个。
az monitor autoscale rule create --autoscale-name $AUTOSCALE_SETTINGS_NAME --condition "CpuUtilizationPercentage < 25 avg 5m" --scale in 1
创建规则定义。
rule_scale_in = ScaleRule(
    metric_trigger = MetricTrigger(
        metric_name="CpuUtilizationPercentage",
        metric_resource_uri = deployment.id,
        time_grain = datetime.timedelta(minutes = 1),
        statistic = "Average",
        operator = "LessThan",
        time_aggregation = "Last",
        time_window = datetime.timedelta(minutes = 5),
        threshold = 30
    ),
    scale_action = ScaleAction(
        direction = "Decrease",
        type = "ChangeCount",
        value = 1,
        cooldown = datetime.timedelta(hours = 1)
    )
)
更新 my-scale-settings 配置文件以包含此规则。
mon_client.autoscale_settings.create_or_update(
    resource_group,
    autoscale_settings_name,
    parameters = {
        "location" : endpoint.location,
        "target_resource_uri" : deployment.id,
        "profiles" : [
            AutoscaleProfile(
                name="my-scale-settings",
                capacity={
                    "minimum" : 2,
                    "maximum" : 5,
                    "default" : 2
                },
                rules = [
                    rule_scale_out,
                    rule_scale_in
                ]
            )
        ]
    }
)
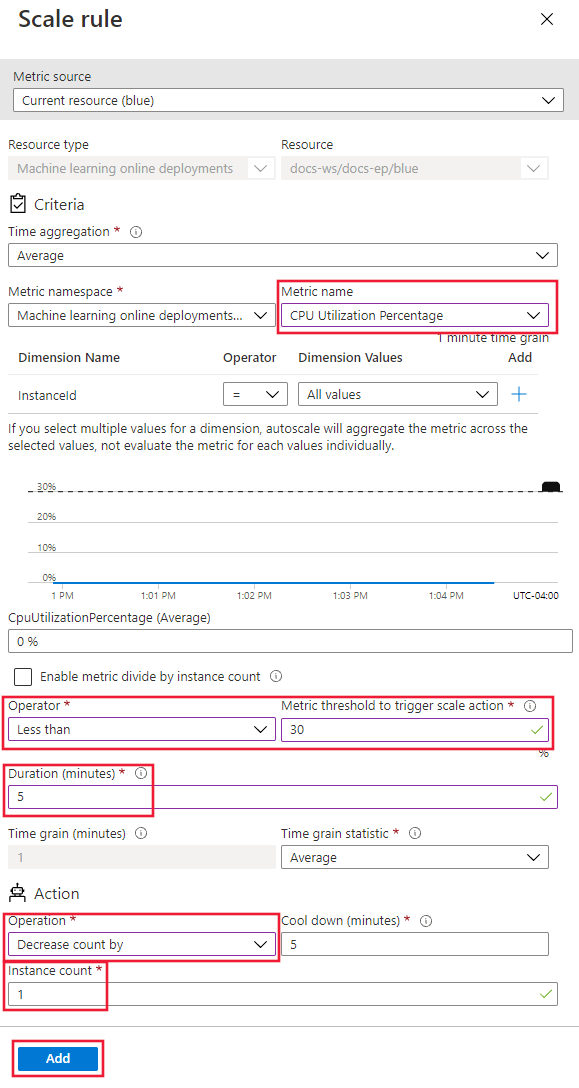
以下步骤调整“规则”配置以支持缩放规则。
在 Azure 门户缩放页中选择自定义自动缩放后,选择基于指标缩放,然后点击“添加规则”链接。
在“缩放规则”页上,配置以下值:
-
指标名称:选择“CPU 使用率百分比”。
-
运算符:设置为“小于”。
-
指标阈值:设置为 30。
-
持续时间(分钟):设置为 5。
-
时间粒度统计信息:选择“平均”。
-
操作:选择“减少计数”。
-
实例计数:设置为 1。
选择 并添加。
在 “缩放 ”页上,选择“ 保存”。
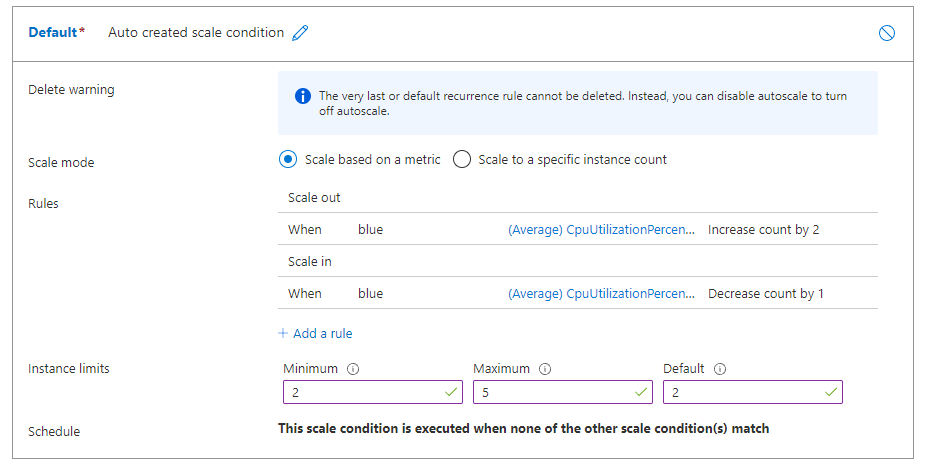
如果同时配置横向扩展和横向扩展规则,则默认配置文件的规则类似于以下屏幕截图。 规则指定,如果平均 CPU 负载持续 5 分钟超过 70%,则应再分配两个节点,最大限制为 5 个。 如果 CPU 负载在 5 分钟内低于 30%,则应释放一个节点,但节点数量至少要保持在两个。
基于终结点指标创建缩放规则
在前面的部分中,你创建了根据部署指标进行缩减或扩展的规则。 还可以创建适用于部署终结点指标的规则。 例如,当请求延迟大于 5 分钟的平均 70 毫秒时,可以分配另一个节点。
az monitor autoscale rule create --autoscale-name $AUTOSCALE_SETTINGS_NAME --condition "RequestLatency > 70 avg 5m" --scale out 1 --resource $ENDPOINT_RESOURCE_ID
创建规则定义:
rule_scale_out_endpoint = ScaleRule(
    metric_trigger = MetricTrigger(
        metric_name="RequestLatency",
        metric_resource_uri = endpoint.id,
        time_grain = datetime.timedelta(minutes = 1),
        statistic = "Average",
        operator = "GreaterThan",
        time_aggregation = "Last",
        time_window = datetime.timedelta(minutes = 5),
        threshold = 70
    ),
    scale_action = ScaleAction(
        direction = "Increase",
        type = "ChangeCount",
        value = 1,
        cooldown = datetime.timedelta(hours = 1)
    )
)
该规则的 metric_resource_uri 字段现在指向的是终结点,而不是部署。
更新 my-scale-settings 配置文件以包含此规则。
mon_client.autoscale_settings.create_or_update(
    resource_group,
    autoscale_settings_name,
    parameters = {
        "location" : endpoint.location,
        "target_resource_uri" : deployment.id,
        "profiles" : [
            AutoscaleProfile(
                name="my-scale-settings",
                capacity={
                    "minimum" : 2,
                    "maximum" : 5,
                    "default" : 2
                },
                rules = [
                    rule_scale_out,
                    rule_scale_in,
                    rule_scale_out_endpoint
                ]
            )
        ]
    }
)
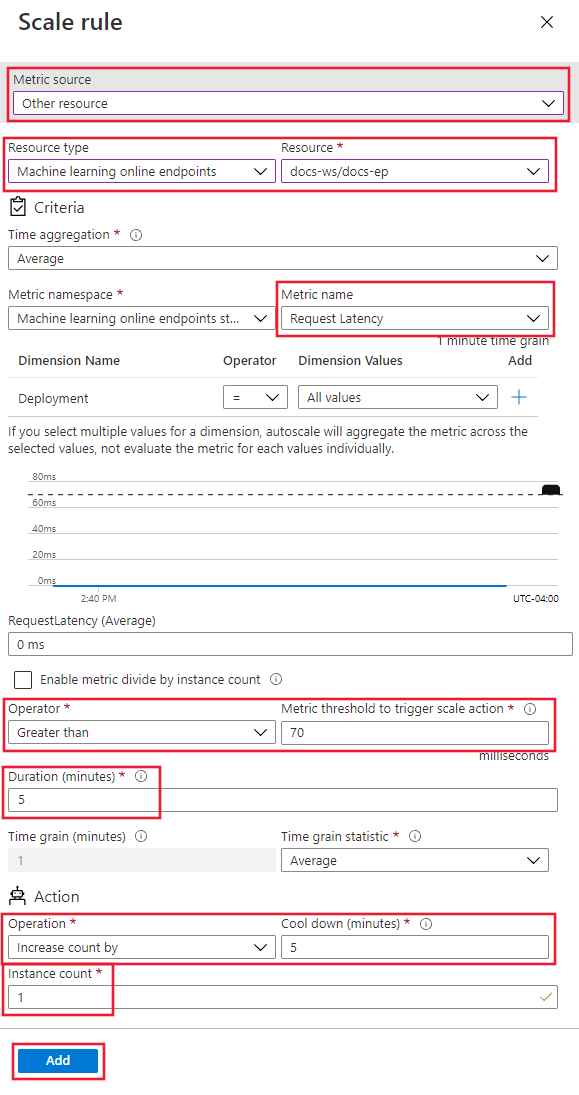
在选择了“自定义自动缩放”的 Azure 门户缩放页面底部,选择“添加缩放条件”链接。
在配置部分中,选择根据指标进行缩放,然后选择添加规则链接。
在“缩放规则”页上,配置以下值:
-
指标源:选择“其他资源”。
-
资源类型:选择“机器学习联机终结点”。
-
资源:选择终结点。
-
指标名称:选择“请求延迟”。
-
运算符:设置为“大于”。
-
指标阈值:设置为 70。
-
持续时间(分钟):设置为 5。
-
时间粒度统计信息:选择“平均”。
-
操作:选择“增加计数”。
-
实例计数:设置为 1。
选择 并添加。
在 “缩放 ”页上,选择“ 保存”。
查找其他支持的指标
设置自动缩放规则时,可以使用其他指标。
有关在代码中使用的终结点指标的名称,请参阅 Microsoft.MachineLearningServices/workspaces/onlineEndpoints 支持的指标表中的“REST API 中的名称”列中的值。
有关在代码中使用的部署指标的名称,请参阅 Microsoft.MachineLearningServices/workspaces/onlineEndpoints/deployments 支持的指标表中的“REST API 中的名称”列中的值。
若要在 Azure 门户 缩放规则 屏幕上选择其他指标,请在 “指标源”下选择指标源,然后从 “指标名称”下的可用指标中进行选择。
根据时间表创建刻度规则
可以创建仅在特定日期或特定时间应用的自动缩放规则。 例如,可以创建一个规则,将节点计数设置为周末的两个。
az monitor autoscale profile create --name weekend-profile --autoscale-name $AUTOSCALE_SETTINGS_NAME --min-count 2 --count 2 --max-count 2 --recurrence week sat sun --timezone "Pacific Standard Time"
mon_client.autoscale_settings.create_or_update(
    resource_group,
    autoscale_settings_name,
    parameters = {
        "location" : endpoint.location,
        "target_resource_uri" : deployment.id,
        "profiles" : [
            AutoscaleProfile(
                name="Default",
                capacity={
                    "minimum" : 2,
                    "maximum" : 2,
                    "default" : 2
                },
                rules=[],
                recurrence = Recurrence(
                    frequency = "Week",
                    schedule = RecurrentSchedule(
                        time_zone = "Pacific Standard Time",
                        days = ["Saturday", "Sunday"],
                        hours = ["0"],
                        minutes = ["0"]
                    )
                )
            )
        ]
    }
)
在 Azure 门户缩放页面底部,选择“自定义自动缩放”,然后选择“添加缩放条件”。
在 “配置文件 ”部分中,选择“ 缩放到特定实例计数”。
将 实例计数 设置为 2。
对于“计划”,请选择“重复特定日期”。
对于 “每周重复”,请选择 “星期六” 和 “星期日”。
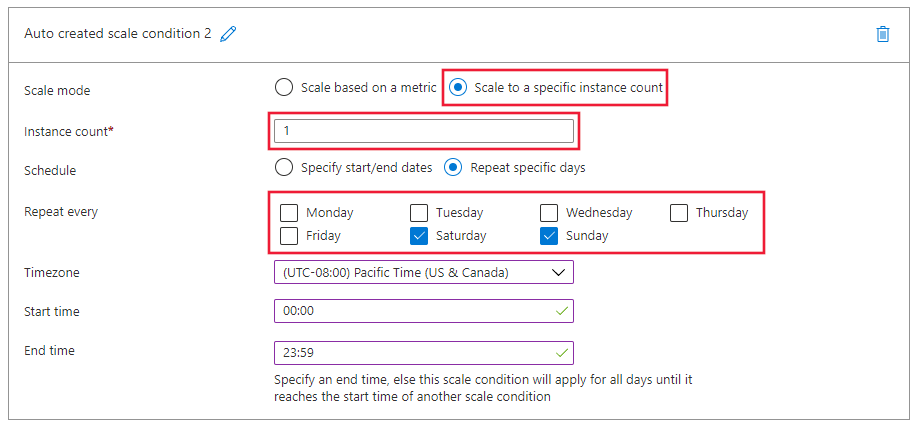
选择“保存”在“缩放”页的顶部。
启用或禁用自动缩放
可以启用或禁用特定的自动缩放配置文件。
az monitor autoscale update --autoscale-name $AUTOSCALE_SETTINGS_NAME --enabled false
mon_client.autoscale_settings.create_or_update(
    resource_group,
    autoscale_settings_name,
    parameters = {
        "location" : endpoint.location,
        "target_resource_uri" : deployment.id,
        "enabled" : False
    }
)
在 Azure 门户 缩放 页面上:
- 若要禁用正在使用的自动缩放配置文件,请选择 “手动缩放”,然后选择“ 保存”。
- 若要重新启用自动缩放配置文件,请选择自定义自动缩放,然后选择保存
删除资源
以下命令同时删除自动缩放配置文件和终结点。
# delete the autoscaling profile
az monitor autoscale delete -n "$AUTOSCALE_SETTINGS_NAME"

# delete the endpoint
az ml online-endpoint delete --name $ENDPOINT_NAME --yes --no-wait
mon_client.autoscale_settings.delete(
    resource_group,
    autoscale_settings_name
)

ml_client.online_endpoints.begin_delete(endpoint_name)
相关内容

