适用于: Python SDK azure-ai-ml v2(当前版本)
注意
有关使用 SDK v1 生成管道的教程,请参阅教程:生成用于图像分类的 Azure 机器学习管道
机器学习管道将完整的机器学习任务拆分为多步骤工作流。 每个步骤都是一个可管理组件,可以单独开发、优化、配置和自动化。 定义明确的接口连接各个步骤。 Azure 机器学习管道服务协调管道步骤之间的所有依赖项。
使用管道的好处是标准化 MLOps 实践、可缩放的团队协作、培训效率和成本降低。 若要详细了解管道的优势,请参阅什么是 Azure 机器学习管道。
在本教程中,你将使用 Azure 机器学习通过 Azure 机器学习 Python SDK v2 创建生产就绪的机器学习项目。 本教程结束后,可以使用 Azure 机器学习 Python SDK 执行以下作:
- 获取 Azure 机器学习工作区的句柄
- 创建 Azure 机器学习数据资产
- 创建可重用的 Azure 机器学习组件
- 创建、验证和运行 Azure 机器学习管道
在本教程中,你要创建一个 Azure 机器学习管道来训练用于信用违约预测的模型。 此管道处理两个步骤:
- 数据准备
- 训练和注册已训练的模型
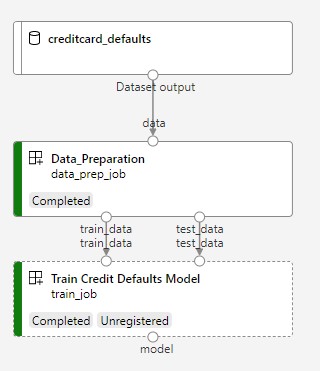
下一张图像显示了在提交后在 Azure Studio 中看到的简单管道。
这两个步骤是数据准备和训练。
先决条件
-
要使用 Azure 机器学习,你需要一个工作区。 如果没有工作区,请完成创建开始使用所需的资源以创建工作区并详细了解如何使用它。
重要
如果 Azure 机器学习工作区配置了托管虚拟网络,则可能需要添加出站规则以允许访问公共 Python 包存储库。 有关详细信息,请参阅应用场景:访问公共机器学习包。
-
登录到工作室,选择工作区(如果尚未打开)。
完成本教程上传、访问和浏览数据,以创建本教程中所需的数据资产。 请确保运行所有代码来创建初始数据资产。 如果需要,可以浏览数据并对其进行修改,但只需要本教程的初始数据。
-
在工作区中打开或创建一个笔记本:
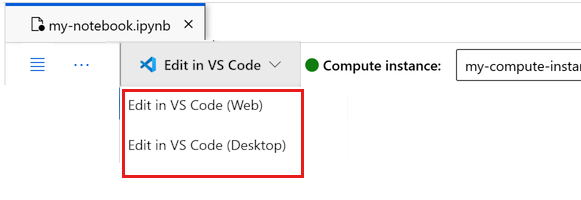
设置内核并在 Visual Studio Code (VS Code) 中打开
在打开的笔记本上方的顶部栏中,创建一个计算实例(如果还没有计算实例)。

如果计算实例已停止,请选择“启动计算”,并等待它运行。

等待计算实例运行。 然后确保右上角的内核为
Python 3.10 - SDK v2。 如果不是,请使用下拉列表选择该内核。
如果没有看到该内核,请验证计算实例是否正在运行。 如果它正在运行,请选择笔记本右上角的“刷新”按钮。
如果看到一个横幅,提示你需要进行身份验证,请选择“身份验证”。
可在此处运行笔记本,或者在 VS Code 中将其打开,以获得具有 Azure 机器学习资源强大功能的完整集成开发环境 (IDE)。 选择“在 VS Code 中打开”,然后选择 Web 或桌面选项。 以这种方式启动时,VS Code 将附加到计算实例、内核和工作区文件系统。


重要
本教程的其余部分包含教程笔记本的单元格。 将其复制并粘贴到新笔记本中,或者立即切换到该笔记本(如果已克隆该笔记本)。
设置管道资源
可以从 Azure CLI、Python SDK 或工作室界面使用 Azure 机器学习框架。 在此示例中,你要使用 Azure 机器学习 Python SDK v2 创建管道。
在创建管道之前,需要以下资源:
- 用于训练的数据资产
- 运行管道的软件环境
- 运行作业的计算资源
创建工作区的句柄
在使用代码之前,你需要一种方法来关联你的工作区。 创建 ml_client 为工作区的句柄。 然后,使用 ml_client 来管理资源和作业。
在下一个单元中,输入你的订阅 ID、资源组名称和工作区名称。 若要查找这些值:
- 在右上方的 Azure 机器学习工作室工具栏中,选择你的工作区名称。
- 将工作区、资源组和订阅 ID 的值复制到代码中。 需要复制一个值,关闭区域并粘贴,然后返回下一个值。
from azure.ai.ml import MLClient
from azure.identity import DefaultAzureCredential

# authenticate
credential = DefaultAzureCredential()

SUBSCRIPTION = "<SUBSCRIPTION_ID>"
RESOURCE_GROUP = "<RESOURCE_GROUP>"
WS_NAME = "<AML_WORKSPACE_NAME>"
# Get a handle to the workspace
ml_client = MLClient(
    credential=credential,
    subscription_id=SUBSCRIPTION,
    resource_group_name=RESOURCE_GROUP,
    workspace_name=WS_NAME,
)
SDK 参考:
注意
创建“MLClient”不会连接到工作区。 客户端初始化不会立即进行, 它会在第一次需要进行呼叫时等待。 初始化发生在下一个代码单元中。
通过调用 ml_client 来验证连接。 由于此调用是你第一次调用工作区,因此系统可能会要求你进行身份验证。
# Verify that the handle works correctly.
# If you get an error here, modify your SUBSCRIPTION, RESOURCE_GROUP, and WS_NAME in the previous cell.
ws = ml_client.workspaces.get(WS_NAME)
print(ws.location, ":", ws.resource_group)
SDK 参考:
访问已注册的数据资产
首先,获取之前在教程中注册的数据 :上传、访问和浏览 Azure 机器学习中的数据。
注意
Azure 机器学习使用对象 Data 来注册可重用的数据定义,并在管道中使用数据。
# get a handle of the data asset and print the URI
credit_data = ml_client.data.get(name="credit-card", version="initial")
print(f"Data asset URI: {credit_data.path}")
SDK 参考:
为管道步骤创建作业环境
到目前为止,你在计算实例(开发计算机)上创建了开发环境。 你还需要为管道的每个步骤使用一个环境。 每个步骤可以使用自身的环境,或者,你可以对多个步骤使用某些通用环境。
在此示例中,使用 conda yaml 文件为作业创建一个 conda 环境。 首先,创建一个目录来存储文件。
import os

dependencies_dir = "./dependencies"
os.makedirs(dependencies_dir, exist_ok=True)
现在,在依赖项目录中创建文件。
%%writefile {dependencies_dir}/conda.yaml
name: model-env
channels:
  - conda-forge
dependencies:
    - python=3.10
  - numpy=1.21.2
  - pip=21.2.4
  - scikit-learn=0.24.2
  - scipy=1.7.1
  - pandas>=1.1,<1.2
  - pip:
    - inference-schema[numpy-support]==1.3.0
    - xlrd==2.0.1
    - mlflow== 2.4.1
    - azureml-mlflow==1.51.0
该规范包含管道(numpy,pip)中使用的一些常用包,以及一些 Azure 机器学习特定包(azureml-mlflow)。
运行 Azure 机器学习作业不需要 Azure 机器学习包。 通过添加这些包,可以与 Azure 机器学习进行交互,以便记录指标和注册模型,所有这些模型都在 Azure 机器学习作业中。 稍后你会在本教程的训练脚本中使用它们。
使用 yaml 文件在工作区中创建并注册此自定义环境:
from azure.ai.ml.entities import Environment

custom_env_name = "aml-scikit-learn"

pipeline_job_env = Environment(
    name=custom_env_name,
    description="Custom environment for Credit Card Defaults pipeline",
    tags={"scikit-learn": "0.24.2"},
    conda_file=os.path.join(dependencies_dir, "conda.yaml"),
    image="mcr.microsoft.com/azureml/openmpi4.1.0-ubuntu22.04:latest",
    version="0.2.0",
)
pipeline_job_env = ml_client.environments.create_or_update(pipeline_job_env)

print(
    f"Environment with name {pipeline_job_env.name} is registered to workspace, the environment version is {pipeline_job_env.version}"
)
SDK 参考:
生成训练管道
现在你拥有运行管道所需的所有资产,准备开始构建管道本身了。
Azure 机器学习管道是可重用的 ML 工作流,它通常由多个组件构成。 组件的典型生命周期为:
- 编写组件的 YAML 规范,或使用
ComponentMethod以编程方式创建它。 - (可选)在工作区中将组件注册为名称和版本,使其可重用且可共享。
- 从管道代码加载该组件。
- 使用组件的输入、输出和参数实现管道。
- 提交管道。
可以通过两种方式创建组件: 编程定义 和 YAML 定义。 接下来的两个部分将引导你以两种方式创建组件。 可以通过尝试这两个选项或选择首选方法来创建这两个组件。
注意
在本教程中,为简单起见,对所有组件使用相同的计算。 但是,可以为每个组件设置不同的计算。 例如,你可以添加一行代码如 train_step.compute = "cpu-cluster"。 若要查看为每个组件生成具有不同计算的管道的示例,请参阅 cifar-10 管道教程中的基础管道作业部分。
创建组件 1:数据准备(使用编程定义)
首先创建第一个组件。 此组件处理数据的预处理。 预处理任务在 data_prep.py Python 文件中执行。
首先,为data_prep组件创建源文件夹:
import os

data_prep_src_dir = "./components/data_prep"
os.makedirs(data_prep_src_dir, exist_ok=True)
此脚本执行一个简单的任务:将数据拆分为训练数据集和测试数据集。 Azure 机器学习将数据集作为文件夹装载到计算中。 你创建了一个辅助 select_first_file 函数来访问装载的输入文件夹中的数据文件。
MLFlow 用于在管道运行期间记录参数和指标。
%%writefile {data_prep_src_dir}/data_prep.py
import os
import argparse
import pandas as pd
from sklearn.model_selection import train_test_split
import logging
import mlflow


def main():
    """Main function of the script."""

    # input and output arguments
    parser = argparse.ArgumentParser()
    parser.add_argument("--data", type=str, help="path to input data")
    parser.add_argument("--test_train_ratio", type=float, required=False, default=0.25)
    parser.add_argument("--train_data", type=str, help="path to train data")
    parser.add_argument("--test_data", type=str, help="path to test data")
    args = parser.parse_args()

    # Start Logging
    mlflow.start_run()

    print(" ".join(f"{k}={v}" for k, v in vars(args).items()))

    print("input data:", args.data)

    credit_df = pd.read_csv(args.data, header=1, index_col=0)

    mlflow.log_metric("num_samples", credit_df.shape[0])
    mlflow.log_metric("num_features", credit_df.shape[1] - 1)

    credit_train_df, credit_test_df = train_test_split(
        credit_df,
        test_size=args.test_train_ratio,
    )

    # output paths are mounted as folder, therefore, we are adding a filename to the path
    credit_train_df.to_csv(os.path.join(args.train_data, "data.csv"), index=False)

    credit_test_df.to_csv(os.path.join(args.test_data, "data.csv"), index=False)

    # Stop Logging
    mlflow.end_run()


if __name__ == "__main__":
    main()
准备好可以执行所需任务的脚本后,接下来请从该脚本创建一个 Azure 机器学习组件。
使用可运行命令行操作的常规用途 CommandComponent。 此命令行操作可以直接调用系统命令或运行脚本。 使用 ${{ ... }} 表示法在命令行上指定输入和输出。
from azure.ai.ml import command
from azure.ai.ml import Input, Output

data_prep_component = command(
    name="data_prep_credit_defaults",
    display_name="Data preparation for training",
    description="reads a .xl input, split the input to train and test",
    inputs={
        "data": Input(type="uri_folder"),
        "test_train_ratio": Input(type="number"),
    },
    outputs=dict(
        train_data=Output(type="uri_folder", mode="rw_mount"),
        test_data=Output(type="uri_folder", mode="rw_mount"),
    ),
    # The source folder of the component
    code=data_prep_src_dir,
    command="""python data_prep.py \
            --data ${{inputs.data}} --test_train_ratio ${{inputs.test_train_ratio}} \
            --train_data ${{outputs.train_data}} --test_data ${{outputs.test_data}} \
            """,
    environment=f"{pipeline_job_env.name}:{pipeline_job_env.version}",
)
SDK 参考:
(可选)在工作区中注册组件供将来重用。
# Now register the component to the workspace
data_prep_component = ml_client.create_or_update(data_prep_component.component)

# Create and register the component in your workspace
print(
    f"Component {data_prep_component.name} with Version {data_prep_component.version} is registered"
)
SDK 参考:
创建组件 2:训练(使用 yaml 定义)
创建的第二个组件使用训练和测试数据,训练基于树的模型,并返回输出模型。 使用 Azure 机器学习日志记录功能来记录和可视化学习进度。
前面你使用 CommandComponent 类创建了第一个组件。 这次,你将使用 yaml 定义来定义第二个组件。 每种方法各有优势。 YAML 定义可以与代码一起签入,并提供易于阅读的历史记录跟踪。 将内置的类记录和代码完成与使用 CommandComponent 的编程方法相结合可以更容易。
为此组件创建目录:
import os

train_src_dir = "./components/train"
os.makedirs(train_src_dir, exist_ok=True)
在目录中创建训练脚本:
%%writefile {train_src_dir}/train.py
import argparse
from sklearn.ensemble import GradientBoostingClassifier
from sklearn.metrics import classification_report
import os
import pandas as pd
import mlflow


def select_first_file(path):
    """Selects first file in folder, use under assumption there is only one file in folder
    Args:
        path (str): path to directory or file to choose
    Returns:
        str: full path of selected file
    """
    files = os.listdir(path)
    return os.path.join(path, files[0])


# Start Logging
mlflow.start_run()

# enable autologging
mlflow.sklearn.autolog()

os.makedirs("./outputs", exist_ok=True)


def main():
    """Main function of the script."""

    # input and output arguments
    parser = argparse.ArgumentParser()
    parser.add_argument("--train_data", type=str, help="path to train data")
    parser.add_argument("--test_data", type=str, help="path to test data")
    parser.add_argument("--n_estimators", required=False, default=100, type=int)
    parser.add_argument("--learning_rate", required=False, default=0.1, type=float)
    parser.add_argument("--registered_model_name", type=str, help="model name")
    parser.add_argument("--model", type=str, help="path to model file")
    args = parser.parse_args()

    # paths are mounted as folder, therefore, we are selecting the file from folder
    train_df = pd.read_csv(select_first_file(args.train_data))

    # Extracting the label column
    y_train = train_df.pop("default payment next month")

    # convert the dataframe values to array
    X_train = train_df.values

    # paths are mounted as folder, therefore, we are selecting the file from folder
    test_df = pd.read_csv(select_first_file(args.test_data))

    # Extracting the label column
    y_test = test_df.pop("default payment next month")

    # convert the dataframe values to array
    X_test = test_df.values

    print(f"Training with data of shape {X_train.shape}")

    clf = GradientBoostingClassifier(
        n_estimators=args.n_estimators, learning_rate=args.learning_rate
    )
    clf.fit(X_train, y_train)

    y_pred = clf.predict(X_test)

    print(classification_report(y_test, y_pred))

    # Registering the model to the workspace
    print("Registering the model via MLFlow")
    mlflow.sklearn.log_model(
        sk_model=clf,
        registered_model_name=args.registered_model_name,
        artifact_path=args.registered_model_name,
    )

    # Saving the model to a file
    mlflow.sklearn.save_model(
        sk_model=clf,
        path=os.path.join(args.model, "trained_model"),
    )

    # Stop Logging
    mlflow.end_run()


if __name__ == "__main__":
    main()
如此训练脚本中所示,训练模型后,模型文件将保存并注册到工作区。 现在可以在推理终结点中使用已注册的模型。
对于此步骤的环境,你要使用一个内置(特选)Azure 机器学习环境。 该标记 azureml 告知系统在特选环境中查找名称。
首先,创建用于描述组件的 yaml 文件:
%%writefile {train_src_dir}/train.yml
# <component>
name: train_credit_defaults_model
display_name: Train Credit Defaults Model
# version: 1 # Not specifying a version will automatically update the version
type: command
inputs:
  train_data:
    type: uri_folder
  test_data:
    type: uri_folder
  learning_rate:
    type: number
  registered_model_name:
    type: string
outputs:
  model:
    type: uri_folder
code: .
environment:
  # for this step, we'll use an AzureML curate environment
  azureml://registries/azureml/environments/sklearn-1.0/labels/latest
command: >-
  python train.py
  --train_data ${{inputs.train_data}}
  --test_data ${{inputs.test_data}}
  --learning_rate ${{inputs.learning_rate}}
  --registered_model_name ${{inputs.registered_model_name}}
  --model ${{outputs.model}}
# </component>
现在请创建并注册组件。 注册它可让你在其他管道中重复使用它。 有权访问工作区的其他人也可以使用已注册的组件。
# importing the Component Package
from azure.ai.ml import load_component

# Loading the component from the yml file
train_component = load_component(source=os.path.join(train_src_dir, "train.yml"))

# Now register the component to the workspace
train_component = ml_client.create_or_update(train_component)

# Create and register the component in your workspace
print(
    f"Component {train_component.name} with Version {train_component.version} is registered"
)
SDK 参考:
从组件创建管道
定义并注册组件后,开始实现管道。
Python 函数 load_component() 返回的工作方式与任何常规的 Python 函数类似。 在管道中使用它们来调用每个步骤。
若要对管道进行编码,请使用标识 Azure 机器学习管道的特定 @dsl.pipeline 修饰器。 在修饰器中,指定管道说明和默认资源,例如计算和存储。 像 Python 函数一样,管道可以使用输入。 可以使用不同的输入创建单个管道的多个实例。
在以下示例中,使用 输入数据、 拆分比率和 已注册的模型名称 作为输入变量。 然后,调用组件并使用其输入和输出标识符进行连接。 可以通过 .outputs 属性来访问每个步骤的输出。
# the dsl decorator tells the sdk that we are defining an Azure Machine Learning pipeline
from azure.ai.ml import dsl, Input, Output


@dsl.pipeline(
    compute="serverless",  # "serverless" value runs pipeline on serverless compute
    description="E2E data_perp-train pipeline",
)
def credit_defaults_pipeline(
    pipeline_job_data_input,
    pipeline_job_test_train_ratio,
    pipeline_job_learning_rate,
    pipeline_job_registered_model_name,
):
    # using data_prep_function like a python call with its own inputs
    data_prep_job = data_prep_component(
        data=pipeline_job_data_input,
        test_train_ratio=pipeline_job_test_train_ratio,
    )

    # using train_func like a python call with its own inputs
    train_job = train_component(
        train_data=data_prep_job.outputs.train_data,  # note: using outputs from previous step
        test_data=data_prep_job.outputs.test_data,  # note: using outputs from previous step
        learning_rate=pipeline_job_learning_rate,  # note: using a pipeline input as parameter
        registered_model_name=pipeline_job_registered_model_name,
    )

    # a pipeline returns a dictionary of outputs
    # keys will code for the pipeline output identifier
    return {
        "pipeline_job_train_data": data_prep_job.outputs.train_data,
        "pipeline_job_test_data": data_prep_job.outputs.test_data,
    }
SDK 参考:
现在,使用管道定义来实例化包含数据集的管道、所选拆分率和为模型选择的名称。
registered_model_name = "credit_defaults_model"

# Let's instantiate the pipeline with the parameters of our choice
pipeline = credit_defaults_pipeline(
    pipeline_job_data_input=Input(type="uri_file", path=credit_data.path),
    pipeline_job_test_train_ratio=0.25,
    pipeline_job_learning_rate=0.05,
    pipeline_job_registered_model_name=registered_model_name,
)
SDK 参考:
提交作业
现在提交要在 Azure 机器学习中运行的作业。 这次在 create_or_update 上使用 ml_client.jobs。
输入实验名称。 试验是针对特定项目执行的所有迭代的容器。 在 Azure 机器学习工作室中,在同一试验名称下提交的所有作业都彼此相邻。
完成后,管道会在工作区中注册模型,这是训练的结果。
# submit the pipeline job
pipeline_job = ml_client.jobs.create_or_update(
    pipeline,
    # Project's name
    experiment_name="e2e_registered_components",
)
ml_client.jobs.stream(pipeline_job.name)
SDK 参考:
可以使用上一单元格中生成的链接来跟踪管道的进度。 首次选择此链接时,可能会看到管道仍在运行。 完成后,可以检查每个组件的结果。
双击“训练信用违约模型”组件。
要查看有关训练的两个重要结果:
查看日志:
- 选择“输出 + 日志”选项卡。
- 打开文件夹到
user_logs>std_log.txt此部分显示脚本运行 stdout。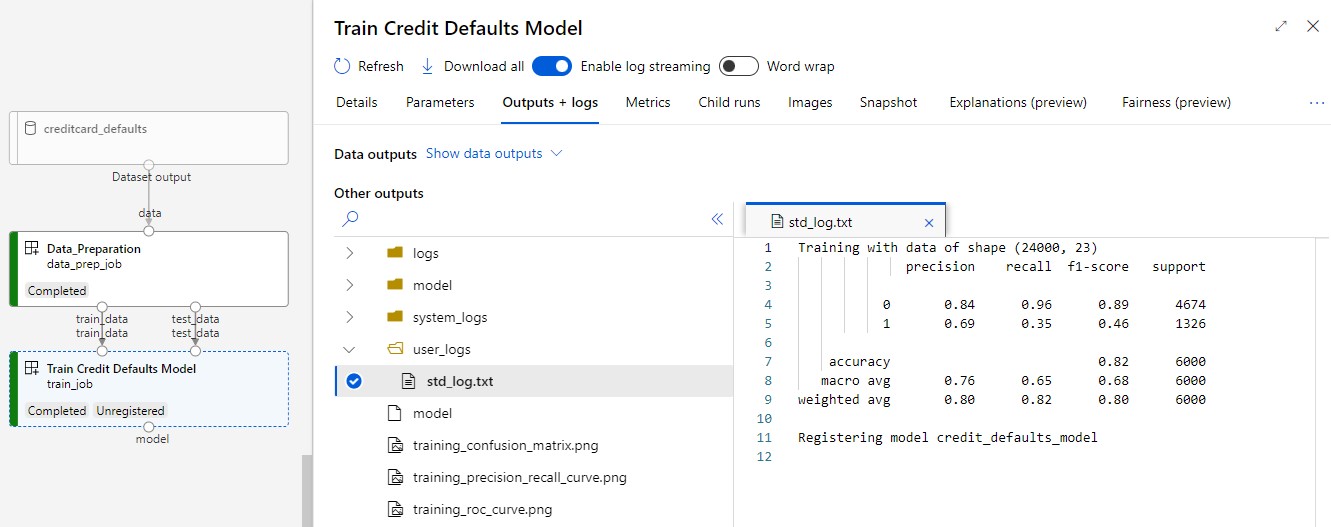
查看指标:选择“指标”选项卡。本部分显示记录的不同指标。 在此示例中,mlflow
autologging会自动记录训练指标。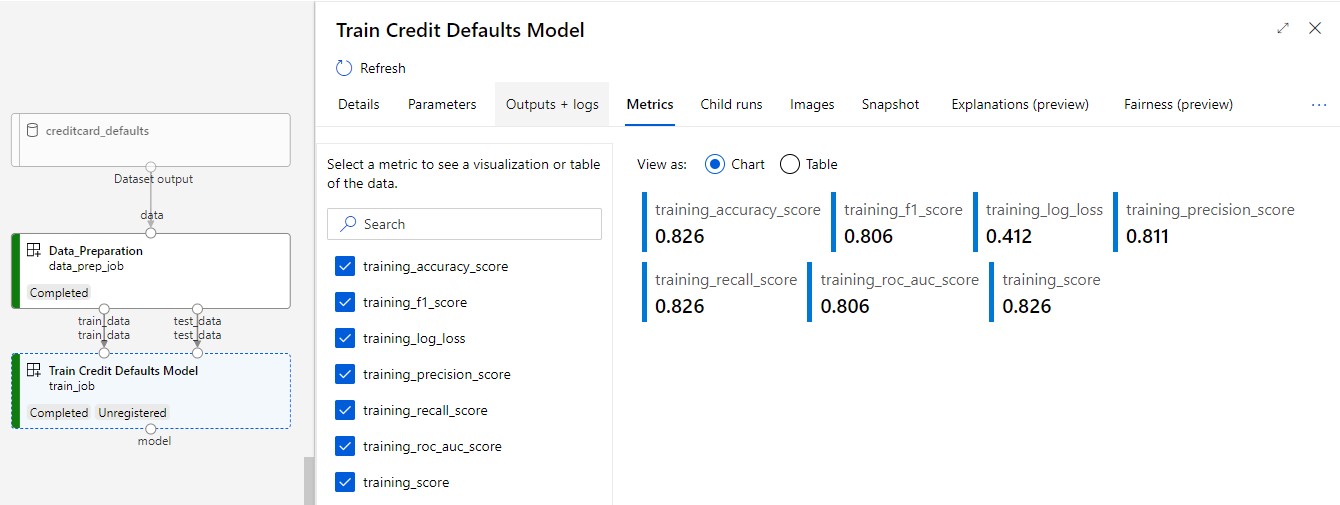


将模型部署为联机终结点
有关将模型部署到联机终结点的详细信息,请参阅 将模型部署为联机终结点教程。
清理资源
如果打算继续学习其他教程,请跳到 下一步。
停止计算实例
如果现在不打算使用计算实例,请停止它:
- 在工作室的左窗格中,选择 “计算”。
- 在顶部选项卡中,选择“计算实例”。
- 在列表中选择该计算实例。
- 在顶部工具栏中,选择“停止”。
删除所有资源
重要
已创建的资源可用作其他 Azure 机器学习教程和操作方法文章的先决条件。
如果你不打算使用已创建的任何资源,请删除它们,以免产生任何费用:
在 Azure 门户的搜索框中输入“资源组”,然后从结果中选择它。
从列表中选择你创建的资源组。
在“概述”页面上,选择“删除资源组”。
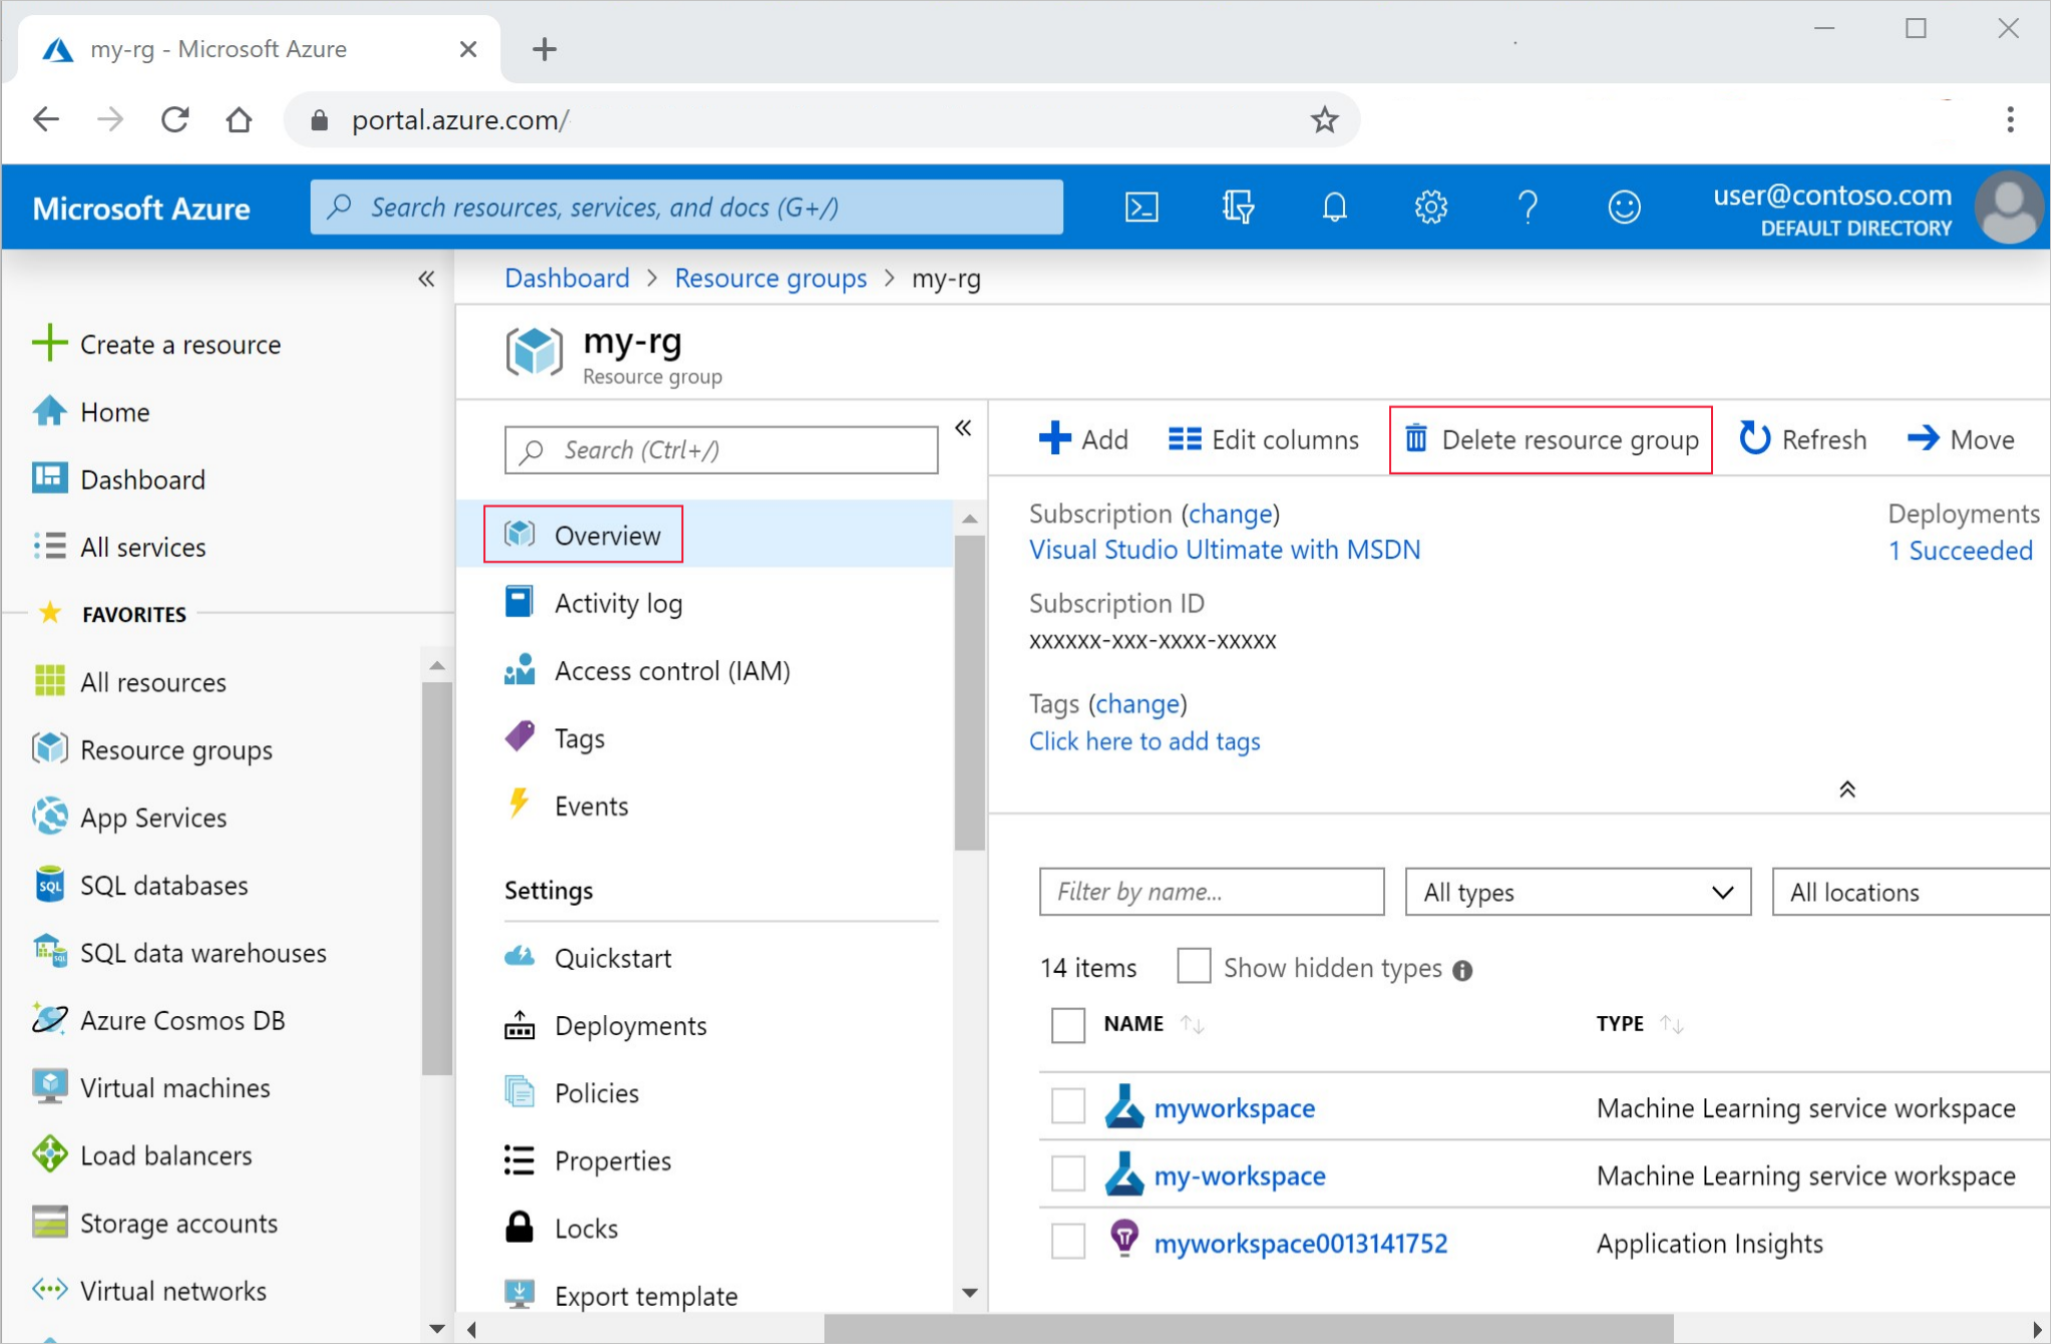
输入资源组名称。 然后选择“删除”。