Tutorial:使用 Azure 通知中心 (Legacy API) 向 iOS 应用发送推送通知Tutorial: Send push notifications to iOS apps using Azure Notification Hubs (Legacy API)
本教程演示如何使用适用于 Apple Legacy API 的 Azure 通知中心 SDK 和 Azure 通知中心向 iOS 应用程序发送推送通知。This tutorial shows you how to use Azure Notification Hubs to send push notifications to an iOS application, using the Azure Notification Hubs SDK for Apple Legacy APIs.
本教程涵盖以下步骤:This tutorial covers the following steps:
- 创建示例 iOS 应用。Create a sample iOS app.
- 将 iOS 应用连接到 Azure 通知中心。Connect your iOS app to Azure Notification Hubs.
- 发送测试推送通知。Send test push notifications.
- 验证应用是否可以接收通知。Verify that your app receives notifications.
可以从 GitHub 下载本教程的完整代码。You can download the complete code for this tutorial from GitHub.
先决条件Prerequisites
要完成本教程,需要具备以下先决条件:To complete this tutorial, you’ll need the following prerequisites:
- 运行 Xcode 的 Mac,以及安装到密钥链中的有效开发人员证书。A Mac running Xcode, along with a valid developer certificate installed into your Keychain.
- 运行 iOS 版本 10 或更高版本的 iPhone 或 iPad。An iPhone or iPad running iOS version 10 or later.
- 在 Apple 门户中注册并与证书关联的物理设备。Your physical device registered in the Apple Portal, and associated with your certificate.
在继续操作之前,请务必完成上一篇教程,了解如何开始使用适用于 iOS 应用的 Azure 通知中心,并在通知中心设置和配置推送凭据。Before you proceed, be sure to go through the previous tutorial on getting started with Azure Notification Hubs for iOS apps, to set up and configure push credentials in your notification hub. 即使没有 iOS 开发经验,也应该能够按照这些步骤操作。Even if you have no prior experience with iOS development, you should be able to follow these steps.
备注
由于推送通知的配置要求,必须在物理 iOS 设备(iPhone 或 iPad)而不是在 iOS 仿真器上部署和测试推送通知。Because of configuration requirements for push notifications, you must deploy and test push notifications on a physical iOS device (iPhone or iPad), instead of the iOS emulator.
将 iOS 应用连接到通知中心Connect your iOS app to Notification Hubs
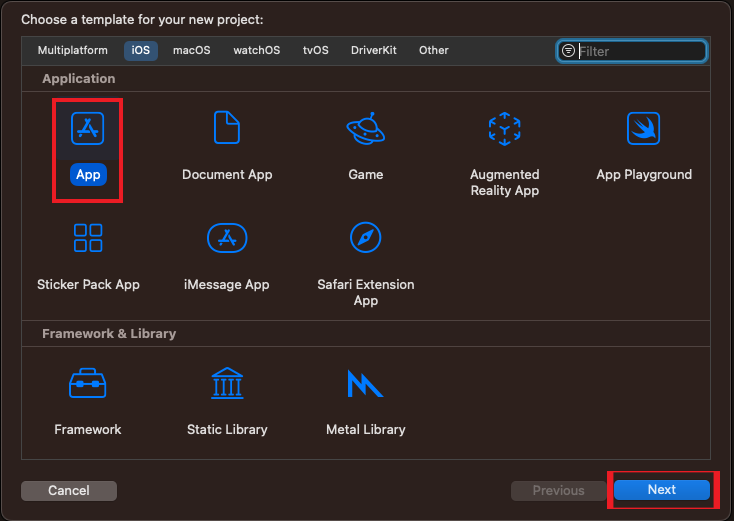
在 Xcode 中,创建新的 iOS 项目,然后选择“单视图应用程序”模板 。In Xcode, create a new iOS project and select the Single View Application template.
设置新项目的选项时,请务必使用在 Apple 开发人员门户中设置捆绑标识符时使用的同一 产品名称 和 组织标识符。When setting the options for your new project, make sure to use the same Product Name and Organization Identifier that you used when you set the bundle identifier in the Apple Developer portal.
在“项目导航器”的“目标”下选择项目名称,然后选择“签名和功能”选项卡 。确保为 Apple 开发人员帐户选择适当的“团队”。Under Project Navigator, select your project name under Targets, then select the Signing & Capabilities tab. Make sure you select the appropriate Team for your Apple Developer account. XCode 会根据捆绑标识符自动下拉以前创建的预配配置文件。XCode should automatically pull down the Provisioning Profile you created previously based on your bundle identifier.
如果屏幕未显示在 Xcode 中创建的新预配配置文件,请尝试刷新签名标识的配置文件。If you don't see the new provisioning profile that you created in Xcode, try refreshing the profiles for your signing identity. 单击菜单栏上的“Xcode”,再依次单击“首选项”、“帐户”选项卡、“查看详细信息”按钮、签名标识,然后单击右下角的刷新按钮。Click Xcode on the menu bar, click Preferences, click the Account tab, click the View Details button, click your signing identity, and then click the refresh button in the bottom-right corner.
在“签名和功能”选项卡中,选择“+ 功能”。In the Signing & Capabilities tab, select + Capability. 双击“推送通知”以启用它。Double-click Push Notifications to enable it.
添加 Azure 通知中心 SDK 模块。Add the Azure Notification Hubs SDK modules.
可以将 Azure 通知中心 SDK 集成到应用,方法是使用 Cocoapods 或者手动将二进制文件添加到项目。You can integrate the Azure Notification Hubs SDK into your app by using Cocoapods or by manually adding the binaries to your project.
通过 Cocoapods 集成:将以下依赖项添加到 podfile,以便将 Azure 通知中心 SDK 包含到应用中:Integration via Cocoapods: Add the following dependencies to your podfile to include Azure Notification Hubs SDK in your app:
pod 'AzureNotificationHubs-iOS'
运行 pod 安装,安装新定义的 pod 并打开 .xcworkspace。Run pod install to install your newly defined pod and open your .xcworkspace.
如果在运行 pod 安装时看到错误(例如找不到 AzureNotificationHubs-iOS 的规范),请运行
pod repo update
以从 Cocoapods 存储库获取最新的 pod,然后运行 pod 安装。If you see an error such as Unable to find a specification for AzureNotificationHubs-iOS while running pod install, runpod repo update
to get the latest pods from the Cocoapods repository, and then run pod install.
通过 Carthage 集成:将以下依赖项添加到 Cartfile,以便将 Azure 通知中心 SDK 包含到应用中:Integration via Carthage: Add the following dependencies to your Cartfile to include the Azure Notification Hubs SDK in your app:
github "Azure/azure-notificationhubs-ios"
- 接下来,更新生成依赖项:Next, update build dependencies:
$ carthage update
有关使用 Carthage 的详细信息,请参阅 Carthage GitHub 存储库。For more information about using Carthage, see the Carthage GitHub repository.
通过将二进制文件复制到项目中进行集成:可以通过将二进制文件复制到项目中来进行集成,如下所示:Integration by copying the binaries into your project: You can integrate by copying the binaries into your project, as follows:
下载以 zip 文件形式提供的 Azure 通知中心 SDK 框架,然后将其解压缩。Download the Azure Notification Hubs SDK framework provided as a zip file, and unzip it.
在 Xcode 中,右键单击项目,然后单击“将文件添加到”选项,将 WindowsAzureMessaging.framework 文件夹添加到 Xcode 项目。In Xcode, right-click your project and click the Add Files to option to add the WindowsAzureMessaging.framework folder to your Xcode project. 选择“选项”,确保选中“根据需要复制项目”,然后单击“添加”。Select Options and make sure Copy items if needed is selected, and then click Add.
在相应的
<string></string>
部分中添加用于连接到 Azure 通知中心的信息。Add the information for connecting to Azure Notification Hubs in the appropriate<string></string>
section. 将字符串字面量占位符--HUB-NAME--
和--CONNECTION-STRING--
分别替换为之前从门户中获取的中心名称和 DefaultListenSharedAccessSignature:Replace the string literal placeholders--HUB-NAME--
and--CONNECTION-STRING--
with the hub name and the DefaultListenSharedAccessSignature, respectively, as you previously obtained from the portal:<?xml version="1.0" encoding="UTF-8"?> <!DOCTYPE plist PUBLIC "-//Apple//DTD PLIST 1.0//EN" "http://www.apple.com/DTDs/PropertyList-1.0.dtd"> <plist version="1.0"> <dict> <key>HUB_NAME</key> <string>--HUB-NAME--</string> <key>CONNECTION_STRING</key> <string>--CONNECTION-STRING--</string> </dict> </plist>
打开项目 AppDelegate.h 文件,并将其内容替换为以下代码:Open your project AppDelegate.h file and replace its contents with the following code:
#import <UIKit/UIKit.h> #import <WindowsAzureMessaging/WindowsAzureMessaging.h> #import <UserNotifications/UserNotifications.h> @interface AppDelegate : UIResponder <UIApplicationDelegate, UNUserNotificationCenterDelegate> @property (strong, nonatomic) UIWindow *window; - (void)handleRegister; - (void)handleUnregister; @end
在项目 AppDelegate.m 文件中,添加以下
import
语句:In the project AppDelegate.m file, add the followingimport
statements:#import "NotificationDetailViewController.h"
此外,在 AppDelegate.m 文件中,根据 iOS 版本在
didFinishLaunchingWithOptions
方法中添加以下代码行。Also in your AppDelegate.m file, add the following line of code in thedidFinishLaunchingWithOptions
method, based on your version of iOS. 此代码将向 APNs 注册设备句柄:This code registers your device handle with APNs:[[UNUserNotificationCenter currentNotificationCenter] setDelegate:self];
在同一 AppDelegate.m 文件中,将
didFinishLaunchingWithOptions
后面的所有代码替换为以下代码:In the same AppDelegate.m file, replace all the code afterdidFinishLaunchingWithOptions
with the following code:// Tells the app that a remote notification arrived that indicates there is data to be fetched. - (void)application:(UIApplication *)application didReceiveRemoteNotification:(NSDictionary *)userInfo fetchCompletionHandler:(void (^)(UIBackgroundFetchResult result))completionHandler { NSLog(@"Received remote (silent) notification"); [self logNotificationDetails:userInfo]; // // Let the system know the silent notification has been processed. // completionHandler(UIBackgroundFetchResultNoData); } // Tells the delegate that the app successfully registered with Apple Push Notification service (APNs). - (void) application:(UIApplication *)application didRegisterForRemoteNotificationsWithDeviceToken:(NSData *)deviceToken { NSMutableSet *tags = [[NSMutableSet alloc] init]; // Load and parse stored tags NSString *unparsedTags = [[NSUserDefaults standardUserDefaults] valueForKey:NHUserDefaultTags]; if (unparsedTags.length > 0) { NSArray *tagsArray = [unparsedTags componentsSeparatedByString: @","]; [tags addObjectsFromArray:tagsArray]; } // Register the device with the Notification Hub. // If the device has not already been registered, this will create the registration. // If the device has already been registered, this will update the existing registration. // SBNotificationHub* hub = [self getNotificationHub]; [hub registerNativeWithDeviceToken:deviceToken tags:tags completion:^(NSError* error) { if (error != nil) { NSLog(@"Error registering for notifications: %@", error); } else { [self showAlert:@"Registered" withTitle:@"Registration Status"]; } }]; } // UNUserNotificationCenterDelegate methods // // Asks the delegate how to handle a notification that arrived while the app was running in the foreground. - (void)userNotificationCenter:(UNUserNotificationCenter *)center willPresentNotification:(UNNotification *)notification withCompletionHandler:(void (^)(UNNotificationPresentationOptions options))completionHandler { NSLog(@"Received notification while the application is in the foreground"); // The system calls this delegate method when the app is in the foreground. This allows the app to handle the notification // itself (and potentially modify the default system behavior). // Handle the notification by displaying custom UI. // [self showNotification:notification.request.content.userInfo]; // Use 'options' to specify which default behaviors to enable. // - UNNotificationPresentationOptionsBadge: Apply the notification's badge value to the app’s icon. // - UNNotificationPresentationOptionList: Show in the Notification Center // - UNNotificationPresentationOptionsSound: Play the sound associated with the notification. // completionHandler(UNNotificationPresentationOptionsBadge | UNNotificationPresentationOptionsSound); } // Asks the delegate to process the user's response to a delivered notification. // - (void)userNotificationCenter:(UNUserNotificationCenter *)center didReceiveNotificationResponse:(UNNotificationResponse *)response withCompletionHandler:(void(^)(void))completionHandler { NSLog(@"Received notification while the application is in the background"); // The system calls this delegate method when the user taps or responds to the system notification. // Handle the notification response by displaying custom UI // [self showNotification:response.notification.request.content.userInfo]; // Let the system know the response has been processed. // completionHandler(); } // App logic and helpers - (SBNotificationHub *)getNotificationHub { NSString *path = [[NSBundle mainBundle] pathForResource:@"DevSettings" ofType:@"plist"]; NSDictionary *configValues = [NSDictionary dictionaryWithContentsOfFile:path]; NSString *connectionString = [configValues objectForKey:@"CONNECTION_STRING"]; NSString *hubName = [configValues objectForKey:@"HUB_NAME"]; return [[SBNotificationHub alloc] initWithConnectionString:connectionString notificationHubPath:hubName]; } - (void)handleRegister { UNUserNotificationCenter *center = [UNUserNotificationCenter currentNotificationCenter]; UNAuthorizationOptions options = UNAuthorizationOptionAlert | UNAuthorizationOptionSound | UNAuthorizationOptionBadge; [center requestAuthorizationWithOptions:(options) completionHandler:^(BOOL granted, NSError * _Nullable error) { if (error != nil) { NSLog(@"Error requesting for authorization: %@", error); } if (granted) { NSLog(@"Authorization granted"); } }]; [[UIApplication sharedApplication] registerForRemoteNotifications]; } - (void)handleUnregister { // // Unregister the device with the Notification Hub. // SBNotificationHub *hub = [self getNotificationHub]; [hub unregisterNativeWithCompletion:^(NSError* error) { if (error != nil) { NSLog(@"Error unregistering for push: %@", error); } else { [self showAlert:@"Unregistered" withTitle:@"Registration Status"]; } }]; } - (void)logNotificationDetails:(NSDictionary *)userInfo { if (userInfo != nil) { UIApplicationState state = [UIApplication sharedApplication].applicationState; BOOL background = state != UIApplicationStateActive; NSLog(@"Received %@notification: \n%@", background ? @"(background) " : @"", userInfo); } } - (void)showAlert:(NSString *)message withTitle:(NSString *)title { if (title == nil) { title = @"Alert"; } UIAlertController *alert = [UIAlertController alertControllerWithTitle:title message:message preferredStyle:UIAlertControllerStyleAlert]; [alert addAction:[UIAlertAction actionWithTitle:@"OK" style:UIAlertActionStyleDefault handler:nil]]; [[[[UIApplication sharedApplication] keyWindow] rootViewController] presentViewController:alert animated:YES completion:nil]; } - (void)showNotification:(NSDictionary *)userInfo { [self logNotificationDetails:userInfo]; NotificationDetailViewController *notificationDetail = [[NotificationDetailViewController alloc] initWithUserInfo:userInfo]; [[[[UIApplication sharedApplication] keyWindow] rootViewController] presentViewController:notificationDetail animated:YES completion:nil]; } @end
此代码使用在 Constants.h 中指定的连接信息连接到通知中心。This code connects to the notification hub using the connection information you specified in Constants.h. 然后,它向通知中心提供设备令牌,使中心能够发送通知。It then gives the device token to the notification hub, so that the hub can send notifications.
创建 NotificationDetailViewController 头文件Create NotificationDetailViewController header file
与之前的说明类似,添加另一个名为 NotificationDetailViewController.h 的头文件。Similar to the previous instructions, add another header file named NotificationDetailViewController.h. 将新的头文件的内容替换为以下代码:Replace the contents of the new header file with the following code:
#import <UIKit/UIKit.h> NS_ASSUME_NONNULL_BEGIN @interface NotificationDetailViewController : UIViewController @property (strong, nonatomic) IBOutlet UILabel *titleLabel; @property (strong, nonatomic) IBOutlet UILabel *bodyLabel; @property (strong, nonatomic) IBOutlet UIButton *dismissButton; @property (strong, nonatomic) NSDictionary *userInfo; - (id)initWithUserInfo:(NSDictionary *)userInfo; @end NS_ASSUME_NONNULL_END
添加实现文件 NotificationDetailViewController.m。Add the implementation file NotificationDetailViewController.m. 将该文件的内容替换为以下代码,此代码可实现 UIViewController 方法:Replace the contents of the file with the following code, which implements the UIViewController methods:
#import "NotificationDetailViewController.h" @interface NotificationDetailViewController () @end @implementation NotificationDetailViewController - (id)initWithUserInfo:(NSDictionary *)userInfo { self = [super initWithNibName:@"NotificationDetail" bundle:nil]; if (self) { _userInfo = userInfo; } return self; } - (void)viewDidLayoutSubviews { [self.titleLabel sizeToFit]; [self.bodyLabel sizeToFit]; } - (void)viewDidLoad { [super viewDidLoad]; NSString *title = nil; NSString *body = nil; NSDictionary *aps = [_userInfo valueForKey:@"aps"]; NSObject *alertObject = [aps valueForKey:@"alert"]; if (alertObject != nil) { if ([alertObject isKindOfClass:[NSDictionary class]]) { NSDictionary *alertDict = (NSDictionary *)alertObject; title = [alertDict valueForKey:@"title"]; body = [alertObject valueForKey:@"body"]; } else if ([alertObject isKindOfClass:[NSString class]]) { body = (NSString *)alertObject; } else { NSLog(@"Unable to parse notification content. Unexpected format: %@", alertObject); } } if (title == nil) { title = @"<unset>"; } if (body == nil) { body = @"<unset>"; } self.titleLabel.text = title; self.bodyLabel.text = body; } - (IBAction)handleDismiss:(id)sender { [self dismissViewControllerAnimated:YES completion:nil]; } @end
ViewControllerViewController
在项目 ViewController.h 文件中,添加以下
import
语句:In the project ViewController.h file, add the followingimport
statements:#import <WindowsAzureMessaging/WindowsAzureMessaging.h> #import <UserNotifications/UserNotifications.h>
此外,在 ViewController.h 中,在
@interface
声明后添加以下属性声明:Also in ViewController.h, add the following property declarations after the@interface
declaration:@property (strong, nonatomic) IBOutlet UITextField *tagsTextField; @property (strong, nonatomic) IBOutlet UIButton *registerButton; @property (strong, nonatomic) IBOutlet UIButton *unregisterButton;
在项目的 ViewController.m 实现文件中,将该文件的内容替换为以下代码:In the project's ViewController.m implementation file, replace the contents of the file with the following code:
#import "ViewController.h" #import "AppDelegate.h" static NSString *const kNHUserDefaultTags = @"notification_tags"; @interface ViewController () @end @implementation ViewController // UIViewController methods - (void)touchesBegan:(NSSet<UITouch *> *)touches withEvent:(UIEvent *)event { // Simple method to dismiss keyboard when user taps outside of the UITextField. [self.view endEditing:YES]; } - (void)viewDidLoad { [super viewDidLoad]; // Load raw tags text from storage and initialize the text field self.tagsTextField.text = [[NSUserDefaults standardUserDefaults] valueForKey:kNHUserDefaultTags]; } - (IBAction)handleRegister:(id)sender { // Save raw tags text in storage [[NSUserDefaults standardUserDefaults] setValue:self.tagsTextField.text forKey:kNHUserDefaultTags]; // Delegate processing the register action to the app delegate. [[[UIApplication sharedApplication] delegate] performSelector:@selector(handleRegister)]; } - (IBAction)handleUnregister:(id)sender { [[[UIApplication sharedApplication] delegate] performSelector:@selector(handleUnregister)]; } @end
若要验证是否没有故障,请在设备上生成并运行应用。To verify there are no failures, build and run the app on your device.
发送测试推送通知Send test push notifications
可以在 Azure 门户中使用“测试性发送”选项,在应用中测试通知的发送。You can test receiving notifications in your app with the Test Send option in the Azure portal. 它会向设备发送测试性的推送通知。It sends a test push notification to your device.
通常,推送通知是在后端服务(例如,移动应用,或者使用兼容库的 ASP.NET)中发送的。Push notifications are normally sent in a back-end service like Mobile Apps or ASP.NET using a compatible library. 如果后端没有可用库,也可使用 REST API 直接发送通知消息。If a library isn't available for your back end, you can also use the REST API directly to send notification messages.
下面是可能需要查看的有关发送通知的其他教程列表:Here is a list of some other tutorials you might want to review for sending notifications:
- Azure 移动应用:有关如何从通知中心集成的移动应用后端发送通知的示例,请参阅将推送通知添加到 iOS 应用。Azure Mobile Apps: For an example of how to send notifications from a Mobile Apps back end integrated with Notification Hubs, see Add Push Notifications to your iOS App.
- ASP.NET:使用通知中心向用户发送推送通知。ASP.NET: Use Notification Hubs to send push notifications to users.
- Azure 通知中心 Java SDK:有关从 Java 发送通知的信息,请参阅 如何通过 Java 使用通知中心 。Azure Notification Hubs Java SDK: See How to use Notification Hubs from Java for sending notifications from Java. 这种方法已在 Eclipse for Android 开发环境中进行测试。This has been tested in Eclipse for Android Development.
- PHP: 如何通过 PHP 使用通知中心。PHP: How to use Notification Hubs from PHP.
验证应用可以接收推送通知Verify that your app receives push notifications
要在 iOS 上测试推送通知,必须将应用部署到物理 iOS 设备。To test push notifications on iOS, you must deploy the app to a physical iOS device. 不能使用 iOS 模拟器发送 Apple 推送通知。You cannot send Apple push notifications by using the iOS simulator.
运行应用并验证注册是否成功,并按“确定”。Run the app and verify that registration succeeds, and then press OK.
如上一部分所述,接下来可以从 Azure 门户发送测试推送通知。Next, send a test push notification from the Azure portal, as described in the previous section.
该推送通知会从给定通知中心发送到所有已注册接收通知的设备。The push notification is sent to all devices that are registered to receive the notifications from the given notification hub.
后续步骤Next steps
在这个简单的示例中,已将推送通知广播到所有已注册的 iOS 设备。In this simple example, you broadcast push notifications to all your registered iOS devices. 要了解如何向特定 iOS 设备发送推送通知,请转到以下教程:To learn how to send push notifications to specific iOS devices, advance to the following tutorial:
教程:向特定设备推送通知Tutorial: Push notifications to specific devices
有关详细信息,请参阅以下文章:For more information, see the following articles:
- Azure 通知中心概述Azure Notification Hubs overview
- 通知中心 REST APINotification Hubs REST APIs
- 用于后端操作的通知中心 SDKNotification Hubs SDK for back-end operations
- GitHub 上的通知中心 SDKNotification Hubs SDK on GitHub
- 使用应用程序后端注册Register with application back end
- 注册管理Registration management
- 使用标记Working with tags
- 使用自定义模板Working with custom templates
- 使用共享访问签名进行服务总线访问控制Service Bus access control with shared access signatures
- 以编程方式生成 SAS 令牌Programmatically generate SAS tokens
- Apple 安全性:常见加密Apple security: common crypto