概述
本教程介绍如何使用 Azure 通知中心将突发新闻通知广播到 iOS 应用。 完成后,可以注册感兴趣的突发新闻类别,并仅接收这些类别的推送通知。 此方案是许多应用的常见模式,其中通知必须发送到以前声明感兴趣的用户组,例如 RSS 阅读器、音乐迷的应用等。
在通知中心创建注册时,通过包括一个或多个 标记 来启用广播场景。 当通知发送到标记时,已注册标记的设备会收到通知。 由于标记只是字符串,因此无需提前预配它们。 有关标记的详细信息,请参阅 通知中心路由和标记表达式。
在本教程中,你将执行以下步骤:
- 向应用添加类别选择
- 发送带标记的通知
- 从设备发送通知
- 运行应用并生成通知
先决条件
本主题基于在教程中创建的应用 :使用 Azure 通知中心向 iOS 应用推送通知。 在开始本教程之前,必须已完成 教程:使用 Azure 通知中心将通知推送到 iOS 应用。
向应用添加类别选择
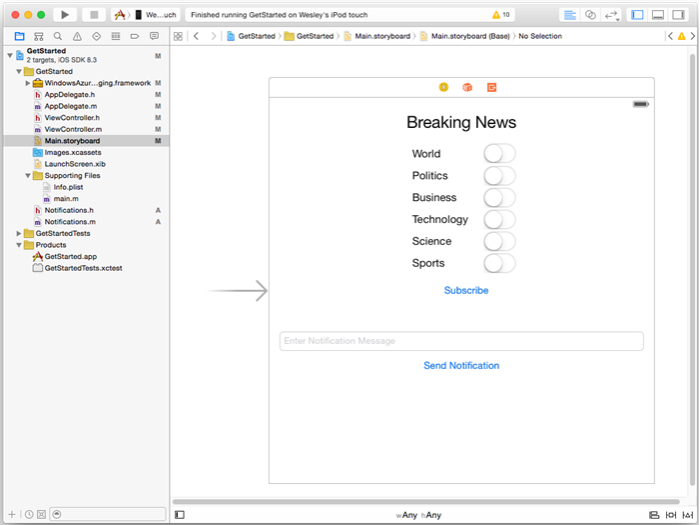
第一步是将 UI 元素添加到您现有的故事板,使用户能够选择要注册的类别。 用户选择的类别存储在设备上。 应用启动时,会在通知中心创建设备注册,其中所选类别为标记。
在 MainStoryboard_iPhone.storyboard 中,从对象库添加以下组件:
带有 突发新闻“文本的标签。
带有类别文本 “World”、“ 政治”、“ 商业”、“ 技术”、“ 科学”和 “体育”的标签。
6 个开关,每个类别一个,默认将每个开关 状态 设置为 “关闭 ”。
一个标记为 “订阅”的按钮。
故事板应如下所示:
在辅助编辑器中,为所有开关创建出口,并将其称为 WorldSwitch、PoliticsSwitch、BusinessSwitch、TechnologySwitch、ScienceSwitch 和 SportsSwitch。
为您的按钮创建一个名为
subscribe的动作;ViewController.h应该包含以下代码:@property (weak, nonatomic) IBOutlet UISwitch *WorldSwitch; @property (weak, nonatomic) IBOutlet UISwitch *PoliticsSwitch; @property (weak, nonatomic) IBOutlet UISwitch *BusinessSwitch; @property (weak, nonatomic) IBOutlet UISwitch *TechnologySwitch; @property (weak, nonatomic) IBOutlet UISwitch *ScienceSwitch; @property (weak, nonatomic) IBOutlet UISwitch *SportsSwitch; - (IBAction)subscribe:(id)sender;创建一个新的 Cocoa Touch 类,名称为
Notifications。 复制文件 Notifications.h 的接口部分中的以下代码:@property NSData* deviceToken; - (id)initWithConnectionString:(NSString*)listenConnectionString HubName:(NSString*)hubName; - (void)storeCategoriesAndSubscribeWithCategories:(NSArray*)categories completion:(void (^)(NSError* error))completion; - (NSSet*)retrieveCategories; - (void)subscribeWithCategories:(NSSet*)categories completion:(void (^)(NSError *))completion;将以下导入指令添加到 Notifications.m:
#import <WindowsAzureMessaging/WindowsAzureMessaging.h>复制文件 Notifications.m 的实现部分中的以下代码。
SBNotificationHub* hub;

- (id)initWithConnectionString:(NSString*)listenConnectionString HubName:(NSString*)hubName{

    hub = [[SBNotificationHub alloc] initWithConnectionString:listenConnectionString
                                notificationHubPath:hubName];

    return self;
}

- (void)storeCategoriesAndSubscribeWithCategories:(NSSet *)categories completion:(void (^)(NSError *))completion {
    NSUserDefaults* defaults = [NSUserDefaults standardUserDefaults];
    [defaults setValue:[categories allObjects] forKey:@"BreakingNewsCategories"];

    [self subscribeWithCategories:categories completion:completion];
}

- (NSSet*)retrieveCategories {
    NSUserDefaults* defaults = [NSUserDefaults standardUserDefaults];

    NSArray* categories = [defaults stringArrayForKey:@"BreakingNewsCategories"];

    if (!categories) return [[NSSet alloc] init];
    return [[NSSet alloc] initWithArray:categories];
}

- (void)subscribeWithCategories:(NSSet *)categories completion:(void (^)(NSError *))completion
{
    NSString* templateBodyAPNS = @"{\"aps\":{\"alert\":\"$(messageParam)\"}}";

    [hub registerTemplateWithDeviceToken:self.deviceToken name:@"simpleAPNSTemplate"
        jsonBodyTemplate:templateBodyAPNS expiryTemplate:@"0" tags:categories completion:completion];
}
此类使用本地存储来存储和检索此设备接收的新闻类别。 此外,它还包含一种使用 模板 为这些类别进行注册的方法。
在
AppDelegate.h文件中,添加一个针对Notifications.h的import语句,并为Notifications类的实例添加一个属性。#import "Notifications.h" @property (nonatomic) Notifications* notifications;在
didFinishLaunchingWithOptions方法中AppDelegate.m,添加代码以在方法开头初始化通知实例。
HUBNAME和HUBLISTENACCESS(在hubinfo.h中) 应该已经将<hub name>和<connection string with listen access>占位符替换为您之前获取的通知中心名称和 DefaultListenSharedAccessSignature 的连接字符串self.notifications = [[Notifications alloc] initWithConnectionString:HUBLISTENACCESS HubName:HUBNAME];注释
由于使用客户端应用分发的凭据通常不安全,因此应仅分发密钥以使用客户端应用进行侦听访问。 接收访问权限使应用能够注册以接收通知,但无法修改现有的注册,也无法发送通知。 完全访问密钥用于安全后端服务,用于发送通知和更改现有注册。
在
didRegisterForRemoteNotificationsWithDeviceToken的AppDelegate.m方法中,将方法中的代码替换为以下代码,以将设备令牌传递给notifications类。 该notifications类负责向类别进行通知注册。 如果用户更改类别选择,请调用subscribeWithCategories方法以响应 订阅 按钮以更新它们。注释
由于 Apple Push Notification Service (APNS) 分配的设备令牌可以随时更改,因此应经常注册通知以避免通知失败。 本示例在应用启动时注册通知。 对于频繁运行的应用(每天多次运行一次),如果自上一次注册以来过去不到一天,则可以跳过注册以保留带宽。
self.notifications.deviceToken = deviceToken;

// Retrieves the categories from local storage and requests a registration for these categories
// each time the app starts and performs a registration.

NSSet* categories = [self.notifications retrieveCategories];
[self.notifications subscribeWithCategories:categories completion:^(NSError* error) {
    if (error != nil) {
        NSLog(@"Error registering for notifications: %@", error);
    }
}];
此时,该方法中
didRegisterForRemoteNotificationsWithDeviceToken不应有其他代码。在完成
AppDelegate.m教程后,以下方法应该已经存在于。 如果没有,请添加它们。- (void)MessageBox:(NSString *)title message:(NSString *)messageText { UIAlertView *alert = [[UIAlertView alloc] initWithTitle:title message:messageText delegate:self cancelButtonTitle:@"OK" otherButtonTitles: nil]; [alert show]; } - (void)application:(UIApplication *)application didReceiveRemoteNotification: (NSDictionary *)userInfo { NSLog(@"%@", userInfo); [self MessageBox:@"Notification" message:[[userInfo objectForKey:@"aps"] valueForKey:@"alert"]]; }此方法通过显示简单的 UIAlert 来处理应用运行时收到的通知。
在
ViewController.m中添加一个import语句,并将以下代码复制到 Xcode 生成的AppDelegate.h方法中。 此代码将更新通知注册,以使用用户在用户界面中选择的新类别标记。#import "Notifications.h" NSMutableArray* categories = [[NSMutableArray alloc] init]; if (self.WorldSwitch.isOn) [categories addObject:@"World"]; if (self.PoliticsSwitch.isOn) [categories addObject:@"Politics"]; if (self.BusinessSwitch.isOn) [categories addObject:@"Business"]; if (self.TechnologySwitch.isOn) [categories addObject:@"Technology"]; if (self.ScienceSwitch.isOn) [categories addObject:@"Science"]; if (self.SportsSwitch.isOn) [categories addObject:@"Sports"]; Notifications* notifications = [(AppDelegate*)[[UIApplication sharedApplication]delegate] notifications]; [notifications storeCategoriesAndSubscribeWithCategories:categories completion: ^(NSError* error) { if (!error) { UIAlertView *alert = [[UIAlertView alloc] initWithTitle:"Notification" message:"Subscribed" delegate:self cancelButtonTitle:@"OK" otherButtonTitles: nil]; [alert show]; } else { NSLog(@"Error subscribing: %@", error); } }];此方法创建一个
NSMutableArray类别,并使用Notifications该类将列表存储在本地存储中,并将相应的标记注册到通知中心。 更改类别后,使用新类别重新创建注册。在
ViewController.m方法中添加viewDidLoad以下代码,以基于以前保存的类别设置用户界面。// This updates the UI on startup based on the status of previously saved categories. Notifications* notifications = [(AppDelegate*)[[UIApplication sharedApplication]delegate] notifications]; NSSet* categories = [notifications retrieveCategories]; if ([categories containsObject:@"World"]) self.WorldSwitch.on = true; if ([categories containsObject:@"Politics"]) self.PoliticsSwitch.on = true; if ([categories containsObject:@"Business"]) self.BusinessSwitch.on = true; if ([categories containsObject:@"Technology"]) self.TechnologySwitch.on = true; if ([categories containsObject:@"Science"]) self.ScienceSwitch.on = true; if ([categories containsObject:@"Sports"]) self.SportsSwitch.on = true;
应用现在可以在设备本地存储中存储一组类别,用于在应用启动时向通知中心注册。 用户可以在运行时更改类别的选择,然后单击 subscribe 方法来更新设备的注册。 接下来,更新应用以直接在应用本身中发送突发新闻通知。
(可选)发送带标记的通知
如果你无权访问 Visual Studio,可以跳到下一部分并从应用本身发送通知。 还可以使用通知中心的调试选项卡从 Azure 门户 发送正确的模板通知。
在本部分中,将从 .NET 控制台应用将突发新闻作为带标记的模板通知发送。
在 Visual Studio 中,创建新的 Visual C# 控制台应用程序:
- 在菜单上,选择“ 文件>新建>项目”。
- 在 “创建新项目”中,选择模板列表中的 C# 控制台应用(.NET Framework), 然后选择“ 下一步”。
- 输入应用程序的名称。
- 对于 解决方案,请选择 “添加到解决方案”,然后选择“ 创建 ”以创建项目。
选择“工具>NuGet 包管理器>控制台”,然后在控制台窗口中运行以下命令:
Install-Package Microsoft.Azure.NotificationHubs此操作通过使用Microsoft.Azure.NotificationHubs包添加对Azure通知中心 SDK 的引用。
打开 Program.cs 文件,并添加以下
using语句:using Microsoft.Azure.NotificationHubs;在
Program类中,添加以下方法,或替换它(如果已存在):private static async void SendTemplateNotificationAsync() { // Define the notification hub. NotificationHubClient hub = NotificationHubClient.CreateClientFromConnectionString("<connection string with full access>", "<hub name>"); // Apple requires the apns-push-type header for all requests var headers = new Dictionary<string, string> {{"apns-push-type", "alert"}}; // Create an array of breaking news categories. var categories = new string[] { "World", "Politics", "Business", "Technology", "Science", "Sports"}; // Send the notification as a template notification. All template registrations that contain // "messageParam" and the proper tags will receive the notifications. // This includes APNS, WNS, and MPNS template registrations. Dictionary<string, string> templateParams = new Dictionary<string, string>(); foreach (var category in categories) { templateParams["messageParam"] = "Breaking " + category + " News!"; await hub.SendTemplateNotificationAsync(templateParams, category); } }此代码为字符串数组中六个标记中的每一个发送模板通知。 使用标记可确保设备仅接收已注册类别的通知。
在前面的代码中,将
<hub name>和<connection string with full access>占位符替换为您的通知中心名称,以及在通知中心的仪表板中找到的DefaultFullSharedAccessSignature连接字符串。在
Main()方法中,添加以下行:SendTemplateNotificationAsync(); Console.ReadLine();生成控制台应用。
(可选)从设备发送通知
通常,通知将由后端服务发送,但可以直接从应用发送突发新闻通知。 为此,请更新您在 SendNotificationRESTAPI 教程中定义的 方法。
在
ViewController.m中,按如下所示更新SendNotificationRESTAPI方法,以便它接受类别标记的参数并发送正确的 模板 通知。- (void)SendNotificationRESTAPI:(NSString*)categoryTag { NSURLSession* session = [NSURLSession sessionWithConfiguration:[NSURLSessionConfiguration defaultSessionConfiguration] delegate:nil delegateQueue:nil]; NSString *json; // Construct the messages REST endpoint NSURL* url = [NSURL URLWithString:[NSString stringWithFormat:@"%@%@/messages/%@", HubEndpoint, HUBNAME, API_VERSION]]; // Generated the token to be used in the authorization header. NSString* authorizationToken = [self generateSasToken:[url absoluteString]]; //Create the request to add the template notification message to the hub NSMutableURLRequest *request = [NSMutableURLRequest requestWithURL:url]; [request setHTTPMethod:@"POST"]; // Add the category as a tag [request setValue:categoryTag forHTTPHeaderField:@"ServiceBusNotification-Tags"]; // Template notification json = [NSString stringWithFormat:@"{\"messageParam\":\"Breaking %@ News : %@\"}", categoryTag, self.notificationMessage.text]; // Signify template notification format [request setValue:@"template" forHTTPHeaderField:@"ServiceBusNotification-Format"]; // JSON Content-Type [request setValue:@"application/json;charset=utf-8" forHTTPHeaderField:@"Content-Type"]; //Authenticate the notification message POST request with the SaS token [request setValue:authorizationToken forHTTPHeaderField:@"Authorization"]; //Add the notification message body [request setHTTPBody:[json dataUsingEncoding:NSUTF8StringEncoding]]; // Send the REST request NSURLSessionDataTask* dataTask = [session dataTaskWithRequest:request completionHandler:^(NSData *data, NSURLResponse *response, NSError *error) { NSHTTPURLResponse* httpResponse = (NSHTTPURLResponse*) response; if (error || httpResponse.statusCode != 200) { NSLog(@"\nError status: %d\nError: %@", httpResponse.statusCode, error); } if (data != NULL) { //xmlParser = [[NSXMLParser alloc] initWithData:data]; //[xmlParser setDelegate:self]; //[xmlParser parse]; } }]; [dataTask resume]; }在
ViewController.m中,按照如代码所示,更新Send Notification操作。 因此,它使用每个标记单独发送通知,并发送到多个平台。- (IBAction)SendNotificationMessage:(id)sender { self.sendResults.text = @""; NSArray* categories = [NSArray arrayWithObjects: @"World", @"Politics", @"Business", @"Technology", @"Science", @"Sports", nil]; // Lets send the message as breaking news for each category to WNS, Baidu and APNS // using a template. for(NSString* category in categories) { [self SendNotificationRESTAPI:category]; } }重新生成项目并确保没有生成错误。
运行应用并生成通知
按“运行”按钮生成项目并启动应用。 选择要订阅的一些突发新闻选项,然后按 “订阅 ”按钮。 应会看到一个对话框,指示已订阅通知。
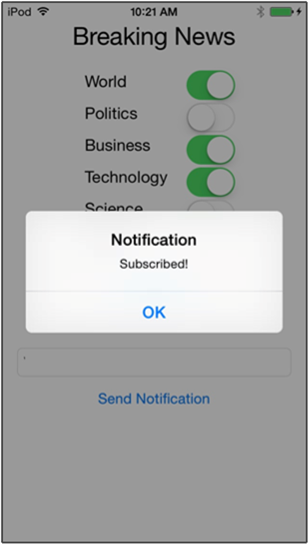
选择 “订阅”时,应用会将所选类别转换为标记,并从通知中心请求所选标记的新设备注册。
输入要作为突发新闻发送的消息,然后按 “发送通知 ”按钮。 或者,运行 .NET 控制台应用以生成通知。
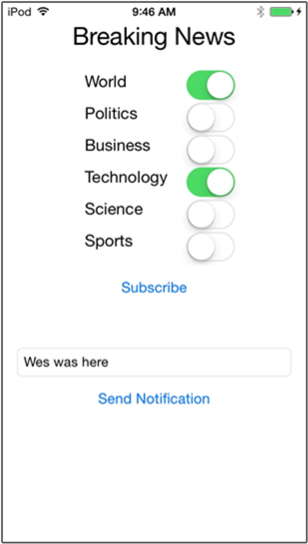
订阅突发新闻的每个设备都会收到刚刚发送的突发新闻通知。
后续步骤
在本教程中,你已向已注册类别的特定 iOS 设备发送广播通知。 若要了解如何推送本地化通知,请转到以下教程: