- 百度
- iOS
- Windows Phone Silverlight 8.x
- 通用 Windows 平台
百度云推送是一种中国云服务,可用于将推送通知发送到移动设备。
由于 Google Play 和 FCM (Firebase Cloud Messaging) 在中国不可用,必须使用其他的应用商店和推送服务。 百度就是其中的一个,也是通知中心目前所使用的。
先决条件
本教程需要:
- Android SDK(我们假设你使用 Android Studio),可从 Android 站点下载
- 百度推送 Android SDK
注意
要完成本教程,必须有一个有效的 Azure 帐户。 如果没有帐户,可以创建一个试用帐户,只需几分钟即可完成。 有关详细信息,请参阅 Azure 试用版订阅。
若要开始,请执行以下操作:
- 创建一个百度帐户。
- 创建一个百度云推送项目,并记下 API 密钥和秘密密钥。
配置新通知中心
登录 Azure 门户。
在左侧菜单上选择所有服务,然后在 Web + 移动部分选择通知中心。 选择服务名称旁边的星形图标,以便将服务添加到左侧菜单上的收藏夹部分。 在将通知中心添加到收藏夹之后,在左侧菜单上选择它。

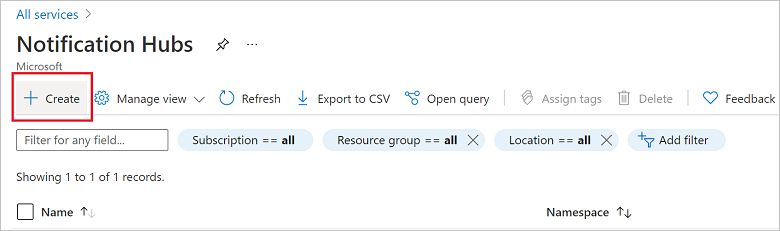
在通知中心页面上,在工具栏上选择创建。
在通知中心页面上的基本信息选项卡中,执行以下步骤:
在订阅中,选择要使用的 Azure 订阅的名称,然后选择现有资源组或创建新资源组。
在命名空间详细信息中为新命名空间输入唯一名称。
命名空间包含一个或多个通知中心,因此请在通知中心详细信息中键入中心的名称。
从位置下拉列表框中选择值。 此值指定要在其中创建中心的位置。
选择创建。
部署完成后,选择“转到资源”。
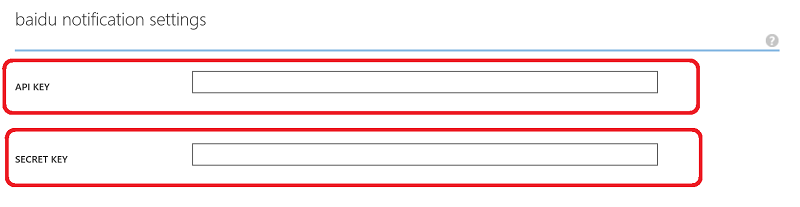
6. 在通知中心选择通知服务,然后选择百度(Android China)。
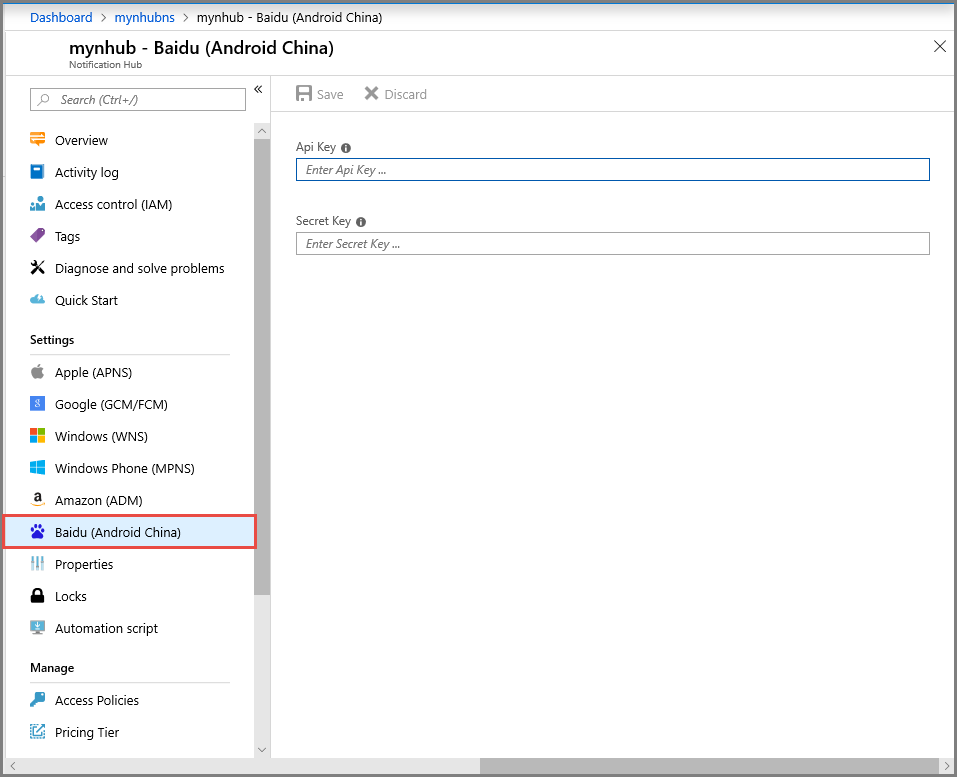
7. 向下滚动到百度通知设置部分。 在百度云推送项目中,输入从百度控制台获得的 API 密钥和私密密钥。 然后单击“保存”。
通知中心现在已配置为使用百度。 此外还有连接字符串,用于注册发送和接收推送通知的应用。
记下“访问连接信息”窗口中的 DefaultListenSharedAccessSignature 和 DefaultFullSharedAccessSignature。
将应用连接到通知中心
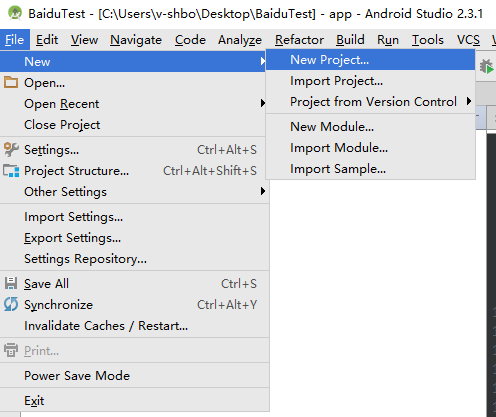
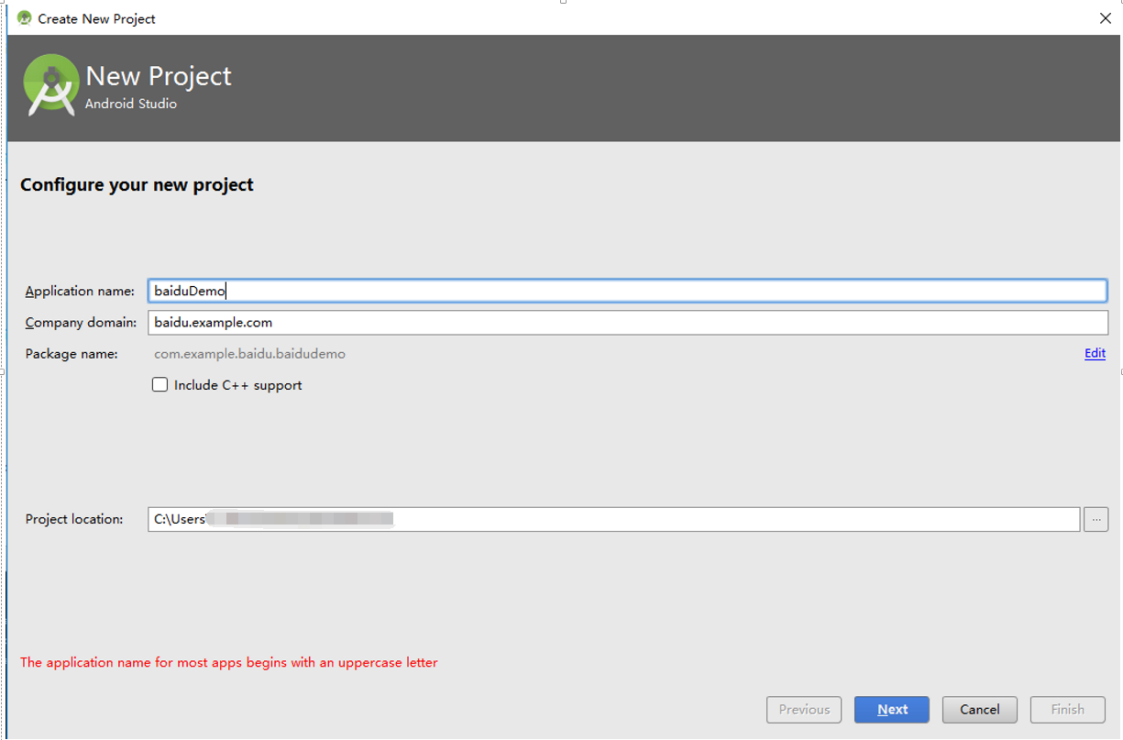
在 Android Studio 中创建新的 Android 项目(“文件”>“新建”>“新建项目”)。
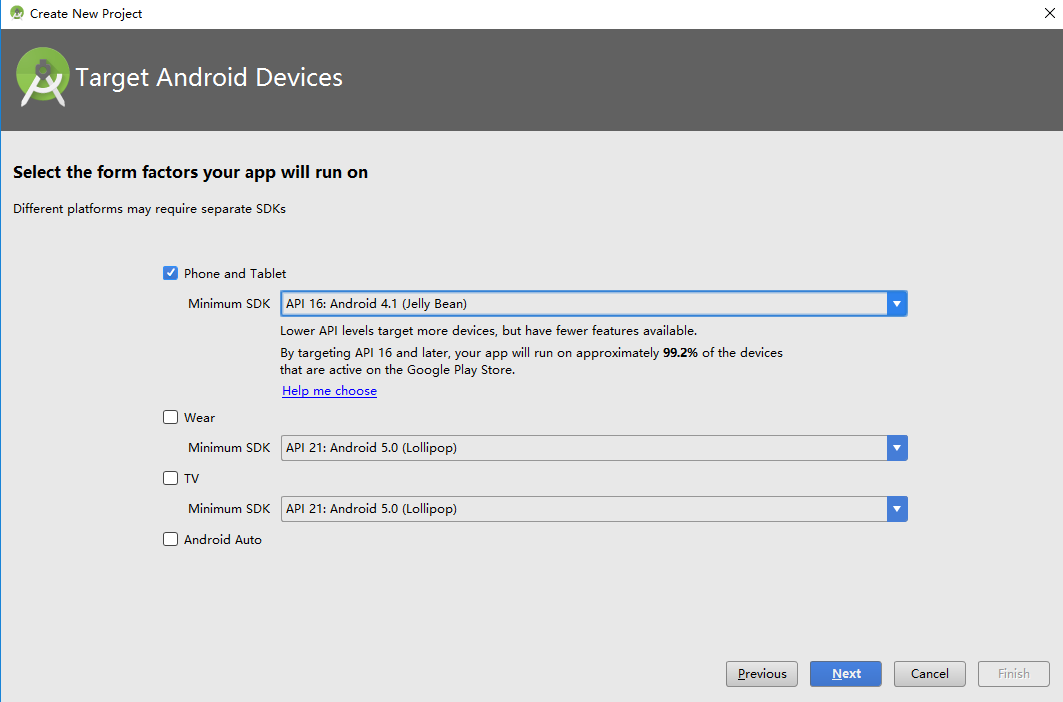
输入应用程序名称,并确保将要求的最低 SDK 版本设为“API 16:Android 4.1”。 另请确保应用包名与百度云推送门户中的相同
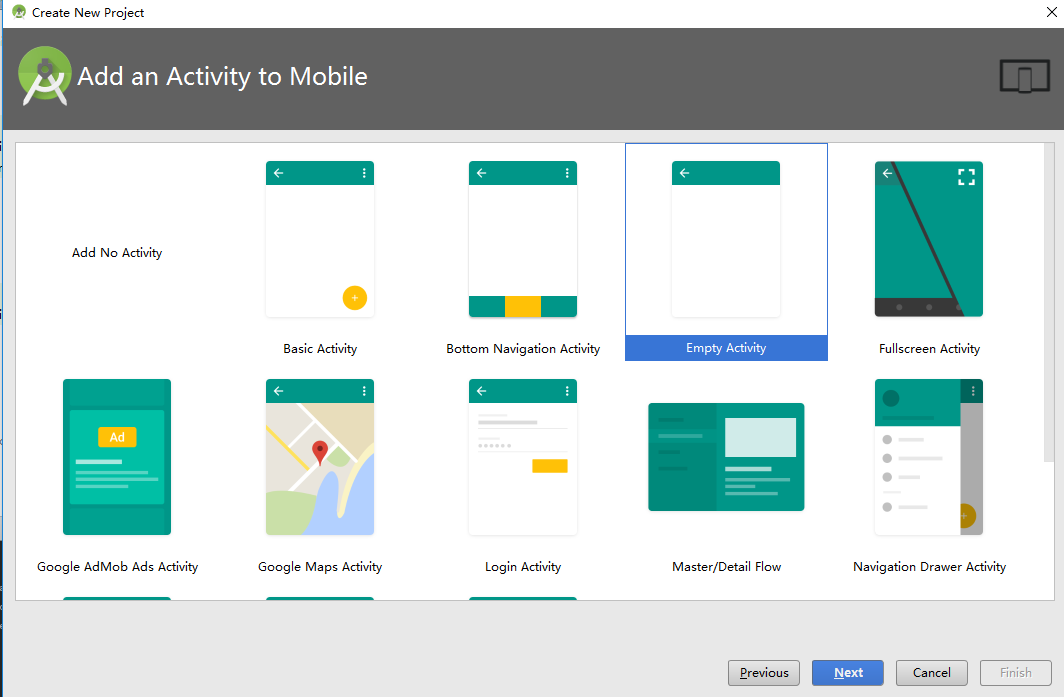
单击“下一步”,并继续执行向导,直到显示“创建活动”窗口。 确保选中了“空活动”,最后选择“完成”以创建新的 Android 应用程序。
确保“项目生成目标”已正确设置。
然后添加 Azure 通知中心库。 在应用的
Build.Gradle文件中,在 dependencies 节添加以下行。implementation 'com.microsoft.azure:notification-hubs-android-sdk:0.6@aar' implementation 'com.microsoft.azure:azure-notifications-handler:1.0.1@aar'在 dependencies 节的后面添加以下存储库。
repositories {
    maven {
        url "https://dl.bintray.com/microsoftazuremobile/SDK"
    }
}
为了避免列表冲突,请在项目的
Manifest.xml文件中添加以下代码:<manifest package="YOUR.PACKAGE.NAME" xmlns:tools="http://schemas.android.com/tools" xmlns:android="http://schemas.android.com/apk/res/android">然后在
<application/>标记中执行以下操作:<application tools:replace="android:allowBackup,icon,theme,label">下载并解压缩百度推送 Android SDK。 复制 libs 文件夹中的
pushservice-x.y.z jar文件。 然后复制 Android 应用程序的.so(创建新文件夹)文件夹中的src/main/jniLibs文件。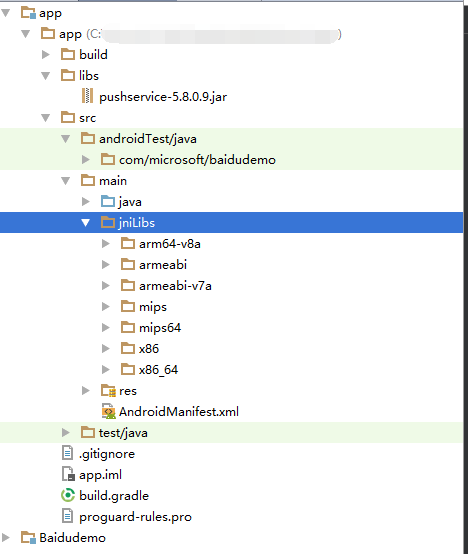
在项目的
libs文件夹中,右键单击pushervice-x.y.z.jar文件,选择作为库添加,以便将此库包括在项目中。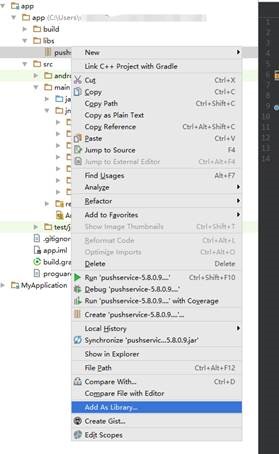
打开 Android 项目的
AndroidManifest.xml文件,添加百度 SDK 所需的权限。 将YOURPACKAGENAME替换为包名。<uses-permission android:name="android.permission.INTERNET" /> <uses-permission android:name="android.permission.READ_PHONE_STATE" /> <uses-permission android:name="android.permission.ACCESS_NETWORK_STATE" /> <uses-permission android:name="android.permission.RECEIVE_BOOT_COMPLETED" /> <uses-permission android:name="android.permission.WRITE_SETTINGS" /> <uses-permission android:name="android.permission.VIBRATE" /> <uses-permission android:name="android.permission.WRITE_EXTERNAL_STORAGE" /> <uses-permission android:name="android.permission.DISABLE_KEYGUARD" /> <uses-permission android:name="android.permission.ACCESS_COARSE_LOCATION" /> <uses-permission android:name="android.permission.ACCESS_WIFI_STATE" /> <uses-permission android:name="android.permission.ACCESS_DOWNLOAD_MANAGER" /> <uses-permission android:name="android.permission.DOWNLOAD_WITHOUT_NOTIFICATION" /> <uses-permission android:name="android.permission.EXPAND_STATUS_BAR" /> !! <uses-permission android:name="baidu.push.permission.WRITE_PUSHINFOPROVIDER.YOURPACKAGENAME" /> !!<permission android:name="baidu.push.permission.WRITE_PUSHINFOPROVIDER.YOURPACKAGENAME" android:protectionLevel="normal" />在
.MainActivity活动元素后的 application 元素内添加以下配置,并替换 yourprojectname(例如com.example.BaiduTest):<activity android:name="com.baidu.android.pushservice.richmedia.MediaViewActivity" android:configChanges="orientation|keyboardHidden" android:label="MediaViewActivity" /> <activity android:name="com.baidu.android.pushservice.richmedia.MediaListActivity" android:configChanges="orientation|keyboardHidden" android:label="MediaListActivity" android:launchMode="singleTask" /> <!-- Push application definition message --> <receiver android:name=".MyPushMessageReceiver"> <intent-filter> <!-- receive push message--> <action android:name="com.baidu.android.pushservice.action.MESSAGE" /> <!-- receive bind,unbind,fetch,delete.. message--> <action android:name="com.baidu.android.pushservice.action.RECEIVE" /> <action android:name="com.baidu.android.pushservice.action.notification.CLICK" /> </intent-filter> </receiver> <receiver android:name="com.baidu.android.pushservice.PushServiceReceiver" android:process=":bdservice_v1"> <intent-filter> <action android:name="android.intent.action.BOOT_COMPLETED" /> <action android:name="android.net.conn.CONNECTIVITY_CHANGE" /> <action android:name="com.baidu.android.pushservice.action.notification.SHOW" /> <action android:name="com.baidu.android.pushservice.action.media.CLICK" /> <action android:name="android.intent.action.MEDIA_MOUNTED" /> <action android:name="android.intent.action.USER_PRESENT" /> <action android:name="android.intent.action.ACTION_POWER_CONNECTED" /> <action android:name="android.intent.action.ACTION_POWER_DISCONNECTED" /> </intent-filter> </receiver> <receiver android:name="com.baidu.android.pushservice.RegistrationReceiver" android:process=":bdservice_v1"> <intent-filter> <action android:name="com.baidu.android.pushservice.action.METHOD" /> <action android:name="com.baidu.android.pushservice.action.BIND_SYNC" /> </intent-filter> <intent-filter> <action android:name="android.intent.action.PACKAGE_REMOVED" /> <data android:scheme="package" /> </intent-filter> </receiver> <service android:name="com.baidu.android.pushservice.PushService" android:exported="true" android:process=":bdservice_v1"> <intent-filter> <action android:name="com.baidu.android.pushservice.action.PUSH_SERVICE" /> </intent-filter> </service> <service android:name="com.baidu.android.pushservice.CommandService" android:exported="true" /> <!-- Adapt the ContentProvider declaration required for the Android N system, and the write permissions include the application package name--> <provider android:name="com.baidu.android.pushservice.PushInfoProvider" android:authorities="com.baidu.push.example.bdpush" android:exported="true" android:protectionLevel="signature" android:writePermission="baidu.push.permission.WRITE_PUSHINFOPROVIDER. yourprojectname " /> <!-- API Key of the Baidu application --> <meta-data android:name="api_key" !! android:value="api_key" /> </application>将名为
ConfigurationSettings.java的新类添加到项目。public class ConfigurationSettings { public static String API_KEY = "..."; public static String NotificationHubName = "..."; public static String NotificationHubConnectionString = "..."; }使用百度云项目中的 API_KEY 设置
API_KEY字符串的值。在
NotificationHubName中使用来自Azure 门户的通知中心名称设置字符串的值,然后使用来自Azure 门户的DefaultListenSharedAccessSignature设置NotificationHubConnectionString的值。打开 MainActivity.java,并将以下内容添加到 onCreate 方法中:
PushManager.startWork(this, PushConstants.LOGIN_TYPE_API_KEY, API_KEY );添加一个名为
MyPushMessageReceiver.java的新类,并向此类中添加以下代码: 此类用于处理从百度推送服务器收到的推送通知。package your.package.name; import android.content.Context; import android.content.Intent; import android.os.AsyncTask; import android.text.TextUtils; import android.util.Log; import com.baidu.android.pushservice.PushMessageReceiver; import com.microsoft.windowsazure.messaging.NotificationHub; import org.json.JSONException; import org.json.JSONObject; import java.util.List; public class MyPushMessageReceiver extends PushMessageReceiver { public static final String TAG = MyPushMessageReceiver.class .getSimpleName(); public static NotificationHub hub = null; public static String mChannelId, mUserId; @Override public void onBind(Context context, int errorCode, String appid, String userId, String channelId, String requestId) { String responseString = "onBind errorCode=" + errorCode + " appid=" + appid + " userId=" + userId + " channelId=" + channelId + " requestId=" + requestId; Log.d(TAG, responseString); if (errorCode == 0) { // Binding successful Log.d(TAG, " Binding successful"); } try { if (hub == null) { hub = new NotificationHub( ConfigurationSettings.NotificationHubName, ConfigurationSettings.NotificationHubConnectionString, context); Log.i(TAG, "Notification hub initialized"); } } catch (Exception e) { Log.e(TAG, e.getMessage()); } mChannelId = channelId; mUserId = userId; registerWithNotificationHubs(); } private void registerWithNotificationHubs() { new AsyncTask<Void, Void, Void>() { @Override protected Void doInBackground(Void... params) { try { hub.registerBaidu(mUserId, mChannelId); Log.i(TAG, "Registered with Notification Hub - '" + ConfigurationSettings.NotificationHubName + "'" + " with UserId - '" + mUserId + "' and Channel Id - '" + mChannelId + "'"); } catch (Exception e) { Log.e(TAG, e.getMessage()); } return null; } }.execute(null, null, null); } @Override public void onMessage(Context context, String message, String customContentString) { String messageString = " onMessage=\"" + message + "\" customContentString=" + customContentString; Log.d(TAG, messageString); if (!TextUtils.isEmpty(customContentString)) { JSONObject customJson = null; try { customJson = new JSONObject(customContentString); String myvalue = null; if (!customJson.isNull("mykey")) { myvalue = customJson.getString("mykey"); } } catch (JSONException e) { e.printStackTrace(); } } } @Override public void onNotificationArrived(Context context, String title, String description, String customContentString) { String notifyString = " Notice Arrives onNotificationArrived title=\"" + title + "\" description=\"" + description + "\" customContent=" + customContentString; Log.d(TAG, notifyString); if (!TextUtils.isEmpty(customContentString)) { JSONObject customJson = null; try { customJson = new JSONObject(customContentString); String myvalue = null; if (!customJson.isNull("mykey")) { myvalue = customJson.getString("mykey"); } } catch (JSONException e) { // TODO Auto-generated catch block e.printStackTrace(); } } } @Override public void onNotificationClicked(Context context, String title, String description, String customContentString) { String notifyString = " onNotificationClicked title=\"" + title + "\" description=\"" + description + "\" customContent=" + customContentString; Log.d(TAG, notifyString); Intent intent = new Intent(context.getApplicationContext(),MainActivity.class); intent.putExtra("title",title); intent.putExtra("description",description); intent.putExtra("isFromNotify",true); intent.addFlags(Intent.FLAG_ACTIVITY_NEW_TASK); context.getApplicationContext().startActivity(intent); } @Override public void onSetTags(Context context, int errorCode, List<String> successTags, List<String> failTags, String requestId) { String responseString = "onSetTags errorCode=" + errorCode + " successTags=" + successTags + " failTags=" + failTags + " requestId=" + requestId; Log.d(TAG, responseString); } @Override public void onDelTags(Context context, int errorCode, List<String> successTags, List<String> failTags, String requestId) { String responseString = "onDelTags errorCode=" + errorCode + " successTags=" + successTags + " failTags=" + failTags + " requestId=" + requestId; Log.d(TAG, responseString); } @Override public void onListTags(Context context, int errorCode, List<String> tags, String requestId) { String responseString = "onListTags errorCode=" + errorCode + " tags=" + tags; Log.d(TAG, responseString); } @Override public void onUnbind(Context context, int errorCode, String requestId) { String responseString = "onUnbind errorCode=" + errorCode + " requestId = " + requestId; Log.d(TAG, responseString); if (errorCode == 0) { // Unbinding is successful Log.d(TAG, " Unbinding is successful "); } } }
向应用程序发送通知
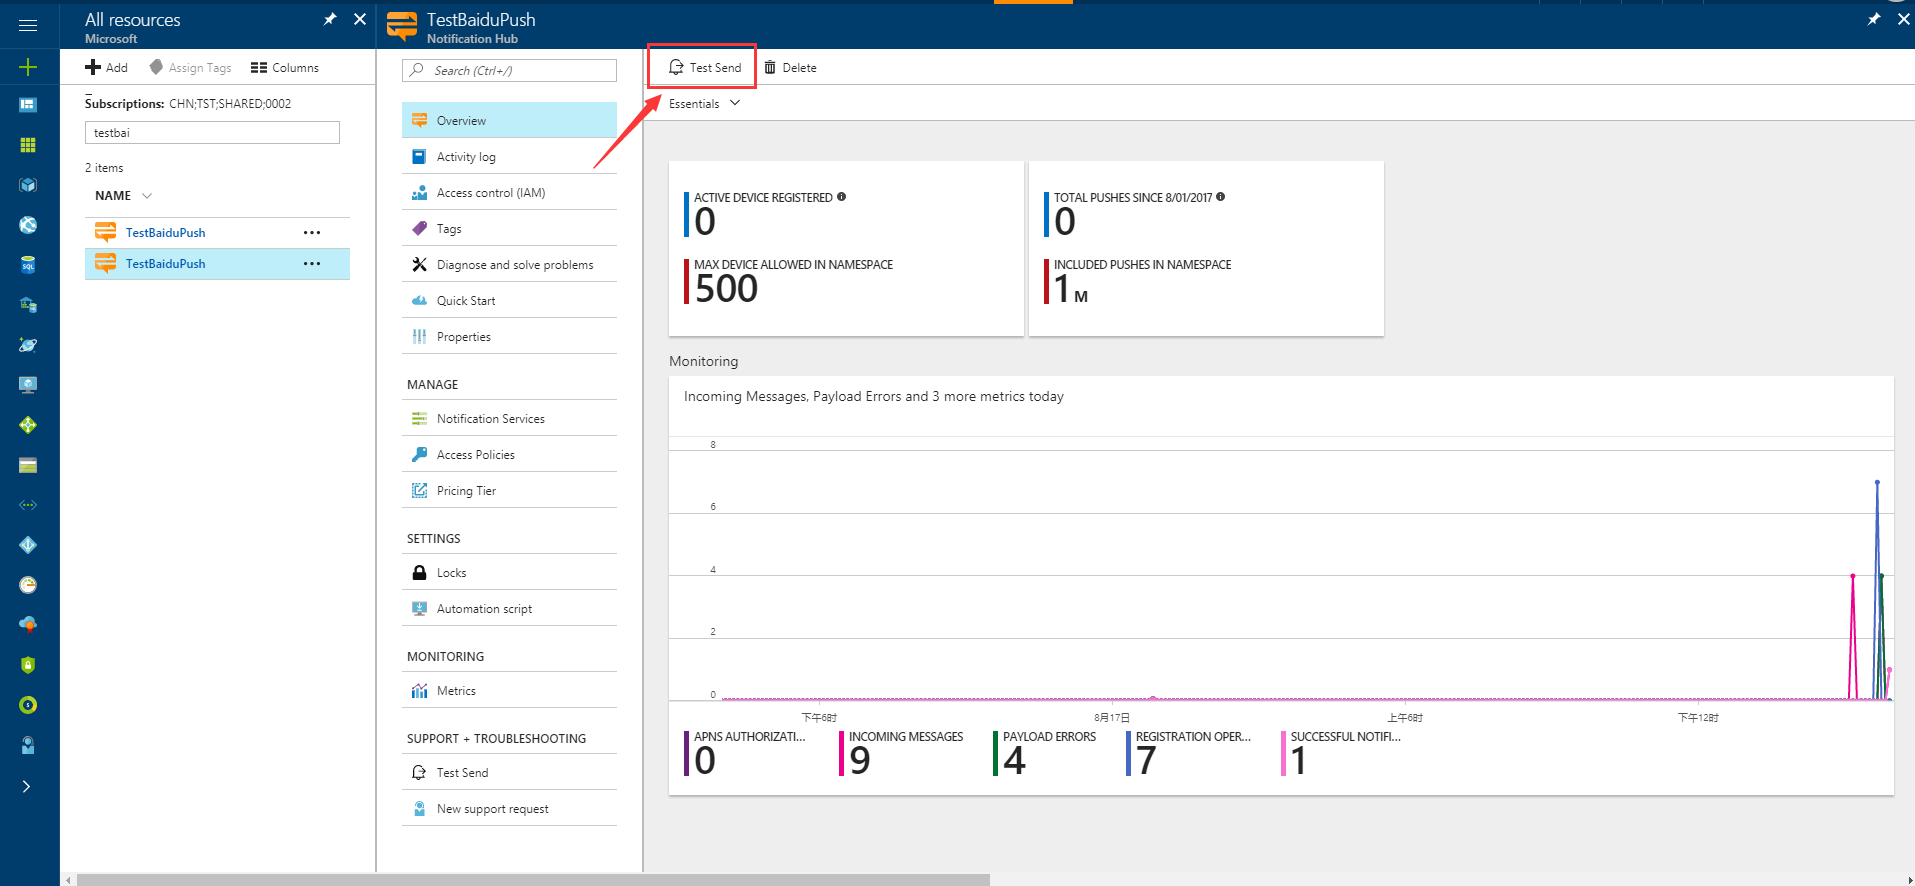
使用通知中心配置屏幕中的发送按钮,可以在 Azure 门户中快速测试通知接收情况,如以下屏幕所示:
通常,推送通知是在后端服务(例如,移动服务,或者使用兼容库的 ASP.NET)中发送的。 如果后端没有可用的库,则可直接使用 REST API 发送通知消息。
为简单起见,本教程使用一个控制台应用演示如何通过 .NET SDK 来发送通知。 但是,建议你接下来学习使用通知中心向用户推送通知教程,了解如何从 ASP.NET 后端发送通知。
下面是用于发送通知的不同方法:
- REST 接口:可以使用 REST 接口在任何后端平台上支持通知。
- Azure 通知中心 .NET SDK:在 Visual Studio 的 NuGet 包管理器中,运行 Install-Package Microsoft.Azure.NotificationHubs。
- Node.js:如何通过 Node.js 使用通知中心。
- 移动应用:有关如何从通知中心集成的 Azure 应用服务移动应用后端发送通知的示例,请参阅将推送通知添加到移动应用。
- Java/PHP:有关如何使用 REST API 发送通知的示例,请参阅“如何通过 Java/PHP 使用通知中心”(Java | PHP)。
(可选)通过 .NET 控制台应用发送通知。
在本部分,我们演示如何使用 .NET 控制台应用发送通知。
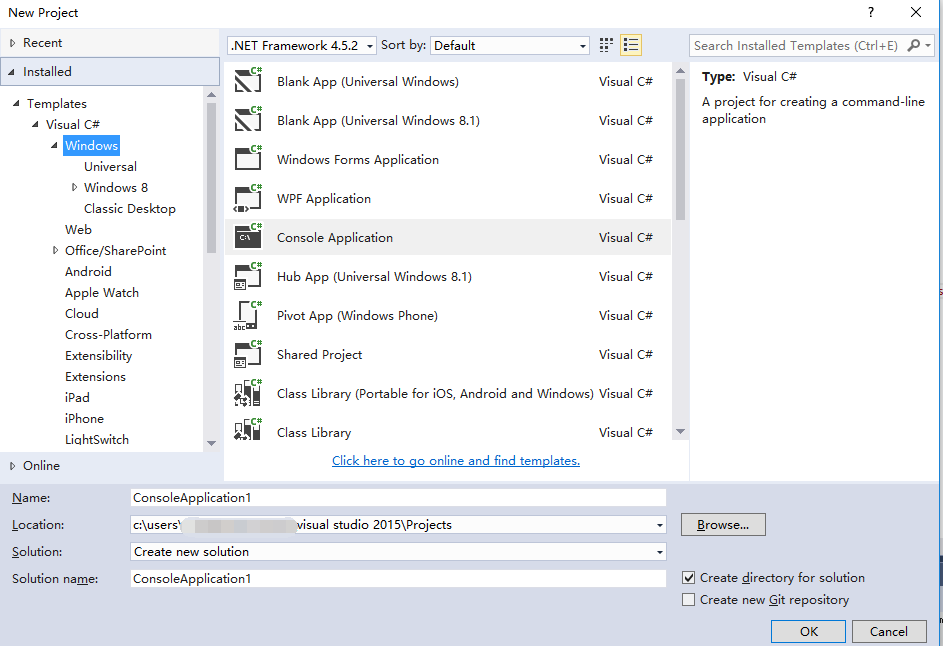
创建新的 Visual C# 控制台应用程序:
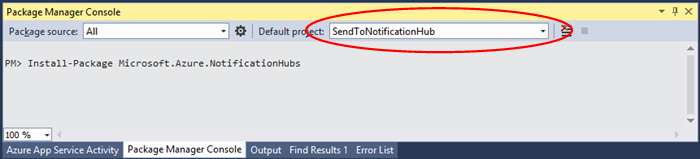
在“包管理器控制台”窗口中,将默认项目设置为新的控制台应用程序项目,并在控制台窗口中执行以下命令:
Install-Package Microsoft.Azure.NotificationHubs此指令会使用 Microsoft.Azure.Notification Hubs NuGet 包添加对 Azure 通知中心 SDK 的引用。
打开
Program.cs文件并添加以下 using 语句:using Microsoft.Azure.NotificationHubs;在
Program类中添加以下方法,并使用自己的值替换DefaultFullSharedAccessSignatureSASConnectionString和NotificationHubName。private static async void SendNotificationAsync() { NotificationHubClient hub = NotificationHubClient.CreateClientFromConnectionString("DefaultFullSharedAccessSignatureSASConnectionString", "NotificationHubName"); string message = "{\"title\":\"((Notification title))\",\"description\":\"Hello from Azure\"}"; var result = await hub.SendBaiduNativeNotificationAsync(message); }在
Main方法中添加以下行:SendNotificationAsync(); Console.ReadLine();
测试应用程序
要使用实际的手机测试此应用,只需使用 USB 电缆将该手机连接到你的计算机。 此操作会将应用加载到连接的手机中。
若要使用模拟器测试此应用,请在 Android Studio 顶部工具栏中单击运行,然后选择用于启动模拟器、加载和运行应用的应用。
该应用将从百度推送通知服务检索 userId 和 channelId,并注册到通知中心。
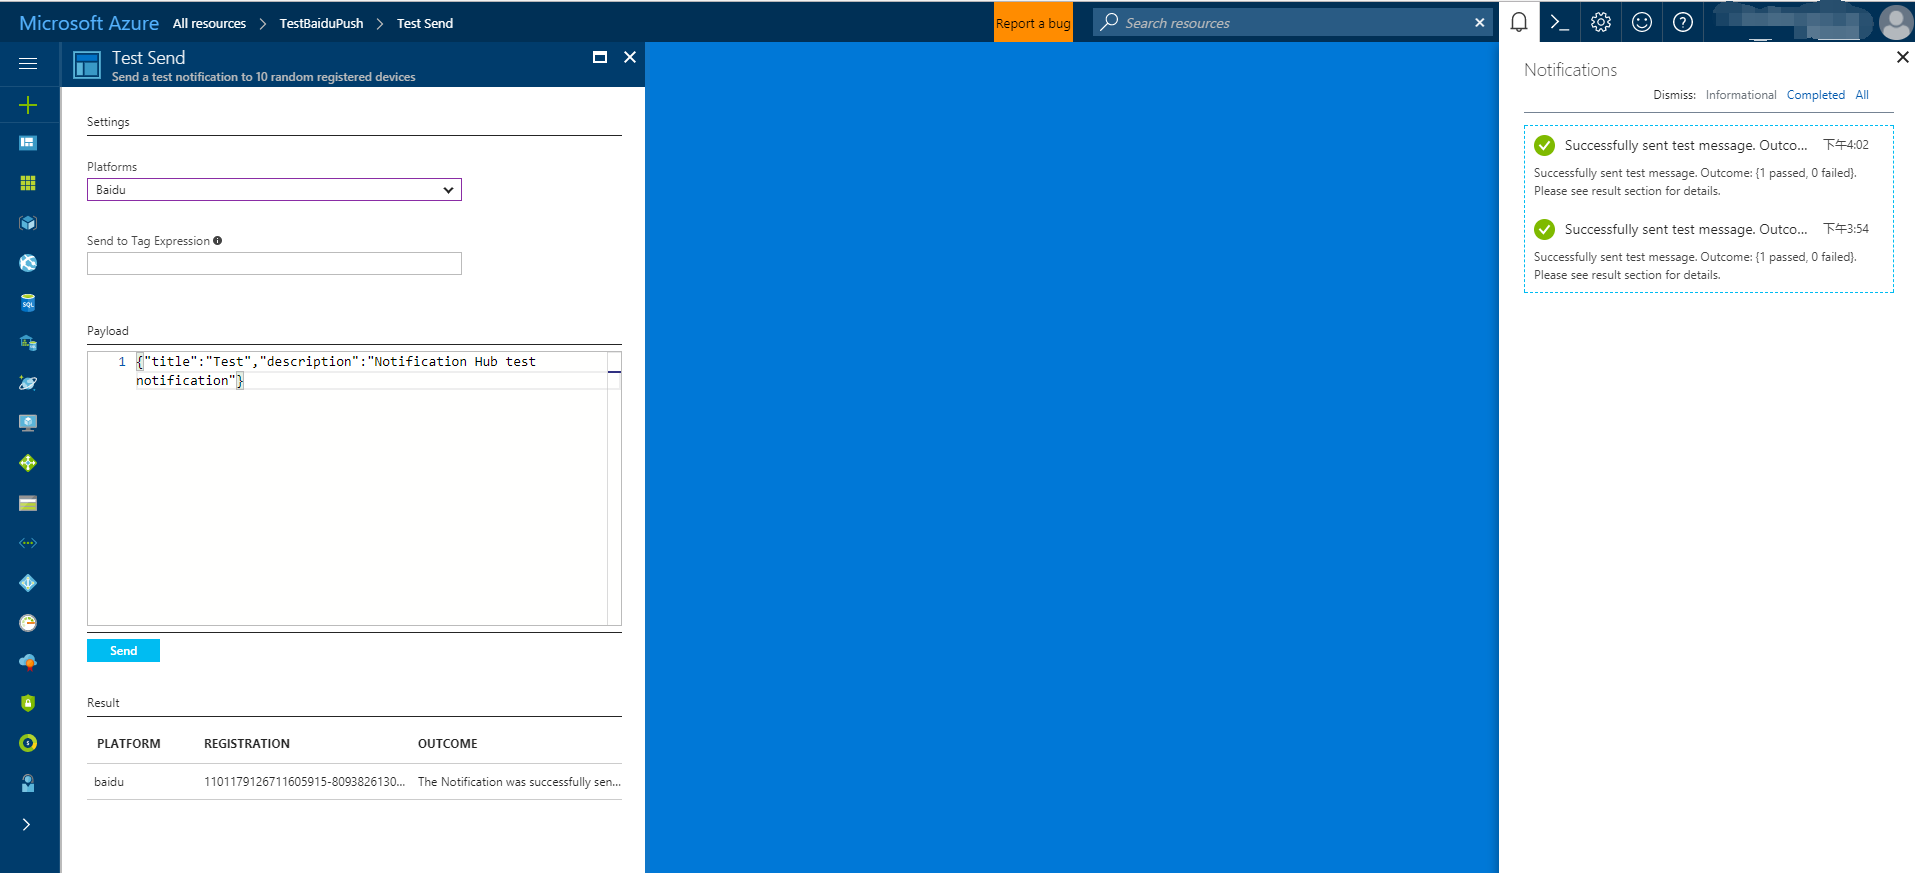
若要发送测试通知,可以使用 Azure 门户的调试选项卡。 如果为 Visual Studio 生成了 .NET 控制台应用程序,只需在 Visual Studio 中按 F5 键以运行该应用程序。 该应用程序会发送一条通知,该通知显示在设备或模拟器的顶部通知区域。