如 MSDN 文章通知中心 REST API 中所述,可以使用通知中心 REST 接口从 Java/PHP/Python/Ruby 后端访问所有通知中心功能。
注意
这是在 Python 中实现通知发送的示例引用实现,不是官方支持的通知中心 Python SDK。 该示例是使用 Python 3.4 创建的。
本文介绍如何:
- 以 Python 构建 REST 客户端以获取通知中心功能。
- 使用 Python 接口发送通知到通知中心 REST API。
- 获取 HTTP REST 请求/响应的转储以进行调试/培训。
可以按照所选定的移动平台的入门教程,以 Python 实现后端部分。
注意
该示例仅限于发送通知,并不执行任何注册管理操作。
客户端接口
主要的客户端接口可提供 .NET 通知中心 SDK 中可用的相同方法。 此接口允许直接翻译该网站目前提供的所有教程和示例,这些内容均由社区通过 Internet 提供。
可以在 Python REST 包装器示例中找到提供的所有代码。
例如,创建客户端:
isDebug = True
hub = NotificationHub("myConnectionString", "myNotificationHubName", isDebug)
发送 Windows toast 通知:
wns_payload = """<toast><visual><binding template=\"ToastText01\"><text id=\"1\">Hello world!</text></binding></visual></toast>"""
hub.send_windows_notification(wns_payload)
实现
如果尚未实现,按照入门教程学至最后一节,必须在此过程中实现后端。
有关实现完整 REST 包装器的所有详细信息,请访问 MSDN。 本节介绍访问通知中心 REST 终结点和发送通知所需的主要步骤的 Python 实现
- 解析连接字符串
- 生成授权令牌
- 使用 HTTP REST API 发送通知
解析连接字符串
下面是实现客户端的主类,其构造函数将解析连接字符串:
class NotificationHub:
    API_VERSION = "?api-version=2013-10"
    DEBUG_SEND = "&test"

    def __init__(self, connection_string=None, hub_name=None, debug=0):
        self.HubName = hub_name
        self.Debug = debug

        # Parse connection string
        parts = connection_string.split(';')
        if len(parts) != 3:
            raise Exception("Invalid ConnectionString.")

        for part in parts:
            if part.startswith('Endpoint'):
                self.Endpoint = 'https' + part[11:].lower()
            if part.startswith('SharedAccessKeyName'):
                self.SasKeyName = part[20:]
            if part.startswith('SharedAccessKey'):
                self.SasKeyValue = part[16:]
创建安全令牌
有关创建安全令牌的详细信息,请访问此处。
将以下方法添加到 NotificationHub 类,以便根据当前请求的 URI 和提取自连接字符串的凭据创建令牌。
@staticmethod
def get_expiry():
    # By default returns an expiration of 5 minutes (=300 seconds) from now
    return int(round(time.time() + 300))

@staticmethod
def encode_base64(data):
    return base64.b64encode(data)

def sign_string(self, to_sign):
    key = self.SasKeyValue.encode('utf-8')
    to_sign = to_sign.encode('utf-8')
    signed_hmac_sha256 = hmac.HMAC(key, to_sign, hashlib.sha256)
    digest = signed_hmac_sha256.digest()
    encoded_digest = self.encode_base64(digest)
    return encoded_digest

def generate_sas_token(self):
    target_uri = self.Endpoint + self.HubName
    my_uri = urllib.parse.quote(target_uri, '').lower()
    expiry = str(self.get_expiry())
    to_sign = my_uri + '\n' + expiry
    signature = urllib.parse.quote(self.sign_string(to_sign))
    auth_format = 'SharedAccessSignature sig={0}&se={1}&skn={2}&sr={3}'
    sas_token = auth_format.format(signature, expiry, self.SasKeyName, my_uri)
    return sas_token
使用 HTTP REST API 发送通知
注意
Azure 推送通知服务 (MPNS) 已弃用,不再受支持。
首先,定义表示通知的类。
class Notification:
    def __init__(self, notification_format=None, payload=None, debug=0):
        valid_formats = ['template', 'apple', 'gcm',
                         'windows', 'windowsphone', "adm", "baidu"]
        if not any(x in notification_format for x in valid_formats):
            raise Exception(
                "Invalid Notification format. " +
                "Must be one of the following - 'template', 'apple', 'gcm', 'windows', 'windowsphone', 'adm', 'baidu'")

        self.format = notification_format
        self.payload = payload

        # array with keynames for headers
        # Note: Some headers are mandatory: Windows: X-WNS-Type, WindowsPhone: X-NotificationType
        # Note: For Apple you can set Expiry with header: ServiceBusNotification-ApnsExpiry
        # in W3C DTF, YYYY-MM-DDThh:mmTZD (for example, 1997-07-16T19:20+01:00).
        self.headers = None
此类是一个容器,其中包含本机通知正文或一组模板通知的属性,以及一组包含格式(本机平台或模板)和平台特定属性(如 Apple 过期属性和 WNS 标头)的标头。
请参阅通知中心 REST API 文档和具体的通知平台格式,了解所有可用选项。
现在有了此类后,便可在 NotificationHub 类中编写发送通知方法了。
def make_http_request(self, url, payload, headers):
    parsed_url = urllib.parse.urlparse(url)
    connection = http.client.HTTPSConnection(
        parsed_url.hostname, parsed_url.port)

    if self.Debug > 0:
        connection.set_debuglevel(self.Debug)
        # adding this querystring parameter gets detailed information about the PNS send notification outcome
        url += self.DEBUG_SEND
        print("--- REQUEST ---")
        print("URI: " + url)
        print("Headers: " + json.dumps(headers, sort_keys=True,
                                       indent=4, separators=(' ', ': ')))
        print("--- END REQUEST ---\n")

    connection.request('POST', url, payload, headers)
    response = connection.getresponse()

    if self.Debug > 0:
        # print out detailed response information for debugging purpose
        print("\n\n--- RESPONSE ---")
        print(str(response.status) + " " + response.reason)
        print(response.msg)
        print(response.read())
        print("--- END RESPONSE ---")

    elif response.status != 201:
        # Successful outcome of send message is HTTP 201 - Created
        raise Exception(
            "Error sending notification. Received HTTP code " + str(response.status) + " " + response.reason)

    connection.close()

def send_notification(self, notification, tag_or_tag_expression=None):
    url = self.Endpoint + self.HubName + '/messages' + self.API_VERSION

    json_platforms = ['template', 'apple', 'gcm', 'adm', 'baidu']

    if any(x in notification.format for x in json_platforms):
        content_type = "application/json"
        payload_to_send = json.dumps(notification.payload)
    else:
        content_type = "application/xml"
        payload_to_send = notification.payload

    headers = {
        'Content-type': content_type,
        'Authorization': self.generate_sas_token(),
        'ServiceBusNotification-Format': notification.format
    }

    if isinstance(tag_or_tag_expression, set):
        tag_list = ' || '.join(tag_or_tag_expression)
    else:
        tag_list = tag_or_tag_expression

    # add the tags/tag expressions to the headers collection
    if tag_list != "":
        headers.update({'ServiceBusNotification-Tags': tag_list})

    # add any custom headers to the headers collection that the user may have added
    if notification.headers is not None:
        headers.update(notification.headers)

    self.make_http_request(url, payload_to_send, headers)

def send_apple_notification(self, payload, tags=""):
    nh = Notification("apple", payload)
    self.send_notification(nh, tags)

def send_google_notification(self, payload, tags=""):
    nh = Notification("gcm", payload)
    self.send_notification(nh, tags)

def send_adm_notification(self, payload, tags=""):
    nh = Notification("adm", payload)
    self.send_notification(nh, tags)

def send_baidu_notification(self, payload, tags=""):
    nh = Notification("baidu", payload)
    self.send_notification(nh, tags)

def send_mpns_notification(self, payload, tags=""):
    nh = Notification("windowsphone", payload)

    if "<wp:Toast>" in payload:
        nh.headers = {'X-WindowsPhone-Target': 'toast',
                      'X-NotificationClass': '2'}
    elif "<wp:Tile>" in payload:
        nh.headers = {'X-WindowsPhone-Target': 'tile',
                      'X-NotificationClass': '1'}

    self.send_notification(nh, tags)

def send_windows_notification(self, payload, tags=""):
    nh = Notification("windows", payload)

    if "<toast>" in payload:
        nh.headers = {'X-WNS-Type': 'wns/toast'}
    elif "<tile>" in payload:
        nh.headers = {'X-WNS-Type': 'wns/tile'}
    elif "<badge>" in payload:
        nh.headers = {'X-WNS-Type': 'wns/badge'}

    self.send_notification(nh, tags)

def send_template_notification(self, properties, tags=""):
    nh = Notification("template", properties)
    self.send_notification(nh, tags)
这些方法将 HTTP POST 请求发送到通知中心的 /messages 终结点,该请求具有发送通知的正确正文和标头。
使用调试属性启用详细的日志记录
在初始化通知中心时启用调试属性会写出关于 HTTP 请求和响应转储的详细日志记录信息,以及详细的通知消息发送结果。 通知中心 TestSend 属性会返回有关通知发送结果的详细信息。 若要使用它 - 请使用以下代码进行初始化:
hub = NotificationHub("myConnectionString", "myNotificationHubName", isDebug)
通知中心发送请求 HTTP URL 会追加一个“test”查询字符串作为结果。
完成教程
现在,可以通过从 Python 后端发送通知来完成该入门教程。
初始化通知中心客户端(按入门教程中所述替换连接字符串和中心名称):
hub = NotificationHub("myConnectionString", "myNotificationHubName")
然后,根据目标移动平台添加发送代码。 此示例还添加了更高级别的方法以支持基于平台发送通知,例如 send_windows_notification for windows; send_apple_notification (for apple) 等。
Windows 应用商店和 Windows Phone 8.1(非 Silverlight)
wns_payload = """<toast><visual><binding template=\"ToastText01\"><text id=\"1\">Test</text></binding></visual></toast>"""
hub.send_windows_notification(wns_payload)
Windows Phone 8.0 和 8.1 Silverlight
hub.send_mpns_notification(toast)
iOS
alert_payload = {
    'data':
        {
            'msg': 'Hello!'
        }
}
hub.send_apple_notification(alert_payload)
Android
gcm_payload = {
    'data':
        {
            'msg': 'Hello!'
        }
}
hub.send_google_notification(gcm_payload)
Kindle Fire
adm_payload = {
    'data':
        {
            'msg': 'Hello!'
        }
}
hub.send_adm_notification(adm_payload)
百度
baidu_payload = {
    'data':
        {
            'msg': 'Hello!'
        }
}
hub.send_baidu_notification(baidu_payload)
运行 Python 代码,现在应该生成显示在目标设备上的通知。
示例
启用 debug 属性
如果在初始化 NotificationHub 时启用调试标志,则会显示详细的 HTTP 请求和响应转储以及 NotificationOutcome,如下所示,可从中了解哪些 HTTP 标头传入请求以及从通知中心收到哪些 HTTP 响应:
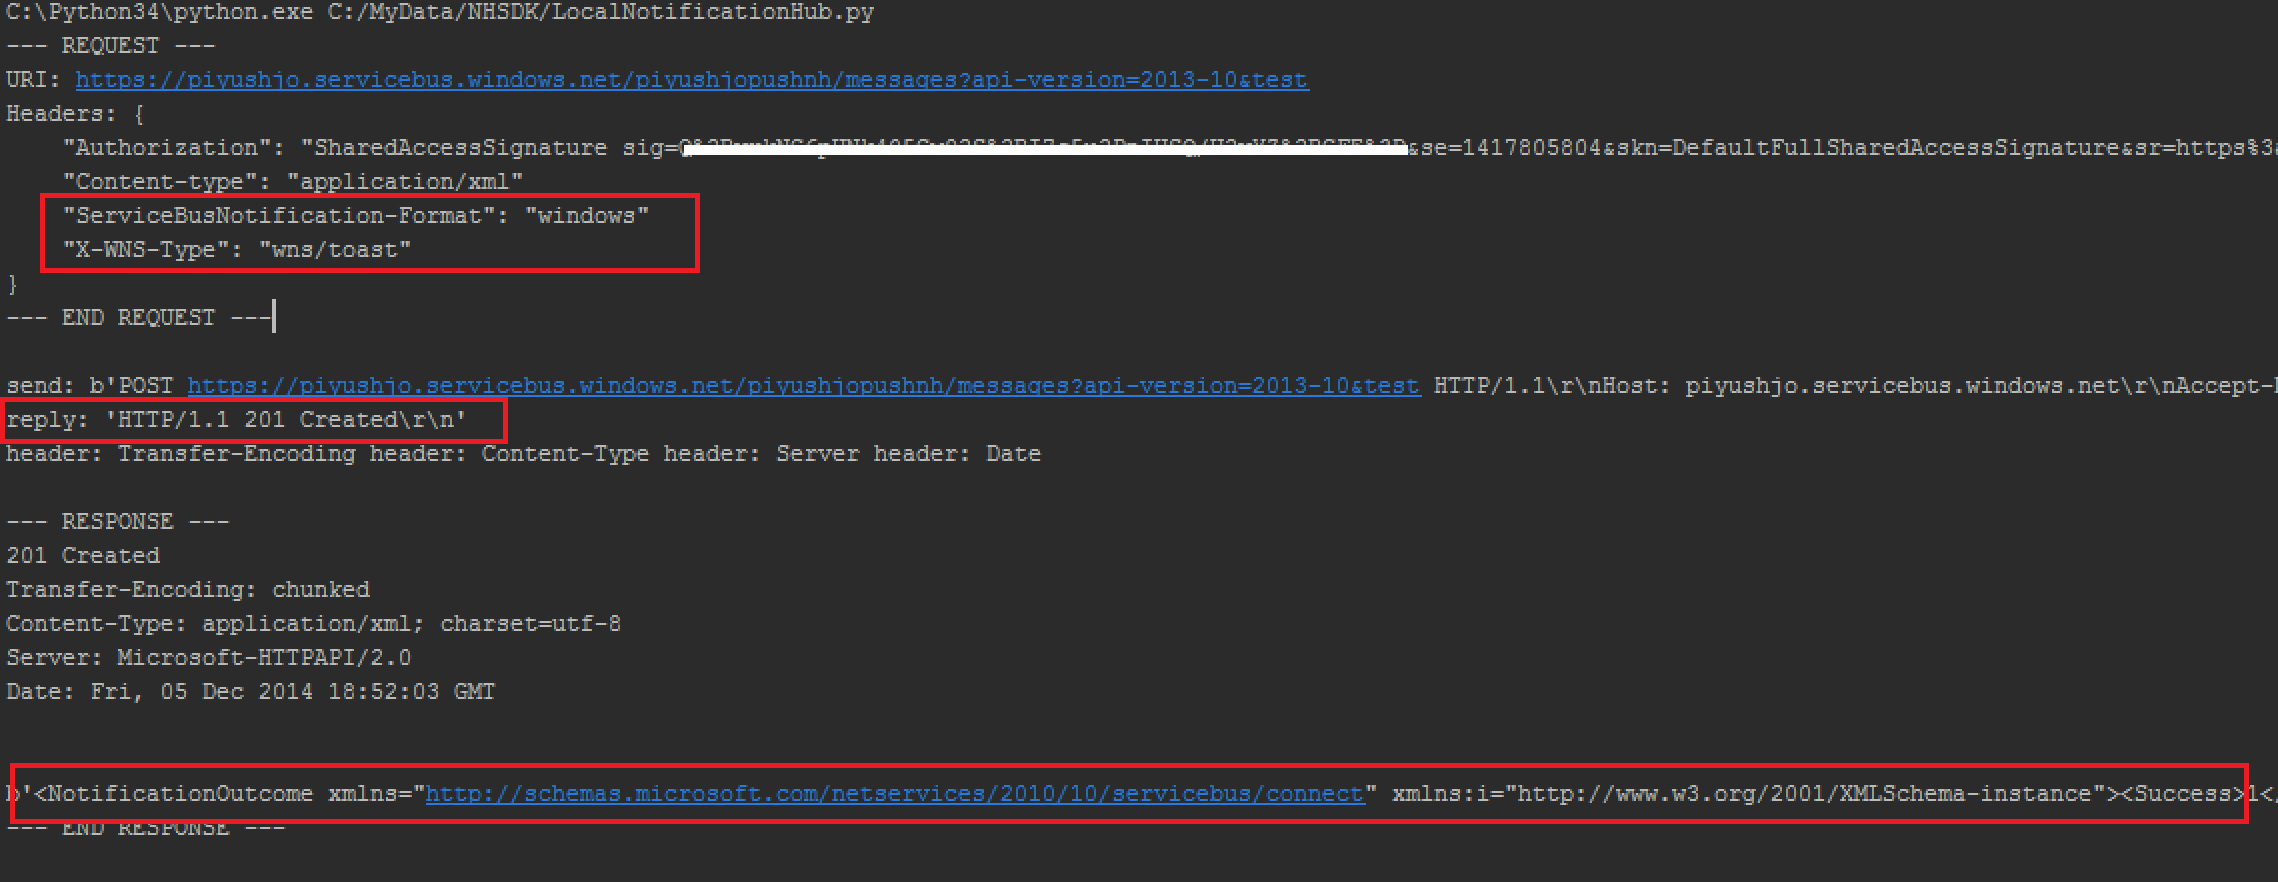
例如会出现详细的通知中心结果。
- 当消息成功发送到推送通知服务时。
<Outcome>The Notification was successfully sent to the Push Notification System</Outcome> - 如果没有找到任何推送通知的目标,则可能出现以下输出作为响应(这表明可能没有找到传递通知的注册,因为这些注册具有一些不匹配的标记)
'<NotificationOutcome xmlns="http://schemas.microsoft.com/netservices/2010/10/servicebus/connect" xmlns:i="https://www.w3.org/2001/XMLSchema-instance"><Success>0</Success><Failure>0</Failure><Results i:nil="true"/></NotificationOutcome>'
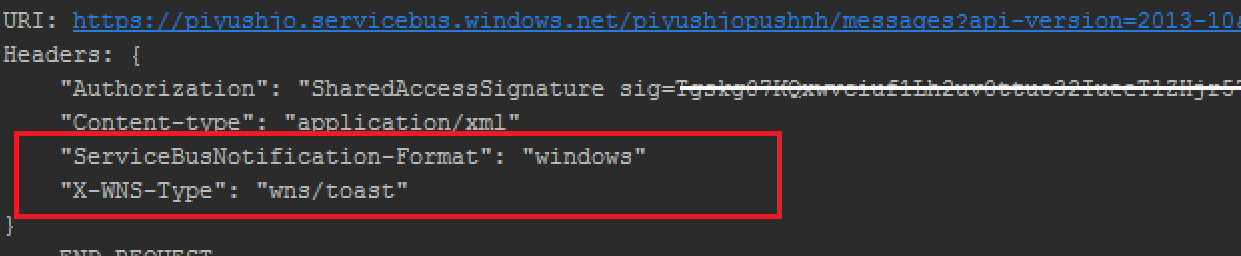
将 toast 通知广播到 Windows
向 Windows 客户端发送 toast 广播通知时请注意发送出去的标头。
hub.send_windows_notification(wns_payload)
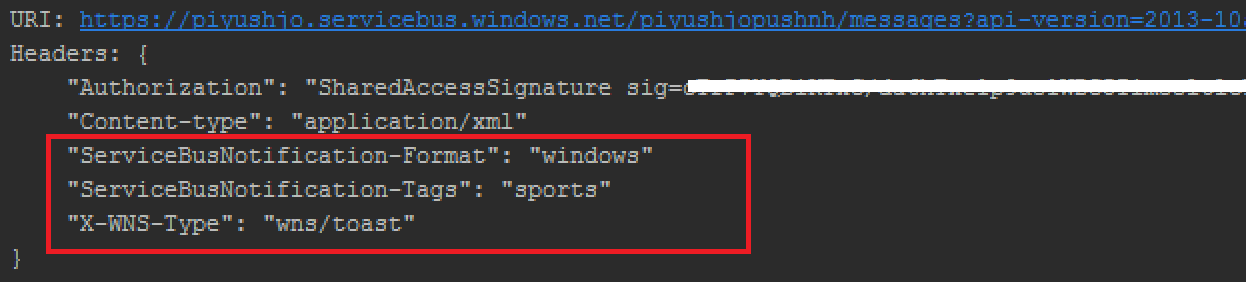
发送通知指定标记(或标记表达式)
请注意添加到 HTTP 请求的 Tags HTTP 标头(在以下示例中,仅将通知发送给具有 'sports' 负载的注册)
hub.send_windows_notification(wns_payload, "sports")
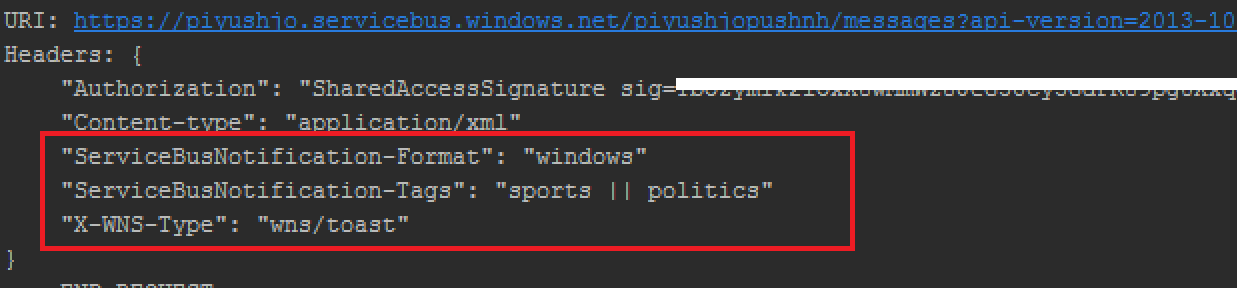
发送通知指定多个标记
请注意发送多个标记时 Tags HTTP 标头的变化方式。
tags = {'sports', 'politics'}
hub.send_windows_notification(wns_payload, tags)
模板通知
请注意 Format HTTP 标头的变化和负载正文作为 HTTP 请求正文的一部分发送:
客户端 - 已注册的模板:
var template = @"<toast><visual><binding template=""ToastText01""><text id=""1"">$(greeting_en)</text></binding></visual></toast>";
服务器端 - 发送有效负载:
template_payload = {'greeting_en': 'Hello', 'greeting_fr': 'Salut'}
hub.send_template_notification(template_payload)

后续步骤
本文介绍了如何为通知中心创建 Python REST 客户端。 可以从此页执行下列操作:
- 下载完整的 Python REST 包装器示例,其中包含本文中的所有代码。
- 在 突发新闻教程
- 在本地化新闻教程中继续学习通知中心模板功能