本教程介绍如何使用 Azure Logic Apps 响应使用 Azure Event Grid 接收的Azure Service Bus事件。
Prerequisites
如果没有 Azure 试用订阅,请在开始之前创建一个 试用订阅。
注释
事件网格与Azure Service Bus集成不支持所有接收模式和方案。 具体而言,Peek-Lock行为和消息解决模式可能与本机Service Bus触发器不同。 如果工作流需要 Peek-Lock 语义或高级结算控制,请使用 Service Bus 原生触发器或接收器,而不是 Event Grid。 使用此示例之前,请确保主题和订阅配置为事件网格兼容性。
创建 Service Bus 命名空间
按照本教程中的说明:快速入门:使用 Azure 门户创建 Service Bus 主题和主题订阅,完成以下任务:
- 创建 premium Service Bus 命名空间。
- 获取连接字符串。
- 创建Service Bus主题。
- 创建主题的订阅。 本教程只需要一个订阅,因此无需创建订阅 S2 和 S3。
将消息发送到服务总线主题
在本部分中,将使用示例应用程序将消息发送到在上一部分创建的Service Bus主题。
克隆 GitHub azure-service-bus 存储库或下载 zip 文件并从中提取文件。
在Visual Studio中,转到 \samples\DotNet\Azure。Messaging.ServiceBus\ServiceBusEventGridIntegrationV2 文件夹,然后打开 SBEventGridIntegration.sln 文件。
在 Solution Explorer 窗口中,展开 MessageSender 项目,然后选择 Program.cs。
将“
<SERVICE BUS NAMESPACE - CONNECTION STRING>”替换为Service Bus命名空间的连接字符串,并将“<TOPIC NAME>”替换为主题名称。const string ServiceBusConnectionString = "<SERVICE BUS NAMESPACE - CONNECTION STRING>"; const string TopicName = "<TOPIC NAME>";生成并运行程序以将五条测试消息(
const int numberOfMessages = 5;)发送到Service Bus主题。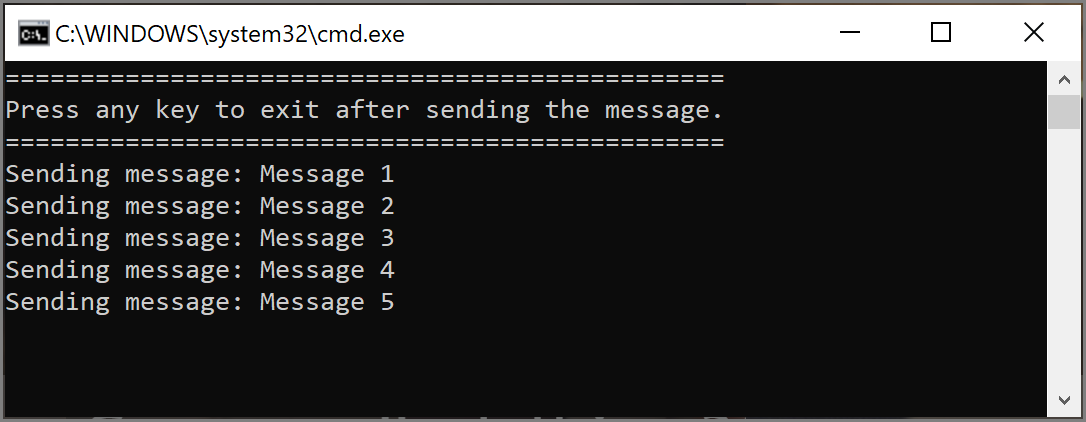
使用逻辑应用接收消息
在本部分中,创建一个使用 Azure Event Grid 接收Service Bus事件的Azure逻辑应用。
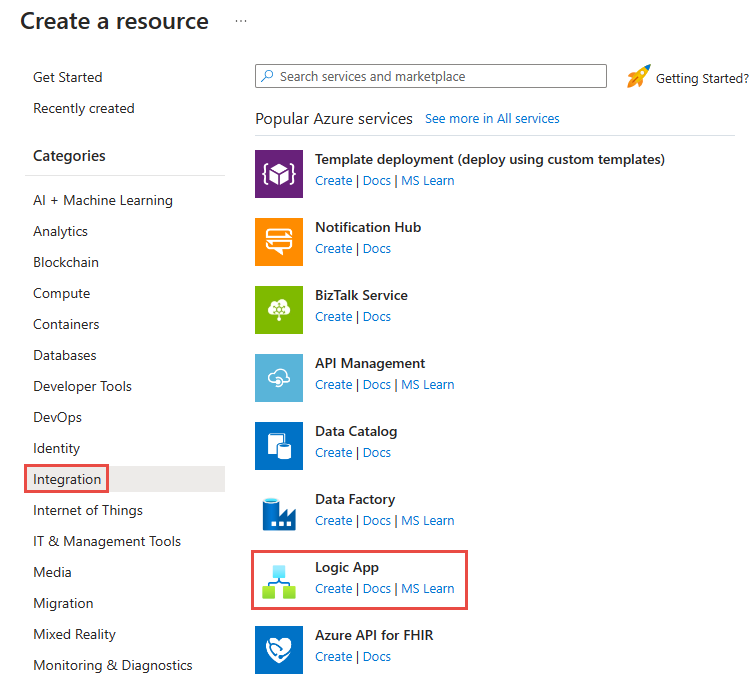
依次选择“+ 创建资源”、“集成”、“逻辑应用”。
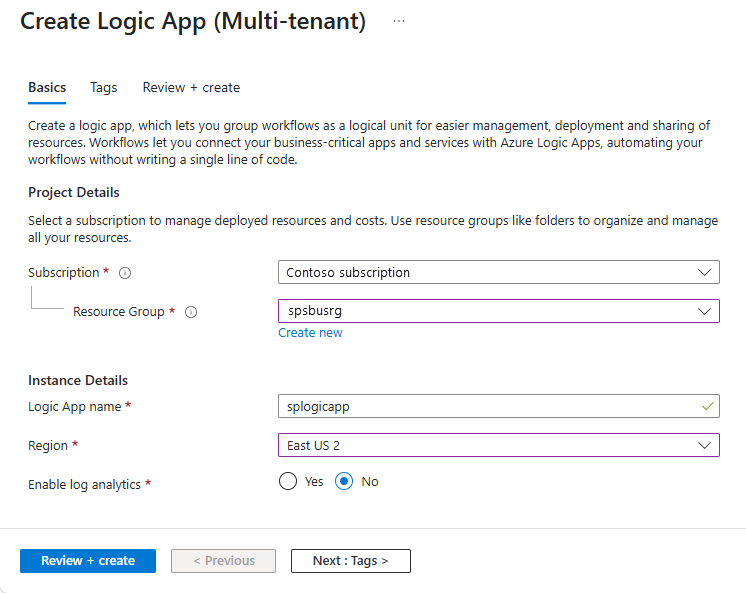
在“创建逻辑应用”页上,执行以下步骤:
选择“消耗”“多租户”选项,然后选中“选择”。>
选择 Azure 订阅。
输入 资源组。 选择用于其他资源的资源组,例如之前创建的Service Bus命名空间。
输入逻辑应用的名称。
为逻辑应用选择“区域”。
选择 审阅 + 创建。
在“查看 + 创建”页面中,选择“创建”,以创建逻辑应用。
在“部署完成”页中,选择“转到资源”来导航到“逻辑应用”页。
添加使用事件网格从Service Bus接收消息的步骤
展开 开发工具 并选择 “逻辑应用模板”。
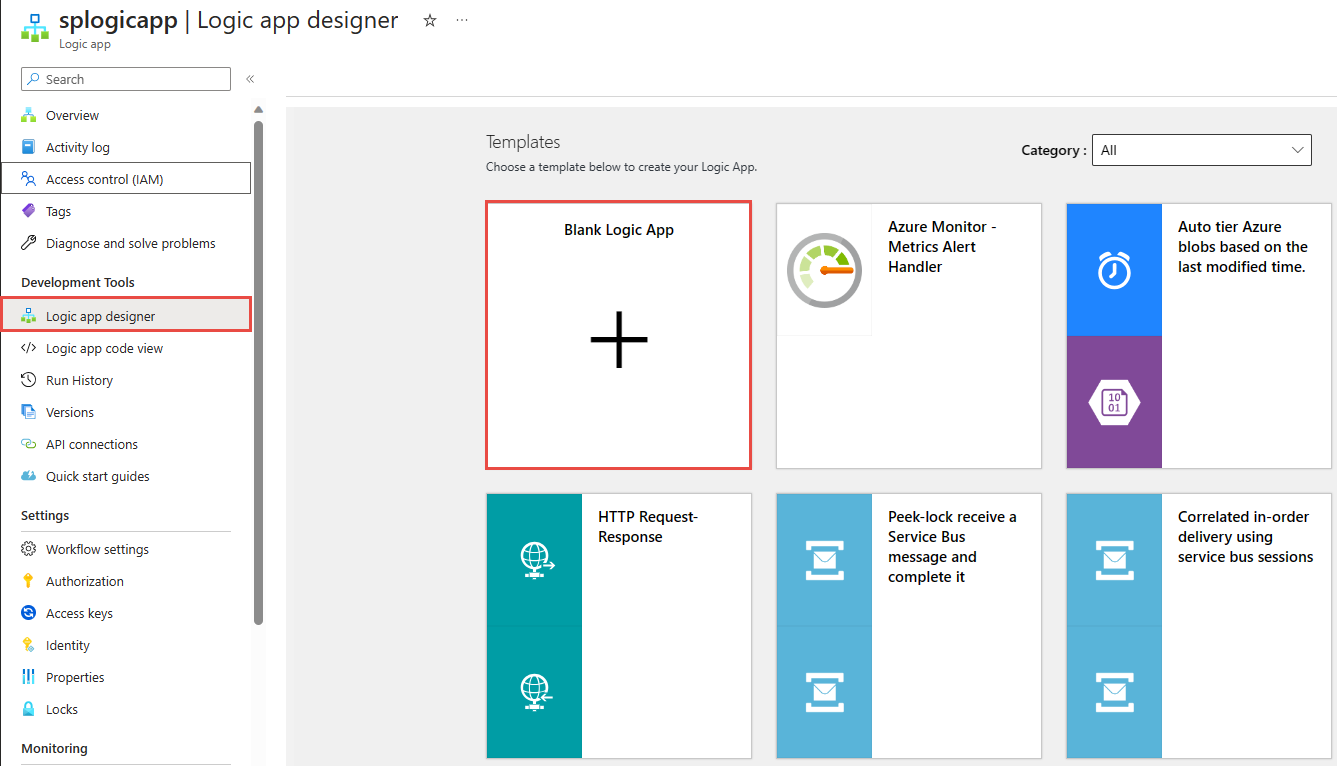
选择 “空白”工作流。 逻辑应用设计器随即打开。
在设计器中执行以下步骤:
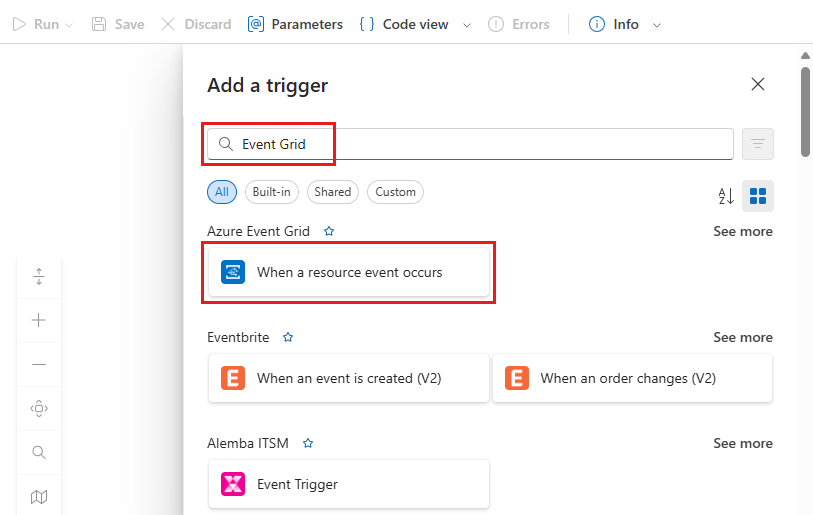
选择 “添加触发器 ”,然后搜索 事件网格。
选择发生 资源事件的时间。
选择“登录”。
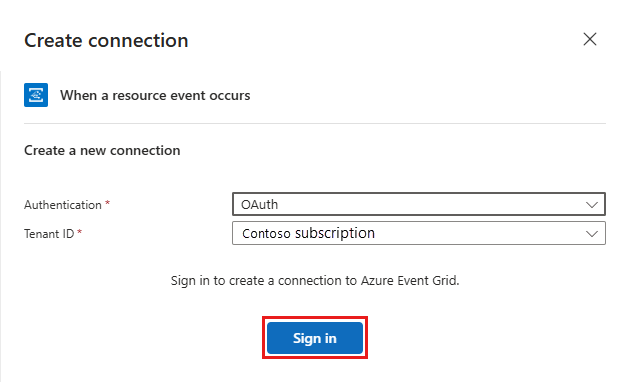
在登录帐户页上,选择要用于登录Azure的帐户。
在“当资源事件发生时”页上执行以下步骤:
对于“资源类型”,请选择“Microsoft.ServiceBus.Namespaces”。
选择Azure订阅。
对于 Resource Name,请选择Service Bus命名空间。
在 “高级参数”下,选择向下箭头。
选择“后缀筛选器”,然后将焦点移出下拉列表。
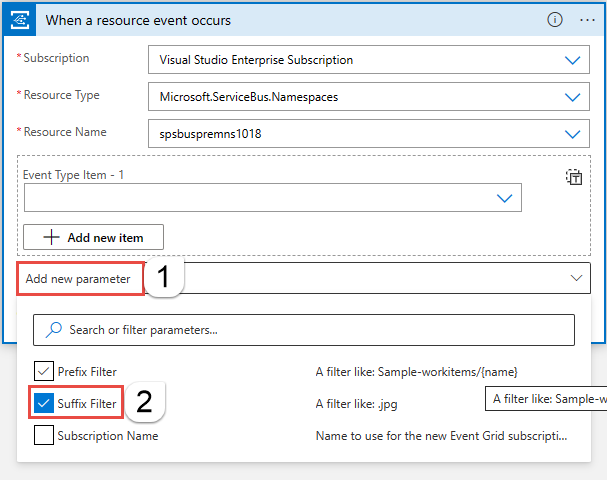
请在后缀筛选器中输入您的Service Bus主题订阅名称。

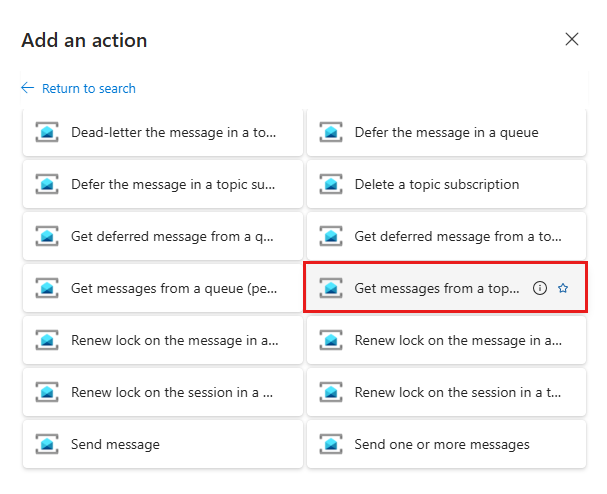
选择该 + 符号,然后选择 添加操作。
搜索 Service Bus。
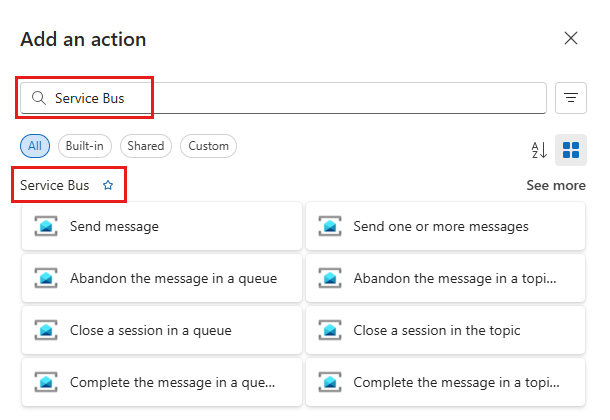
选择“查看更多”,然后选择“从主题订阅获取消息”(速览锁定)。
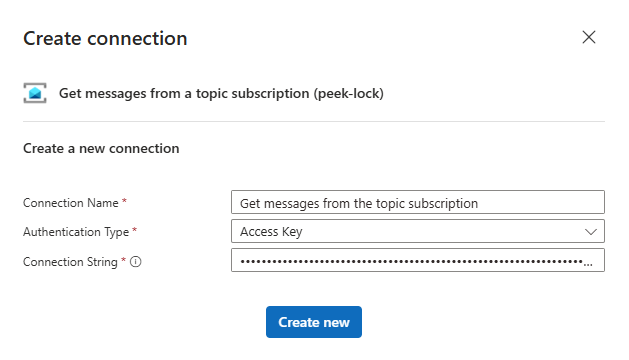
执行以下步骤:
输入连接的名称。 例如“从主题订阅获取消息”。
确认“身份验证类型”设置为“访问密钥”。
对于 Connection String,请将connection string复制并粘贴到之前保存的Service Bus命名空间。
选择“新建”。
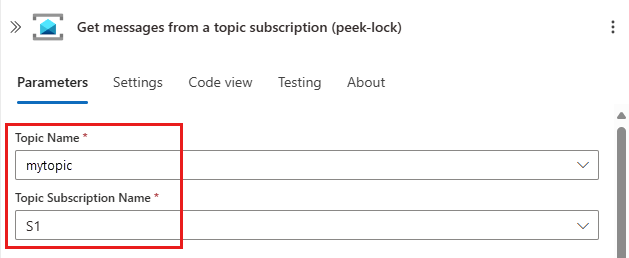
选择主题和订阅。

添加步骤以处理和完成收到的消息
在本部分中,将添加步骤以在电子邮件中发送收到的邮件,然后完成该邮件。 在真实场景中,你会先在逻辑应用中处理消息,然后再完成该消息。
添加 foreach 循环
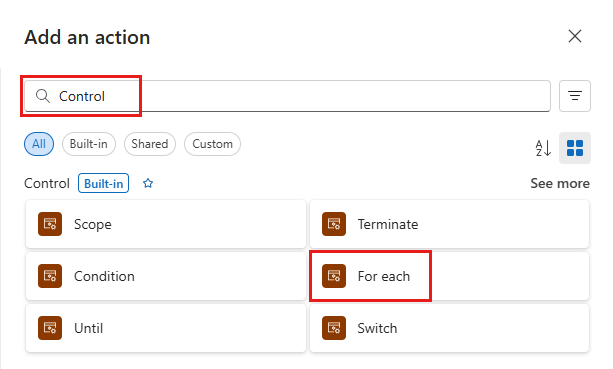
选择该 + 符号,然后选择 添加操作。
搜索并选择“For each”。
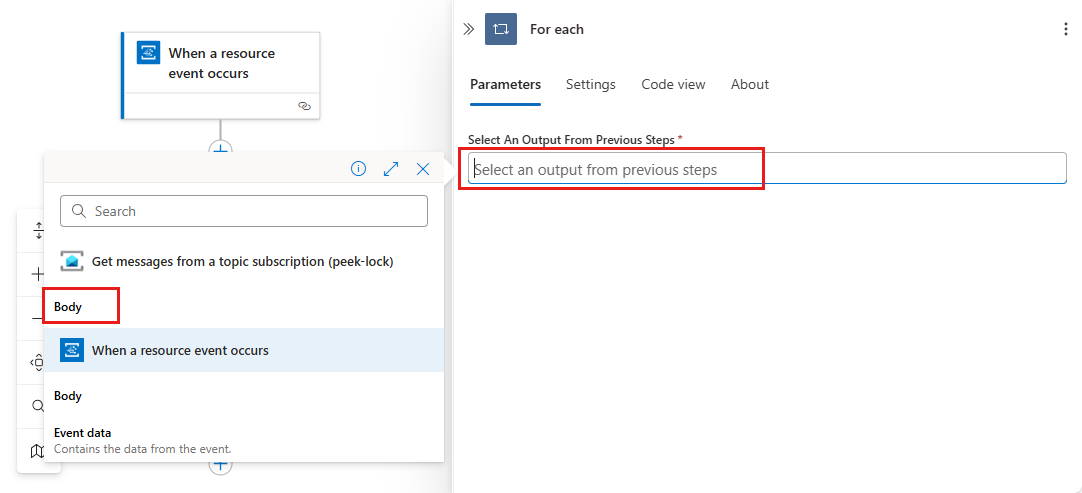
对于 从前面的步骤中选择输出,请选择闪电或输入 / 并选择 “插入动态内容”。
在“从主题订阅获取消息”下选择“正文”(速览锁定)。

在 For each 循环中添加一个步骤,以发送包含消息正文的电子邮件
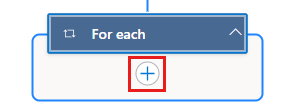
在 For Each 循环中,选择 +,然后选择 添加操作。
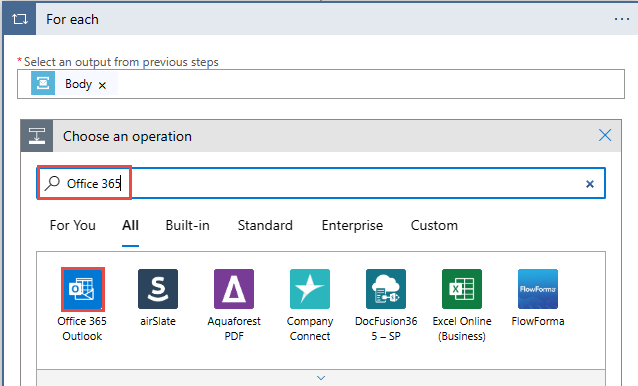
搜索 Office 365,然后选择 See more。
在搜索结果中选择Office 365 Outlook。
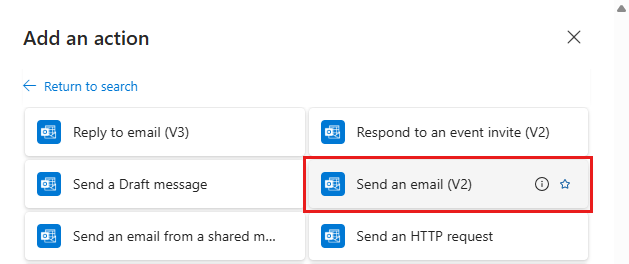
在操作列表中,选择“发送电子邮件(V2)”。
选择 Sign in,然后按照以下步骤创建与Office 365 Outlook的连接。
在“发送电子邮件(V2)”窗口中,执行以下步骤:
在“正文”文本框内部单击,然后执行以下步骤:
对于“收件人”,请输入电子邮件地址。
对于 Subject,请输入从 Service Bus 主题的订阅中接收到的 消息。
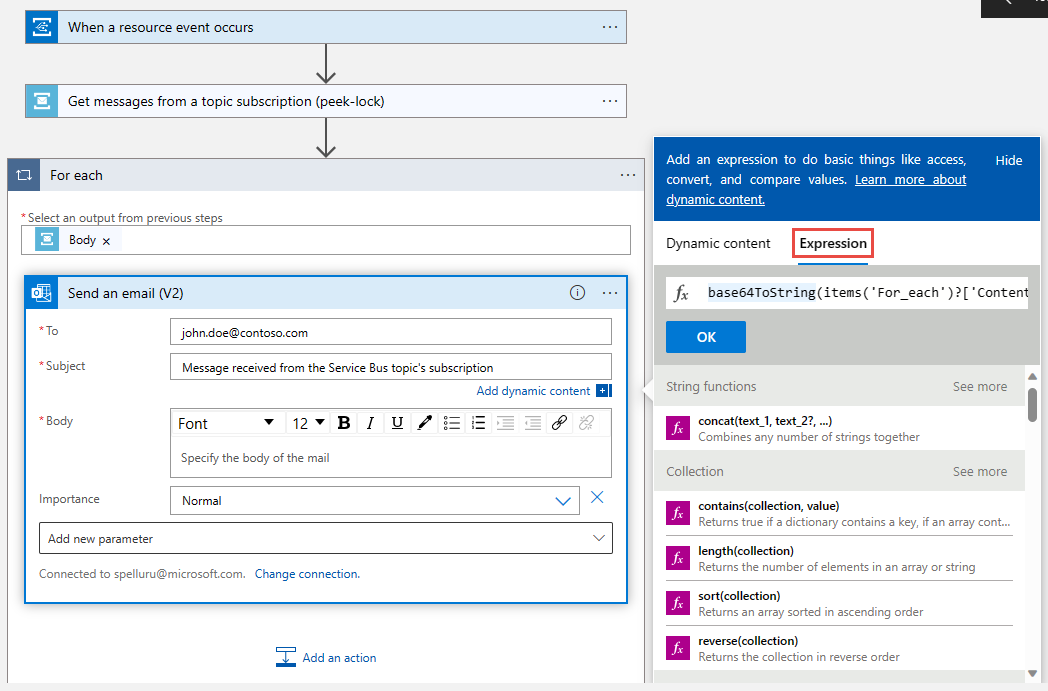
在 正文中,选择表达式或输入 / 并选择 Insert 表达式。
输入以下表达式:
base64ToString(items('For_each')?['ContentData'])选择 并添加。
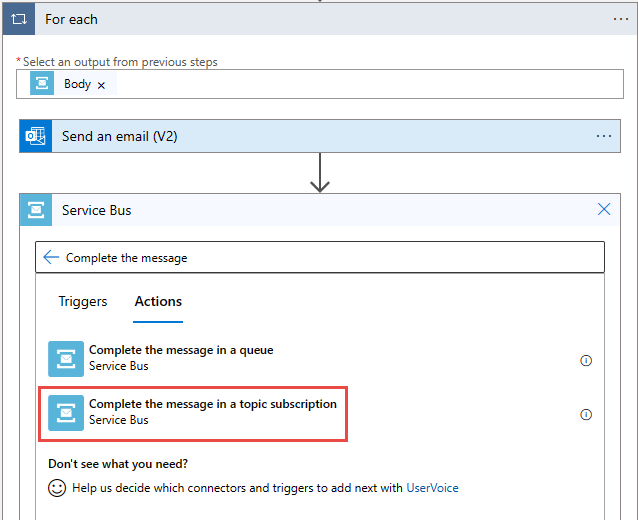
在 foreach 循环中添加另一个操作以完成消息
在 For Each 循环中,选择 +,然后选择 添加操作。
搜索 Service Bus。
在操作列表中选择“完成主题订阅中的消息”。
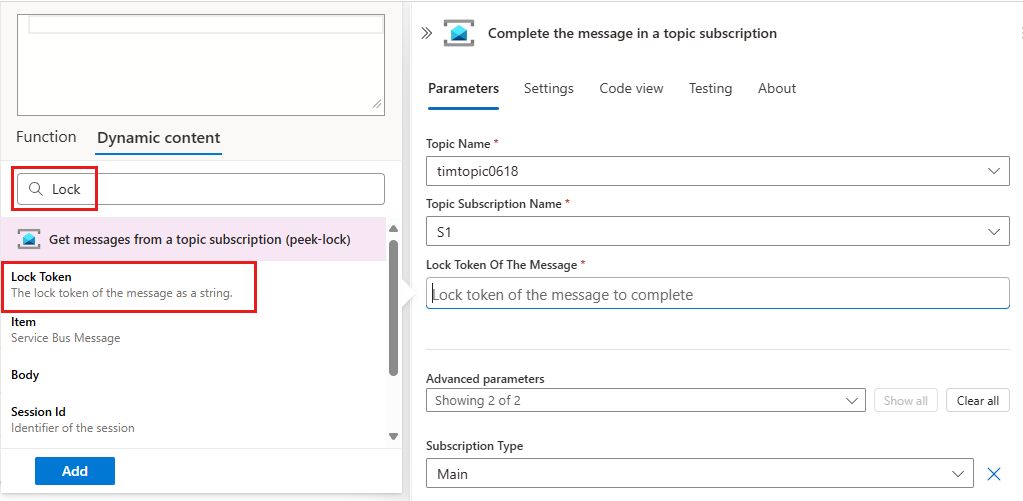
选择 Service Bus 主题。
选择主题的订阅。
在 “消息锁定令牌”中,选择表达式或输入 / 并选择“插入”表达式。
选择 “动态内容 ”,然后选择“ 锁定令牌”。 选择 并添加。
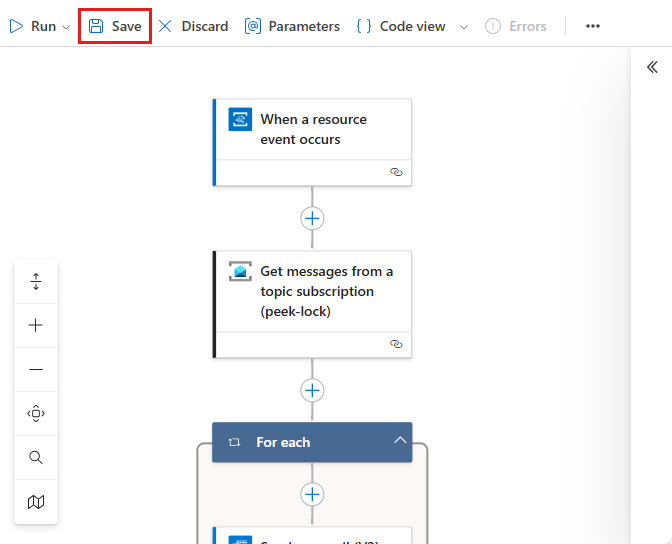
在逻辑应用设计器的工具栏上选择“保存”以保存逻辑应用。

测试应用
如果尚未向主题发送测试消息,请按照 将消息发送到 Service Bus 主题 部分的说明发送消息到该主题。
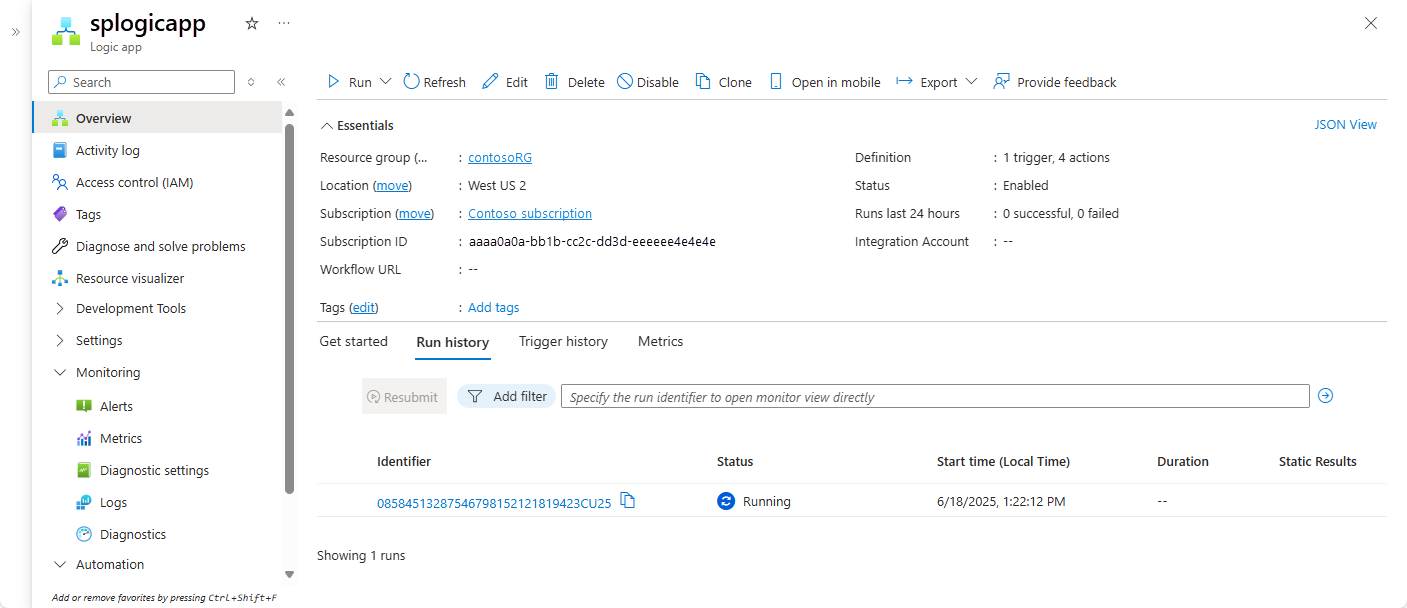
导航到逻辑应用的 “概述 ”页。 然后选择底部窗格中的“ 运行历史记录 ”选项卡。 你会看到逻辑应用运行发送到主题的消息。 可能需要几分钟时间,你才能看到逻辑应用运行。 选择工具栏上的“刷新”,以刷新页面。
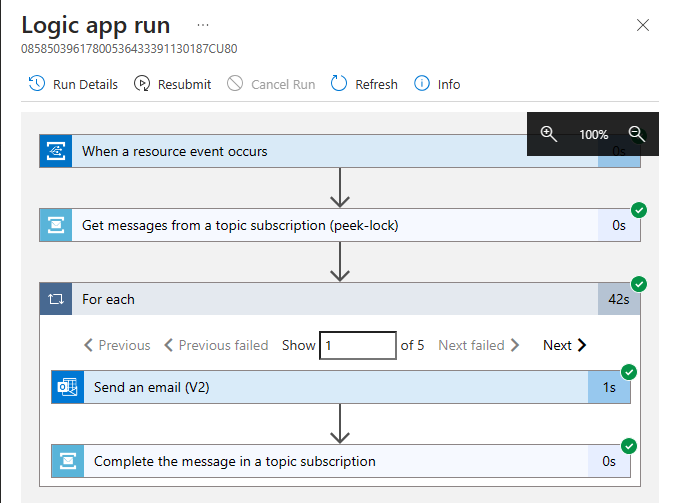
选择一个逻辑应用运行,查看详细信息。 请注意,它在 for 循环中处理了五条消息。
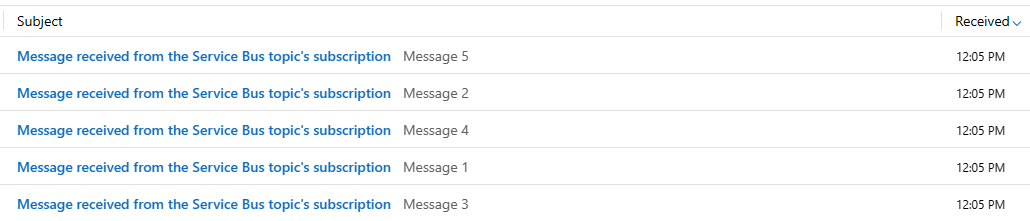
对于逻辑应用收到的每条消息,你都会收到一封电子邮件。


Troubleshoot
如果在等待和刷新一段时间后没有看到任何调用,请执行以下步骤:
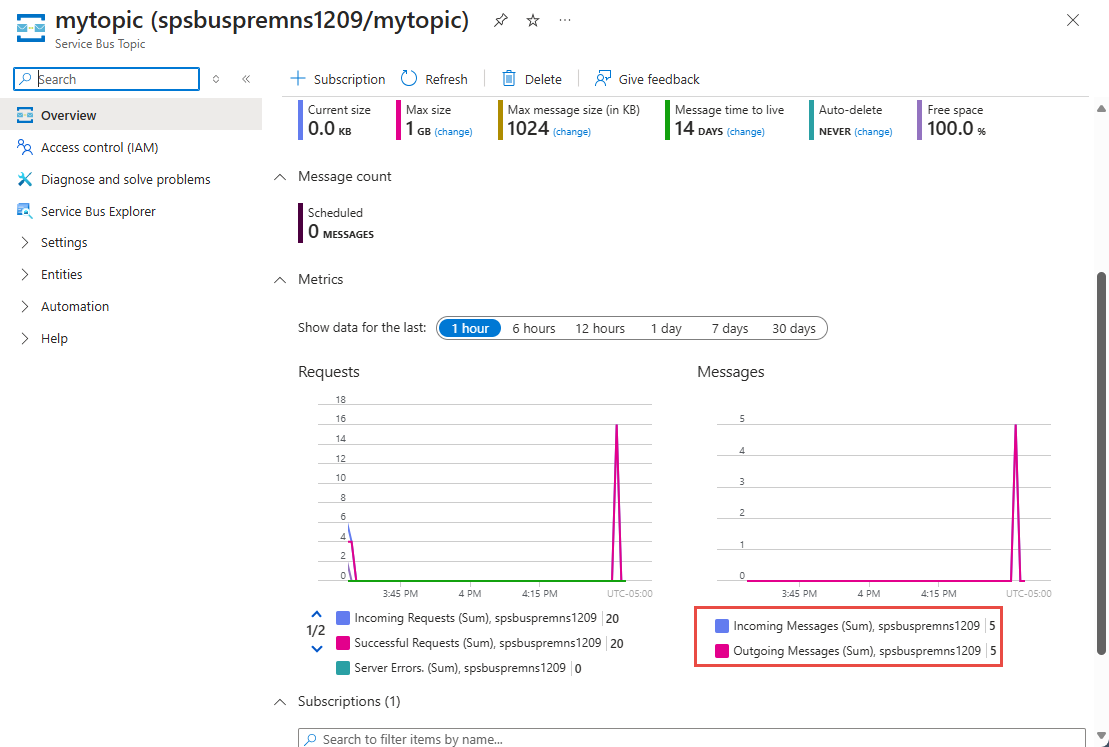
确认消息已到达 Service Bus 主题。 请参阅Service Bus主题页上的传入消息计数器。 在这种情况下, MessageSender 应用程序运行一次,因此有 5 条消息。
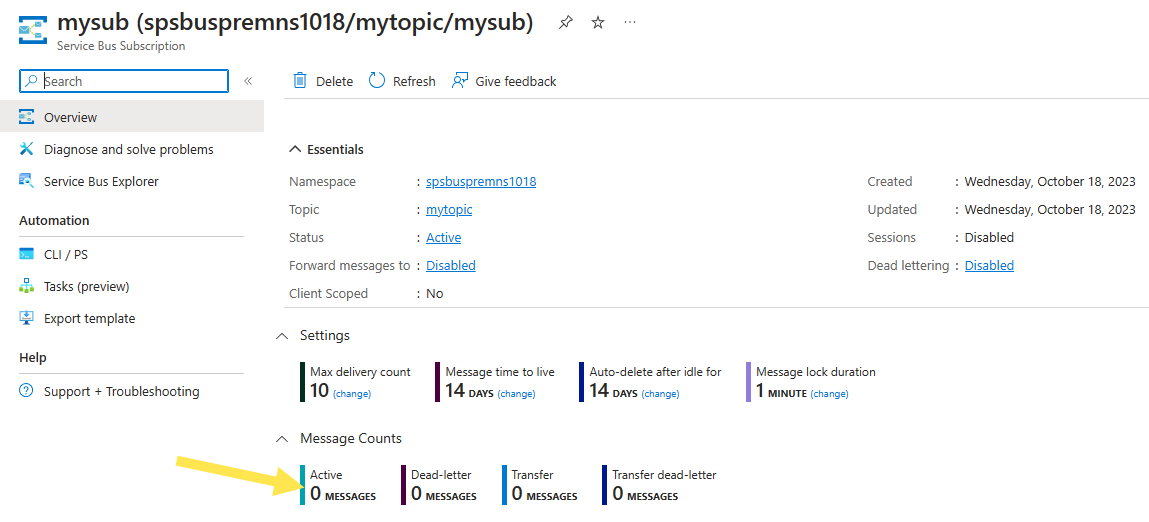
确认 Service Bus 订阅中没有活动消息。
如果在此页上未看到任何事件,请确认 Service Bus Subscription 页是否未显示任何 活动消息计数。 如果此计数器的数字大于零,则由于某些原因,订阅中的消息没有转发到处理程序函数(事件订阅处理程序)。 验证是否已正确设置事件订阅。
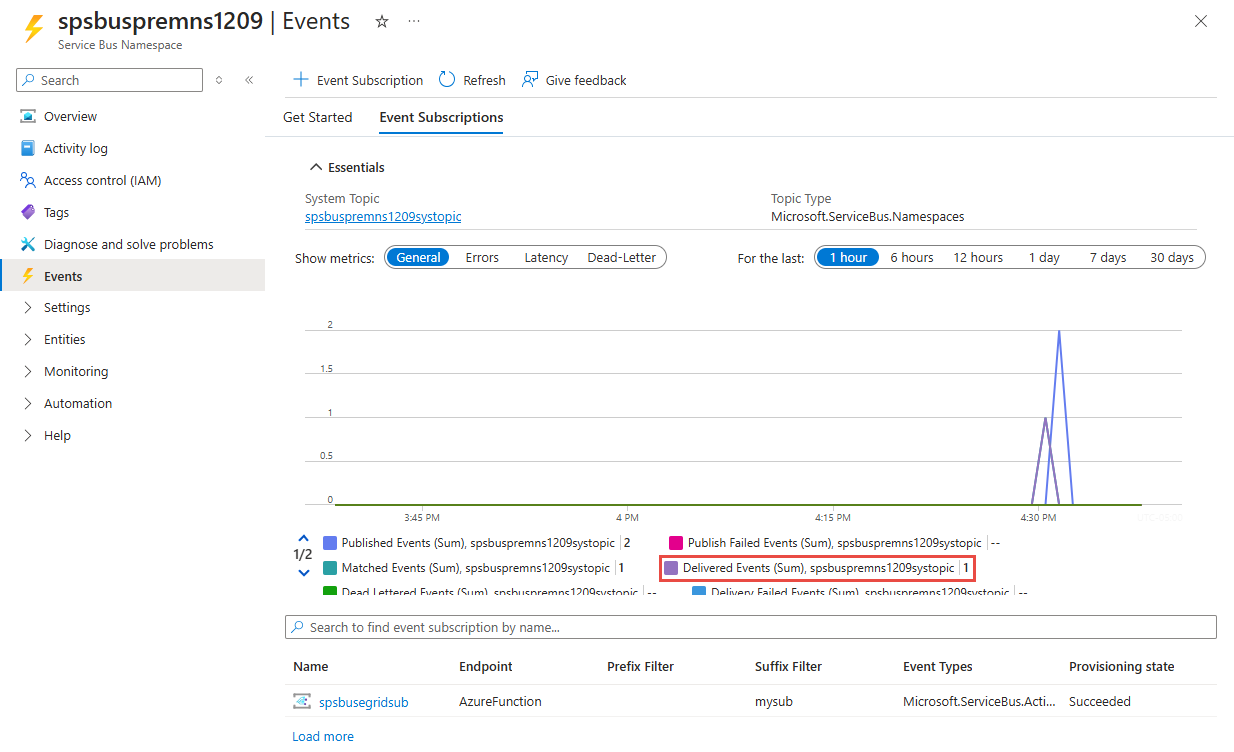
还可以在Service Bus命名空间的 Events 页上看到传递事件。
该截图显示了Service Bus命名空间的事件页。 还可在“事件订阅”页面上看到事件已发送。 可在“事件”页上选择事件订阅来访问此页面。


相关内容
- 详细了解 Azure Event Grid。
- 详细了解 Azure Functions。
- 详细了解 Azure App Service 的 Logic Apps 功能。
- 详细了解 Azure Service Bus。