通过加密范围,可在单个 blob 或容器级别管理加密。 可以使用加密范围在驻留在同一存储帐户中但属于不同客户的数据之间创建安全边界。 有关加密范围的详细信息,请参阅 Blob 存储的加密范围。
可以创建使用Microsoft管理的密钥或存储在 Azure Key Vault 中的客户管理的密钥保护的加密范围。 若要使用客户管理的密钥创建加密范围,必须先创建密钥保管库,并添加要用于该范围的密钥。 密钥保管库必须已启用清除保护。
若要在 Azure 门户中创建加密范围,请执行以下步骤:
在 Azure 门户中导航到你的存储帐户。
在 “安全性 + 网络 ”下,选择“ 加密”。
选择“ 加密范围 ”选项卡。
单击“ 添加 ”按钮添加新的加密范围。
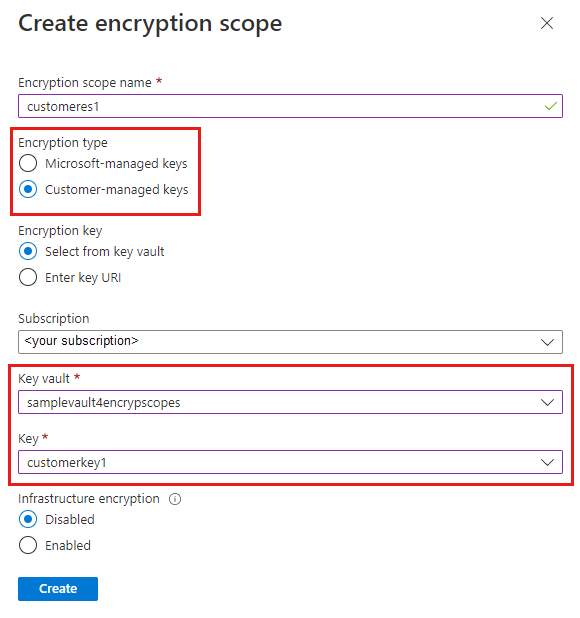
在“ 创建加密范围 ”窗格中,输入新作用域的名称。
选择所需的加密密钥支持类型, Microsoft管理的密钥 或 客户管理的密钥。
- 如果选择 了Microsoft管理的密钥,请单击“ 创建 ”以创建加密范围。
- 如果选择了 客户自管密钥,请选择一个订阅并指定一个密钥保管库和用于此加密范围的密钥。 如果所需的密钥保管库位于其他区域中,请选择 Enter 密钥 URI 并指定密钥 URI。
如果为存储帐户启用了基础结构加密,则会自动为新的加密范围启用该加密。 否则,可以选择是否为加密范围启用基础结构加密。
若要使用 PowerShell 创建加密范围,请安装 Az.Storage PowerShell 模块 3.4.0 或更高版本。
创建受Microsoft管理的密钥保护的加密范围
若要创建由 Microsoft 托管密钥保护的加密范围,请使用 参数调用 -StorageEncryption 命令。
如果为存储帐户启用了基础结构加密,则会自动为新的加密范围启用该加密。 否则,可以选择是否为加密范围启用基础结构加密。 若要创建新的启用了基础结构加密的范围,请包括该 -RequireInfrastructureEncryption 参数。
请记住将示例中的占位符值替换为你自己的值:
$rgName = "<resource-group>"
$accountName = "<storage-account>"
$scopeName = "<encryption-scope>"

New-AzStorageEncryptionScope -ResourceGroupName $rgName `
    -StorageAccountName $accountName `
    -EncryptionScopeName $scopeName1 `
    -StorageEncryption
在同一租户中创建受客户管理的密钥保护的加密范围
若要创建受存储在密钥保管库中的客户管理的密钥保护的加密范围,请先为存储帐户配置客户管理的密钥。 必须将托管标识分配给有权访问密钥保管库的存储帐户。 托管标识可以是用户分配的托管标识,也可以是系统分配的托管标识。 若要详细了解如何配置客户管理的密钥,请参阅为 现有存储帐户在同一租户中配置客户管理的密钥。
若要授予托管标识访问密钥保管库的权限,请将 Key Vault 加密服务加密用户 角色分配给托管标识。
若要配置客户管理的密钥以用于加密范围,必须在密钥保管库上启用清除保护。
以下示例演示如何使用系统分配的托管标识配置加密范围。 请记住将示例中的占位符值替换为你自己的值:
$rgName = "<resource-group>"
$accountName = "<storage-account>"
$keyVaultName = "<key-vault>"
$scopeName = "<encryption-scope>"

# Assign a system-assigned managed identity to the storage account.
$storageAccount = Set-AzStorageAccount -ResourceGroupName $rgName `
    -Name $accountName `
    -AssignIdentity

# Assign the necessary permissions to the managed identity
# so that it can access the key vault.
$principalId = $storageAccount.Identity.PrincipalId
$keyVault = Get-AzKeyVault $keyVaultName

New-AzRoleAssignment -ObjectId $storageAccount.Identity.PrincipalId `
    -RoleDefinitionName "Key Vault Crypto Service Encryption User" `
    -Scope $keyVault.ResourceId
接下来,使用参数调用 -KeyvaultEncryption 命令,并指定密钥 URI。 在密钥 URI 上包括密钥版本是可选的。 如果省略密钥版本,加密范围将自动使用最新的密钥版本。 如果包含密钥版本,则必须手动更新密钥版本才能使用其他版本。
密钥 URI 的格式类似于以下示例,可以从 Key Vault 的 VaultUri 属性和密钥名称构造:
# Without the key version
https://<key-vault>.vault.azure.cn/keys/<key>

# With the key version
https://<key-vault>.vault.azure.cn/keys/<key>/<version>
如果为存储帐户启用了基础结构加密,则会自动为新的加密范围启用该加密。 否则,可以选择是否为加密范围启用基础结构加密。 若要创建新的启用了基础结构加密的范围,请包括该 -RequireInfrastructureEncryption 参数。
请记住将示例中的占位符值替换为你自己的值:
$keyUri = $keyVault.VaultUri + "keys/" + $keyName

New-AzStorageEncryptionScope -ResourceGroupName $rgName `
    -StorageAccountName $accountName `
    -EncryptionScopeName $scopeName `
    -KeyUri $keyUri `
    -KeyvaultEncryption
在不同的租户中创建受客户管理的密钥保护的加密范围
若要创建受存储在与存储帐户不同的租户中的客户管理的密钥保护的加密范围,请先为存储帐户配置客户管理的密钥。 必须为有权访问其他租户中的密钥保管库的存储帐户配置用户分配的托管标识。 若要详细了解如何配置跨租户客户管理的密钥,请参阅 为现有存储帐户配置跨租户客户管理的密钥。
若要配置客户管理的密钥以用于加密范围,必须在密钥保管库上启用清除保护。
为存储帐户配置跨租户客户管理的密钥后,您可以在一个租户中为存储帐户创建一个加密范围,使其适用于另一租户的密钥保管库中的密钥。 需要密钥 URI 来创建跨租户加密范围。
请记住将示例中的占位符值替换为你自己的值:
$rgName = "<resource-group>"
$accountName = "<storage-account>"
$scopeName = "<encryption-scope>"

# Construct the key URI from the key vault URI and key name.
$keyUri = $kvUri + "keys/" + $keyName

New-AzStorageEncryptionScope -ResourceGroupName $rgName `
    -StorageAccountName $accountName `
    -EncryptionScopeName $scopeName `
    -KeyUri $keyUri `
    -KeyvaultEncryption
若要使用 Azure CLI 创建加密范围,请先安装 Azure CLI 2.20.0 或更高版本。
创建受Microsoft管理的密钥保护的加密范围
若要创建受Microsoft管理的密钥保护的加密范围,请调用 az storage account encryption-scope create 命令,将 参数指定为 < a0/>。
如果为存储帐户启用了基础结构加密,则会自动为新的加密范围启用该加密。 否则,可以选择是否为加密范围启用基础结构加密。 若要创建新的启用了基础结构加密的范围,请包含参数 --require-infrastructure-encryption 并将其值设置为 true。
请务必将占位符值替换为你自己的值:
az storage account encryption-scope create \
    --resource-group <resource-group> \
    --account-name <storage-account> \
    --name <encryption-scope> \
    --key-source Microsoft.Storage
在同一租户中创建受客户管理的密钥保护的加密范围
若要创建由客户管理的密钥保护的加密范围,这些密钥存储在与存储帐户同租户的密钥库中,请首先为存储帐户配置客户管理的密钥。 必须将托管标识分配给有权访问密钥保管库的存储帐户。 托管标识可以是用户分配的托管标识,也可以是系统分配的托管标识。 若要详细了解如何配置客户管理的密钥,请参阅为 现有存储帐户在同一租户中配置客户管理的密钥。
若要授予托管标识访问密钥保管库的权限,请将 Key Vault 加密服务加密用户 角色分配给托管标识。
若要配置客户管理的密钥以用于加密范围,必须在密钥保管库上启用清除保护。
以下示例演示如何使用系统分配的托管标识配置加密范围。 请记住将示例中的占位符值替换为你自己的值:
az storage account update \
    --name <storage-account> \
    --resource-group <resource_group> \
    --assign-identity

principalId=$(az storage account show --name <storage-account> \
    --resource-group <resource_group> \
    --query identity.principalId \
    --output tsv)

$kvResourceId=$(az keyvault show \
    --resource-group <resource-group> \
    --name <key-vault> \
    --query id \
    --output tsv)

az role assignment create --assignee-object-id $principalId \
    --role "Key Vault Crypto Service Encryption User" \
    --scope $kvResourceId
接下来,使用参数调用 --key-uri 命令,并指定密钥 URI。 在密钥 URI 上包括密钥版本是可选的。 如果省略密钥版本,加密范围将自动使用最新的密钥版本。 如果包含密钥版本,则必须手动更新密钥版本才能使用其他版本。
密钥 URI 的格式类似于以下示例,可以从 Key Vault 的 vaultUri 属性和密钥名称构造:
# Without the key version
https://<key-vault>.vault.azure.cn/keys/<key>

# With the key version
https://<key-vault>.vault.azure.cn/keys/<key>/<version>
如果为存储帐户启用了基础结构加密,则会自动为新的加密范围启用该加密。 否则,可以选择是否为加密范围启用基础结构加密。 若要创建新的启用了基础结构加密的范围,请包含参数 --require-infrastructure-encryption 并将其值设置为 true。
请记住将示例中的占位符值替换为你自己的值:
az storage account encryption-scope create \
    --resource-group <resource-group> \
    --account-name <storage-account> \
    --name <encryption-scope> \
    --key-source Microsoft.KeyVault \
    --key-uri <key-uri>
在不同的租户中创建受客户管理的密钥保护的加密范围
若要创建受存储在与存储帐户不同的租户中的客户管理的密钥保护的加密范围,请先为存储帐户配置客户管理的密钥。 必须为有权访问其他租户中的密钥保管库的存储帐户配置用户分配的托管标识。 若要详细了解如何配置跨租户客户管理的密钥,请参阅 为现有存储帐户配置跨租户客户管理的密钥。
若要配置客户管理的密钥以用于加密范围,必须在密钥保管库上启用清除保护。
为存储帐户配置跨租户客户管理的密钥后,您可以在一个租户中为存储帐户创建一个加密范围,使其适用于另一租户的密钥保管库中的密钥。 需要密钥 URI 来创建跨租户加密范围。
请记住将示例中的占位符值替换为你自己的值:
az storage account encryption-scope create \
    --resource-group <resource-group> \
    --account-name <storage-account> \
    --name <encryption-scope> \
    --key-source Microsoft.KeyVault \
    --key-uri <key-uri>
若要查看 Azure 门户中存储帐户的加密范围,请导航到存储帐户的 加密范围 设置。 在此窗格中,可以启用或禁用加密范围,或更改加密范围的密钥。
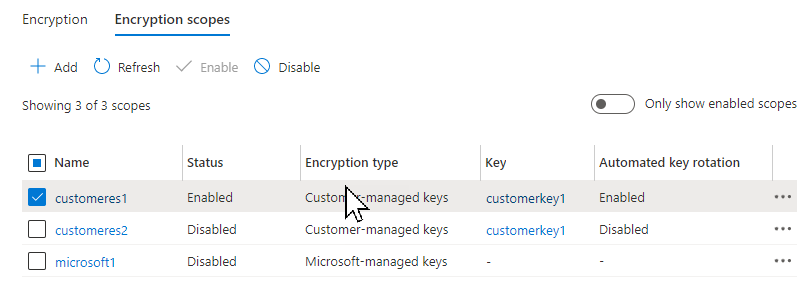
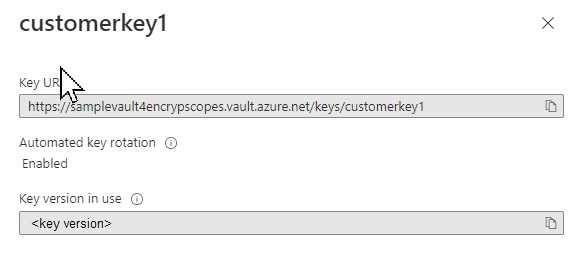
若要查看客户管理的密钥的详细信息,包括密钥 URI 和版本以及密钥版本是否自动更新,请按照 密钥 列中的链接进行作。
若要使用 PowerShell 列出存储帐户可用的加密范围,请调用 Get-AzStorageEncryptionScope 命令。 请记住将示例中的占位符值替换为你自己的值:
Get-AzStorageEncryptionScope -ResourceGroupName $rgName `
    -StorageAccountName $accountName
若要按存储帐户列出资源组中的所有加密范围,请使用管道语法:
Get-AzStorageAccount -ResourceGroupName $rgName | Get-AzStorageEncryptionScope
若要使用 Azure CLI 列出存储帐户可用的加密范围,请调用 az storage account encryption-scope list 命令。 请记住将示例中的占位符值替换为你自己的值:
az storage account encryption-scope list \
    --account-name <storage-account> \
    --resource-group <resource-group>
若要在 Azure 门户中创建具有默认加密范围的容器,请先创建加密范围,如 “创建加密范围”中所述。 接下来,按照以下步骤创建容器:
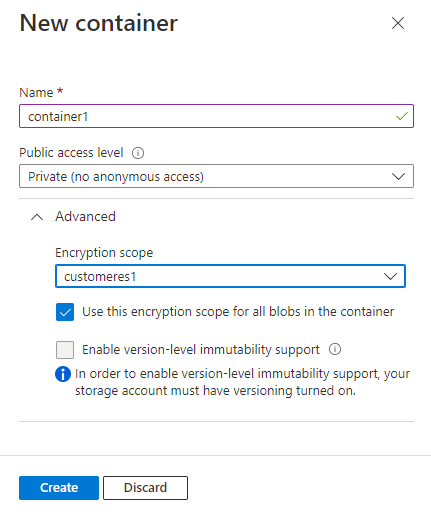
导航到存储帐户中的容器列表,然后选择 “添加 ”按钮以创建容器。
展开高级设置在“新建容器”窗格中。
在 “加密范围 ”下拉列表中,选择容器的默认加密范围。
若要要求容器中的所有 Blob 都使用默认加密范围,请选中复选框以 将此加密范围用于容器中的所有 Blob。 如果选中此复选框,则容器中的单个 Blob 无法替代默认加密范围。
若要使用 PowerShell 创建具有默认加密范围的容器,请调用 New-AzStorageContainer 命令,指定参数的范围 -DefaultEncryptionScope 。 若要强制容器中的所有 Blob 使用容器的默认作用域,请将 -PreventEncryptionScopeOverride 参数设置为 true。
$containerName1 = "container1"
$ctx = New-AzStorageContext -StorageAccountName $accountName -UseConnectedAccount

# Create a container with a default encryption scope that cannot be overridden.
New-AzStorageContainer -Name $containerName1 `
    -Context $ctx `
    -DefaultEncryptionScope $scopeName1 `
    -PreventEncryptionScopeOverride $true
若要使用 Azure CLI 创建具有默认加密范围的容器,请调用 az storage container create 命令,指定参数的范围 --default-encryption-scope 。 若要强制容器中的所有 Blob 使用容器的默认作用域,请将 --prevent-encryption-scope-override 参数设置为 true。
下面的示例使用 Microsoft Entra 帐户来授权操作创建容器。 还可以使用帐户访问密钥。 有关详细信息,请参阅 使用 Azure CLI 授权访问 Blob 或队列数据。
az storage container create \
    --account-name <storage-account> \
    --resource-group <resource-group> \
    --name <container> \
    --default-encryption-scope <encryption-scope> \
    --prevent-encryption-scope-override true \
    --auth-mode login
如果客户端在将 Blob 上传到具有默认加密范围的容器时尝试指定范围,并且该容器配置为阻止 Blob 重写默认作用域,则该作将失败,并显示一条消息,指示容器加密策略禁止请求。
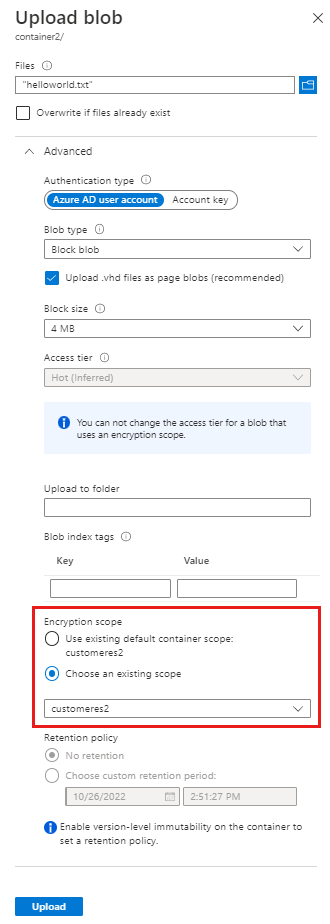
若要通过 Azure 门户上传具有加密范围的 Blob,请先创建 加密范围,如“创建加密范围”中所述。 接下来,按照以下步骤创建 Blob:
导航到要上传 Blob 的容器。
选择“ 上传 ”按钮,找到要上传的 Blob。
展开“上传 Blob”窗格中的高级设置。
找到 “加密范围 ”下拉列表部分。 默认情况下,如果已为容器指定默认加密范围,则会使用该范围创建 Blob。 如果容器要求 Blob 使用默认加密范围,则会禁用此部分。
若要为要上传的 Blob 指定其他范围,请选择 “选择现有范围”,然后从下拉列表中选择所需的范围。
若要通过 PowerShell 上传具有加密范围的 Blob,请调用 Set-AzStorageBlobContent 命令并提供 Blob 的加密范围。
$containerName2 = "container2"
$localSrcFile = "C:\temp\helloworld.txt"
$ctx = New-AzStorageContext -StorageAccountName $accountName -UseConnectedAccount

# Create a container with no default scope defined.
New-AzStorageContainer -Name $containerName2 -Context $ctx

# Upload a block upload with an encryption scope specified.
Set-AzStorageBlobContent -Context $ctx `
    -Container $containerName2 `
    -File $localSrcFile `
    -Blob "helloworld.txt" `
    -BlobType Block `
    -EncryptionScope $scopeName2
若要通过 Azure CLI 上传具有加密范围的 Blob,请调用 az storage blob upload 命令并提供 Blob 的加密范围。
按照 上传 Blob 中所述的步骤在根目录中创建文件。 然后,可以使用以下示例将此文件上传到 Blob。
az storage blob upload \
    --account-name <storage-account> \
    --container-name <container> \
    --file <file> \
    --name <file> \
    --encryption-scope <encryption-scope>
若要更改保护 Azure 门户中范围的密钥,请执行以下步骤:
- 导航到“ 加密范围 ”选项卡,查看存储帐户的加密范围列表。
- 选择要修改的范围旁边的 “更多 ”按钮。
- 在 “编辑加密范围 ”窗格中,可以将加密类型从Microsoft管理的密钥更改为客户管理的密钥,反之亦然。
- 若要选择新的客户管理的密钥,请选择“ 使用新密钥 ”并指定密钥保管库、密钥和密钥版本。
若要使用 PowerShell 将保护加密范围的密钥从客户管理的密钥更改为Microsoft管理的密钥,请调用 Update-AzStorageEncryptionScope 命令并传入 -StorageEncryption 参数:
Update-AzStorageEncryptionScope -ResourceGroupName $rgName `
    -StorageAccountName $accountName `
    -EncryptionScopeName $scopeName2 `
    -StorageEncryption
接下来,调用 Update-AzStorageEncryptionScope 命令并传入 -KeyUri 和 -KeyvaultEncryption 参数:
Update-AzStorageEncryptionScope -ResourceGroupName $rgName `
    -StorageAccountName $accountName `
    -EncryptionScopeName $scopeName1 `
    -KeyUri $keyUri `
    -KeyvaultEncryption
若要使用 Azure CLI 将保护加密范围的密钥从客户管理的密钥更改为Microsoft管理的密钥,请调用 az storage account encryption-scope update 命令,并使用值--key-source传入Microsoft.Storage参数:
az storage account encryption-scope update \
    --account-name <storage-account> \
    --resource-group <resource-group>
    --name <encryption-scope> \
    --key-source Microsoft.Storage
接下来,调用 az storage account encryption-scope update 命令,首先传入--key-uri参数,然后传入值为--key-source的Microsoft.KeyVault参数:
az storage account encryption-scope update \
    --resource-group <resource-group> \
    --account-name <storage-account> \
    --name <encryption-scope> \
    --key-source Microsoft.KeyVault \
    --key-uri <key-uri>


