应用程序通常需要同时在多个 Azure 服务之间建立安全连接。 例如,一个企业 Azure 应用服务实例可能会连接到多个不同的存储帐户、一个 Azure SQL 数据库实例、一个服务总线等。
建议使用托管标识身份验证,以便在 Azure 资源之间建立安全的无密码连接。 开发人员不必手动跟踪和管理托管标识的许多不同机密,因为这些任务大多由 Azure 在内部处理。 本教程介绍如何使用托管标识和 Azure 标识客户端库管理多个服务之间的连接。
对比托管标识的类型
Azure 提供以下类型的托管标识:
-
系统分配的标识:直接链接到单个 Azure 资源。 在服务上启用系统分配的托管标识时,Azure 将创建链接标识并在内部处理该标识的管理任务。 删除 Azure 资源时也会删除该标识。
-
用户分配的托管标识:由管理员创建的独立标识,可与一个或多个 Azure 资源相关联。 标识的生命周期独立于这些资源。
可以阅读托管标识最佳做法建议详细了解相关最佳做法、何时使用系统分配的标识以及何时使用用户分配的托管标识。
探索 DefaultAzureCredential
托管标识最容易通过 Azure 标识客户端库中名为 DefaultAzureCredential 的类在应用程序代码中进行实现。
DefaultAzureCredential 支持多种身份验证机制,并自动确定应在运行时使用哪些机制。 详细了解以下生态系统的 DefaultAzureCredential:
将 Azure 托管的应用连接到多个 Azure 服务
假设你的任务是使用无密码连接将一个现有应用连接到多个 Azure 服务和数据库。 该应用程序是托管在 Azure 应用服务上的 ASP.NET Core Web API,但以下步骤也适用于其他 Azure 托管环境,例如 Azure Spring Apps、虚拟机、容器应用和 AKS。
本教程适用于以下体系结构,但通过少量配置更改也可适用于许多其他方案。
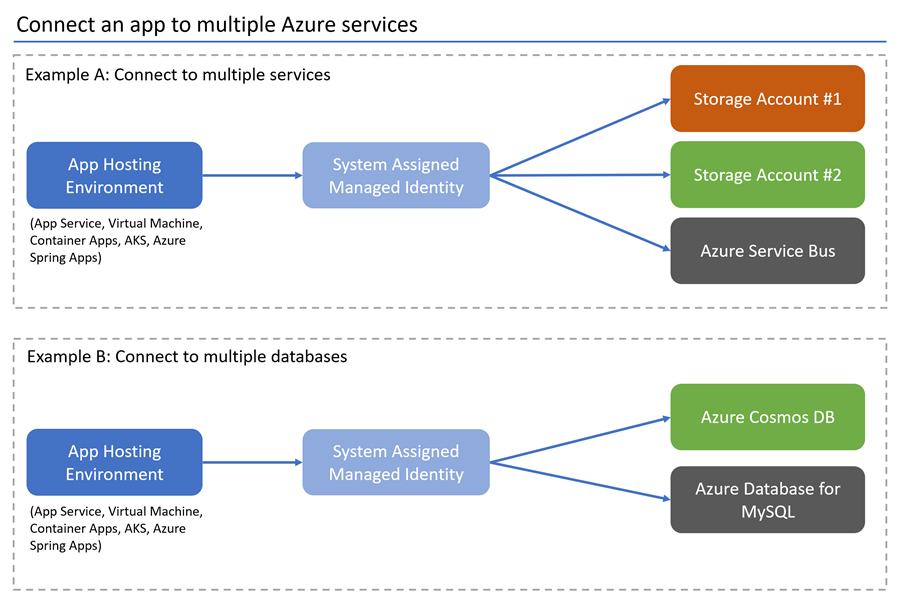
以下步骤演示了如何配置应用,使其使用系统分配的托管标识和本地开发帐户来连接到多个 Azure 服务。
创建系统分配的托管标识
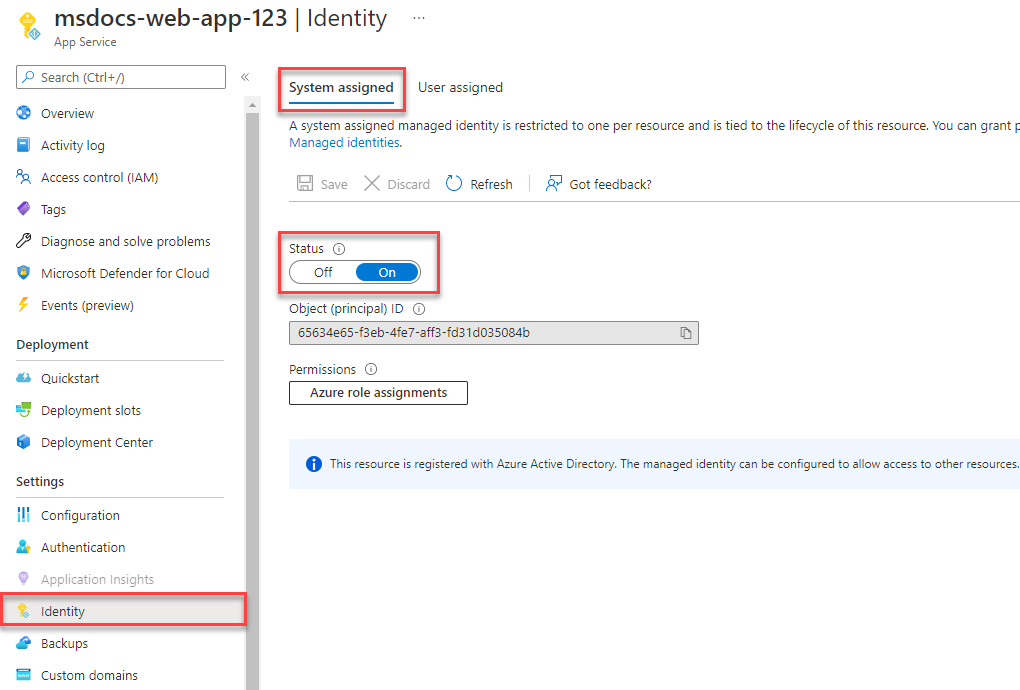
在 Azure 门户中,导航到要连接到其他服务的托管应用程序。
在“服务概述”页面上,选择“标识”。
将“状态”设置切换为“打开”,从而为服务启用系统分配的托管标识。
将角色分配给每个连接服务的托管标识
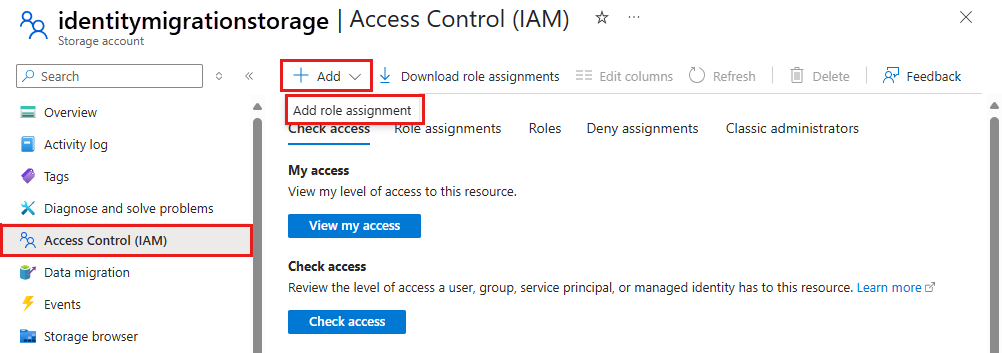
导航到存储帐户的概述页面,你将授予该帐户你的标识访问权限。
从存储帐户导航中选择“访问控制(IAM)”。
依次选择“+ 添加”和“添加角色分配”。
在“角色”搜索框中,搜索“存储 Blob 数据参与者”,该参与者可授予对 Blob 数据执行读取和写入操作的权限。 可以分配适合你的用例的任何角色。 从列表中选择“存储 Blob 数据参与者”,然后选择“下一步”。
在“添加角色分配”屏幕上,针对“将访问权限分配给”选项,请选择“托管标识”。 然后选择“+选择成员”。
在浮出控件中,通过输入应用服务的名称搜索创建的托管标识。 选择系统分配的标识,然后选择“选择”以关闭浮出控件菜单。
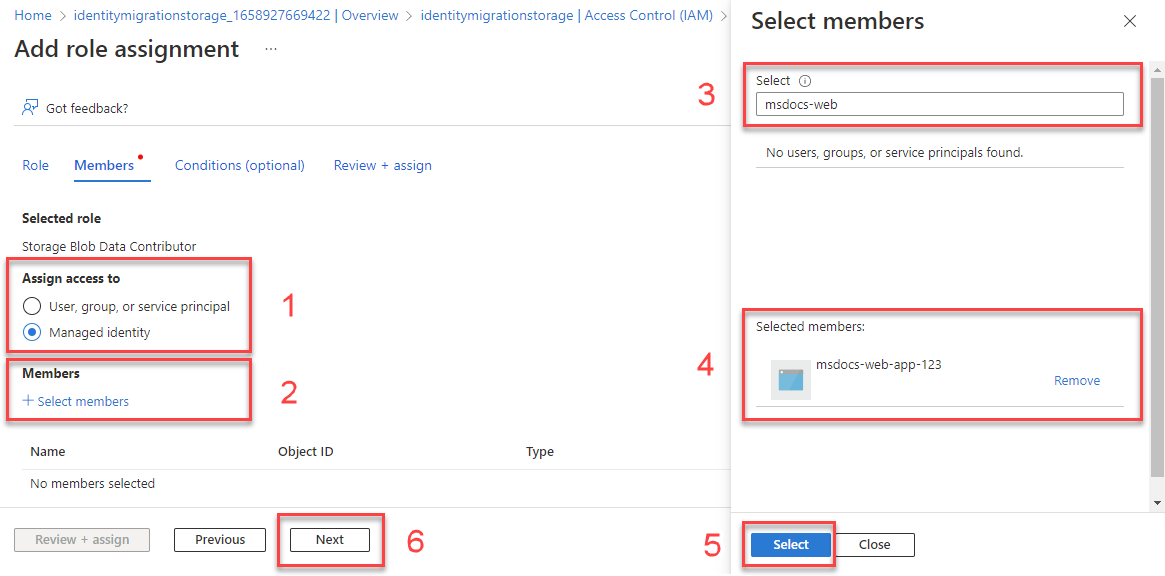
多次选择“下一步”,直到可以选择“查看+分配”,以完成角色分配。
针对要连接到的其他服务,重复此过程。
本地开发注意事项
通过向用户帐户分配角色(方式与向托管标识分配角色一样),也可以实现对 Azure 资源的访问,以进行本地开发。
将“存储 Blob 数据参与者”角色分配给托管标识后,这次请在“将访问权限分配到”下,选择“用户、组或服务主体”。 选择“+ 选择成员”,再次打开浮出控件菜单。
搜索并选择你希望通过电子邮件地址或名称授予其访问权限的 user@domain 帐户或 Microsoft Entra 安全组。 这应该是你用来登录本地开发工具(如 Visual Studio 或 Azure CLI)的同一账户。
注意
如果是与多个开发人员合作,还可以将这些角色分配给 Microsoft Entra 安全组。 然后,可以将需要访问权限以在本地开发应用的任何开发人员放入该组中。
实现应用程序代码
将 Azure.Identity 包安装到项目中。 此库提供 DefaultAzureCredential。 也可以添加与应用相关的任何其他 Azure 库。 例如,添加 Azure.Storage.Blobs 和 Azure.Messaging.ServiceBus 包,以分别连接到 Blob 存储和服务总线。
dotnet add package Azure.Identity
dotnet add package Azure.Messaging.ServiceBus
dotnet add package Azure.Storage.Blobs
对应用必须连接到的 Azure 服务的服务客户端进行实例化。 下面的代码示例使用相应的服务客户端与 Blob 存储和服务总线交互。
using Azure.Identity;
using Azure.Messaging.ServiceBus;
using Azure.Storage.Blobs;

// Create DefaultAzureCredential instance that uses system-assigned managed identity
// in the underlying ManagedIdentityCredential.
DefaultAzureCredential credential = new();

BlobServiceClient blobServiceClient = new(
    new Uri("https://<your-storage-account>.blob.core.chinacloudapi.cn"),
    credential);

ServiceBusClient serviceBusClient = new("<your-namespace>", credential);
ServiceBusSender sender = serviceBusClient.CreateSender("producttracking");
在项目中,将 azure-identity 依赖项添加到 pom.xml 文件。 此库提供 DefaultAzureCredential。 也可以添加与应用相关的任何其他 Azure 依赖项。 在此示例中,添加 azure-storage-blob 和 azure-messaging-servicebus 依赖项,以与 Blob 存储和服务总线进行交互。
<dependencyManagement>
  <dependencies>
    <dependency>
      <groupId>com.azure</groupId>
      <artifactId>azure-sdk-bom</artifactId>
      <version>1.2.5</version>
      <type>pom</type>
      <scope>import</scope>
    </dependency>
  </dependencies>
</dependencyManagement>
<dependencies>
  <dependency>
    <groupId>com.azure</groupId>
    <artifactId>azure-identity</artifactId>
  </dependency>
  <dependency>
    <groupId>com.azure</groupId>
    <artifactId>azure-storage-blob</artifactId>
  </dependency>
  <dependency>
    <groupId>com.azure</groupId>
    <artifactId>azure-messaging-servicebus</artifactId>
  </dependency>
</dependencies>
对应用必须连接到的 Azure 服务的服务客户端进行实例化。 下面的代码示例使用相应的服务客户端与 Blob 存储和服务总线交互。
class Demo {
    public static void main(String[] args) {
        // Create DefaultAzureCredential instance that uses system-assigned managed identity
        // in the underlying ManagedIdentityCredential.
        DefaultAzureCredential credential = new DefaultAzureCredentialBuilder()
            .build();

        BlobServiceClient blobServiceClient = new BlobServiceClientBuilder()
            .endpoint("https://<your-storage-account>.blob.core.chinacloudapi.cn")
            .credential(credential)
            .buildClient();

        ServiceBusClientBuilder clientBuilder = new ServiceBusClientBuilder()
            .credential(credential);
        ServiceBusSenderClient serviceBusSenderClient = clientBuilder.sender()
            .queueName("producttracking")
            .buildClient();
    }
}
在项目中,只需添加你使用的服务依赖项。 在此示例中,添加 spring-cloud-azure-starter-storage-blob 和 spring-cloud-azure-starter-servicebus 依赖项,以便连接到 Blob 存储和服务总线。
<dependencyManagement>
  <dependencies>
    <dependency>
      <groupId>com.azure.spring</groupId>
      <artifactId>spring-cloud-azure-dependencies</artifactId>
      <version>4.5.0</version>
      <type>pom</type>
      <scope>import</scope>
    </dependency>
  </dependencies>
</dependencyManagement>
<dependencies>
  <dependency>
    <groupId>com.azure.spring</groupId>
    <artifactId>spring-cloud-azure-starter-storage-blob</artifactId>
  </dependency>
  <dependency>
    <groupId>com.azure.spring</groupId>
    <artifactId>spring-cloud-azure-starter-servicebus</artifactId>
  </dependency>
</dependencies>
对应用必须连接到的 Azure 服务的服务客户端进行实例化。 以下示例使用相应的服务客户端连接到 Blob 存储和服务总线。
spring:
  cloud:
    azure:
      servicebus:
        namespace: <service-bus-name>
        entity-name: <service-bus-entity-name>
        entity-type: <service-bus-entity-type>
      storage:
        blob:
          account-name: <storage-account-name>
@Service
public class ExampleService {
    @Autowired
    private BlobServiceClient blobServiceClient;

    @Autowired
    private ServiceBusSenderClient serviceBusSenderClient;
}
将 @azure/identity 包安装到项目中。 此库提供 DefaultAzureCredential。 在此示例中,安装 @azure/storage-blob 和 @azure/service-bus 包以与 Blob 存储和服务总线进行交互。
npm install --save @azure/identity @azure/storage-blob @azure/service-bus
对应用必须连接到的 Azure 服务的服务客户端进行实例化。 下面的代码示例使用相应的服务客户端与 Blob 存储和服务总线交互。
import { DefaultAzureCredential } from "@azure/identity";
import { BlobServiceClient } from "@azure/storage-blob";
import { ServiceBusClient } from "@azure/service-bus";

// Azure resource names
const storageAccount = process.env.AZURE_STORAGE_ACCOUNT_NAME;
const serviceBusNamespace = process.env.AZURE_SERVICE_BUS_NAMESPACE;

// Create DefaultAzureCredential instance that uses system-assigned managed identity
// in the underlying ManagedIdentityCredential.
const credential = new DefaultAzureCredential();

// Create client for Blob Storage
const blobServiceClient = new BlobServiceClient(
  `https://${storageAccount}.blob.core.chinacloudapi.cn`,
  credential
);

// Create client for Service Bus
const serviceBusClient = new ServiceBusClient(
  `https://${serviceBusNamespace}.servicebus.chinacloudapi.cn`,
  credential
);
在项目中,将引用添加到 azure-identity 包。 此库提供 DefaultAzureCredential。 也可以添加与应用相关的任何其他 Azure 库。 例如,添加 azure-storage-blob 和 azure-service-bus 包,以分别连接到 Blob 存储和服务总线。
pip install azure-identity azure-servicebus azure-storage-blob
对应用必须连接到的 Azure 服务的服务客户端进行实例化。 下面的代码示例使用相应的服务客户端与 Blob 存储和服务总线交互。
from azure.identity import DefaultAzureCredential
from azure.servicebus import ServiceBusClient, ServiceBusMessage
from azure.storage.blob import BlobServiceClient
import os

# Create DefaultAzureCredential instance that uses system-assigned managed identity
# in the underlying ManagedIdentityCredential.
credential = DefaultAzureCredential()

blob_service_client = BlobServiceClient(
    account_url="https://<my-storage-account-name>.blob.core.chinacloudapi.cn/",
    credential=credential
)

fully_qualified_namespace = os.environ['SERVICEBUS_FULLY_QUALIFIED_NAMESPACE']
queue_name = os.environ['SERVICE_BUS_QUEUE_NAME']

with ServiceBusClient(fully_qualified_namespace, credential) as service_bus_client:
    with service_bus_client.get_queue_sender(queue_name) as sender:
        # Sending a single message
        single_message = ServiceBusMessage("Single message")
        sender.send_messages(single_message)
在本地运行此代码时,DefaultAzureCredential 将在凭证链中搜索首个可用凭证。 如果 Managed_Identity_Client_ID 环境变量在本地为 null,则使用与本地安装的开发人员工具对应的凭证。 例如,Azure CLI 或 Visual Studio。 若要了解有关此过程的详细信息,请参阅浏览 DefaultAzureCredential 部分。
将应用程序部署到 Azure 后,DefaultAzureCredential 将自动从应用服务环境中检索 Managed_Identity_Client_ID 变量。 当托管标识与应用关联时,该值将变为可用。
整个这一过程可确保应用能够在本地和 Azure 中安全运行,而无需进行任何代码更改。
使用多个托管标识连接多个应用
尽管上一示例中,应用的服务访问要求都相同,但实际环境中通常存在着细微差异。 假设以下场景:多个应用都连接到同一存储帐户,但其中两个应用还访问不同的服务或数据库。
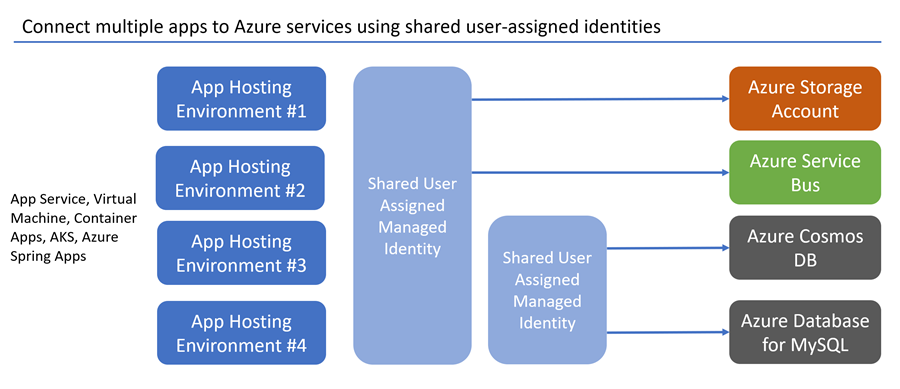
若要在代码中配置此设置,请确保应用程序注册单独的服务客户端来连接到每个存储帐户或数据库。 在配置 DefaultAzureCredential 时,为每个服务引用正确的托管标识客户端 ID。 以下代码示例配置这些 Azure 服务连接:
- 到单独存储帐户的两个连接(使用共享的用户分配托管标识)
- 到 Azure Cosmos DB 和 Azure SQL 服务的连接(使用另一个用户分配托管标识)。 当 Azure SQL 客户端驱动程序允许时,共享此托管标识。 有关详细信息,请参阅代码注释。
在项目中,安装所需的包。 Azure 标识库提供 DefaultAzureCredential。
dotnet add package Azure.Identity
dotnet add package Azure.Storage.Blobs
dotnet add package Microsoft.Azure.Cosmos
dotnet add package Microsoft.Data.SqlClient
将以下内容添加到代码:
using Azure.Core;
using Azure.Identity;
using Azure.Storage.Blobs;
using Microsoft.Azure.Cosmos;
using Microsoft.Data.SqlClient;

string clientIdStorage =
    Environment.GetEnvironmentVariable("Managed_Identity_Client_ID_Storage")!;

// Create a DefaultAzureCredential instance that configures the underlying
// ManagedIdentityCredential to use a user-assigned managed identity.
DefaultAzureCredential credentialStorage = new(
    new DefaultAzureCredentialOptions
    {
        ManagedIdentityClientId = clientIdStorage,
    });

// First Blob Storage client
BlobServiceClient blobServiceClient1 = new(
    new Uri("https://<receipt-storage-account>.blob.core.chinacloudapi.cn"),
    credentialStorage);

// Second Blob Storage client
BlobServiceClient blobServiceClient2 = new(
    new Uri("https://<contract-storage-account>.blob.core.chinacloudapi.cn"),
    credentialStorage);

string clientIdDatabases =
    Environment.GetEnvironmentVariable("Managed_Identity_Client_ID_Databases")!;

// Create a DefaultAzureCredential instance that configures the underlying
// ManagedIdentityCredential to use a user-assigned managed identity.
DefaultAzureCredential credentialDatabases = new(
    new DefaultAzureCredentialOptions
    {
        ManagedIdentityClientId = clientIdDatabases,
    });

// Create an Azure Cosmos DB client
CosmosClient cosmosClient = new(
    Environment.GetEnvironmentVariable("COSMOS_ENDPOINT", EnvironmentVariableTarget.Process),
    credentialDatabases);

// Open a connection to Azure SQL
string connectionString =
    $"Server=<azure-sql-hostname>.database.chinacloudapi.cn;User Id={clientIdDatabases};Authentication=Active Directory Default;Database=<database-name>";

using (SqlConnection connection = new(connectionString)
{
    AccessTokenCallback = async (authParams, cancellationToken) =>
    {
        const string defaultScopeSuffix = "/.default";
        string scope = authParams.Resource.EndsWith(defaultScopeSuffix)
            ? authParams.Resource
            : $"{authParams.Resource}{defaultScopeSuffix}";
        AccessToken token = await credentialDatabases.GetTokenAsync(
            new TokenRequestContext([scope]),
            cancellationToken);

        return new SqlAuthenticationToken(token.Token, token.ExpiresOn);
    }
})
{
    connection.Open();
}
将以下代码添加到 pom.xml 文件:
<dependencyManagement>
  <dependencies>
    <dependency>
      <groupId>com.azure</groupId>
      <artifactId>azure-sdk-bom</artifactId>
      <version>1.2.5</version>
      <type>pom</type>
      <scope>import</scope>
    </dependency>
  </dependencies>
</dependencyManagement>
<dependencies>
  <dependency>
    <groupId>com.azure</groupId>
    <artifactId>azure-identity</artifactId>
  </dependency>
  <dependency>
    <groupId>com.azure</groupId>
    <artifactId>azure-storage-blob</artifactId>
  </dependency>
  <dependency>
    <groupId>com.azure</groupId>
    <artifactId>azure-cosmos</artifactId>
  </dependency>
  <dependency>
    <groupId>com.microsoft.sqlserver</groupId>
    <artifactId>mssql-jdbc</artifactId>
    <version>11.2.1.jre17</version>
  </dependency>
</dependencies>
将以下内容添加到代码:
class Demo {
    public static void main(String[] args) {
        String clientIdStorage = System.getenv("Managed_Identity_Client_ID_Storage");

        // Create a DefaultAzureCredential instance that configures the underlying
        // ManagedIdentityCredential to use a user-assigned managed identity.
        DefaultAzureCredential credentialStorage = new DefaultAzureCredentialBuilder()
            .managedIdentityClientId(clientIdStorage)
            .build();

        // First Blob Storage client
        BlobServiceClient blobServiceClient1 = new BlobServiceClientBuilder()
            .endpoint("https://<receipt-storage-account>.blob.core.chinacloudapi.cn")
            .credential(credentialStorage)
            .buildClient();

        // Second Blob Storage client
        BlobServiceClient blobServiceClient2 = new BlobServiceClientBuilder()
            .endpoint("https://<contract-storage-account>.blob.core.chinacloudapi.cn")
            .credential(credentialStorage)
            .buildClient();

        String clientIdDatabases = System.getenv("Managed_Identity_Client_ID_Databases");

        // Create a DefaultAzureCredential instance that configures the underlying
        // ManagedIdentityCredential to use a user-assigned managed identity.
        DefaultAzureCredential credentialDatabases = new DefaultAzureCredentialBuilder()
            .managedIdentityClientId(clientIdDatabases)
            .build()

        // Create an Azure Cosmos DB client
        CosmosClient cosmosClient = new CosmosClientBuilder()
            .endpoint("https://<cosmos-db-account>.documents.azure.cn:443/")
            .credential(credentialDatabases)
            .buildClient();

        // Open a connection to Azure SQL using a managed identity.
        // The DefaultAzureCredential instance stored in the credentialDatabases variable can't be
        // used here, so sharing isn't possible between Cosmos DB and Azure SQL.
        String connectionUrl = "jdbc:sqlserver://<azure-sql-hostname>.database.chinacloudapi.cn:1433;"
            + "database=<database-name>;encrypt=true;trustServerCertificate=false;hostNameInCertificate=*.database"
            + ".chinacloudapi.cn;loginTimeout=30;Authentication=ActiveDirectoryMSI;";
        try {
            Connection connection = DriverManager.getConnection(connectionUrl);
            Statement statement = connection.createStatement();
        } catch (SQLException e) {
            e.printStackTrace();
        }
    }
}
将以下代码添加到 pom.xml 文件:
<dependencyManagement>
  <dependencies>
    <dependency>
      <groupId>com.azure.spring</groupId>
      <artifactId>spring-cloud-azure-dependencies</artifactId>
      <version>4.5.0</version>
      <type>pom</type>
      <scope>import</scope>
    </dependency>
  </dependencies>
</dependencyManagement>
<dependencies>
  <dependency>
    <groupId>com.azure.spring</groupId>
    <artifactId>spring-cloud-azure-starter-storage-blob</artifactId>
  </dependency>
  <dependency>
    <groupId>com.azure.spring</groupId>
    <artifactId>spring-cloud-azure-starter-cosmos</artifactId>
  </dependency>
  <dependency>
    <groupId>com.microsoft.sqlserver</groupId>
    <artifactId>mssql-jdbc</artifactId>
  </dependency>
  <dependency>
    <groupId>org.springframework.boot</groupId>
    <artifactId>spring-boot-starter-jdbc</artifactId>
  </dependency>
</dependencies>
将以下代码添加到 application.yml 文件:
spring:
  cloud:
    azure:
      cosmos:
        endpoint: https://<cosmos-db-account>.documents.azure.cn:443/
        credential:
          client-id: <Managed_Identity_Client_ID_Databases>
          managed-identity-enabled: true
      storage:
        blob:
          endpoint: https://<contract-storage-account>.blob.core.chinacloudapi.cn
          credential:
            client-id: <Managed_Identity_Client_ID_Storage>
            managed-identity-enabled: true
  datasource:
    url: jdbc:sqlserver://<azure-sql-hostname>.database.chinacloudapi.cn:1433;database=<database-name>;encrypt=true;trustServerCertificate=false;hostNameInCertificate=*.database.chinacloudapi.cn;loginTimeout=30;Authentication=ActiveDirectoryMSI;
将以下内容添加到代码:
注意
Spring Cloud Azure 不支持配置同一服务的多个客户端,以下代码示例为这种情况创建多个 bean。
@Configuration
public class AzureStorageConfiguration {
    @Bean("secondBlobServiceClient")
    public BlobServiceClient secondBlobServiceClient(BlobServiceClientBuilder builder) {
        return builder.endpoint("https://<receipt-storage-account>.blob.core.chinacloudapi.cn")
            .buildClient();
    }

    @Bean("firstBlobServiceClient")
    public BlobServiceClient firstBlobServiceClient(BlobServiceClientBuilder builder) {
        return builder.buildClient();
    }
}
@Service
public class ExampleService {
    @Autowired
    @Qualifier("firstBlobServiceClient")
    private BlobServiceClient blobServiceClient1;

    @Autowired
    @Qualifier("secondBlobServiceClient")
    private BlobServiceClient blobServiceClient2;

    @Autowired
    private CosmosClient cosmosClient;

    @Autowired
    private JdbcTemplate jdbcTemplate;
}
在项目中,安装所需的包。 Azure 标识库提供 DefaultAzureCredential。
npm install --save @azure/identity @azure/storage-blob @azure/cosmos tedious
将以下内容添加到代码:
import { DefaultAzureCredential } from "@azure/identity";
import { BlobServiceClient } from "@azure/storage-blob";
import { CosmosClient } from "@azure/cosmos";
import { Connection } from "tedious";

// Create a DefaultAzureCredential instance that configures the underlying
// ManagedIdentityCredential to use a user-assigned managed identity.
const credentialStorage = new DefaultAzureCredential({
  managedIdentityClientId: process.env.MANAGED_IDENTITY_CLIENT_ID_STORAGE
});

// First Blob Storage client
const blobServiceClient1 = new BlobServiceClient(
  `https://${process.env.AZURE_STORAGE_ACCOUNT_NAME_1}.blob.core.chinacloudapi.cn`,
  credentialStorage
);

// Second Blob Storage client
const blobServiceClient2 = new BlobServiceClient(
  `https://${process.env.AZURE_STORAGE_ACCOUNT_NAME_2}.blob.core.chinacloudapi.cn`,
  credentialStorage
);

// Create a DefaultAzureCredential instance that configures the underlying
// ManagedIdentityCredential to use a user-assigned managed identity.
const credentialDatabases = new DefaultAzureCredential({
  managedIdentityClientId: process.env.MANAGED_IDENTITY_CLIENT_ID_DATABASES
});

// Create an Azure Cosmos DB client
const cosmosClient = new CosmosClient({
  endpoint: process.env.COSMOS_ENDPOINT,
  credential: credentialDatabases
});

// Configure connection and connect to Azure SQL
const config = {
  server: process.env.AZURE_SQL_SERVER,
  authentication: {
    type: 'azure-active-directory-access-token',
    options: {
      token: credentialDatabases.getToken("https://database.chinacloudapi.cn//.default").token
    }
  },
  options: {
    database: process.env.AZURE_SQL_DATABASE,
    encrypt: true
  }
};

const connection = new Connection(config);
connection.connect();
在项目中,安装所需的包。 Azure 标识库提供 DefaultAzureCredential。
pip install azure-identity azure-storage-blob azure-cosmos pyodbc
将以下内容添加到代码:
from azure.cosmos import CosmosClient
from azure.identity import DefaultAzureCredential
from azure.storage.blob import BlobServiceClient
import os, pyodbc, struct

# Create a DefaultAzureCredential instance that configures the underlying
# ManagedIdentityCredential to use a user-assigned managed identity.
credential_storage = DefaultAzureCredential(
    managed_identity_client_id=os.environ['Managed_Identity_Client_ID_Storage']
)

# First Blob Storage client
blob_service_client_1 = BlobServiceClient(
    account_url="https://<receipt-storage-account>.blob.core.chinacloudapi.cn/",
    credential=credential_storage
)

# Second Blob Storage client
blob_service_client_2 = BlobServiceClient(
    account_url="https://<contract-storage-account>.blob.core.chinacloudapi.cn/",
    credential=credential_storage
)

# Create a DefaultAzureCredential instance that configures the underlying
# ManagedIdentityCredential to use a user-assigned managed identity.
credential_databases = DefaultAzureCredential(
    managed_identity_client_id=os.environ['Managed_Identity_Client_ID_Databases']
)

# Create an Azure Cosmos DB client
cosmos_client = CosmosClient(
    os.environ['COSMOS_ENDPOINT'],
    credential=credential_databases
)

# Connect to Azure SQL
token_bytes = credential_databases.get_token("https://database.chinacloudapi.cn/.default").token.encode("UTF-16-LE")
token_struct = struct.pack(f'<I{len(token_bytes)}s', len(token_bytes), token_bytes)
SQL_COPT_SS_ACCESS_TOKEN = 1256  # This connection option is defined by microsoft in msodbcsql.h
conn = pyodbc.connect(connection_string, attrs_before={SQL_COPT_SS_ACCESS_TOKEN: token_struct})
还可以将用户分配的托管标识和系统分配的托管标识同时关联到资源。 这样做在以下场景会很有帮助,即所有应用都需要访问同一共享服务,但其中一个应用还对其他服务具有特定的依赖关系。 使用系统分配的托管标识还可以确保在删除特定应用的同时,也删除与其相关联的标识,这有助于清理环境。
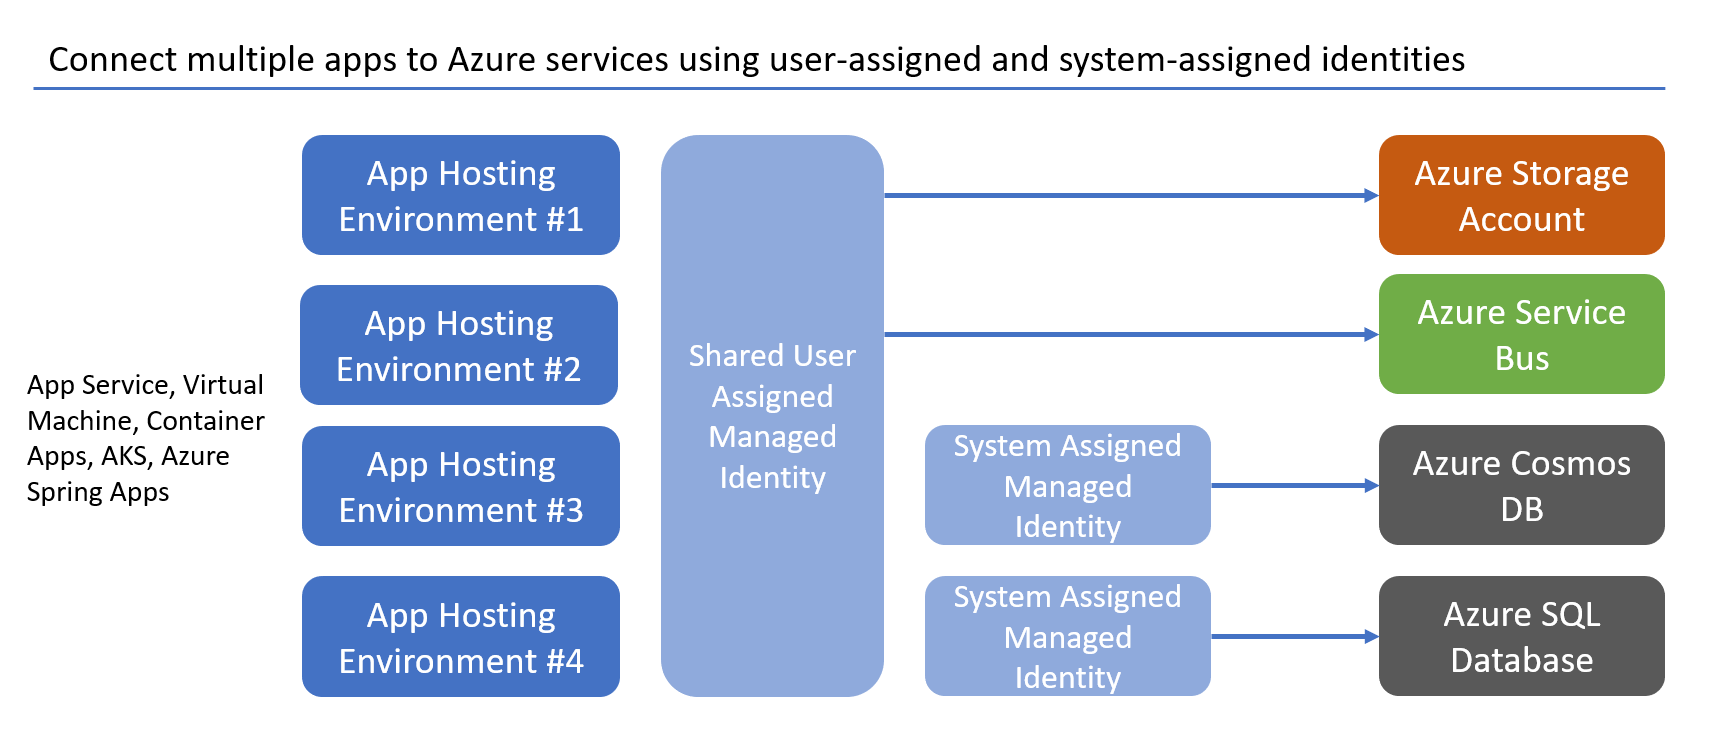
托管标识最佳做法建议中更加深入地探讨了这些类型的方案。
后续步骤
本教程介绍了如何将应用程序迁移到无密码连接。 阅读以下资源,更深入地了解本文中讨论的概念:


