重要
Azure Disk Encryption定于 2028 年 15 月 15 日停用。 在该日期之前,可以继续使用Azure Disk Encryption而不中断。 2028 年 9 月 15 日,已启用 ADE 的工作负荷将继续运行,但 VM 重启后加密磁盘将无法解锁,从而导致服务中断。
使用 主机端加密 用于新 VM。 所有已启用 ADE 的 VM(包括备份)必须在停用日期之前迁移到主机上的加密,以避免服务中断。 有关详细信息,请参阅 将 Azure 磁盘加密迁移到主机加密。
适用于:✔️ Linux VM ✔️ 灵活规模集
本文介绍如何调整使用Azure Disk Encryption的数据磁盘的大小。 若要重设磁盘大小,在 Linux 上使用逻辑卷管理 (LVM)。 这些步骤适用于多种场景。
你可以在以下环境中使用此调整大小流程:
- Linux 发行版:
- Red Hat Enterprise Linux (RHEL) 7 或更高版本
- Ubuntu 18.04 或更高版本
- SUSE 12 或更高版本
- Azure Disk Encryption 版本:
- 单通道扩展
- 双通道扩展
先决条件
本文假设用户具备以下条件:
现有的 LVM 配置。 有关详细信息,请参阅在 Linux VM 上配置 LVM。
已由Azure Disk Encryption加密的磁盘。 有关详细信息,请参阅在加密设备上配置 LVM 和 RAID。
使用 Linux 和 LVM 的经验。
使用 Azure 上数据磁盘的 /dev/disk/scsi1/ 路径的经验。 有关详细信息,请参阅排查 Linux VM 设备名称问题。
场景
本文中的过程适用于以下场景:
- 传统的 LVM 和 LVM-on-crypt 配置
- 传统的 LVM 加密
- LVM-on-crypt
- 仅限数据磁盘。 不支持 OS 磁盘大小调整。
传统的 LVM 和 LVM-on-crypt 配置
当卷组 (VG) 有可用空间时,传统LVM和加密LVM配置会扩展逻辑卷 (LV)。
传统的 LVM 加密
在传统的 LVM 加密中,LV 已加密。 未加密整个磁盘。
通过使用传统的 LVM 加密,你可以:
- 在添加新的物理卷 (PV) 时扩展 LV。
- 在重设现有 PV 的大小时,扩展 LV。
LVM-on-crypt
推荐的磁盘加密方法是 LVM-on-encrypt。 该方法加密整个磁盘,而不仅仅是 LV。
通过使用 LVM-on-crypt,你可以:
- 在添加新的 PV 时扩展 LV。
- 在重设现有 PV 的大小时,扩展 LV。
注意
建议不要在同一个 VM 上混合使用传统的 LVM 加密和 LVM-on-crypt。
以下部分提供了如何使用 LVM 和 LVM-on-crypt 的示例。 这些示例使用磁盘、PV、VG、LV、文件系统、全局唯一标识符 (UUID) 和装入点的预先存在的值。 将这些值替换为您自己的值,以便与您的环境相适应。
当 VG 有可用空间时扩展 LV
调整 LV 大小的传统方法是,当 VG 有可用空间时,扩展 LV。 可以将此方法用于非加密磁盘、传统的 LVM 加密卷和 LVM-on-crypt 配置。
验证要增大的文件系统的当前大小:
df -h /mountpoint
验证 VG 是否有足够的空间来增大 LV:
sudo vgs
也可使用
vgdisplay:sudo vgdisplay vgname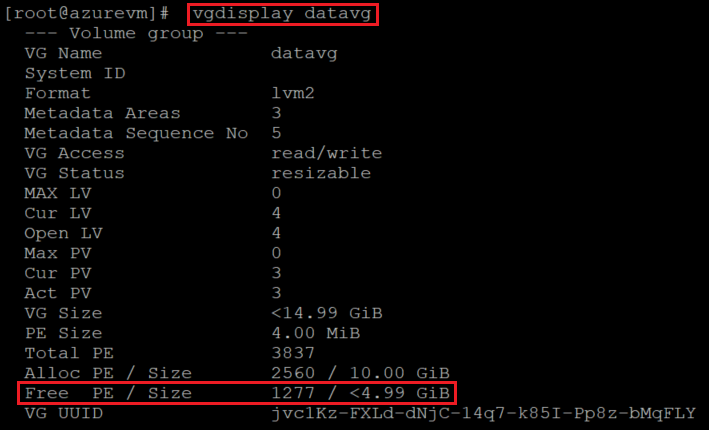
确定需要调整大小的 LV:
sudo lsblk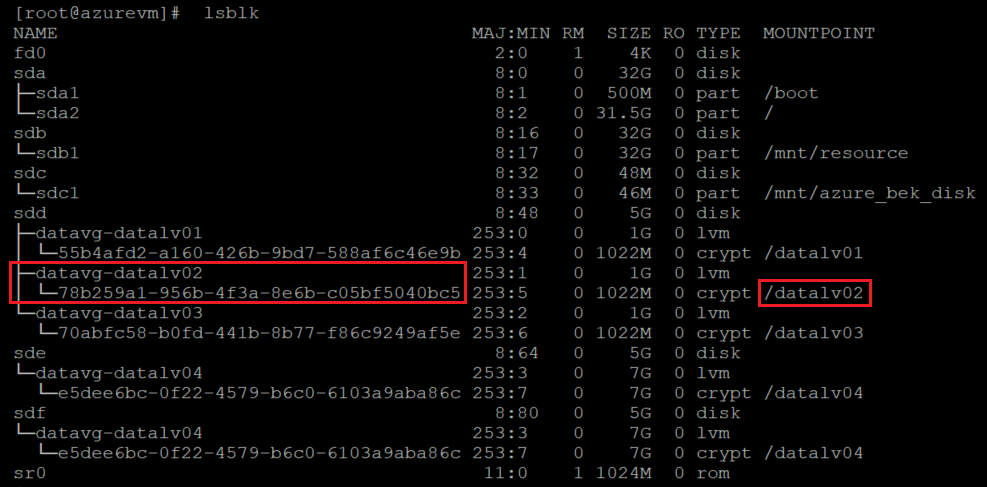
对于 LVM-on-crypt,不同之处在于此输出显示加密层处于磁盘级别。
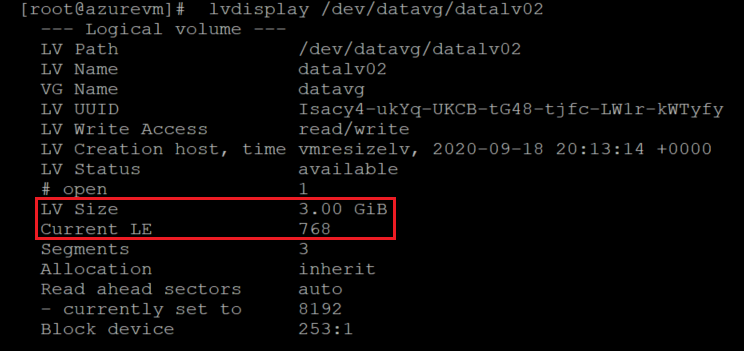
检查 LV 大小。
sudo lvdisplay lvname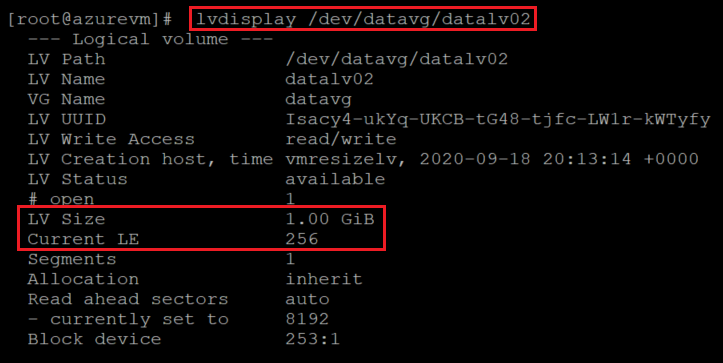
使用
-r在线调整文件系统大小以增加 LV 大小:sudo lvextend -r -L +2G /dev/vgname/lvname
验证 LV 和文件系统的新大小:
df -h /mountpoint
大小输出指示已成功重设 LV 和文件系统的大小。
可以再次检查 LV 信息以确认 LV 级别的更改:
sudo lvdisplay lvname
通过添加新的 PV 来扩展传统的 LVM 卷
当你需要添加一个新磁盘来增加 VG 的大小时,可以通过添加新的 PV 来扩展你的传统 LVM 卷。
验证要增大的文件系统的当前大小:
df -h /mountpoint
验证当前 PV 配置:
sudo pvs
查看当前的 VG 信息:
sudo vgs
检查当前磁盘列表。 通过检查 /dev/disk/azure/scsi1/ 中的设备来标识数据磁盘。
sudo ls -l /dev/disk/azure/scsi1/
查看
lsblk的输出:sudo lsbk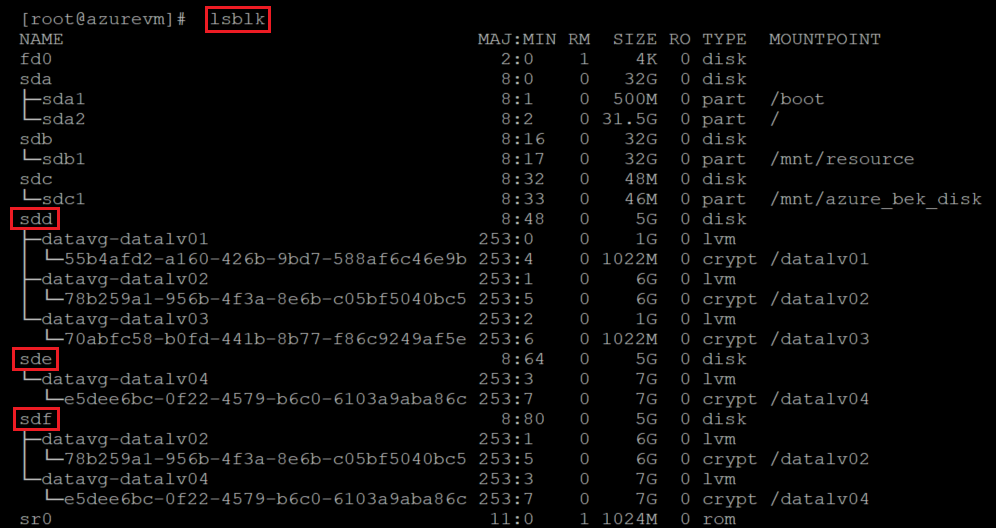
按照将数据磁盘附加到 Linux VM 中的说明,将新磁盘附加到 VM。
检查磁盘列表,并注意新磁盘。
sudo ls -l /dev/disk/azure/scsi1/
sudo lsblk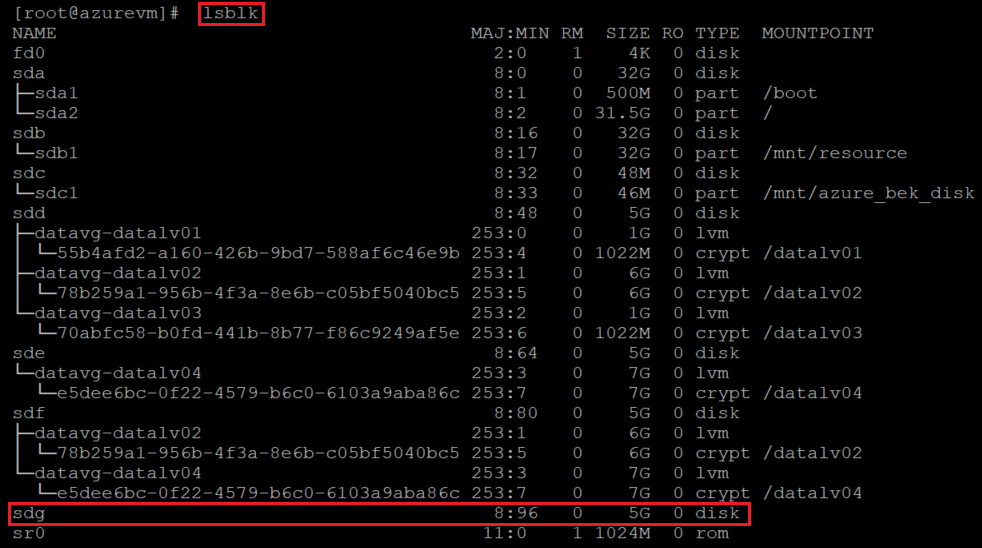
在新的数据磁盘上创建一个新 PV:
sudo pvcreate /dev/newdisk
此方法使用整个磁盘作为没有分区的 PV。 或者,你可以使用
fdisk创建一个分区,然后将该分区用于pvcreate。验证 PV 是否已添加到 PV 列表中:
sudo pvs
通过将新的 PV 添加到 VG 来扩展 VG:
sudo vgextend vgname /dev/newdisk
检查新的 VG 大小:
sudo vgs

使用
lsblk标识需要重设大小的 LV:sudo lsblk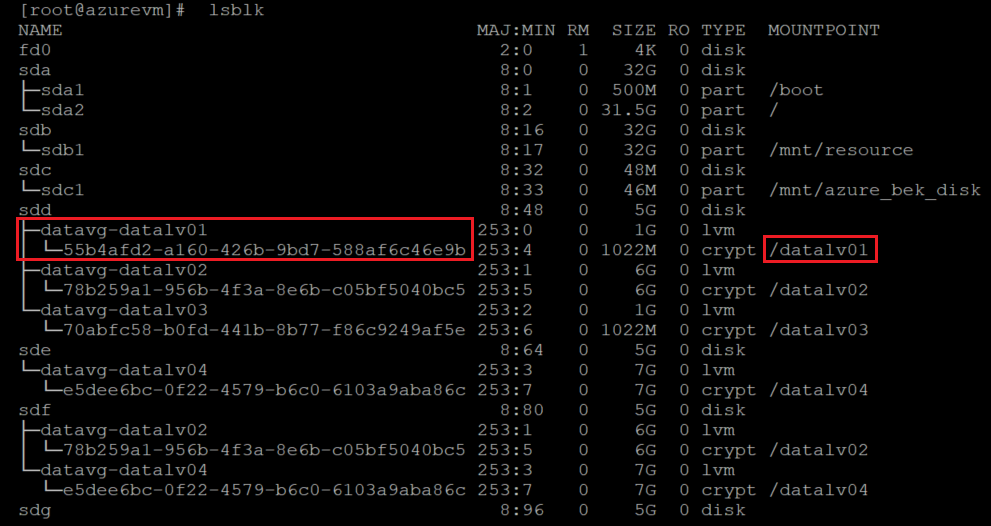
通过使用
-r扩展 LV 大小,然后在线增加文件系统大小:sudo lvextend -r -L +2G /dev/vgname/lvname
验证 LV 和文件系统的新大小:
df -h /mountpoint
重要
在传统 LVM 配置上使用Azure数据加密时,加密层在 LV 级别而不是磁盘级别创建。
此时,加密层已扩展到新磁盘。 实际的数据磁盘在平台级别没有加密设置,因此其加密状态不会更新。
这些是推荐使用 LVM-on-crypt 方法的部分原因。
检查门户中的加密信息:

若要更新磁盘上的加密设置,请添加一个新的 LV 并在 VM 上启用扩展。
添加新的 LV,在其上创建一个文件系统,并将其添加到
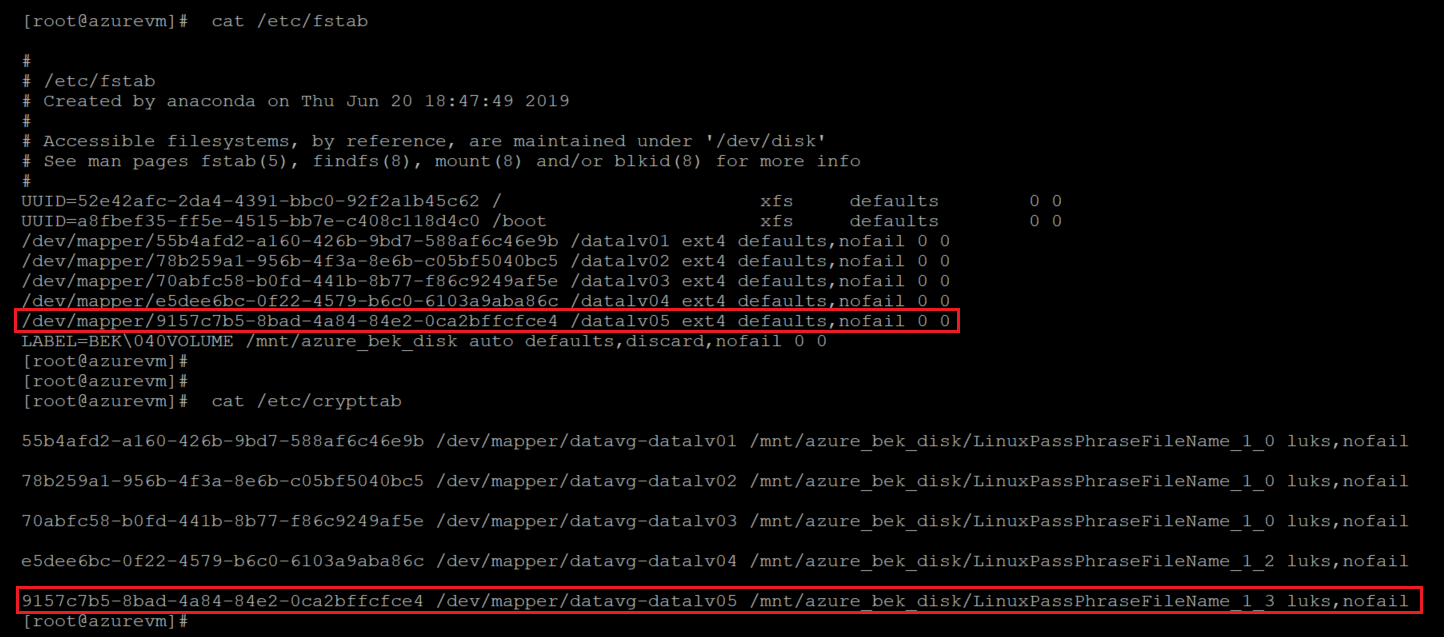
/etc/fstab。再次设置加密扩展。 这次,您将在平台层级对新数据盘应用加密设置。 下面是 CLI 示例:
az vm encryption enable -g ${RGNAME} --name ${VMNAME} --disk-encryption-keyvault "<your-unique-keyvault-name>"检查门户中的加密信息:

更新加密设置后,可以删除新的 LV。 同时从你创建的 /etc/fstab 和 /etc/crypttab 中删除条目。
请按照以下步骤完成清理:
卸载 LV:
sudo umount /mountpoint关闭卷的加密层:
sudo cryptsetup luksClose /dev/vgname/lvname删除 LV:
sudo lvremove /dev/vgname/lvname
通过调整现有 PV 的大小来扩展传统的 LVM 卷
在某些情况下,由于你的容量限制,可能需要调整现有磁盘的大小。 方法如下:
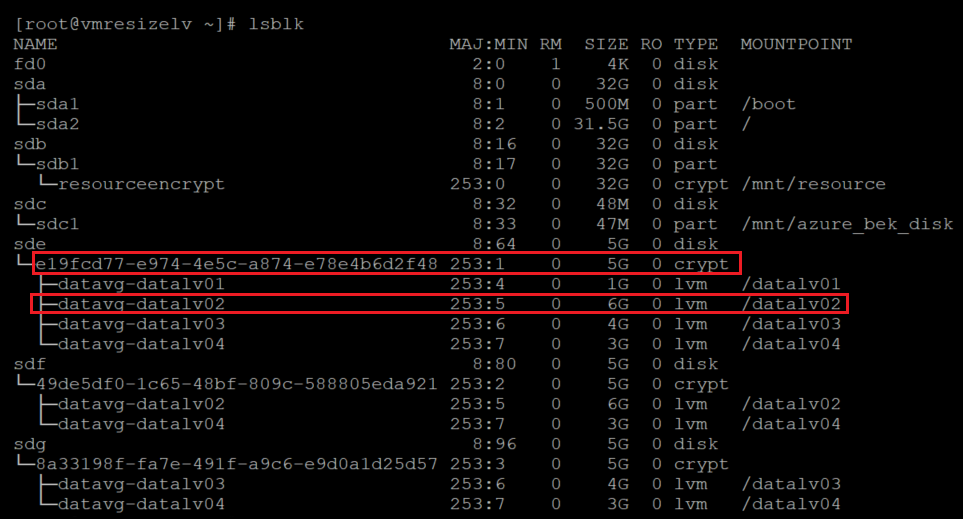
标识加密的磁盘:
sudo ls -l /dev/disk/azure/scsi1/
sudo lsblk -fs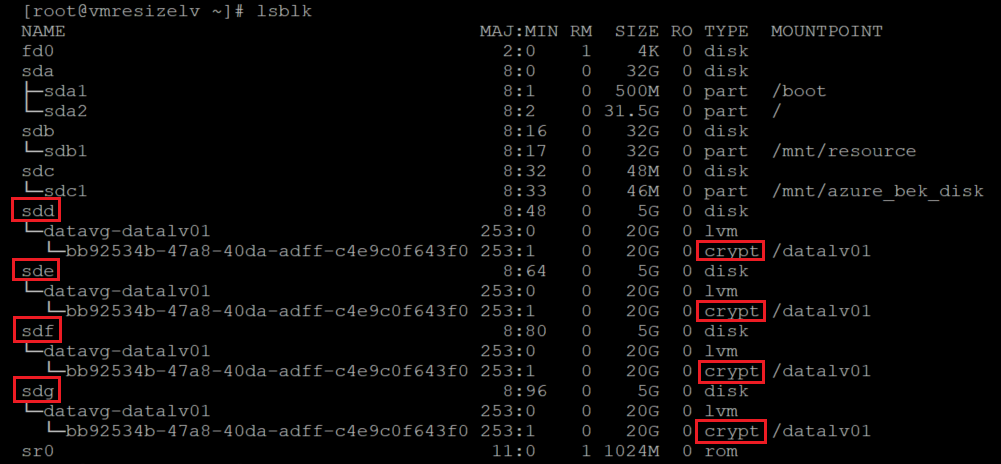
检查 PV 信息:
sudo pvs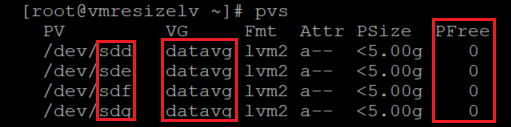
图中结果显示,所有 PV 上的空间当前都已使用完毕。
检查 VG 的信息:
sudo vgs
sudo vgdisplay -v vgname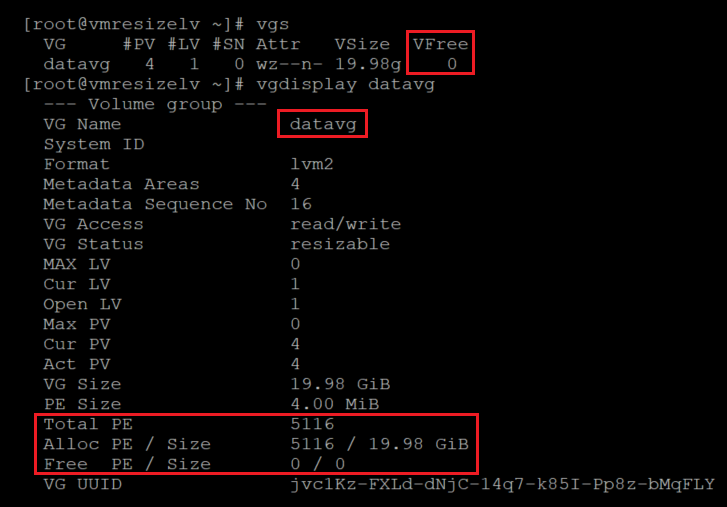
检查磁盘大小。 可以使用
fdisk或lsblk列出驱动器大小。for disk in `sudo ls -l /dev/disk/azure/scsi1/* | awk -F/ '{print $NF}'` ; do echo "sudo fdisk -l /dev/${disk} | grep ^Disk "; done | bash sudo lsblk -o "NAME,SIZE"
此处,我们通过使用
lsblk -fs来标识哪些 PV 与哪些 LV 相关联。 可以通过运行lvdisplay来标识关联。sudo lvdisplay --maps VG/LV sudo lvdisplay --maps datavg/datalv1
在这种情况下,所有四个数据驱动器都属于同一个 VG 和单个 LV。 配置可能有所不同。
检查当前文件系统使用率:
df -h /datalvm*
按照 Expand Azure 托管磁盘中的说明调整数据磁盘的大小。 可以使用门户、CLI 或 PowerShell。
重要
可以在不解除分配 VM 的情况下调整 Linux VM 上的某些数据磁盘的大小,请检查 [在 Linux VM 上展开虚拟硬盘](/virtual-machines/linux/expand-disks?tabs=ubuntu#expand-an-azure-managed-disk),以验证磁盘是否满足要求。
启动 VM,并使用
fdisk检查新的大小。for disk in `sudo ls -l /dev/disk/azure/scsi1/* | awk -F/ '{print $NF}'` ; do echo "sudo fdisk -l /dev/${disk} | grep ^Disk "; done | bash sudo lsblk -o "NAME,SIZE"
在这种情况下,
/dev/sdd的大小从 5 G 调整到 20 G。检查当前 PV 大小:
sudo pvdisplay /dev/resizeddisk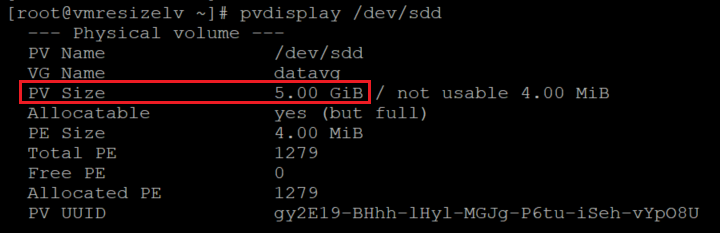
即使磁盘已经调整大小,PV 仍然保持以前的大小。
调整 PV 大小:
sudo pvresize /dev/resizeddisk
检查 PV 大小:
sudo pvdisplay /dev/resizeddisk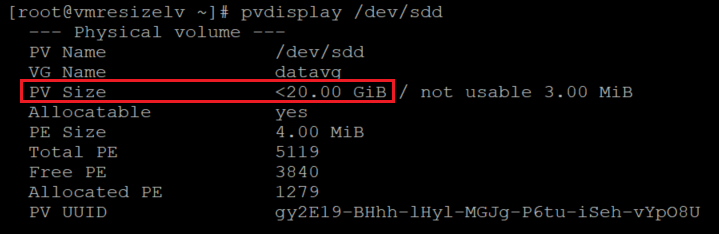
对所有要重设大小的磁盘应用相同的过程。
检查 VG 信息。
sudo vgdisplay vgname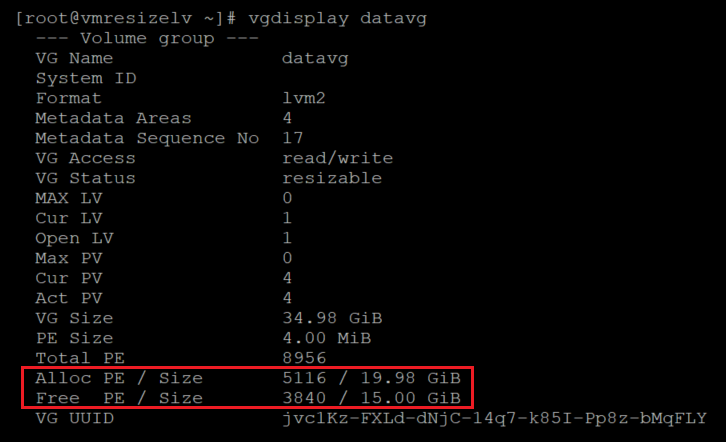
VG 现在有足够的空间分配给 LV。
重设 LV 大小:
sudo lvresize -r -L +5G vgname/lvname
sudo lvresize -r -l +100%FREE /dev/datavg/datalv01
检查文件系统的大小:
df -h /datalvm2
通过添加新的物理卷 (PV) 来扩展 LVM-on-crypt 卷
你也可以通过添加新的 PV 来扩展 LVM-on-crypt 卷。 此方法严格遵循在加密设备上配置 LVM 和 RAID 的步骤。 请参阅解释如何添加新磁盘并在 LVM-on-crypt 配置中对其进行设置的部分。
可以使用此方法向现有 LV 添加空间。 也可以创建新的 VG 或 LV。
验证 VG 的当前大小:
sudo vgdisplay vgname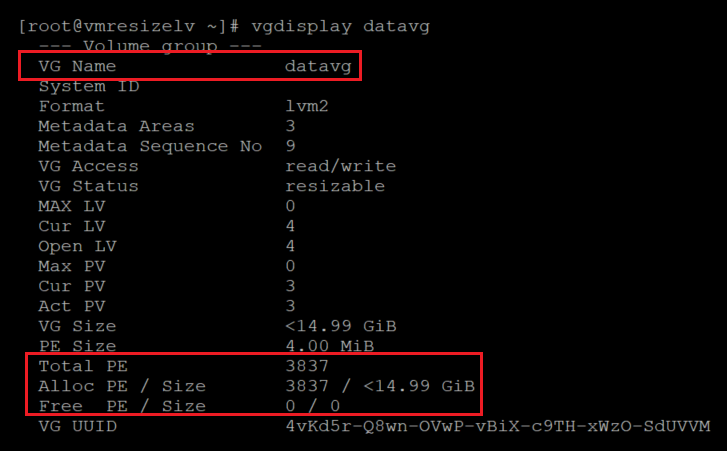
验证要扩展的文件系统和 LV 的大小:
sudo lvdisplay /dev/vgname/lvname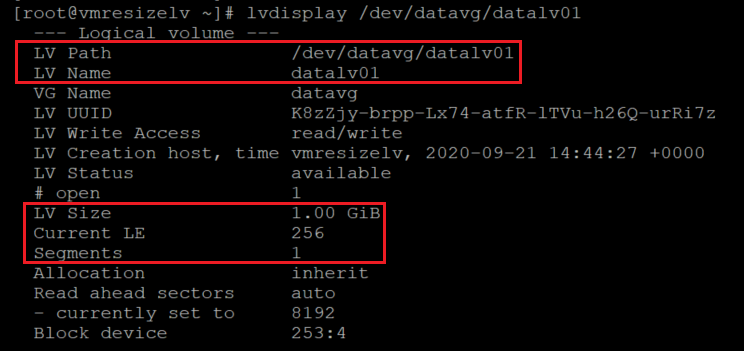
df -h mountpoint
向 VM 添加新的数据磁盘并标识它。
添加新磁盘之前,请检查磁盘:
sudo fdisk -l | egrep ^"Disk /"
下面是另一种在添加新磁盘之前检查磁盘的方法:
sudo lsblk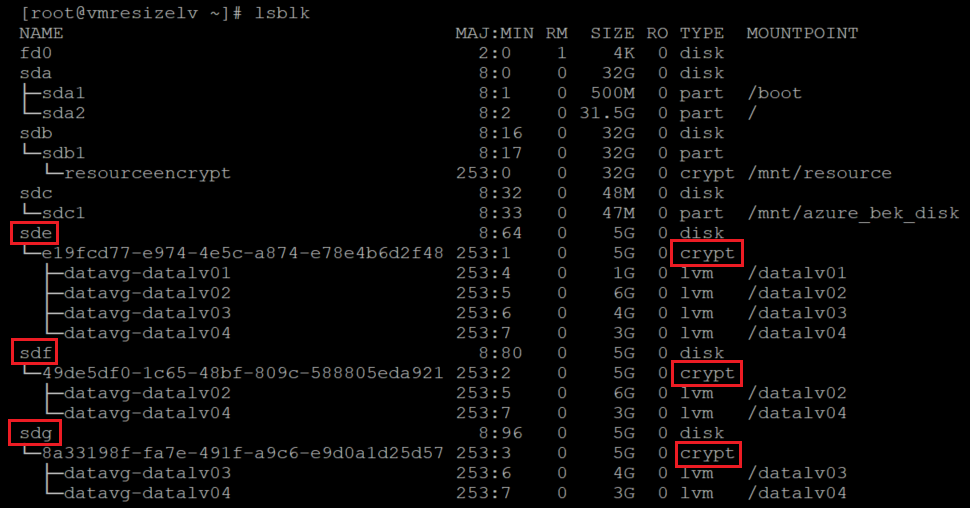
若要添加新磁盘,可以使用 PowerShell、Azure CLI 或Azure门户。 有关详细信息,请参阅将数据磁盘附加到 Linux VM。
内核名称方案适用于新添加的设备。 通常向新驱动器分配下一个可用的驱动器号。 在本例中,添加的磁盘是
sdd。检查磁盘以确保已添加新磁盘:
sudo fdisk -l | egrep ^"Disk /"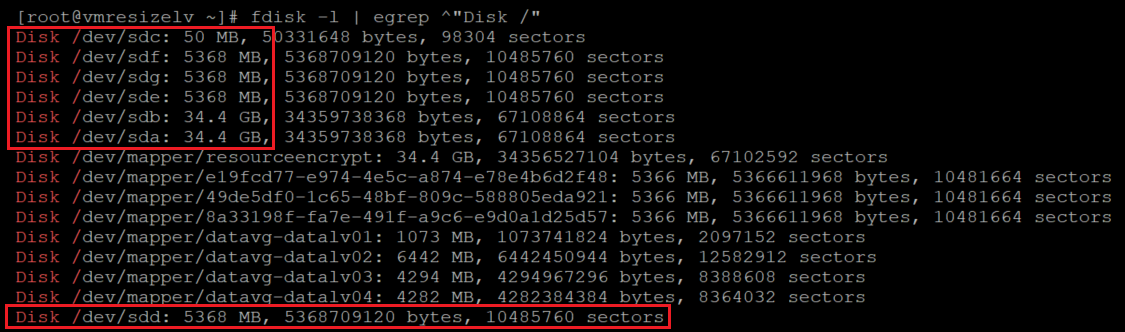
sudo lsblk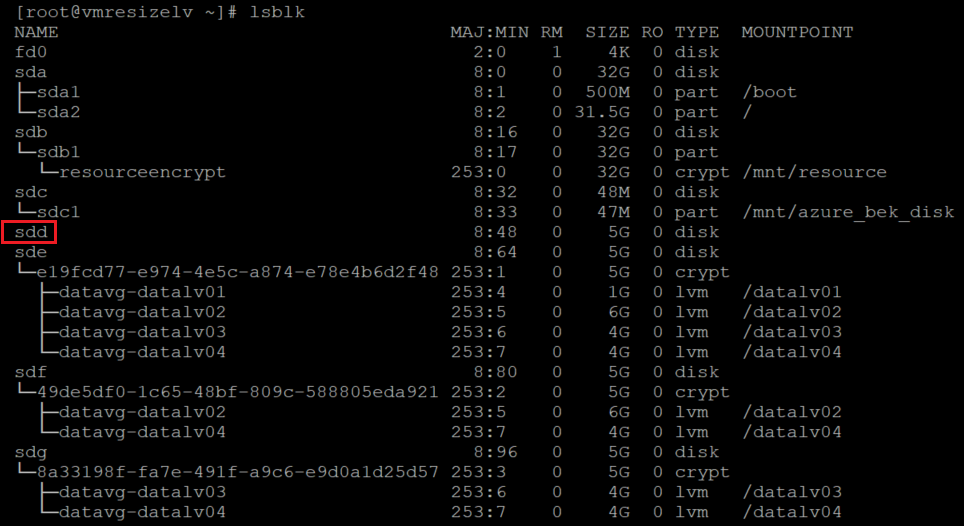
在最近添加的磁盘上创建一个文件系统。 将磁盘与
/dev/disk/azure/scsi1/上的链接设备匹配。sudo ls -la /dev/disk/azure/scsi1/
sudo mkfs.ext4 /dev/disk/azure/scsi1/${disk}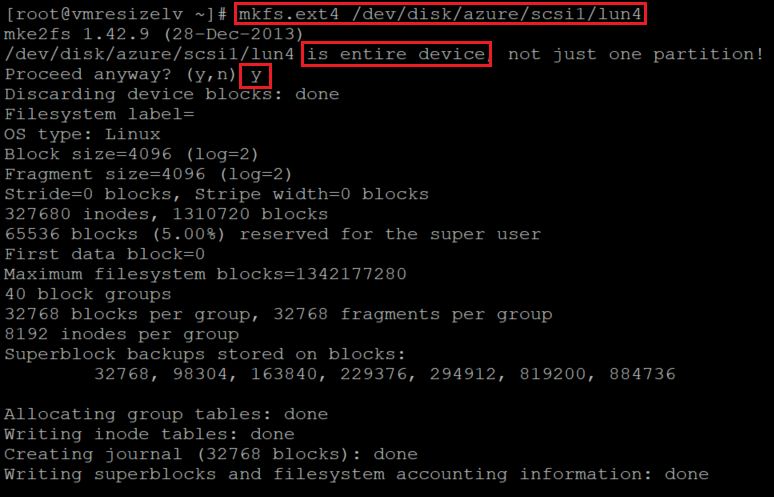
为新添加的磁盘创建临时装入点:
newmount=/data4
sudo mkdir ${newmount}
将最近创建的文件系统添加到
/etc/fstab。sudo blkid /dev/disk/azure/scsi1/lun4| awk -F\" '{print "UUID="$2" '${newmount}' "$4" defaults,nofail 0 0"}' >> /etc/fstab装载新创建的文件系统:
sudo mount -a验证是否已装载新文件系统:
df -h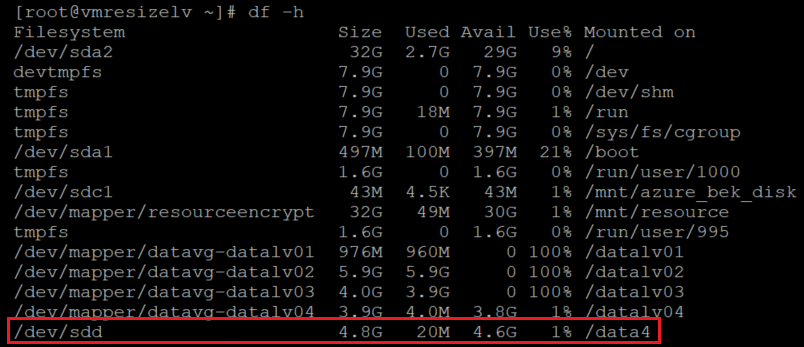
sudo lsblk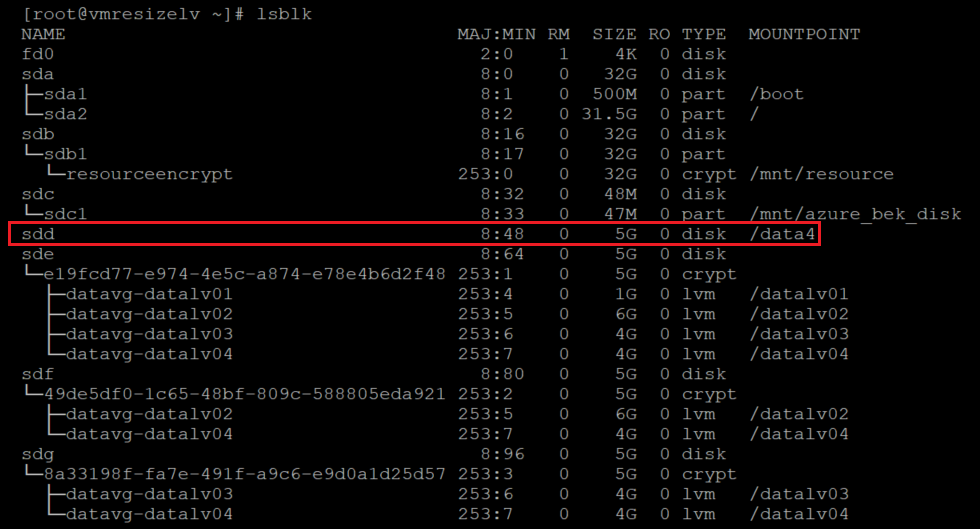
重启以前为数据驱动器启动的加密。
下面是一个示例:
az vm encryption enable \
--resource-group ${RGNAME} \
--name ${VMNAME} \
--disk-encryption-keyvault ${KEYVAULTNAME} \
--key-encryption-key ${KEYNAME} \
--key-encryption-keyvault ${KEYVAULTNAME} \
--volume-type "DATA" \
--encrypt-format-all \
-o table
加密完成后,你会在新添加的磁盘上看到一个加密层:
sudo lsblk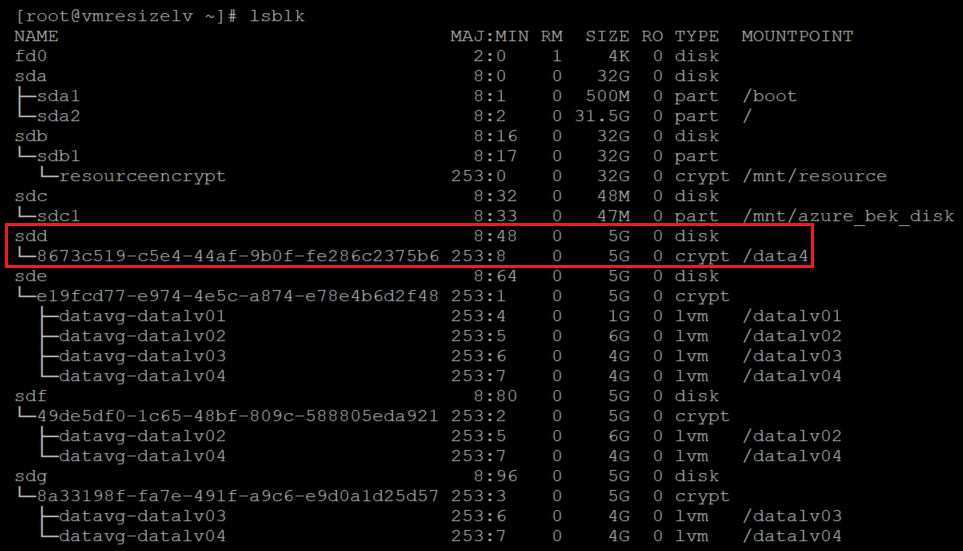
卸载新磁盘的加密层:
sudo umount ${newmount}查看当前的光伏信息:
sudo pvs
在磁盘的加密层上创建一个 PV。 从前面的
lsblk命令获取设备名。 在设备名称前面添加/dev/映射器以创建 PV:sudo pvcreate /dev/mapper/mapperdevicename
将显示一条关于擦除当前
ext4 fs签名的警告。 此警告是在意料之内。 使用y回答此问题。验证新 PV 是否已添加到 LVM 配置中:
sudo pvs
将新的 PV 添加到要扩展的 VG 中。
sudo vgextend vgname /dev/mapper/nameofhenewpv
验证 VG 的新大小和可用空间:
sudo vgdisplay vgname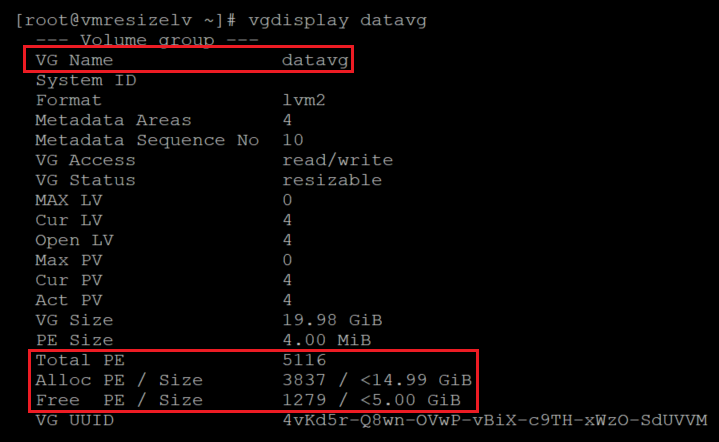
注意
Total PE和Free PE / Size计数的增加。增加 LV 和文件系统的大小。 在
-r上使用lvextend选项。 在本例中,我们将把 VG 中的总可用空间添加到给定的 LV 中。sudo lvextend -r -l +100%FREE /dev/vgname/lvname
按照以下步骤验证更改。
验证 LV 的大小:
sudo lvdisplay /dev/vgname/lvname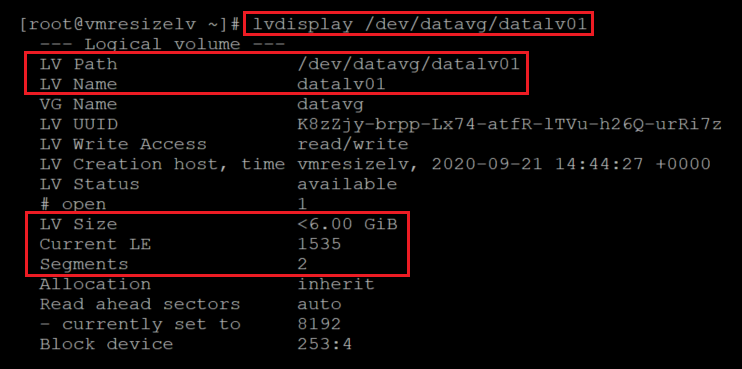
验证文件系统的新大小:
df -h /mountpoint
验证 LVM 层是否位于加密层之上:
sudo lsblk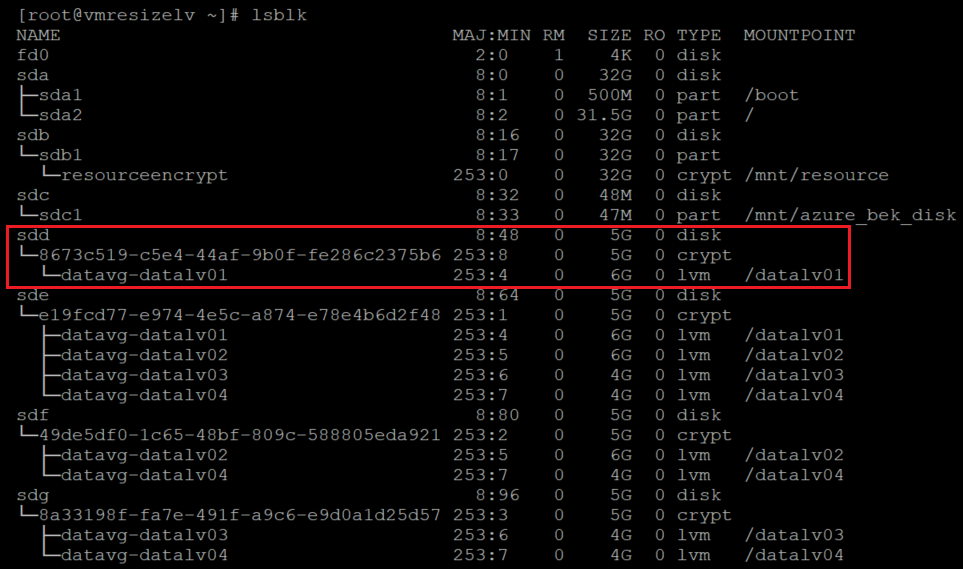
如果你使用不带选项的
lsblk,则会多次看到装入点。 命令按设备和 LV 进行排序。你可能需要使用
lsblk -fs。 在此命令中,-fs反转排序顺序,使装入点只显示一次。 磁盘被多次显示。sudo lsblk -fs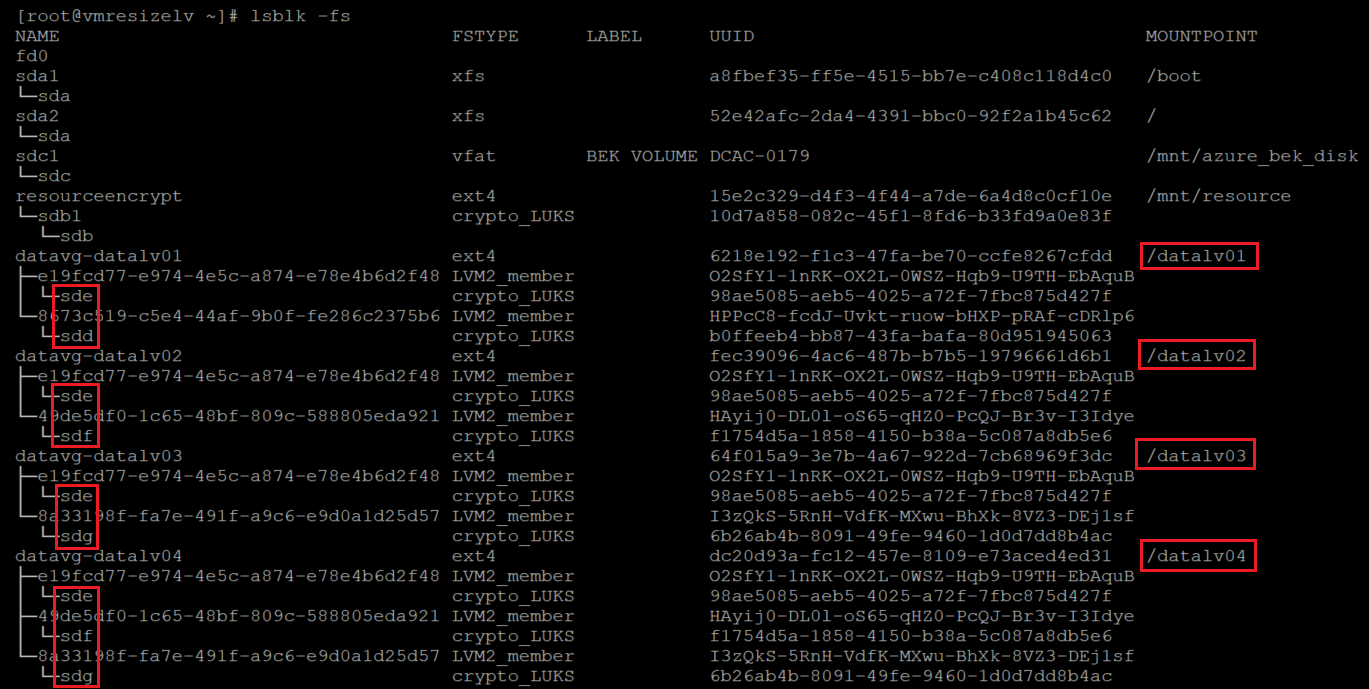
通过调整现有 PV 的大小扩展加密卷上的 LVM
标识加密的磁盘:
sudo lsblk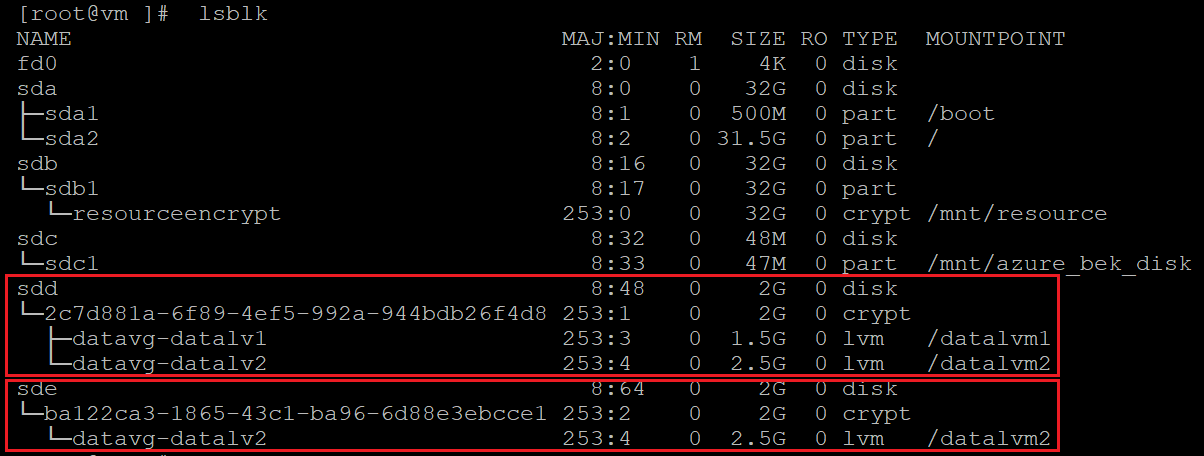
sudo lsblk -s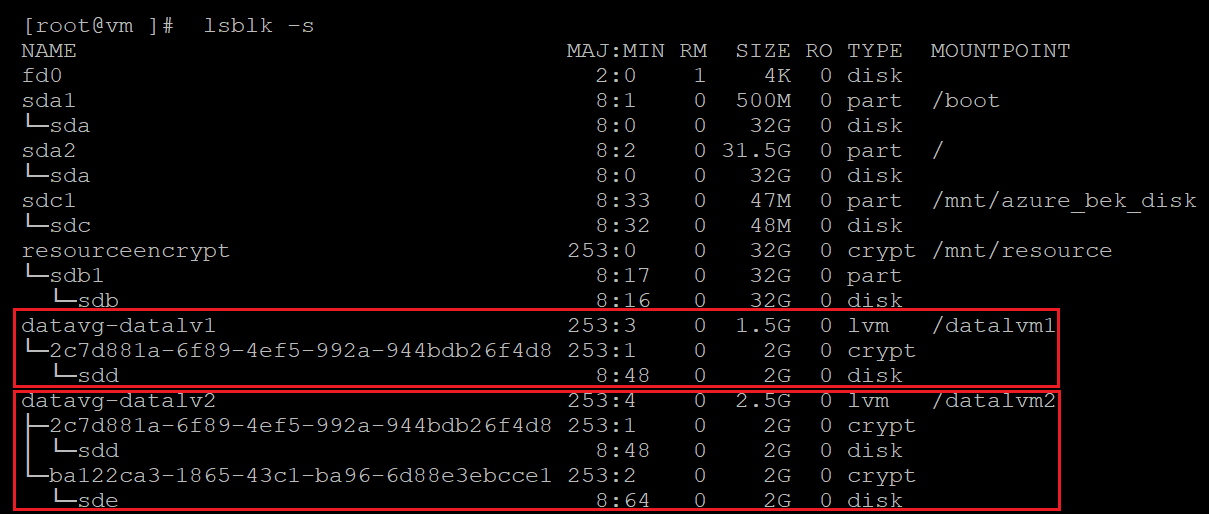
检查光伏(PV)信息:
sudo pvs
检查 VG 信息:
sudo vgs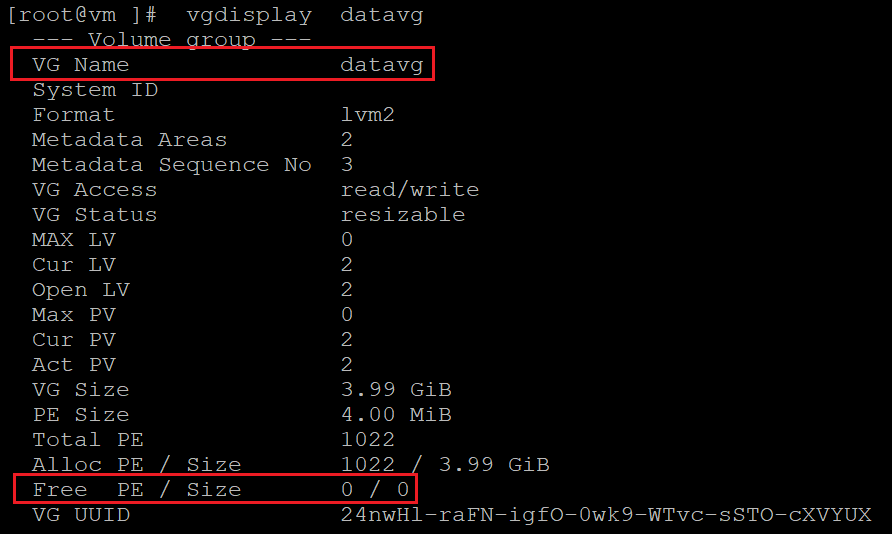
检查 LV 信息:
sudo lvs
检查文件系统使用率:
df -h /mountpoint(s)
检查磁盘的大小:
sudo fdisk
sudo fdisk -l | egrep ^"Disk /"
sudo lsblk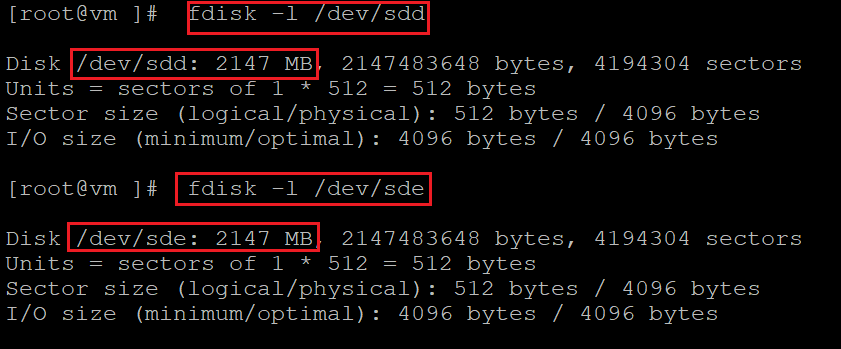
调整数据磁盘的大小。 可以使用门户、CLI 或 PowerShell。 有关详细信息,请参阅扩展 Linux VM 上的虚拟硬盘中的重设磁盘大小部分。
重要
VM 正在运行时,无法重设虚拟磁盘的大小。 在此步骤中解除分配虚拟机。
检查磁盘大小:
sudo fdisk
sudo fdisk -l | egrep ^"Disk /"
sudo lsblk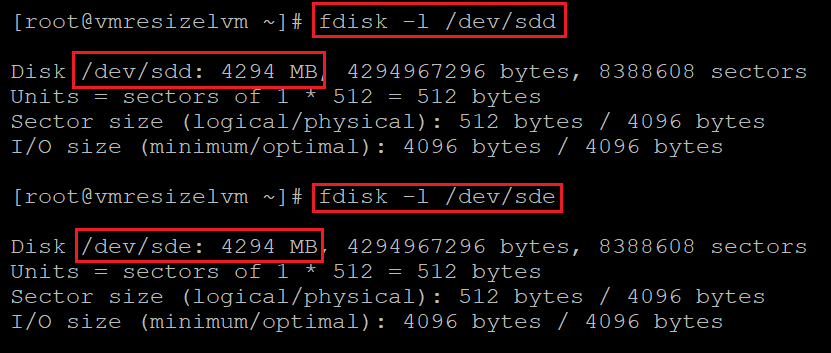
在这种情况下,两个磁盘的大小都从 2 GB 调整到 4 GB。 但是文件系统、LV 和 PV 的大小保持不变。
检查当前 PV 大小。 请记住,在 LVM-on-crypt 上,PV 是
/dev/mapper/设备,而不是/dev/sd*设备。sudo pvdisplay /dev/mapper/devicemappername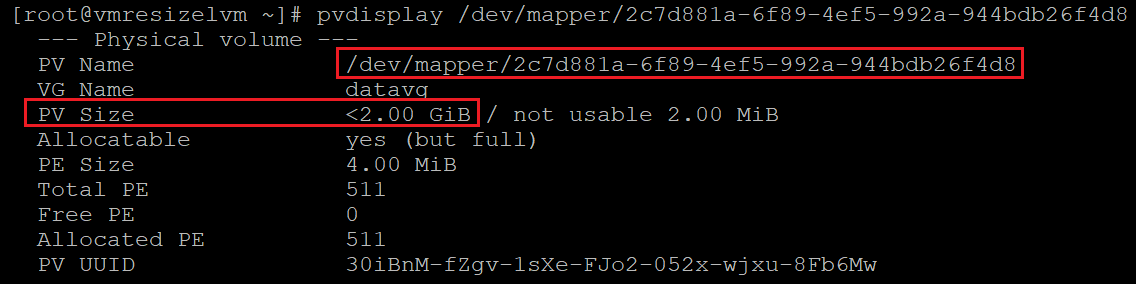
调整 PV 大小:
sudo pvresize /dev/mapper/devicemappername
检查新的 PV 大小:
sudo pvdisplay /dev/mapper/devicemappername
调整在 PV 上的加密层的大小:
sudo cryptsetup resize /dev/mapper/devicemappername对所有要重设大小的磁盘应用相同的过程。
检查 VG 信息:
sudo vgdisplay vgname
VG 现在有足够的空间分配给 LV。
检查 LV 信息:
sudo lvdisplay vgname/lvname
检查文件系统使用率:
df -h /mountpoint
重设 LV 大小:
sudo lvresize -r -L +2G /dev/vgname/lvname
此处,我们也使用
-r选项来重设文件系统的大小。检查 LV 信息:
sudo lvdisplay vgname/lvname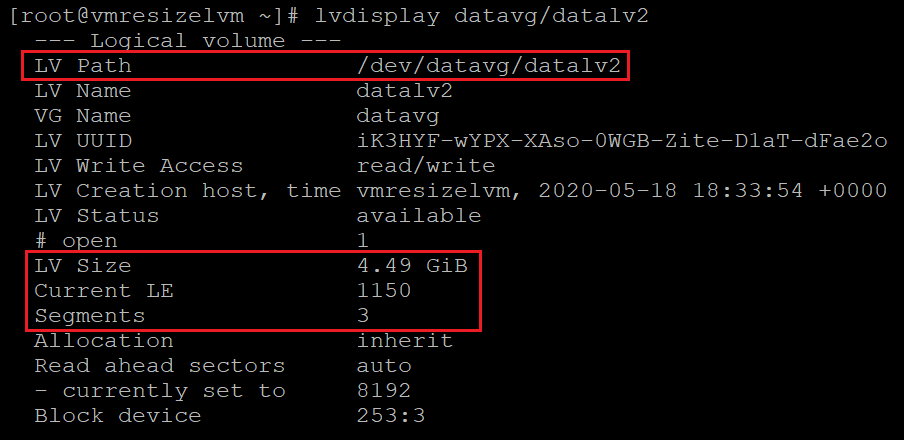
检查文件系统使用率:
df -h /mountpoint
对其他任何需要重设大小的 LV 应用相同的重设大小过程。