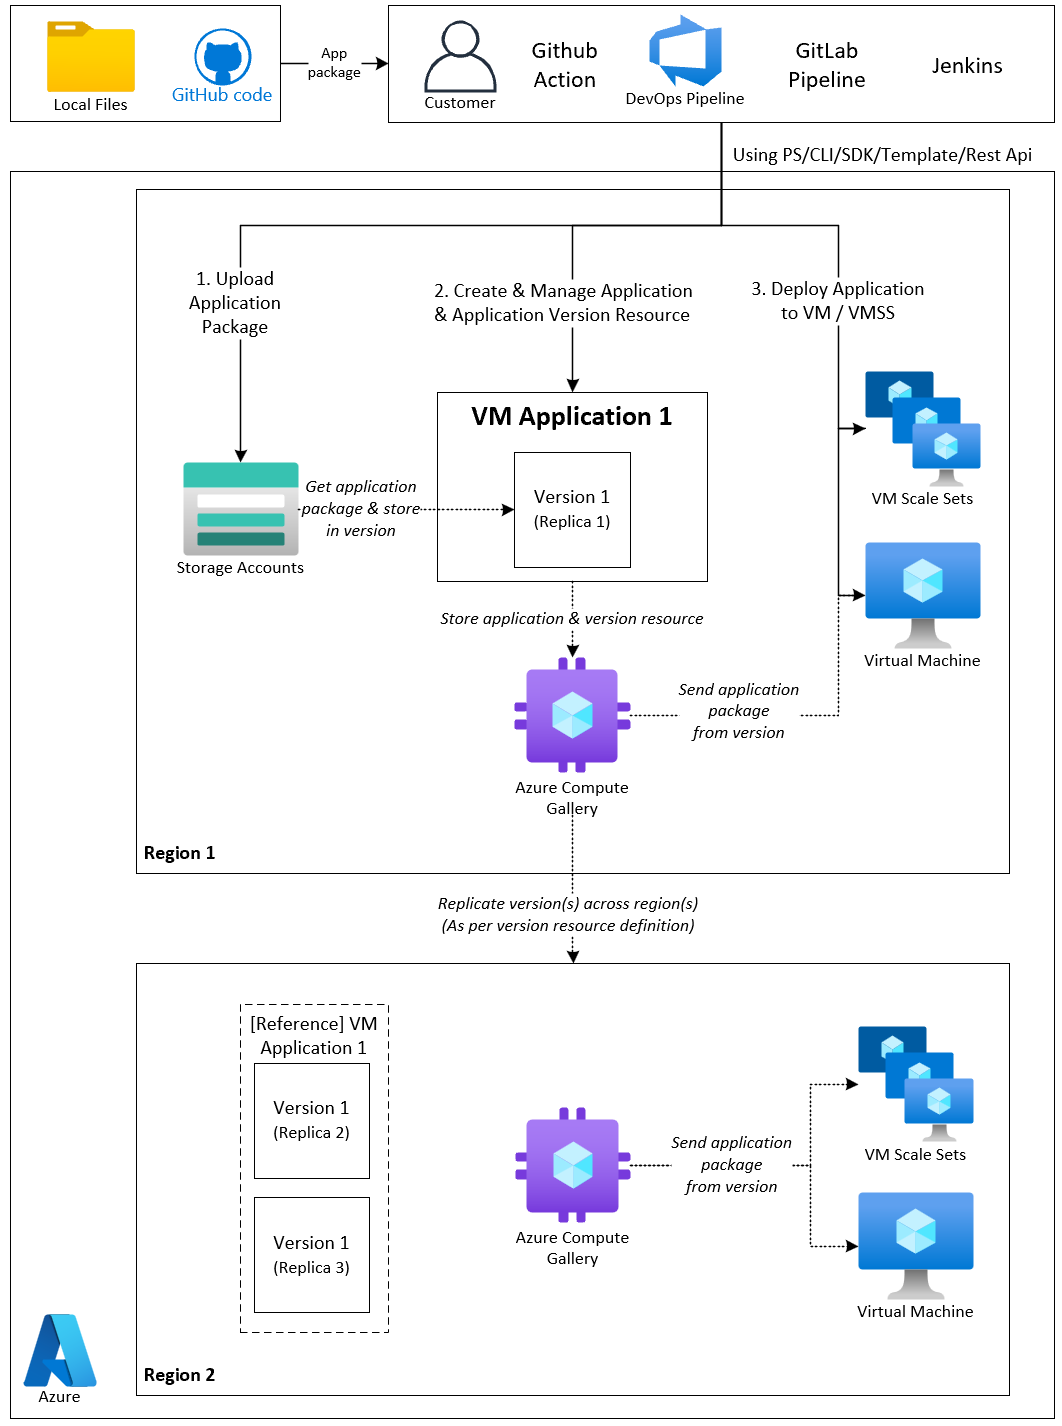
VM 应用程序是Azure计算库中的资源类型,可简化虚拟机的应用程序和脚本的发布、部署、管理、共享和全局分发。
VM 应用程序支持各种方案,包括大规模部署、低延迟要求、故障复原、安全受信任的推出、车队范围的一致性、微服务体系结构和部署后管理。
详细了解 VM 应用程序。
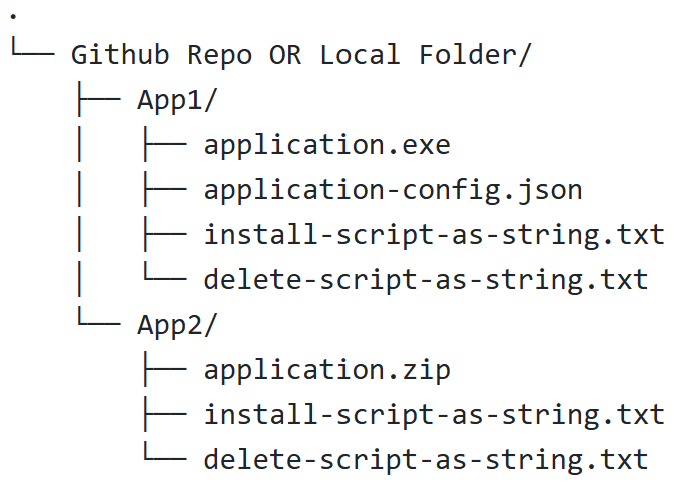
在 Azure 计算库中发布 VM 应用程序资源之前,请将应用程序文件打包为上传到 Azure Storage 帐户。 下图显示了用于组织应用程序文件的可能文件夹结构:
将 VMApp1 替换为应用程序包(VMApp1)和配置文件(VMApp1-config)中的 VM 应用名称。
将 app.tar 替换为所需的应用名称。
替换 config.yaml 为您所需的配置名称。
在不使用配置文件的情况下使用 bash 进行安装:
mv VMApp1 app.tar && tar -xf app.tar && chmod -R +xr . && bash ./install.sh
mv VMApp1 app.tar && tar -xf app.tar && chmod -R +xr . && sudo DEBIAN_FRONTEND=noninteractive dpkg -i ./app.deb
通过配置文件使用 bash 进行安装:
mv VMApp1 app.tar && mv VMApp1-config config.yaml && tar -xf app.tar && chmod -R +xr . && bash ./install.sh --config config.yaml
如果配置文件打包在 tar 文件中
mv VMApp1 app.tar && tar -xf app.tar && chmod -R +xr . && sudo debconf-set-selections < config.cfg && sudo DEBIAN_FRONTEND=noninteractive dpkg -i ./app.deb
请在应用程序包(VMApp1)和配置文件(VMApp1-config)中用您的 VM 应用名称替换 VMApp1。
替换 app.zip 为所需的应用名称。
替换 config.json 为您所需的配置名称。
以下示例假定 vm 应用程序正在安装 python 应用程序,pythonInstaller.exe 打包到 app.zip中。
使用没有配置文件的 CMD 进行安装:
将 VMApp1 替换为 VM 应用名称,并将 app.zip 替换为以下脚本中可执行文件的所需名称。
ren VMApp1 app.zip && tar -xf app.zip && start /wait pythonInstaller.exe /quiet InstallAllUsers=1 PrependPath=1
将 CMD 与配置文件配合使用进行安装:
ren VMApp1 app.zip && tar -xf app.zip && ren VMApp1-config config.json && start /wait pythonInstaller.exe --config config.json /quiet InstallAllUsers=1 PrependPath=1
如果配置文件包含在 .zip 包中
ren VMApp1 app.zip && tar -xf app.zip && start /wait pythonInstaller.exe --config config.json /quiet InstallAllUsers=1 PrependPath=1
在没有配置文件的情况下使用 PowerShell 进行安装:
powershell.exe -ExecutionPolicy Bypass -NoProfile -Command "Rename-Item VMApp1 app.zip; Expand-Archive -Path '.\app.zip' -DestinationPath '.'; Start-Process -FilePath '.\pythonInstaller.exe' -ArgumentList '/quiet','InstallAllUsers=1','PrependPath=1' -Wait -NoNewWindow"
将 PowerShell 与配置文件配合使用进行安装:
powershell.exe -ExecutionPolicy Bypass -NoProfile -Command "Rename-Item VMApp1 app.zip; Rename-Item VMApp1-config config.json Expand-Archive -Path '.\app.zip' -DestinationPath '.'; Start-Process -FilePath '.\pythonInstaller.exe' -ArgumentList '--config','config.json','/quiet','InstallAllUsers=1','PrependPath=1' -Wait -NoNewWindow"
如果配置文件包含在 .zip 包中
powershell.exe -ExecutionPolicy Bypass -NoProfile -Command "Rename-Item VMApp1 app.zip; Expand-Archive -Path '.\app.zip' -DestinationPath '.'; Start-Process -FilePath '.\pythonInstaller.exe' -ArgumentList '--config','config.json','/quiet','InstallAllUsers=1','PrependPath=1' -Wait -NoNewWindow"
将 VMApp1 替换为应用程序包(VMApp1)和配置文件(VMApp1-config)中的 VM 应用名称。
将 pythonInstaller.exe 替换为所需的应用名称。
替换 config.json 为您所需的配置名称。
以下示例假定 vm 应用程序使用 EXE 安装 Python 应用程序。
使用没有配置文件的 CMD 进行安装:
将 VMApp1 替换为 VM 应用名称,并将 pythonInstaller.exe 替换为可执行文件的所需名称。
ren VMApp1 pythonInstaller.exe && start /wait pythonInstaller.exe /quiet InstallAllUsers=1 PrependPath=1
将 CMD 与配置文件配合使用进行安装:
ren VMApp1 pythonInstaller.exe && ren VMApp1-config config.json && start /wait pythonInstaller.exe --config config.json /quiet InstallAllUsers=1 PrependPath=1
在没有配置文件的情况下使用 PowerShell 进行安装:
powershell.exe -ExecutionPolicy Bypass -NoProfile -Command "Rename-Item VMApp1 pythonInstaller.exe; Start-Process -FilePath '.\pythonInstaller.exe' -ArgumentList '/quiet','InstallAllUsers=1','PrependPath=1' -Wait -NoNewWindow"
将 PowerShell 与配置文件配合使用进行安装:
powershell.exe -ExecutionPolicy Bypass -NoProfile -Command "Rename-Item VMApp1 pythonInstaller.exe; Rename-Item VMApp1-config config.json; Start-Process -FilePath '.\pythonInstaller.exe' -ArgumentList '--config','config.json','/quiet','InstallAllUsers=1','PrependPath=1' -Wait -NoNewWindow"
替换 VMApp1 为应用程序包(VMApp1)和配置文件(VMApp1-config)中的 VM 应用名称。
将 pythonInstaller.msi 替换为您想要的应用名称。
替换 config.json 为您所需的配置名称。
以下示例假定 vm 应用程序使用 MSI 安装 Python 应用程序。
使用没有配置文件的 CMD 进行安装:
将 VMApp1 替换为 VM 应用名称,并将 pythonInstaller.msi 替换为 MSI 文件所需的名称。
ren VMApp1 pythonInstaller.msi && msiexec /i pythonInstaller.msi /quiet InstallAllUsers=1 PrependPath=1
将 CMD 与配置文件配合使用进行安装:
ren VMApp1 pythonInstaller.msi && ren VMApp1-config config.json && msiexec /i pythonInstaller.msi CONFIGFILE=config.json /quiet InstallAllUsers=1 PrependPath=1
在没有配置文件的情况下使用 PowerShell 进行安装:
powershell.exe -ExecutionPolicy Bypass -NoProfile -Command "Rename-Item VMApp1 pythonInstaller.msi; Start-Process -FilePath 'msiexec.exe' -ArgumentList '/i','.\pythonInstaller.msi','/quiet','InstallAllUsers=1','PrependPath=1' -Wait -NoNewWindow"
将 PowerShell 与配置文件配合使用进行安装:
powershell.exe -ExecutionPolicy Bypass -NoProfile -Command "Rename-Item VMApp1 pythonInstaller.msi; Rename-Item VMApp1-config config.json; Start-Process -FilePath 'msiexec.exe' -ArgumentList '/i','.\pythonInstaller.msi','CONFIGFILE=config.json','/quiet','InstallAllUsers=1','PrependPath=1' -Wait -NoNewWindow"
在应用程序包(VMApp1)和配置文件(VMApp1-config)中,将 VMApp1 替换为您的 VM 应用名称。
用所需的应用名称替换app.deb。
替换 config.cfg 为您所需的配置名称。
在不使用配置文件的情况下使用 bash 进行安装:
mv VMApp1 app.deb && chmod +xr app.deb && sudo DEBIAN_FRONTEND=noninteractive dpkg -i ./app.deb
通过配置文件使用 bash 进行安装:
mv VMApp1 app.deb && mv VMApp1-config config.cfg && chmod +xr app.deb && sudo debconf-set-selections < config.cfg && sudo DEBIAN_FRONTEND=noninteractive dpkg -i ./app.deb
将 VMApp1 替换为应用程序包(VMApp1)和配置文件(VMApp1-config)中的 VM 应用名称。
将app.rpm替换为所需的应用名称。
替换 config.cfg 为您所需的配置名称。
在不使用配置文件的情况下使用 bash 进行安装:
mv VMApp1 app.rpm && chmod +xr app.rpm && sudo rpm -ivh ./app.rpm
通过配置文件使用 bash 进行安装:
mv VMApp1 app.rpm && mv VMApp1-config config.cfg && chmod +xr app.rpm && sudo rpm -ivh ./app.rpm --rcfile config.cfg
将 VMApp1 替换为应用程序包(VMApp1)和配置文件(VMApp1-config)中的 VM 应用名称。
将 install.sh 替换为所需的脚本名称。
替换 config.yaml 为您所需的配置名称。
在不使用配置文件的情况下使用 bash 进行安装:
mv VMApp1 install.sh && chmod +xr install.sh && bash ./install.sh
通过配置文件使用 bash 进行安装:
mv VMApp1 install.sh && mv VMApp1-config config.yaml && chmod +xr install.sh && bash ./install.sh --config config.yaml
将 VMApp1 替换为您的 VM 应用名称,在应用程序包(VMApp1)和配置文件(VMApp1-config)中。
将 install.ps1 替换为所需的脚本名称。
替换 config.json 为您所需的配置名称。
在没有配置文件的情况下使用 PowerShell 进行安装:
powershell.exe -ExecutionPolicy Bypass -NoProfile -Command "Rename-Item -Path '.\VMApp1' -NewName 'install.ps1'; .\install.ps1"
将 PowerShell 与配置文件配合使用进行安装:
powershell.exe -ExecutionPolicy Bypass -NoProfile -Command "Rename-Item -Path '.\VMApp1' -NewName 'install.ps1'; Rename-Item -Path '.\VMApp1-config' -NewName 'config.json'; .\install.ps1 -ConfigFile 'config.json'"
Blob URL = https://${STORAGE_ACCOUNT}.blob.core.chinacloudapi.cn/${CONTAINER_NAME}/${BLOB_NAME} SAS URL = https://${STORAGE_ACCOUNT}.blob.core.chinacloudapi.cn/${CONTAINER_NAME}/${BLOB_NAME}?${SAS_TOKEN}
如果为 Azure Compute Gallery 分配了托管标识,请使用以下脚本。 此方法使用不使用 SAS 令牌的 Blob URL。
#!/bin/bash
set -euo pipefail

# === CONFIGURATION ===
STORAGE_ACCOUNT="your-storage-account-name"
CONTAINER_NAME="your-container-name"
APP_FILE="./path/to/your-app-file"           # Path to your application payload file
CONFIG_FILE="./path/to/your-config-file"     # Path to your configuration file (optional)

# === LOGIN (if not already logged in) ===
az cloud set -n AzureChinaCloud
az login --only-show-errors

# === CREATE CONTAINER IF NOT EXISTS ===
az storage container create \
  --name "$CONTAINER_NAME" \
  --account-name "$STORAGE_ACCOUNT" \
  --auth-mode login \
  --only-show-errors

# === UPLOAD APPLICATION FILE ===
APP_BLOB_NAME=$(basename "$APP_FILE")
az storage blob upload \
  --account-name "$STORAGE_ACCOUNT" \
  --container-name "$CONTAINER_NAME" \
  --name "$APP_BLOB_NAME" \
  --file "$APP_FILE" \
  --auth-mode login \
  --overwrite \
  --only-show-errors

# === UPLOAD CONFIG FILE (optional) ===
if [ -n "$CONFIG_FILE" ] && [ -f "$CONFIG_FILE" ]; then
  CONFIG_BLOB_NAME=$(basename "$CONFIG_FILE")
  az storage blob upload \
    --account-name "$STORAGE_ACCOUNT" \
    --container-name "$CONTAINER_NAME" \
    --name "$CONFIG_BLOB_NAME" \
    --file "$CONFIG_FILE" \
    --auth-mode login \
    --overwrite \
    --only-show-errors
fi

# === GENERATE BLOB URLs ===
echo "Generating Blob URLs..."

APP_BLOB_URL="https://${STORAGE_ACCOUNT}.blob.core.chinacloudapi.cn/${CONTAINER_NAME}/${APP_BLOB_NAME}"
echo "Application file: $APP_BLOB_URL"

if [ -n "$CONFIG_FILE" ] && [ -f "$CONFIG_FILE" ]; then
  CONFIG_BLOB_URL="https://${STORAGE_ACCOUNT}.blob.core.chinacloudapi.cn/${CONTAINER_NAME}/${CONFIG_BLOB_NAME}"
  echo "Configuration file: $CONFIG_BLOB_URL"
fi
如果存储帐户已禁用匿名访问,并且未将托管标识分配给 Azure 计算库,请使用以下脚本。 此方法生成时间有限的 SAS 令牌。
#!/bin/bash
set -euo pipefail

# === CONFIGURATION ===
STORAGE_ACCOUNT="yourstorageaccount"
CONTAINER_NAME="yourcontainer"
APP_FILE="./your-app-file"           # Path to your application payload file
CONFIG_FILE="./your-config-file"     # Path to your configuration file (optional)
SAS_EXPIRY_HOURS=24

# === LOGIN (if not already logged in) ===
az cloud set -n AzureChinaCloud
az login --only-show-errors

# === CREATE CONTAINER IF NOT EXISTS ===
az storage container create \
  --name "$CONTAINER_NAME" \
  --account-name "$STORAGE_ACCOUNT" \
  --auth-mode login \
  --only-show-errors

# === UPLOAD APPLICATION FILE ===
APP_BLOB_NAME=$(basename "$APP_FILE")
az storage blob upload \
  --account-name "$STORAGE_ACCOUNT" \
  --container-name "$CONTAINER_NAME" \
  --name "$APP_BLOB_NAME" \
  --file "$APP_FILE" \
  --auth-mode login \
  --overwrite \
  --only-show-errors

# === UPLOAD CONFIG FILE (optional) ===
if [ -n "$CONFIG_FILE" ] && [ -f "$CONFIG_FILE" ]; then
  CONFIG_BLOB_NAME=$(basename "$CONFIG_FILE")
  az storage blob upload \
    --account-name "$STORAGE_ACCOUNT" \
    --container-name "$CONTAINER_NAME" \
    --name "$CONFIG_BLOB_NAME" \
    --file "$CONFIG_FILE" \
    --auth-mode login \
    --overwrite \
    --only-show-errors
fi

# === GENERATE SAS URLs ===
# Note: Using --auth-mode login --as-user requires "Storage Blob Delegator" role at the storage account scope

echo "Generating SAS URLs..."
EXPIRY=$(date -u -d "+$SAS_EXPIRY_HOURS hours" '+%Y-%m-%dT%H:%MZ')

APP_SAS_TOKEN=$(az storage blob generate-sas \
  --account-name "$STORAGE_ACCOUNT" \
  --container-name "$CONTAINER_NAME" \
  --name "$APP_BLOB_NAME" \
  --permissions r \
  --expiry "$EXPIRY" \
  --auth-mode login \
  --as-user \
  -o tsv)

APP_SAS_URL="https://${STORAGE_ACCOUNT}.blob.core.chinacloudapi.cn/${CONTAINER_NAME}/${APP_BLOB_NAME}?${APP_SAS_TOKEN}"
echo "Application file: $APP_SAS_URL"

if [ -n "$CONFIG_FILE" ] && [ -f "$CONFIG_FILE" ]; then
  CONFIG_SAS_TOKEN=$(az storage blob generate-sas \
    --account-name "$STORAGE_ACCOUNT" \
    --container-name "$CONTAINER_NAME" \
    --name "$CONFIG_BLOB_NAME" \
    --permissions r \
    --expiry "$EXPIRY" \
    --auth-mode login \
    --as-user \
    -o tsv)

  CONFIG_SAS_URL="https://${STORAGE_ACCOUNT}.blob.core.chinacloudapi.cn/${CONTAINER_NAME}/${CONFIG_BLOB_NAME}?${CONFIG_SAS_TOKEN}"
  echo "Configuration file: $CONFIG_SAS_URL"
fi
如果为 Azure Compute Gallery 分配了托管标识,请使用以下脚本。 此方法使用不使用 SAS 令牌的 Blob URL。
# === CONFIGURATION ===
$subscriptionId = "your-subscription-id"
$resourceGroupName = "yourresourcegroup"
$storageAccountName = "yourstorageaccount"
$containerName = "yourcontainer"
$appFile = "C:\path\to\your-app-file"           # Path to your application payload file
$configFile = "C:\path\to\your-config-file"     # Path to your configuration file (optional, set to $null if not needed)
$sasExpiryHours = 24

# === LOGIN (if not already logged in) ===
Connect-AzAccount -Environment AzureChinaCloud -Subscription $subscriptionId

# === GET STORAGE CONTEXT ===
$storageAccount = Get-AzStorageAccount -ResourceGroupName $resourceGroupName -Name $storageAccountName
$context = $storageAccount.Context

# === CREATE CONTAINER IF NOT EXISTS ===
$container = Get-AzStorageContainer -Name $containerName -Context $context -ErrorAction SilentlyContinue
if (-not $container) {
    New-AzStorageContainer -Name $containerName -Context $context -Permission Off
}

# === UPLOAD APPLICATION FILE ===
$appBlobName = Split-Path -Leaf $appFile
Set-AzStorageBlobContent `
    -File $appFile `
    -Container $containerName `
    -Blob $appBlobName `
    -Context $context `
    -Force

# === UPLOAD CONFIG FILE (optional) ===
if ($configFile -and (Test-Path $configFile)) {
    $configBlobName = Split-Path -Leaf $configFile
    Set-AzStorageBlobContent `
        -File $configFile `
        -Container $containerName `
        -Blob $configBlobName `
        -Context $context `
        -Force
}

# === GENERATE BLOB URLs ===
Write-Host "`nGenerating Blob URLs..."

$appBlobUrl = "https://$storageAccountName.blob.core.chinacloudapi.cn/$containerName/$appBlobName"
Write-Host "Application file: $appBlobUrl"

if ($configFile -and (Test-Path $configFile)) {
  $configBlobUrl = "https://$storageAccountName.blob.core.chinacloudapi.cn/$containerName/$configBlobName"
  Write-Host "Configuration file: $configBlobUrl"
}
如果存储帐户已禁用匿名访问,并且未将托管标识分配给Azure计算库,请使用以下脚本。 此方法生成时间有限的 SAS 令牌。
# === CONFIGURATION ===
$subscriptionId = "your-subscription-id"
$resourceGroupName = "yourresourcegroup"
$storageAccountName = "yourstorageaccount"
$containerName = "yourcontainer"
$appFile = "C:\path\to\your-app-file"           # Path to your application payload file
$configFile = "C:\path\to\your-config-file"     # Path to your configuration file (optional, set to $null if not needed)
$sasExpiryHours = 24

# === LOGIN (if not already logged in) ===
Connect-AzAccount -Environment AzureChinaCloud -Subscription $subscriptionId

# === GET STORAGE CONTEXT ===
$storageAccount = Get-AzStorageAccount -ResourceGroupName $resourceGroupName -Name $storageAccountName
$context = $storageAccount.Context

# === CREATE CONTAINER IF NOT EXISTS ===
$container = Get-AzStorageContainer -Name $containerName -Context $context -ErrorAction SilentlyContinue
if (-not $container) {
    New-AzStorageContainer -Name $containerName -Context $context -Permission Off
}

# === UPLOAD APPLICATION FILE ===
$appBlobName = Split-Path -Leaf $appFile
Set-AzStorageBlobContent `
    -File $appFile `
    -Container $containerName `
    -Blob $appBlobName `
    -Context $context `
    -Force

# === UPLOAD CONFIG FILE (optional) ===
if ($configFile -and (Test-Path $configFile)) {
    $configBlobName = Split-Path -Leaf $configFile
    Set-AzStorageBlobContent `
        -File $configFile `
        -Container $containerName `
        -Blob $configBlobName `
        -Context $context `
        -Force
}

# === GENERATE SAS URLs ===
Write-Host "`nGenerating SAS URLs..."
$expiryTime = (Get-Date).AddHours($sasExpiryHours)

$appSasToken = New-AzStorageBlobSASToken `
    -Container $containerName `
    -Blob $appBlobName `
    -Permission r `
    -ExpiryTime $expiryTime `
    -Context $context

$appSasUrl = "https://$storageAccountName.blob.core.chinacloudapi.cn/$containerName/$appBlobName$appSasToken"
Write-Host "Application file: $appSasUrl"

if ($configFile -and (Test-Path $configFile)) {
    $configSasToken = New-AzStorageBlobSASToken `
        -Container $containerName `
        -Blob $configBlobName `
        -Permission r `
        -ExpiryTime $expiryTime `
        -Context $context

    $configSasUrl = "https://$storageAccountName.blob.core.chinacloudapi.cn/$containerName/$configBlobName$configSasToken"
    Write-Host "Configuration file: $configSasUrl"
}
使用以下 ARM 模板创建 Azure Compute Gallery、VM 应用程序和 VM 应用程序版本。 此模板演示用于发布应用程序包的关键属性和配置选项。
{
  "$schema": "https://schema.management.azure.com/schemas/2020-06-01/deploymentTemplate.json#",
  "contentVersion": "1.0.0.0",
  "parameters": {
    "galleryName": {
      "type": "string"
    },
    "applicationName": {
      "type": "string"
    },
    "versionName": {
      "type": "string",
      "metadata": {
        "description": "Must follow the format: major.minor.patch (Example: 1.0.0)"
      }
    },
    "location": {
      "type": "string",
      "defaultValue": "China North 2"
    },
    "supportedOSType": {
      "type": "string",
      "allowedValues": ["Windows", "Linux"]
    },
    "endOfLifeDate": {
      "type": "string",
      "metadata": {
        "description": "Optional. This property is for information only and doesn't block app deployment."
      }
    },
    "description": {
      "type": "string",
      "defaultValue": "Description of the application"
    },
    "eula": {
      "type": "string",
      "defaultValue": ""
    },
    "privacyStatementUri": {
      "type": "string",
      "defaultValue": ""
    },
    "releaseNoteUri": {
      "type": "string",
      "defaultValue": ""
    },
    "mediaLink": {
      "type": "string"
    },
    "configLink": {
      "type": "string"
    },
    "appConfigFileName": {
      "type": "string"
    },
    "appPackageFileName": {
      "type": "string"
    },
    "replicaRegion1": {
      "type": "string",
      "defaultValue": "China North 2"
    },
    "replicaRegion2": {
      "type": "string",
      "defaultValue": "China North 2"
    },
    "installScript": {
      "type": "string",
      "metadata": {
        "description": "Optional. Script to run to install the application. Example: echo 'Installing application...'"
      }
    },
    "updateScript": {
      "type": "string",
      "metadata": {
        "description": "Optional. Script to run to update the application. Example: echo 'Updating application...'"
      }
    },
    "removeScript": {
      "type": "string",
      "metadata": {
        "description": "Optional. Script to run to delete the application. Example: echo 'Deleting application...'"
      }
    },
    "storageAccountType": {
      "type": "string",
      "allowedValues": ["PremiumV2_LRS", "Premium_LRS", "Standard_LRS", "Standard_ZRS"],
      "defaultValue": "Standard_LRS"
    }
  },
  "resources": [
    {
      "type": "Microsoft.Compute/galleries",
      "apiVersion": "2024-03-03",
      "name": "[parameters('galleryName')]",
      "location": "[parameters('location')]",
      "properties": {
        "identifier": {}
      }
    },
    {
      "type": "Microsoft.Compute/galleries/applications",
      "apiVersion": "2024-03-03",
      "name": "[format('{0}/{1}', parameters('galleryName'), parameters('applicationName'))]",
      "location": "[parameters('location')]",
      "dependsOn": [
        "[resourceId('Microsoft.Compute/galleries', parameters('galleryName'))]"
      ],
      "properties": {
        "supportedOSType": "[parameters('supportedOSType')]",
        "endOfLifeDate": "[parameters('endOfLifeDate')]",
        "description": "[parameters('description')]",
        "eula": "[if(equals(parameters('eula'), ''), json('null'), parameters('eula'))]",
        "privacyStatementUri": "[if(equals(parameters('privacyStatementUri'), ''), json('null'), parameters('privacyStatementUri'))]",
        "releaseNoteUri": "[if(equals(parameters('releaseNoteUri'), ''), json('null'), parameters('releaseNoteUri'))]"
      }
    },
    {
      "type": "Microsoft.Compute/galleries/applications/versions",
      "apiVersion": "2024-03-03",
      "name": "[format('{0}/{1}/{2}', parameters('galleryName'), parameters('applicationName'), parameters('versionName'))]",
      "location": "[parameters('location')]",
      "dependsOn": [
        "[resourceId('Microsoft.Compute/galleries/applications', parameters('galleryName'), parameters('applicationName'))]"
      ],
      "properties": {
        "publishingProfile": {
          "source": {
            "mediaLink": "[parameters('mediaLink')]",
            "defaultConfigurationLink": "[parameters('configLink')]"
          },
          "manageActions": {
            "install": "[parameters('installScript')]",
            "remove": "[parameters('removeScript')]",
            "update": "[parameters('updateScript')]"
          },
          "settings": {
            "scriptBehaviorAfterReboot": "Rerun",
            "configFileName": "[parameters('appConfigFileName')]",
            "packageFileName": "[parameters('appPackageFileName')]"
          },
          "targetRegions": [
            {
              "name": "[parameters('location')]",
              "regionalReplicaCount": 3,
              "storageAccountType": "[parameters('storageAccountType')]"
            },
            {
              "name": "[parameters('replicaRegion1')]",
              "regionalReplicaCount": 1,
              "storageAccountType": "[parameters('storageAccountType')]"
            },
            {
              "name": "[parameters('replicaRegion2')]"
            },
          ],
          "excludeFromLatest": false,
          "replicaCount": 2,
          "storageAccountType": "[parameters('storageAccountType')]"
        },
        "safetyProfile": {
          "allowDeletionOfReplicatedLocations": true
        },
        "endOfLifeDate": "[parameters('endOfLifeDate')]"
      }
    }
  ]
}
使用“创建库应用程序 API”创建 VM 应用程序定义
- 我们正在创建名为 myApp 的 VM 应用程序定义。
PUT
/subscriptions/{subscriptionId}/resourceGroups/{resourceGroupName}/providers/Microsoft.Compute/galleries/{galleryName}/applications/{applicationName}?api-version=2024-03-03

{
  "location": "China North 2",
  "name": "myApp",
  "properties": {
    "supportedOSType": "Windows | Linux",
    "endOfLifeDate": "2030-01-01",
	  "description": "Description of the App",
	  "eula": "Link to End-User License Agreement (EULA)",
	  "privacyStatementUri": "Link to privacy statement for the application",
	  "releaseNoteUri": "Link to release notes for the application"
  }
}
使用“创建库应用程序版本 API”创建VM 应用程序版本。
接下来,我们将在应用程序定义中创建版本。 在上一步中创建的 Blob/SAS URL 用于从存储帐户拉取应用程序和配置 blob。
- 更新 mediaLink,安装和删除应用程序的属性。
- (可选)更新 defaultConfigurationLink 以传递配置文件。
- (可选)更新 packageFileName 和 configFileName,使Azure能够下载具有此名称的文件。 这些属性无需在安装脚本中重命名下载的文件。
PUT
/subscriptions/{subscriptionId}/resourceGroups/{resourceGroupName}/providers/Microsoft.Compute/galleries/{galleryName}/applications/{applicationName}/versions/{versionName}?api-version=2024-03-03

{
  "location": "China North 2",
  "properties": {
    "publishingProfile": {
      "source": {
        "mediaLink": "Blob or SAS URL of application blob",
        "defaultConfigurationLink": "Blob or SAS URL of configuration blob. Optional"
      },
      "manageActions": {
        "install": "Install script for application as string",
        "remove": "Uninstall script for application as string",
        "update": "Update script for application as string. Optional "
      },
      "targetRegions": [
        {
          "name": "China North 2",
          "regionalReplicaCount": 1
        },
	      {
	        "name": "China North. Optional"
	      }
      ]
      "endofLifeDate": "2030-01-01",
      "replicaCount": 1,
      "excludeFromLatest": false,
      "storageAccountType": "PremiumV2_LRS | Premium_LRS | Standard_LRS | Standard_ZRS",
      "safetyProfile": {
	      "allowDeletionOfReplicatedLocations": false
      },
      "settings": {
	      "scriptBehaviorAfterReboot": "None | Rerun",
	      "configFileName": "Name for downloaded configuration file on the VM",
	      "packageFileName": "Name for downloaded application file on the VM"
      }
   }
}
使用“az sig gallery-application create”创建 VM 应用程序定义。
- 我们正在为基于 Linux 的 VM 创建名为 myApp 的 VM 应用程序定义。
- VM 应用程序需要 Azure CLI 版本 2.30.0 或更高版本。
application_name="myApp"
gallery_name="myGallery"
resource_group="myResourceGroup"
location="China North 2"
os_type="Linux"

az sig gallery-application create \
  --application-name "$application_name" \
  --gallery-name "$gallery_name" \
  --resource-group "$resource_group" \
  --os-type "$os_type" \
  --location "$location"
使用“az sig gallery-application version create”创建 VM 应用程序版本。
接下来,我们将在应用程序定义中创建版本。 上一步创建的 Blob/SAS URL 用于从存储帐户中提取应用程序 Blob。
- 更新您的应用程序的 package_url、install_command 和 remove_command。
- (可选)取消注释并更新 config_url 和 default-configuration-file-link,以便可选地传递配置文件。
- (可选)更新“package_file_name”和“config_file_name”。 Azure下载具有此名称的文件,因此无需在安装脚本中重命名下载的文件。
version_name="1.0.0"
package_url="Blob or SAS URL for application blob"
package_file_name="Name to give for downloaded application file on VM"
# config_url="Blob or SAS URL for configuration"
# config_file_name="Name to give for downloaded config file on VM"

install_command="install script for your application"
remove_command="uninstall script for you application"
target_regions='[
  {"name": "China North 2", "regionalReplicaCount": 2},
  {"name": "China North 2", "regionalReplicaCount": 1}
]'

az sig gallery-application version create \
   --version-name "$version_name" \
   --application-name "$application_name" \
   --gallery-name "$gallery_name" \
   --location "$location" \
   --resource-group "$resource_group" \
   --package-file-link "$package_url" \
   --package-file-name "$package_file_name" \
   --install-command "$install_command" \
   --remove-command "$remove_command" \
   --target-regions "$target_regions"
   # --default-configuration-file-link "$config_url" \
   # --config-file-name "$config_file_name" \
使用“New-AzGalleryApplication”创建 VM 应用程序定义。
- 我们将在 myGallery Azure 计算库和 myGallery 资源组中创建一个名为 myApp 的 Linux 应用。
- 根据需要替换变量的值。
$galleryName = "myGallery"
$rgName = "myResourceGroup"
$applicationName = "myApp"
$description = "Backend Linux application for finance."
$location = "China North 2"

New-AzGalleryApplication `
  -ResourceGroupName $rgName `
  -GalleryName $galleryName `
  -Location $location `
  -Name $applicationName `
  -SupportedOSType Windows `
  -Description $description
使用'New-AzGalleryApplicationVersion'创建您的 VM 应用程序的一个版本。
接下来,我们将在应用程序定义中创建版本。 上一步创建的 Blob/SAS URL 用于从存储帐户中提取应用程序 Blob。
- 更新您的应用程序的 package_url、install_command 和 remove_command。
- (可选)取消注释并更新 config_url 和 default-configuration-file-link,以便可选地传递配置文件。
- (可选)更新“package_file_name”和“config_file_name”。 Azure下载具有此名称的文件,因此无需在安装脚本中重命名下载的文件。
$galleryName = "myGallery"
$rgName = "myResourceGroup"
$location = "China North 2"
$applicationName = "myApp"
$version = "1.0.0"

$package_url = "Blob or SAS URL for application blob in storage account"
$package_file_name="Name to give for downloaded application file on VM"
# $config_url = "Blob or SAS URL for configuration blob in storage account"
# $config_file_name="Name to give for downloaded config file on VM"
$install_command = "Install script for your application"
$remove_command = "Uninstall script for your application"
$target_regions = @(
  @{ Name = "China North 2"; RegionalReplicaCount = 2 },
  @{ Name = "China North 2"; RegionalReplicaCount = 1 }
)

New-AzGalleryApplicationVersion `
   -ResourceGroupName $rgName `
   -GalleryName $galleryName `
   -GalleryApplicationName $applicationName `
   -Name $version `
   -PackageFileLink $package_url `
   -PackageFileName $package_file_name `
   -Location $location `
   -Install $install_command `
   -Remove $remove_command `
   -TargetRegion $target_regions
   # -DefaultConfigFileLink $config_url `
   # -ConfigFileName $config_file_name `
- 转到 Azure 门户,然后搜索并选择“Azure Compute Gallery”。
- 从列表中选择需要使用的图库。
- 在库页面上,选择页面顶部的“添加”,然后从下拉列表中选择“VM 应用程序定义”。 此时会打开“创建 VM 应用程序定义”页。
- 在“基本信息”选项卡中输入应用程序的名称,然后选择该应用程序是用于运行 Linux 还是 Windows 的 VM。
- 如果要为 VM 应用程序定义指定以下任一可选设置,请选择“ 发布选项 ”选项卡:
- VM 应用程序定义的说明。
- 生命周期终结日期
- 指向最终用户许可协议(EULA)的链接
- 隐私声明的 URI
- 发行说明的 URI
- 完成操作后,选择“查看 + 创建”。
- 验证完成后,选择“创建”以部署定义。
- 部署完成后,选择“ 转到资源”。
- 在应用程序页面上,选择“创建 VM 应用程序版本”。 此时会打开“创建 VM 应用程序版本”页。
- 输入版本号,例如 1.0.0。
- 选择上传应用程序包的区域。
- 在“源应用程序包”下,选择“浏览”。 选择存储帐户,然后选择包所在的容器。 从列表中选择包,完成后再选择选择。 或者,如果需要,可以将 SAS URI 粘贴到此字段中。
- 提供“安装脚本”。
- 提供“卸载脚本”。
- (可选)提供“更新脚本”。
- 如果已将默认配置文件上传到存储帐户,可以在“默认配置”中选择它。
- 如果在创建 VM 时不希望该版本显示为最新版本,请选择“从最新版本中排除”。
- 对于“生命周期结束日期”,选择一个将来的日期来跟踪该版本应该何时停用。 它不会自动删除或移除,仅用于你自己的跟踪。
- 若要将此版本复制到其他区域,请选择“ 复制 ”选项卡,添加更多区域,并更改每个区域的副本数。 创建版本的原始区域必须在列表中,并且不能删除。
- 完成更改后,在页面底部选择“审阅并创建”。
- 当验证结果显示为通过时,选择“创建”来部署你的 VM 应用程序版本。
name: Deploy Azure VM Application

on:
  push:
    branches:
      - main

env:
  APP_FILE: app.exe
  CONFIG_FILE: app-config.json

  AZURE_RESOURCE_GROUP: ${{ secrets.AZURE_RESOURCE_GROUP }}
  AZURE_LOCATION: ${{ secrets.AZURE_LOCATION }}
  AZURE_STORAGE_ACCOUNT: ${{ secrets.AZURE_STORAGE_ACCOUNT }}
  AZURE_CONTAINER_NAME: ${{ secrets.AZURE_CONTAINER_NAME }}
  GALLERY_NAME: ${{ secrets.GALLERY_NAME }}
  APPLICATION_NAME: ${{ secrets.AZURE_VM_APPLICATION_NAME }}

jobs:
  deploy:
    runs-on: ubuntu-latest

    permissions:
      id-token: write
      contents: read

    steps:
    - name: Checkout
      uses: actions/checkout@v4

    - name: Azure Login
      uses: azure/login@v2
      with:
        client-id: ${{ secrets.AZURE_CLIENT_ID }}
        tenant-id: ${{ secrets.AZURE_TENANT_ID }}
        subscription-id: ${{ secrets.AZURE_SUBSCRIPTION_ID }}

    - name: Upload files to Azure Blob Storage
      run: |
        set -euo pipefail

        echo "Creating container if missing..."
        az storage container create \
          --name "$AZURE_CONTAINER_NAME" \
          --account-name "$AZURE_STORAGE_ACCOUNT" \
          --auth-mode login \
          --only-show-errors

        echo "Uploading files..."
        az storage blob upload \
          --account-name "$AZURE_STORAGE_ACCOUNT" \
          --container-name "$AZURE_CONTAINER_NAME" \
          --name "$APP_FILE" \
          --file "$APP_FILE" \
          --auth-mode login \
          --overwrite \
          --only-show-errors

        az storage blob upload \
          --account-name "$AZURE_STORAGE_ACCOUNT" \
          --container-name "$AZURE_CONTAINER_NAME" \
          --name "$CONFIG_FILE" \
          --file "$CONFIG_FILE" \
          --auth-mode login \
          --overwrite \
          --only-show-errors

    - name: Create VM Application if missing
      run: |
        set -euo pipefail

        echo "Checking for existing VM Application..."
        if ! az sig gallery-application show \
          --resource-group "$AZURE_RESOURCE_GROUP" \
          --gallery-name "$GALLERY_NAME" \
          --application-name "$APPLICATION_NAME" &>/dev/null; then

          az sig gallery-application create \
            --resource-group "$AZURE_RESOURCE_GROUP" \
            --gallery-name "$GALLERY_NAME" \
            --application-name "$APPLICATION_NAME" \
            --location "$AZURE_LOCATION" \
            --os-type Windows
        fi

    - name: Generate SAS URLs
      id: sas
      run: |
        set -euo pipefail

        echo "Generating SAS URLs valid for 24 hours..."
        EXPIRY=$(date -u -d "+1 day" '+%Y-%m-%dT%H:%MZ')

        APP_SAS=$(az storage blob generate-sas \
          --account-name "$AZURE_STORAGE_ACCOUNT" \
          --container-name "$AZURE_CONTAINER_NAME" \
          --name "$APP_FILE" \
          --permissions r \
          --expiry "$EXPIRY" \
          --auth-mode login \
          --as-user \
          -o tsv)

        CONFIG_SAS=$(az storage blob generate-sas \
          --account-name "$AZURE_STORAGE_ACCOUNT" \
          --container-name "$AZURE_CONTAINER_NAME" \
          --name "$CONFIG_FILE" \
          --permissions r \
          --expiry "$EXPIRY" \
          --auth-mode login \
          --as-user \
          -o tsv)

        echo "APP_SAS=$APP_SAS" >> $GITHUB_ENV
        echo "CONFIG_SAS=$CONFIG_SAS" >> $GITHUB_ENV

    - name: Create VM Application Version
      run: |
        set -euo pipefail

        MAJOR=1
        MINOR=0
        PATCH=$(date +%Y%m%d)
        VERSION="$MAJOR.$MINOR.$PATCH"

        INSTALL_CMD=$(jq -Rs '.' < install-script-as-string.txt)
        REMOVE_CMD=$(jq -Rs '.' < uninstall-script-as-string.txt)

        PACKAGE_URL="https://${AZURE_STORAGE_ACCOUNT}.blob.core.chinacloudapi.cn/${AZURE_CONTAINER_NAME}/${APP_FILE}?${APP_SAS}"
        CONFIG_URL="https://${AZURE_STORAGE_ACCOUNT}.blob.core.chinacloudapi.cn/${AZURE_CONTAINER_NAME}/${CONFIG_FILE}?${CONFIG_SAS}"

        az sig gallery-application version create \
          --resource-group "$AZURE_RESOURCE_GROUP" \
          --gallery-name "$GALLERY_NAME" \
          --application-name "$APPLICATION_NAME" \
          --version-name "$VERSION" \
          --location "$AZURE_LOCATION" \
          --package-file-link "$PACKAGE_URL" \
          --default-configuration-file-link "$CONFIG_URL" \
          --install-command "$INSTALL_CMD" \
          --remove-command "$REMOVE_CMD" \
          --only-show-errors
trigger:
  branches:
    include: [ main ]

variables:
  APP_FILE: app.exe
  CONFIG_FILE: app-config.json
  AZURE_RESOURCE_GROUP: $(AZURE_RESOURCE_GROUP)
  AZURE_LOCATION: $(AZURE_LOCATION)
  AZURE_STORAGE_ACCOUNT: $(AZURE_STORAGE_ACCOUNT)
  AZURE_CONTAINER_NAME: $(AZURE_CONTAINER_NAME)
  GALLERY_NAME: $(GALLERY_NAME)
  APPLICATION_NAME: $(AZURE_VM_APPLICATION_NAME)

stages:
  - stage: DeployVMApp
    displayName: Upload files and deploy Azure VM Application
    jobs:
      - job: Deploy
        pool:
          vmImage: 'ubuntu-latest'
        steps:
          - checkout: self

          - task: AzureCLI@2
            displayName: Upload app and config to Blob
            inputs:
              azureSubscription: 'AzureServiceConnection'
              scriptType: bash
              scriptLocation: inlineScript
              inlineScript: |
                set -euo pipefail

                echo "Creating container if it doesn't exist..."
                az storage container create \
                  --name "$AZURE_CONTAINER_NAME" \
                  --account-name "$AZURE_STORAGE_ACCOUNT" \
                  --auth-mode login \
                  --only-show-errors

                echo "Uploading files..."
                az storage blob upload \
                  --account-name "$AZURE_STORAGE_ACCOUNT" \
                  --container-name "$AZURE_CONTAINER_NAME" \
                  --name "$APP_FILE" \
                  --file "$APP_FILE" \
                  --auth-mode login \
                  --overwrite \
                  --only-show-errors

                az storage blob upload \
                  --account-name "$AZURE_STORAGE_ACCOUNT" \
                  --container-name "$AZURE_CONTAINER_NAME" \
                  --name "$CONFIG_FILE" \
                  --file "$CONFIG_FILE" \
                  --auth-mode login \
                  --overwrite \
                  --only-show-errors

          - task: AzureCLI@2
            displayName: Create VM Application Definition
            inputs:
              azureSubscription: 'AzureServiceConnection'
              scriptType: bash
              scriptLocation: inlineScript
              inlineScript: |
                set -euo pipefail

                echo "Checking for existing VM Application..."
                if ! az sig gallery-application show \
                  --resource-group "$AZURE_RESOURCE_GROUP" \
                  --gallery-name "$GALLERY_NAME" \
                  --application-name "$APPLICATION_NAME" &>/dev/null; then
                  echo "Creating new VM Application..."
                  az sig gallery-application create \
                    --resource-group "$AZURE_RESOURCE_GROUP" \
                    --gallery-name "$GALLERY_NAME" \
                    --application-name "$APPLICATION_NAME" \
                    --location "$AZURE_LOCATION" \
                    --os-type Windows
                else
                  echo "VM Application definition already exists."
                fi

          - task: AzureCLI@2
            displayName: Generate SAS URLs
            inputs:
              azureSubscription: 'AzureServiceConnection'
              scriptType: bash
              scriptLocation: inlineScript
              inlineScript: |
                set -euo pipefail

                echo "Generating SAS URLs valid for 24 hours..."
                EXPIRY=$(date -u -d "+1 day" '+%Y-%m-%dT%H:%MZ')

                APP_SAS=$(az storage blob generate-sas \
                  --account-name "$AZURE_STORAGE_ACCOUNT" \
                  --container-name "$AZURE_CONTAINER_NAME" \
                  --name "$APP_FILE" \
                  --permissions r \
                  --expiry "$EXPIRY" \
                  --auth-mode login \
                  --as-user \
                  -o tsv)

                CONFIG_SAS=$(az storage blob generate-sas \
                  --account-name "$AZURE_STORAGE_ACCOUNT" \
                  --container-name "$AZURE_CONTAINER_NAME" \
                  --name "$CONFIG_FILE" \
                  --permissions r \
                  --expiry "$EXPIRY" \
                  --auth-mode login \
                  --as-user \
                  -o tsv)

                echo "##vso[task.setvariable variable=APP_SAS]$APP_SAS"
                echo "##vso[task.setvariable variable=CONFIG_SAS]$CONFIG_SAS"

          - task: AzureCLI@2
            displayName: Create VM Application Version
            inputs:
              azureSubscription: 'AzureServiceConnection'
              scriptType: bash
              scriptLocation: inlineScript
              inlineScript: |
                set -euo pipefail

                MAJOR=1
                MINOR=0
                PATCH=$(date +%Y%m%d)
                VERSION="$MAJOR.$MINOR.$PATCH"

                INSTALL_CMD=$(jq -Rs '.' < install-script-as-string.txt)
                REMOVE_CMD=$(jq -Rs '.' < uninstall-script-as-string.txt)

                PACKAGE_URL="https://${AZURE_STORAGE_ACCOUNT}.blob.core.chinacloudapi.cn/${AZURE_CONTAINER_NAME}/${APP_FILE}?${APP_SAS}"
                CONFIG_URL="https://${AZURE_STORAGE_ACCOUNT}.blob.core.chinacloudapi.cn/${AZURE_CONTAINER_NAME}/${CONFIG_FILE}?${CONFIG_SAS}"

                az sig gallery-application version create \
                  --resource-group "$AZURE_RESOURCE_GROUP" \
                  --gallery-name "$GALLERY_NAME" \
                  --application-name "$APPLICATION_NAME" \
                  --version-name "$VERSION" \
                  --location "$AZURE_LOCATION" \
                  --package-file-link "$PACKAGE_URL" \
                  --default-configuration-file-link "$CONFIG_URL" \
                  --install-command "$INSTALL_CMD" \
                  --remove-command "$REMOVE_CMD" \
                  --only-show-errors
stages:
  - deploy

variables:
  APP_FILE: "app.exe"
  CONFIG_FILE: "app-config.json"
  AZURE_RESOURCE_GROUP: "$AZURE_RESOURCE_GROUP"
  AZURE_LOCATION: "$AZURE_LOCATION"
  AZURE_STORAGE_ACCOUNT: "$AZURE_STORAGE_ACCOUNT"
  AZURE_CONTAINER_NAME: "$AZURE_CONTAINER_NAME"
  GALLERY_NAME: "$GALLERY_NAME"
  APPLICATION_NAME: "$AZURE_VM_APPLICATION_NAME"

deploy_vm_app:
  image: mcr.microsoft.com/azure-cli
  stage: deploy
  rules:
    - if: $CI_COMMIT_BRANCH == "main"
  script:
    - az login --service-principal -u "$AZURE_CLIENT_ID" -p "$AZURE_CLIENT_SECRET" --tenant "$AZURE_TENANT_ID"
    - az account set --subscription "$AZURE_SUBSCRIPTION_ID"

    - |
      echo "Creating container and uploading files..."
      az storage container create \
        --name "$AZURE_CONTAINER_NAME" \
        --account-name "$AZURE_STORAGE_ACCOUNT" \
        --auth-mode login \
        --only-show-errors

      az storage blob upload \
        --account-name "$AZURE_STORAGE_ACCOUNT" \
        --container-name "$AZURE_CONTAINER_NAME" \
        --name "$APP_FILE" \
        --file "$APP_FILE" \
        --auth-mode login \
        --overwrite \
        --only-show-errors

      az storage blob upload \
        --account-name "$AZURE_STORAGE_ACCOUNT" \
        --container-name "$AZURE_CONTAINER_NAME" \
        --name "$CONFIG_FILE" \
        --file "$CONFIG_FILE" \
        --auth-mode login \
        --overwrite \
        --only-show-errors

    - |
      echo "Checking for existing VM Application..."
      if ! az sig gallery-application show \
          --resource-group "$AZURE_RESOURCE_GROUP" \
          --gallery-name "$GALLERY_NAME" \
          --application-name "$APPLICATION_NAME" &>/dev/null; then
        echo "Creating VM Application definition..."
        az sig gallery-application create \
          --resource-group "$AZURE_RESOURCE_GROUP" \
          --gallery-name "$GALLERY_NAME" \
          --application-name "$APPLICATION_NAME" \
          --location "$AZURE_LOCATION" \
          --os-type Windows \
          --only-show-errors
      else
        echo "VM Application already exists."
      fi

    - |
      echo "Generating SAS URLs and creating VM Application Version..."
      EXPIRY=$(date -u -d "+1 day" '+%Y-%m-%dT%H:%MZ')

      APP_SAS=$(az storage blob generate-sas \
        --account-name "$AZURE_STORAGE_ACCOUNT" \
        --container-name "$AZURE_CONTAINER_NAME" \
        --name "$APP_FILE" \
        --permissions r \
        --expiry "$EXPIRY" \
        --auth-mode login \
        --as-user \
        -o tsv)

      CONFIG_SAS=$(az storage blob generate-sas \
        --account-name "$AZURE_STORAGE_ACCOUNT" \
        --container-name "$AZURE_CONTAINER_NAME" \
        --name "$CONFIG_FILE" \
        --permissions r \
        --expiry "$EXPIRY" \
        --auth-mode login \
        --as-user \
        -o tsv)

      MAJOR=1
      MINOR=0
      PATCH=$(date +%Y%m%d)
      VERSION="$MAJOR.$MINOR.$PATCH"
      echo "Creating VM Application Version: $VERSION"

      INSTALL_CMD=$(jq -Rs '.' < install-script-as-string.txt)
      REMOVE_CMD=$(jq -Rs '.' < uninstall-script-as-string.txt)

      az sig gallery-application version create \
        --resource-group "$AZURE_RESOURCE_GROUP" \
        --gallery-name "$GALLERY_NAME" \
        --application-name "$APPLICATION_NAME" \
        --version-name "$VERSION" \
        --location "$AZURE_LOCATION" \
        --package-file-link "https://${AZURE_STORAGE_ACCOUNT}.blob.core.chinacloudapi.cn/${AZURE_CONTAINER_NAME}/${APP_FILE}?${APP_SAS}" \
        --default-configuration-file-link "https://${AZURE_STORAGE_ACCOUNT}.blob.core.chinacloudapi.cn/${AZURE_CONTAINER_NAME}/${CONFIG_FILE}?${CONFIG_SAS}" \
        --install-command "$INSTALL_CMD" \
        --remove-command "$REMOVE_CMD" \
        --only-show-errors
pipeline {
  agent any

  environment {
    APP_FILE = 'app.exe'
    CONFIG_FILE = 'app-config.json'

    AZURE_RESOURCE_GROUP = credentials('AZURE_RESOURCE_GROUP')
    AZURE_LOCATION = credentials('AZURE_LOCATION')
    AZURE_STORAGE_ACCOUNT = credentials('AZURE_STORAGE_ACCOUNT')
    AZURE_CONTAINER_NAME = credentials('AZURE_CONTAINER_NAME')
    GALLERY_NAME = credentials('GALLERY_NAME')
    APPLICATION_NAME = credentials('AZURE_VM_APPLICATION_NAME')

    AZURE_CLIENT_ID = credentials('AZURE_CLIENT_ID')
    AZURE_CLIENT_SECRET = credentials('AZURE_CLIENT_SECRET')
    AZURE_TENANT_ID = credentials('AZURE_TENANT_ID')
    AZURE_SUBSCRIPTION_ID = credentials('AZURE_SUBSCRIPTION_ID')
  }

  stages {
    stage('Login to Azure') {
      steps {
        sh '''
          az login --service-principal \
            -u "$AZURE_CLIENT_ID" \
            -p "$AZURE_CLIENT_SECRET" \
            --tenant "$AZURE_TENANT_ID"
          az account set --subscription "$AZURE_SUBSCRIPTION_ID"
        '''
      }
    }

    stage('Upload to Blob Storage') {
      steps {
        sh '''
          az storage container create \
            --name "$AZURE_CONTAINER_NAME" \
            --account-name "$AZURE_STORAGE_ACCOUNT" \
            --auth-mode login \
            --only-show-errors

          az storage blob upload \
            --account-name "$AZURE_STORAGE_ACCOUNT" \
            --container-name "$AZURE_CONTAINER_NAME" \
            --name "$APP_FILE" \
            --file "$APP_FILE" \
            --auth-mode login \
            --overwrite \
            --only-show-errors

          az storage blob upload \
            --account-name "$AZURE_STORAGE_ACCOUNT" \
            --container-name "$AZURE_CONTAINER_NAME" \
            --name "$CONFIG_FILE" \
            --file "$CONFIG_FILE" \
            --auth-mode login \
            --overwrite \
            --only-show-errors
        '''
      }
    }

    stage('Create VM Application if Needed') {
      steps {
        sh '''
          if ! az sig gallery-application show \
            --resource-group "$AZURE_RESOURCE_GROUP" \
            --gallery-name "$GALLERY_NAME" \
            --application-name "$APPLICATION_NAME" &>/dev/null; then
            az sig gallery-application create \
              --resource-group "$AZURE_RESOURCE_GROUP" \
              --gallery-name "$GALLERY_NAME" \
              --application-name "$APPLICATION_NAME" \
              --location "$AZURE_LOCATION" \
              --os-type Windows \
              --only-show-errors
          fi
        '''
      }
    }

    stage('Generate SAS and Create Version') {
      steps {
        sh '''
          EXPIRY=$(date -u -d "+1 day" '+%Y-%m-%dT%H:%MZ')

          APP_SAS=$(az storage blob generate-sas \
            --account-name "$AZURE_STORAGE_ACCOUNT" \
            --container-name "$AZURE_CONTAINER_NAME" \
            --name "$APP_FILE" \
            --permissions r \
            --expiry "$EXPIRY" \
            --auth-mode login \
            --as-user \
            -o tsv)

          CONFIG_SAS=$(az storage blob generate-sas \
            --account-name "$AZURE_STORAGE_ACCOUNT" \
            --container-name "$AZURE_CONTAINER_NAME" \
            --name "$CONFIG_FILE" \
            --permissions r \
            --expiry "$EXPIRY" \
            --auth-mode login \
            --as-user \
            -o tsv)

          MAJOR=1
          MINOR=0
          PATCH=$(date +%Y%m%d)
          VERSION="$MAJOR.$MINOR.$PATCH"

          INSTALL_CMD=$(jq -Rs '.' < install-script-as-string.txt)
          REMOVE_CMD=$(jq -Rs '.' < uninstall-script-as-string.txt)

          PACKAGE_URL="https://${AZURE_STORAGE_ACCOUNT}.blob.core.chinacloudapi.cn/${AZURE_CONTAINER_NAME}/${APP_FILE}?${APP_SAS}"
          CONFIG_URL="https://${AZURE_STORAGE_ACCOUNT}.blob.core.chinacloudapi.cn/${AZURE_CONTAINER_NAME}/${CONFIG_FILE}?${CONFIG_SAS}"

          az sig gallery-application version create \
            --resource-group "$AZURE_RESOURCE_GROUP" \
            --gallery-name "$GALLERY_NAME" \
            --application-name "$APPLICATION_NAME" \
            --version-name "$VERSION" \
            --location "$AZURE_LOCATION" \
            --package-file-link "$PACKAGE_URL" \
            --default-configuration-file-link "$CONFIG_URL" \
            --install-command "$INSTALL_CMD" \
            --remove-command "$REMOVE_CMD" \
            --only-show-errors
        '''
      }
    }
  }
}
使用以下 ARM 模板在 Azure VM 或Azure Virtual Machine Scale Sets上部署 VM 应用程序。 此模板演示用于部署 VM 应用程序的关键属性和配置选项。
在虚拟机规模集中部署虚拟机应用程序
{
  "$schema": "https://schema.management.azure.com/schemas/2019-04-01/deploymentTemplate.json#",
  "contentVersion": "1.0.0.0",
  "parameters": {
    "vmssName": {
      "type": "string"
    },
    "location": {
      "type": "string"
    },
    "subscriptionId": {
      "type": "string"
    },
    "resourceGroupName": {
      "type": "string"
    },
    "galleryName": {
      "type": "string"
    },
    "applicationName1": {
      "type": "string"
    },
    "applicationVersion1": {
      "type": "string",
      "defaultValue": "latest"
    },
    "configurationReference1": {
      "type": "string",
      "metadata": {
        "description": "Optional path to configuration file from Storage Account. Overrides default configuration file."
      }
    },
    "applicationName2": {
      "type": "string"
    },
    "applicationVersion2": {
      "type": "string",
      "defaultValue": "latest"
    }
  },
  "variables": {
    "packageReferenceId1": "[format('/subscriptions/{0}/resourceGroups/{1}/providers/Microsoft.Compute/galleries/{2}/applications/{3}/versions/{4}', parameters('subscriptionId'), parameters('resourceGroupName'), parameters('galleryName'), parameters('applicationName1'), parameters('applicationVersion1'))]",
    "packageReferenceId2": "[format('/subscriptions/{0}/resourceGroups/{1}/providers/Microsoft.Compute/galleries/{2}/applications/{3}/versions/{4}', parameters('subscriptionId'), parameters('resourceGroupName'), parameters('galleryName'), parameters('applicationName2'), parameters('applicationVersion2'))]"
  },
  "resources": [
    {
      "type": "Microsoft.Compute/virtualMachineScaleSets",
      "apiVersion": "2024-03-03",
      "name": "[parameters('vmssName')]",
      "location": "[parameters('location')]",
      "properties": {
        "virtualMachineProfile": {
          "applicationProfile": {
            "galleryApplications": [
              {
                "order": 1,
                "packageReferenceId": "[variables('packageReferenceId1')]",
                "configurationReference": "[parameters('configurationReference1')]",
                "treatFailureAsDeploymentFailure": true
              },
              {
                "order": 2,
                "packageReferenceId": "[variables('packageReferenceId2')]",
                "treatFailureAsDeploymentFailure": false
              }
            ]
          }
        }
      }
    }
  ]
}
在 Azure VM 上部署 VM 应用程序
{
  "$schema": "https://schema.management.azure.com/schemas/2019-04-01/deploymentTemplate.json#",
  "contentVersion": "1.0.0.0",
  "parameters": {
    "vmName": {
      "type": "string"
    },
    "location": {
      "type": "string"
    },
    "subscriptionId": {
      "type": "string"
    },
    "resourceGroupName": {
      "type": "string"
    },
    "galleryName": {
      "type": "string"
    },
    "applicationName1": {
      "type": "string"
    },
    "applicationVersion1": {
      "type": "string",
      "defaultValue": "latest"
    },
    "configurationReference1": {
      "type": "string",
      "metadata": {
        "description": "Optional path to configuration blob for application 1"
      }
    },
    "applicationName2": {
      "type": "string"
    },
    "applicationVersion2": {
      "type": "string",
      "defaultValue": "latest"
    }
  },
  "variables": {
    "packageReferenceId1": "[format('/subscriptions/{0}/resourceGroups/{1}/providers/Microsoft.Compute/galleries/{2}/applications/{3}/versions/{4}', parameters('subscriptionId'), parameters('resourceGroupName'), parameters('galleryName'), parameters('applicationName1'), parameters('applicationVersion1'))]",
    "packageReferenceId2": "[format('/subscriptions/{0}/resourceGroups/{1}/providers/Microsoft.Compute/galleries/{2}/applications/{3}/versions/{4}', parameters('subscriptionId'), parameters('resourceGroupName'), parameters('galleryName'), parameters('applicationName2'), parameters('applicationVersion2'))]"
  },
  "resources": [
    {
      "type": "Microsoft.Compute/virtualMachines",
      "apiVersion": "2024-07-01",
      "name": "[parameters('vmName')]",
      "location": "[parameters('location')]",
      "properties": {
        "applicationProfile": {
          "galleryApplications": [
            {
              "order": 1,
              "packageReferenceId": "[variables('packageReferenceId1')]",
              "configurationReference": "[parameters('configurationReference1')]",
              "treatFailureAsDeploymentFailure": true
            },
            {
              "order": 2,
              "packageReferenceId": "[variables('packageReferenceId2')]",
              "treatFailureAsDeploymentFailure": false
            }
          ]
        }
      }
    }
  ]
}
若要将 VM 应用程序版本添加到某个 VM,请对该 VM 执行 PUT。
PUT
/subscriptions/{subscriptionId}/resourceGroups/{resourceGroupName}/providers/Microsoft.Compute/virtualMachines/{VMName}?api-version=2024-03-03

{
  "properties": {
    "applicationProfile": {
      "galleryApplications": [
        {
          "order": 1,
          "packageReferenceId": "/subscriptions/{subscriptionId}/resourceGroups/<resource group>/providers/Microsoft.Compute/galleries/{gallery name}/applications/{application name}/versions/{version | latest}",
          "configurationReference": "{path to configuration storage blob}",
          "treatFailureAsDeploymentFailure": false
        }
      ]
    }
  },
  "name": "{vm name}",
  "id": "/subscriptions/{subscriptionId}/resourceGroups/{resource group}/providers/Microsoft.Compute/virtualMachines/{vm name}",
  "location": "{vm location}"
}
将虚拟机应用程序应用到统一的虚拟机规模集:
PUT
/subscriptions/{subscriptionId}/resourceGroups/{resourceGroupName}/providers/Microsoft.Compute/virtualMachineScaleSets/{VMSSName}?api-version=2024-03-03

{
  "properties": {
    "virtualMachineProfile": {
      "applicationProfile": {
        "galleryApplications": [
          {
            "order": 1,
            "packageReferenceId": "/subscriptions/{subscriptionId}/resourceGroups/<resource group>/providers/Microsoft.Compute/galleries/{gallery name}/applications/{application name}/versions/{version | latest}",
            "configurationReference": "{path to configuration storage blob}",
            "treatFailureAsDeploymentFailure": false
          }
        ]
      }
    }
  },
  "name": "{vm name}",
  "id": "/subscriptions/{subscriptionId}/resourceGroups/{resource group}/providers/Microsoft.Compute/virtualMachines/{vm name}",
  "location": "{vm location}"
}
响应包括完整的 VM 模型。 下面是相关部分。
{
  "name": "{vm name}",
  "id": "{vm id}",
  "type": "Microsoft.Compute/virtualMachines",
  "location": "{vm location}",
  "properties": {
    "applicationProfile": {
      "galleryApplications": ""
    },
    "provisioningState": "Updating"
  },
  "resources": [
    {
      "name": "VMAppExtension",
      "id": "{extension id}",
      "type": "Microsoft.Compute/virtualMachines/extensions",
      "location": "chinanorth2",
      "properties": "@{autoUpgradeMinorVersion=True; forceUpdateTag=7c4223fc-f4ea-4179-ada8-c8a85a1399f5; provisioningState=Creating; publisher=Microsoft.CPlat.Core; type=VMApplicationManagerLinux; typeHandlerVersion=1.0; settings=}"
    }
  ]
}
使用 “az vm application set” 将 VM 应用程序设置为现有 VM,并将参数的值替换为自己的值。
az vm application set \
	--resource-group myResourceGroup \
	--name myVM \
  	--app-version-ids /subscriptions/{subID}/resourceGroups/MyResourceGroup/providers/Microsoft.Compute/galleries/myGallery/applications/myApp/versions/1.0.0 \
  	--treat-deployment-as-failure true
若要在 VM 上设置多个应用程序,请执行以下操作:
az vm application set \
	--resource-group myResourceGroup \
	--name myVM \
	--app-version-ids /subscriptions/{subId}/resourceGroups/myResourceGroup/providers/Microsoft.Compute/galleries/myGallery/applications/myApp/versions/1.0.0 /subscriptions/{subId}/resourceGroups/myResourceGroup/providers/Microsoft.Compute/galleries/myGallery/applications/myApp2/versions/1.0.1 \
	--treat-deployment-as-failure true true
若要将应用程序添加到Virtual Machine Scale Sets,请使用 'az vmss application set':
az vmss application set \
	--resource-group myResourceGroup \
	--name myVmss \
	--app-version-ids /subscriptions/{subId}/resourceGroups/myResourceGroup/providers/Microsoft.Compute/galleries/myGallery/applications/myApp/versions/1.0.0 \
	--treat-deployment-as-failure true
要将多个应用程序添加到“虚拟机规模集”:
az vmss application set \
	--resource-group myResourceGroup \
	--name myVmss
	--app-version-ids /subscriptions/{subId}/resourceGroups/myResourceGroup/providers/Microsoft.Compute/galleries/myGallery/applications/myApp/versions/1.0.0 /subscriptions/{subId}/resourceGroups/myResourceGroup/providers/Microsoft.Compute/galleries/myGallery/applications/myApp2/versions/1.0.0 \
	--treat-deployment-as-failure true
若要将应用程序添加到现有 VM,请获取应用程序版本并使用它来获取 VM 应用程序版本 ID。 使用 ID 和 “New-AzVmGalleryApplication” 创建应用程序对象,并使用 “Add-AzVmGalleryApplication”将应用程序添加到 VM 配置。
$galleryName = "myGallery"
$rgName = "myResourceGroup"
$applicationName = "myApp"
$version = "1.0.0"
$vmName = "myVM"

$vm = Get-AzVM -ResourceGroupName $rgname -Name $vmName
$appVersion = Get-AzGalleryApplicationVersion `
   -GalleryApplicationName $applicationName `
   -GalleryName $galleryName `
   -Name $version `
   -ResourceGroupName $rgName
$packageId = $appVersion.Id
$app = New-AzVmGalleryApplication -PackageReferenceId $packageId
Add-AzVmGalleryApplication -VM $vm -GalleryApplication $app -TreatFailureAsDeploymentFailure true
Update-AzVM -ResourceGroupName $rgName -VM $vm
要将应用程序添加到虚拟机规模集:
$galleryName = "myGallery"
$rgName = "myResourceGroup"
$applicationName = "myApp"
$version = "1.0.0"
$vmssName = "myVMSS"

$vmss = Get-AzVmss -ResourceGroupName $rgname -Name $vmssName
$appVersion = Get-AzGalleryApplicationVersion `
   -GalleryApplicationName $applicationName `
   -GalleryName $galleryName `
   -Name $version `
   -ResourceGroupName $rgName
$packageId = $appVersion.Id
$app = New-AzVmssGalleryApplication -PackageReferenceId $packageId
Add-AzVmssGalleryApplication -VirtualMachineScaleSetVM $vmss.VirtualMachineProfile -GalleryApplication $app
Update-AzVmss -ResourceGroupName $rgName -VirtualMachineScaleSet $vmss -VMScaleSetName $vmssName
现在,可以使用门户创建一个 VM 并将 VM 应用程序部署到其中。 只需像往常一样创建 VM,然后在“高级”选项卡下,选择“选择要安装的 VM 应用程序” 。
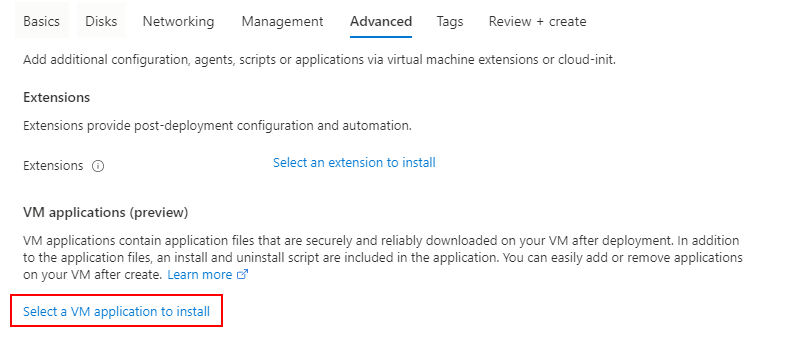
从列表中选择 VM 应用程序,然后选择页面底部的 “保存 ”。

如果要安装多个 VM 应用程序,可以返回“高级”选项卡并设置每个 VM 应用程序的安装顺序。
还可以将 VM 应用程序部署到当前正在运行的 VM。 在门户中查看 VM 详细信息时,在左侧菜单中的“设置”下选择“扩展 + 应用程序”选项。
选择“VM 应用程序”,然后选择“添加应用程序”以添加 VM 应用程序。
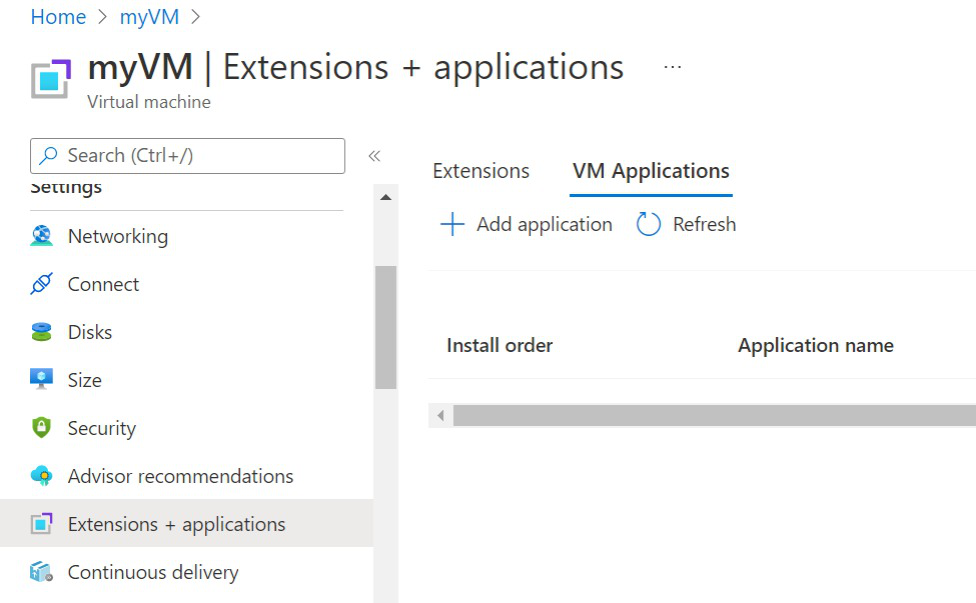
从列表中选择 VM 应用程序,然后选择页面底部的 “保存 ”。