Add on-demand "burst" nodes to an HPC Pack cluster in Azure
Important
Classic VMs will be retired on March 1, 2023.
If you use IaaS resources from ASM, please complete your migration by March 1, 2023. We encourage you to make the switch sooner to take advantage of the many feature enhancements in Azure Resource Manager.
For more information, see Migrate your IaaS resources to Azure Resource Manager by March 1, 2023.
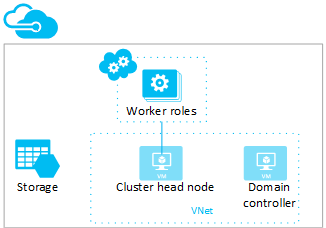
If you set up a Microsoft HPC Pack cluster in Azure, you might want a way to quickly scale the cluster capacity up or down, without maintaining a set of preconfigured compute node VMs. This article shows you how to add on-demand "burst" nodes (worker role instances running in a cloud service) as compute resources to a head node in Azure.
Important
Azure has two different deployment models for creating and working with resources: Resource Manager and Classic. This article covers using the Classic deployment model. Microsoft recommends that most new deployments use the Resource Manager model.
Starting November 15, 2017, virtual machines will be available only in the Azure portal.
The steps in this article help you add Azure nodes quickly to a cloud-based HPC Pack head node VM for a test or proof-of-concept deployment. The high-level steps are the same as the steps to “burst to Azure” to add cloud compute capacity to an on-premises HPC Pack cluster. For a tutorial, see Set up a hybrid compute cluster with Microsoft HPC Pack. For detailed guidance and considerations for production deployments, see Burst to Azure with Microsoft HPC Pack.
HPC Pack head node deployed in an Azure VM - You can use a stand-alone head node VM or one that is part of a larger cluster. To create a stand-alone head node, see Deploy an HPC Pack Head Node in an Azure VM. For automated HPC Pack cluster deployment options, see Options to create and manage a Windows HPC cluster in Azure with Microsoft HPC Pack.
Tip
If you use the HPC Pack IaaS deployment script to create the cluster in Azure, you can include Azure burst nodes in your automated deployment. See the examples in that article.
Azure subscription - To add Azure nodes, you can choose the same subscription used to deploy the head node VM, or a different subscription (or subscriptions).
Cores quota - You might need to increase the quota of cores, especially if you choose to deploy several Azure nodes with multicore sizes. To increase a quota, open an online customer support request at no charge.
Use the Azure portal or equivalent tools to configure the following resources that are needed to deploy your Azure nodes:
- A new Azure cloud service (classic)
- A new Azure storage account (classic)
Note
Don't reuse an existing cloud service in your subscription.
Considerations
- Configure a separate cloud service for each Azure node template that you plan to create. However, you can use the same storage account for multiple node templates.
- We recommend that you locate the cloud service and the storage account for the deployment in the same Azure region.
To add Azure nodes as compute resources, you need a management certificate on the head node and upload a corresponding certificate to the Azure subscription used for the deployment.
For this scenario, you can choose the Default HPC Azure Management Certificate that HPC Pack installs and configures automatically on the head node. This certificate is useful for testing purposes and proof-of-concept deployments. To use this certificate, upload the file C:\Program Files\Microsoft HPC Pack 2012\Bin\hpccert.cer from the head node VM to the subscription. To upload the certificate in the Azure portal:
Click Subscriptions > your_subscription_name.
Click Management certificates > Upload.
For additional options to configure the management certificate, see Scenarios to Configure the Azure Management Certificate for Azure Burst Deployments.
The steps to add and start Azure nodes in this scenario are generally the same as the steps with an on-premises head node. For more information, see the following sections in Steps to Deploy Azure Nodes with Microsoft HPC Pack:
- Create an Azure node template
- Add Azure nodes to the Windows HPC cluster
- Start (provision) the Azure nodes
After you add and start the nodes, they are ready for you to use to run cluster jobs.
If you encounter problems when deploying Azure nodes, see Troubleshoot Deployments of Azure Nodes with Microsoft HPC Pack.
- To use a compute-intensive instance size for the burst nodes, see the considerations in High performance compute VM sizes.
- If you want to automatically grow or shrink the Azure computing resources according to the cluster workload, see Automatically grow and shrink Azure compute resources in an HPC Pack cluster.