Tutorial: Learn about Windows virtual machine management with Azure PowerShell
When deploying resources to Azure, you have tremendous flexibility when deciding what types of resources to deploy, where they are located, and how to set them up. However, that flexibility may open more options than you would like to allow in your organization. As you consider deploying resources to Azure, you might be wondering:
- How do I meet legal requirements for data sovereignty in certain countries/regions?
- How do I control costs?
- How do I ensure that someone does not inadvertently change a critical system?
- How do I track resource costs and bill it accurately?
This article addresses those questions. Specifically, you:
- Assign users to roles and assign the roles to a scope so users have permission to perform expected actions but not more actions.
- Apply policies that prescribe conventions for resources in your subscription.
- Lock resources that are critical to your system.
- Tag resources so you can track them by values that make sense to your organization.
This article focuses on the tasks you take to implement governance. For a broader discussion of the concepts, see Governance in Azure.
Launch Azure Cloud Shell
The Azure Cloud Shell is a free interactive shell that you can use to run the steps in this article. It has common Azure tools preinstalled and configured to use with your account.
To open the Cloud Shell, just select Try it from the upper right corner of a code block. You can also launch Cloud Shell in a separate browser tab by going to https://shell.azure.com/powershell. Select Copy to copy the blocks of code, paste it into the Cloud Shell, and press enter to run it.
Understand scope
Before creating any items, let's review the concept of scope. Azure provides four levels of management: management groups, subscription, resource group, and resource. Management groups are in a preview release. The following image shows an example of these layers.
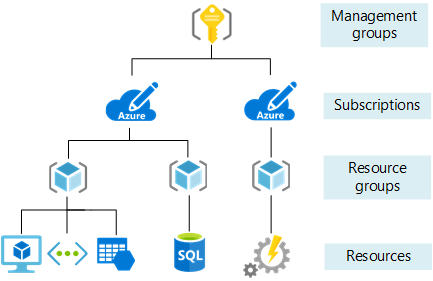
You apply management settings at any of these levels of scope. The level you select determines how widely the setting is applied. Lower levels inherit settings from higher levels. When you apply a setting to the subscription, that setting is applied to all resource groups and resources in your subscription. When you apply a setting on the resource group, that setting is applied the resource group and all its resources. However, another resource group does not have that setting.
Usually, it makes sense to apply critical settings at higher levels and project-specific requirements at lower levels. For example, you might want to make sure all resources for your organization are deployed to certain regions. To accomplish this requirement, apply a policy to the subscription that specifies the allowed locations. As other users in your organization add new resource groups and resources, the allowed locations are automatically enforced.
In this tutorial, you apply all management settings to a resource group so you can easily remove those settings when done.
Let's create that resource group.
New-AzResourceGroup -Name myResourceGroup -Location EastUS
Currently, the resource group is empty.
Azure role-based access control
You want to make sure users in your organization have the right level of access to these resources. You don't want to grant unlimited access to users, but you also need to make sure they can do their work. Azure role-based access control (Azure RBAC) enables you to manage which users have permission to complete specific actions at a scope.
To create and remove role assignments, users must have Microsoft.Authorization/roleAssignments/* access. This access is granted through the Owner or User Access Administrator roles.
For managing virtual machine solutions, there are three resource-specific roles that provide commonly needed access:
Instead of assigning roles to individual users, it's often easier to use an Azure Active Directory group that has users who need to take similar actions. Then, assign that group to the appropriate role. For this article, either use an existing group for managing the virtual machine, or use the portal to create an Azure Active Directory group.
After creating a new group or finding an existing one, use the New-AzRoleAssignment command to assign the Azure Active Directory group to the Virtual Machine Contributor role for the resource group.
$adgroup = Get-AzADGroup -DisplayName <your-group-name>

New-AzRoleAssignment -ObjectId $adgroup.id `
  -ResourceGroupName myResourceGroup `
  -RoleDefinitionName "Virtual Machine Contributor"
If you receive an error stating Principal <guid> does not exist in the directory, the new group hasn't propagated throughout Azure Active Directory. Try running the command again.
Typically, you repeat the process for Network Contributor and Storage Account Contributor to make sure users are assigned to manage the deployed resources. In this article, you can skip those steps.
Azure Policy
Azure Policy helps you make sure all resources in subscription meet corporate standards. Your subscription already has several policy definitions. To see the available policy definitions, use the Get-AzPolicyDefinition command:
(Get-AzPolicyDefinition).Properties | Format-Table displayName, policyType
You see the existing policy definitions. The policy type is either BuiltIn or Custom. Look through the definitions for ones that describe a condition you want assign. In this article, you assign policies that:
- Limit the locations for all resources.
- Limit the SKUs for virtual machines.
- Audit virtual machines that don't use managed disks.
In the following example, you retrieve three policy definitions based on the display name. You use the New-AzPolicyAssignment command to assign those definitions to the resource group. For some policies, you provide parameter values to specify the allowed values.
# Values to use for parameters
$locations ="eastus", "eastus2"
$skus = "Standard_DS1_v2", "Standard_E2s_v2"

# Get the resource group
$rg = Get-AzResourceGroup -Name myResourceGroup

# Get policy definitions for allowed locations, allowed SKUs, and auditing VMs that don't use managed disks
$locationDefinition = Get-AzPolicyDefinition | where-object {$_.properties.displayname -eq "Allowed locations"}
$skuDefinition = Get-AzPolicyDefinition | where-object {$_.properties.displayname -eq "Allowed virtual machine size SKUs"}
$auditDefinition = Get-AzPolicyDefinition | where-object {$_.properties.displayname -eq "Audit VMs that do not use managed disks"}

# Assign policy for allowed locations
New-AzPolicyAssignment -Name "Set permitted locations" `
  -Scope $rg.ResourceId `
  -PolicyDefinition $locationDefinition `
  -listOfAllowedLocations $locations

# Assign policy for allowed SKUs
New-AzPolicyAssignment -Name "Set permitted VM SKUs" `
  -Scope $rg.ResourceId `
  -PolicyDefinition $skuDefinition `
  -listOfAllowedSKUs $skus

# Assign policy for auditing unmanaged disks
New-AzPolicyAssignment -Name "Audit unmanaged disks" `
  -Scope $rg.ResourceId `
  -PolicyDefinition $auditDefinition
Deploy the virtual machine
You have assigned roles and policies, so you're ready to deploy your solution. The default size is Standard_DS1_v2, which is one of your allowed SKUs. When running this step, you're prompted for credentials. The values that you enter are configured as the user name and password for the virtual machine.
New-AzVm -ResourceGroupName "myResourceGroup" `
     -Name "myVM" `
     -Location "East US" `
     -VirtualNetworkName "myVnet" `
     -SubnetName "mySubnet" `
     -SecurityGroupName "myNetworkSecurityGroup" `
     -PublicIpAddressName "myPublicIpAddress" `
     -OpenPorts 80,3389
After your deployment finishes, you can apply more management settings to the solution.
Lock resources
Resource locks prevent users in your organization from accidentally deleting or modifying critical resources. Unlike role-based access control, resource locks apply a restriction across all users and roles. You can set the lock level to CanNotDelete or ReadOnly.
To lock the virtual machine and network security group, use the New-AzResourceLock command:
# Add CanNotDelete lock to the VM
New-AzResourceLock -LockLevel CanNotDelete `
  -LockName LockVM `
  -ResourceName myVM `
  -ResourceType Microsoft.Compute/virtualMachines `
  -ResourceGroupName myResourceGroup

# Add CanNotDelete lock to the network security group
New-AzResourceLock -LockLevel CanNotDelete `
  -LockName LockNSG `
  -ResourceName myNetworkSecurityGroup `
  -ResourceType Microsoft.Network/networkSecurityGroups `
  -ResourceGroupName myResourceGroup
To test the locks, try running the following command:
Remove-AzResourceGroup -Name myResourceGroup
You see an error stating that the delete operation can't be completed because of a lock. The resource group can only be deleted if you specifically remove the locks. That step is shown in Clean up resources.
Tag resources
You apply tags to your Azure resources to logically organize them by categories. Each tag consists of a name and a value. For example, you can apply the name "Environment" and the value "Production" to all the resources in production.
To add two tags to a resource group, use the Set-AzResourceGroup command:
Set-AzResourceGroup -Name myResourceGroup -Tag @{ Dept="IT"; Environment="Test" }
Let's suppose you want to add a third tag. Every time you apply tags to a resource or a resource group, you overwrite the existing tags on that resource or resource group. To add a new tag without losing the existing tags, you must retrieve the existing tags, add a new tag, and reapply the collection of tags:
# Get existing tags and add a new tag
$tags = (Get-AzResourceGroup -Name myResourceGroup).Tags
$tags.Add("Project", "Documentation")

# Reapply the updated set of tags
Set-AzResourceGroup -Tag $tags -Name myResourceGroup
Resources don't inherit tags from the resource group. Currently, your resource group has three tags but the resources do not have any tags. To apply all tags from a resource group to its resources, and retain existing tags on resources that are not duplicates, use the following script:
# Get the resource group
$group = Get-AzResourceGroup myResourceGroup

if ($group.Tags -ne $null) {
    # Get the resources in the resource group
    $resources = Get-AzResource -ResourceGroupName $group.ResourceGroupName

    # Loop through each resource
    foreach ($r in $resources)
    {
        # Get the tags for this resource
        $resourcetags = (Get-AzResource -ResourceId $r.ResourceId).Tags

        # If the resource has existing tags, add new ones
        if ($resourcetags)
        {
            foreach ($key in $group.Tags.Keys)
            {
                if (-not($resourcetags.ContainsKey($key)))
                {
                    $resourcetags.Add($key, $group.Tags[$key])
                }
            }

            # Reapply the updated tags to the resource
            Set-AzResource -Tag $resourcetags -ResourceId $r.ResourceId -Force
        }
        else
        {
            Set-AzResource -Tag $group.Tags -ResourceId $r.ResourceId -Force
        }
    }
}
Alternatively, you can apply tags from the resource group to the resources without keeping the existing tags:
# Get the resource group
$g = Get-AzResourceGroup -Name myResourceGroup

# Find all the resources in the resource group, and for each resource apply the tags from the resource group
Get-AzResource -ResourceGroupName $g.ResourceGroupName | ForEach-Object {Set-AzResource -ResourceId $_.ResourceId -Tag $g.Tags -Force }
To combine several values in a single tag, use a JSON string.
Set-AzResourceGroup -Name myResourceGroup -Tag @{ CostCenter="{`"Dept`":`"IT`",`"Environment`":`"Test`"}" }
To add a new tag with several values without losing the existing tags, you must retrieve the existing tags, use a JSON string for the new tag, and reapply the collection of tags:
# Get existing tags and add a new tag
$ResourceGroup = Get-AzResourceGroup -Name myResourceGroup
$Tags = $ResourceGroup.Tags
$Tags.Add("CostCenter", "{`"Dept`":`"IT`",`"Environment`":`"Test`"}")

# Reapply the updated set of tags
$ResourceGroup | Set-AzResourceGroup -Tag $Tags
To remove all tags, you pass an empty hash table.
Set-AzResourceGroup -Name myResourceGroup -Tag @{ }
To apply tags to a virtual machine, use the Set-AzResource command:
# Get the virtual machine
$r = Get-AzResource -ResourceName myVM `
  -ResourceGroupName myResourceGroup `
  -ResourceType Microsoft.Compute/virtualMachines

# Apply tags to the virtual machine
Set-AzResource -Tag @{ Dept="IT"; Environment="Test"; Project="Documentation" } -ResourceId $r.ResourceId -Force
Find resources by tag
To find resources with a tag name and value, use the Get-AzResource command:
(Get-AzResource -Tag @{ Environment="Test"}).Name
You can use the returned values for management tasks like stopping all virtual machines with a tag value.
Get-AzResource -Tag @{ Environment="Test"} | Where-Object {$_.ResourceType -eq "Microsoft.Compute/virtualMachines"} | Stop-AzVM
View costs by tag values
After applying tags to resources, you can view costs for resources with those tags. It takes a while for cost analysis to show the latest usage, so you may not see the costs yet. When the costs are available, you can view costs for resources across resource groups in your subscription. Users must have subscription level access to billing information to see the costs.
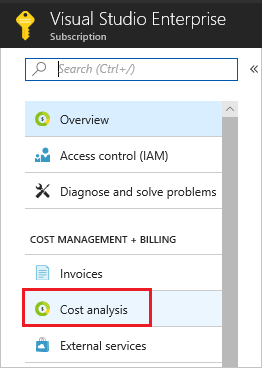
To view costs by tag in the portal, select your subscription and select Cost Analysis.
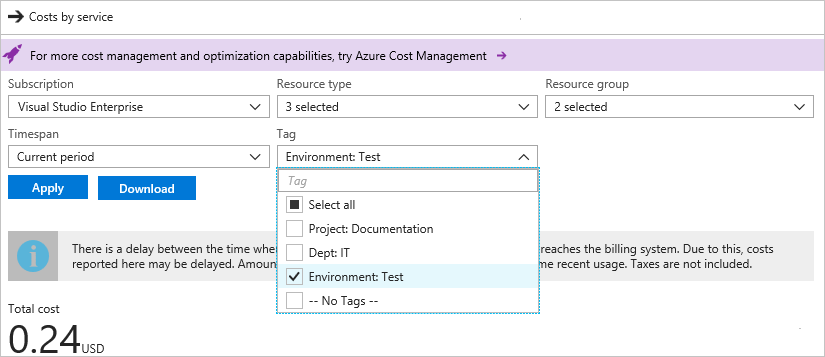
Then, filter by the tag value, and select Apply.
You can also use the Azure consumption API overview to programmatically view costs.
Clean up resources
The locked network security group can't be deleted until the lock is removed. To remove the lock, use the Remove-AzResourceLock command:
Remove-AzResourceLock -LockName LockVM `
  -ResourceName myVM `
  -ResourceType Microsoft.Compute/virtualMachines `
  -ResourceGroupName myResourceGroup
Remove-AzResourceLock -LockName LockNSG `
  -ResourceName myNetworkSecurityGroup `
  -ResourceType Microsoft.Network/networkSecurityGroups `
  -ResourceGroupName myResourceGroup
When no longer needed, you can use the Remove-AzResourceGroup command to remove the resource group, VM, and all related resources.
Remove-AzResourceGroup -Name myResourceGroup
Manage costs
Azure services cost money. Azure Cost Management helps you set budgets and configure alerts to keep spending under control. Analyze, manage, and optimize your Azure costs with Cost Management. To learn more, see the quickstart on analyzing your costs.
Next steps
In this tutorial, you created a custom VM image. You learned how to:
- Assign users to a role
- Apply policies that enforce standards
- Protect critical resources with locks
- Tag resources for billing and management
Advance to the next tutorial to learn about how to identify changes and manage package updates on a Linux virtual machine.