Note
Access to this page requires authorization. You can try signing in or changing directories.
Access to this page requires authorization. You can try changing directories.
Applies to: ✔️ AKS Automatic (preview)
Use automated deployments to build and deploy an application from a code repository to a new or existing AKS Automatic cluster. Automated deployments simplify the process of setting up a GitHub Action workflow to build and deploy your code. Once connected, every new commit you make kicks off the pipeline. Automated deployments build on draft.sh. When you create a new deployment workflow, you can use an existing Dockerfile, generate a Dockerfile, use existing Kubernetes manifests, or generate Kubernetes manifests. The generated manifests are created with security and resiliency best practices in mind.
In this quickstart, you learn to:
- Connect to a code repository
- Containerize your application
- Configure Kubernetes manifests
- Create an AKS Automatic cluster
- Deploy the application via a pull request
- Register the
AutomaticSKUPreviewfeature in your Azure subscription. - Have a GitHub account with the application to deploy.
- The identity creating the cluster should also have the following permissions on the resource group:
Microsoft.Authorization/policyAssignments/writeMicrosoft.Authorization/policyAssignments/read
- AKS Automatic clusters require deployment in Azure regions that support at least three availability zones.
Important
AKS Automatic tries to dynamically select a virtual machine size for the system node pool based on the capacity available in the subscription. Make sure your subscription has quota for 16 vCPUs of any of the following sizes in the region you're deploying the cluster to: Standard_D4pds_v5, Standard_D4lds_v5, Standard_D4ads_v5, Standard_D4ds_v5, Standard_D4d_v5, Standard_D4d_v4, Standard_DS3_v2, Standard_DS12_v2. You can view quotas for specific VM-families and submit quota increase requests through the Azure portal.
To deploy an application from a code repository, start at the Azure portal home page.
- Search for Kubernetes services in the top search bar.
- Select Kubernetes services in the search results.
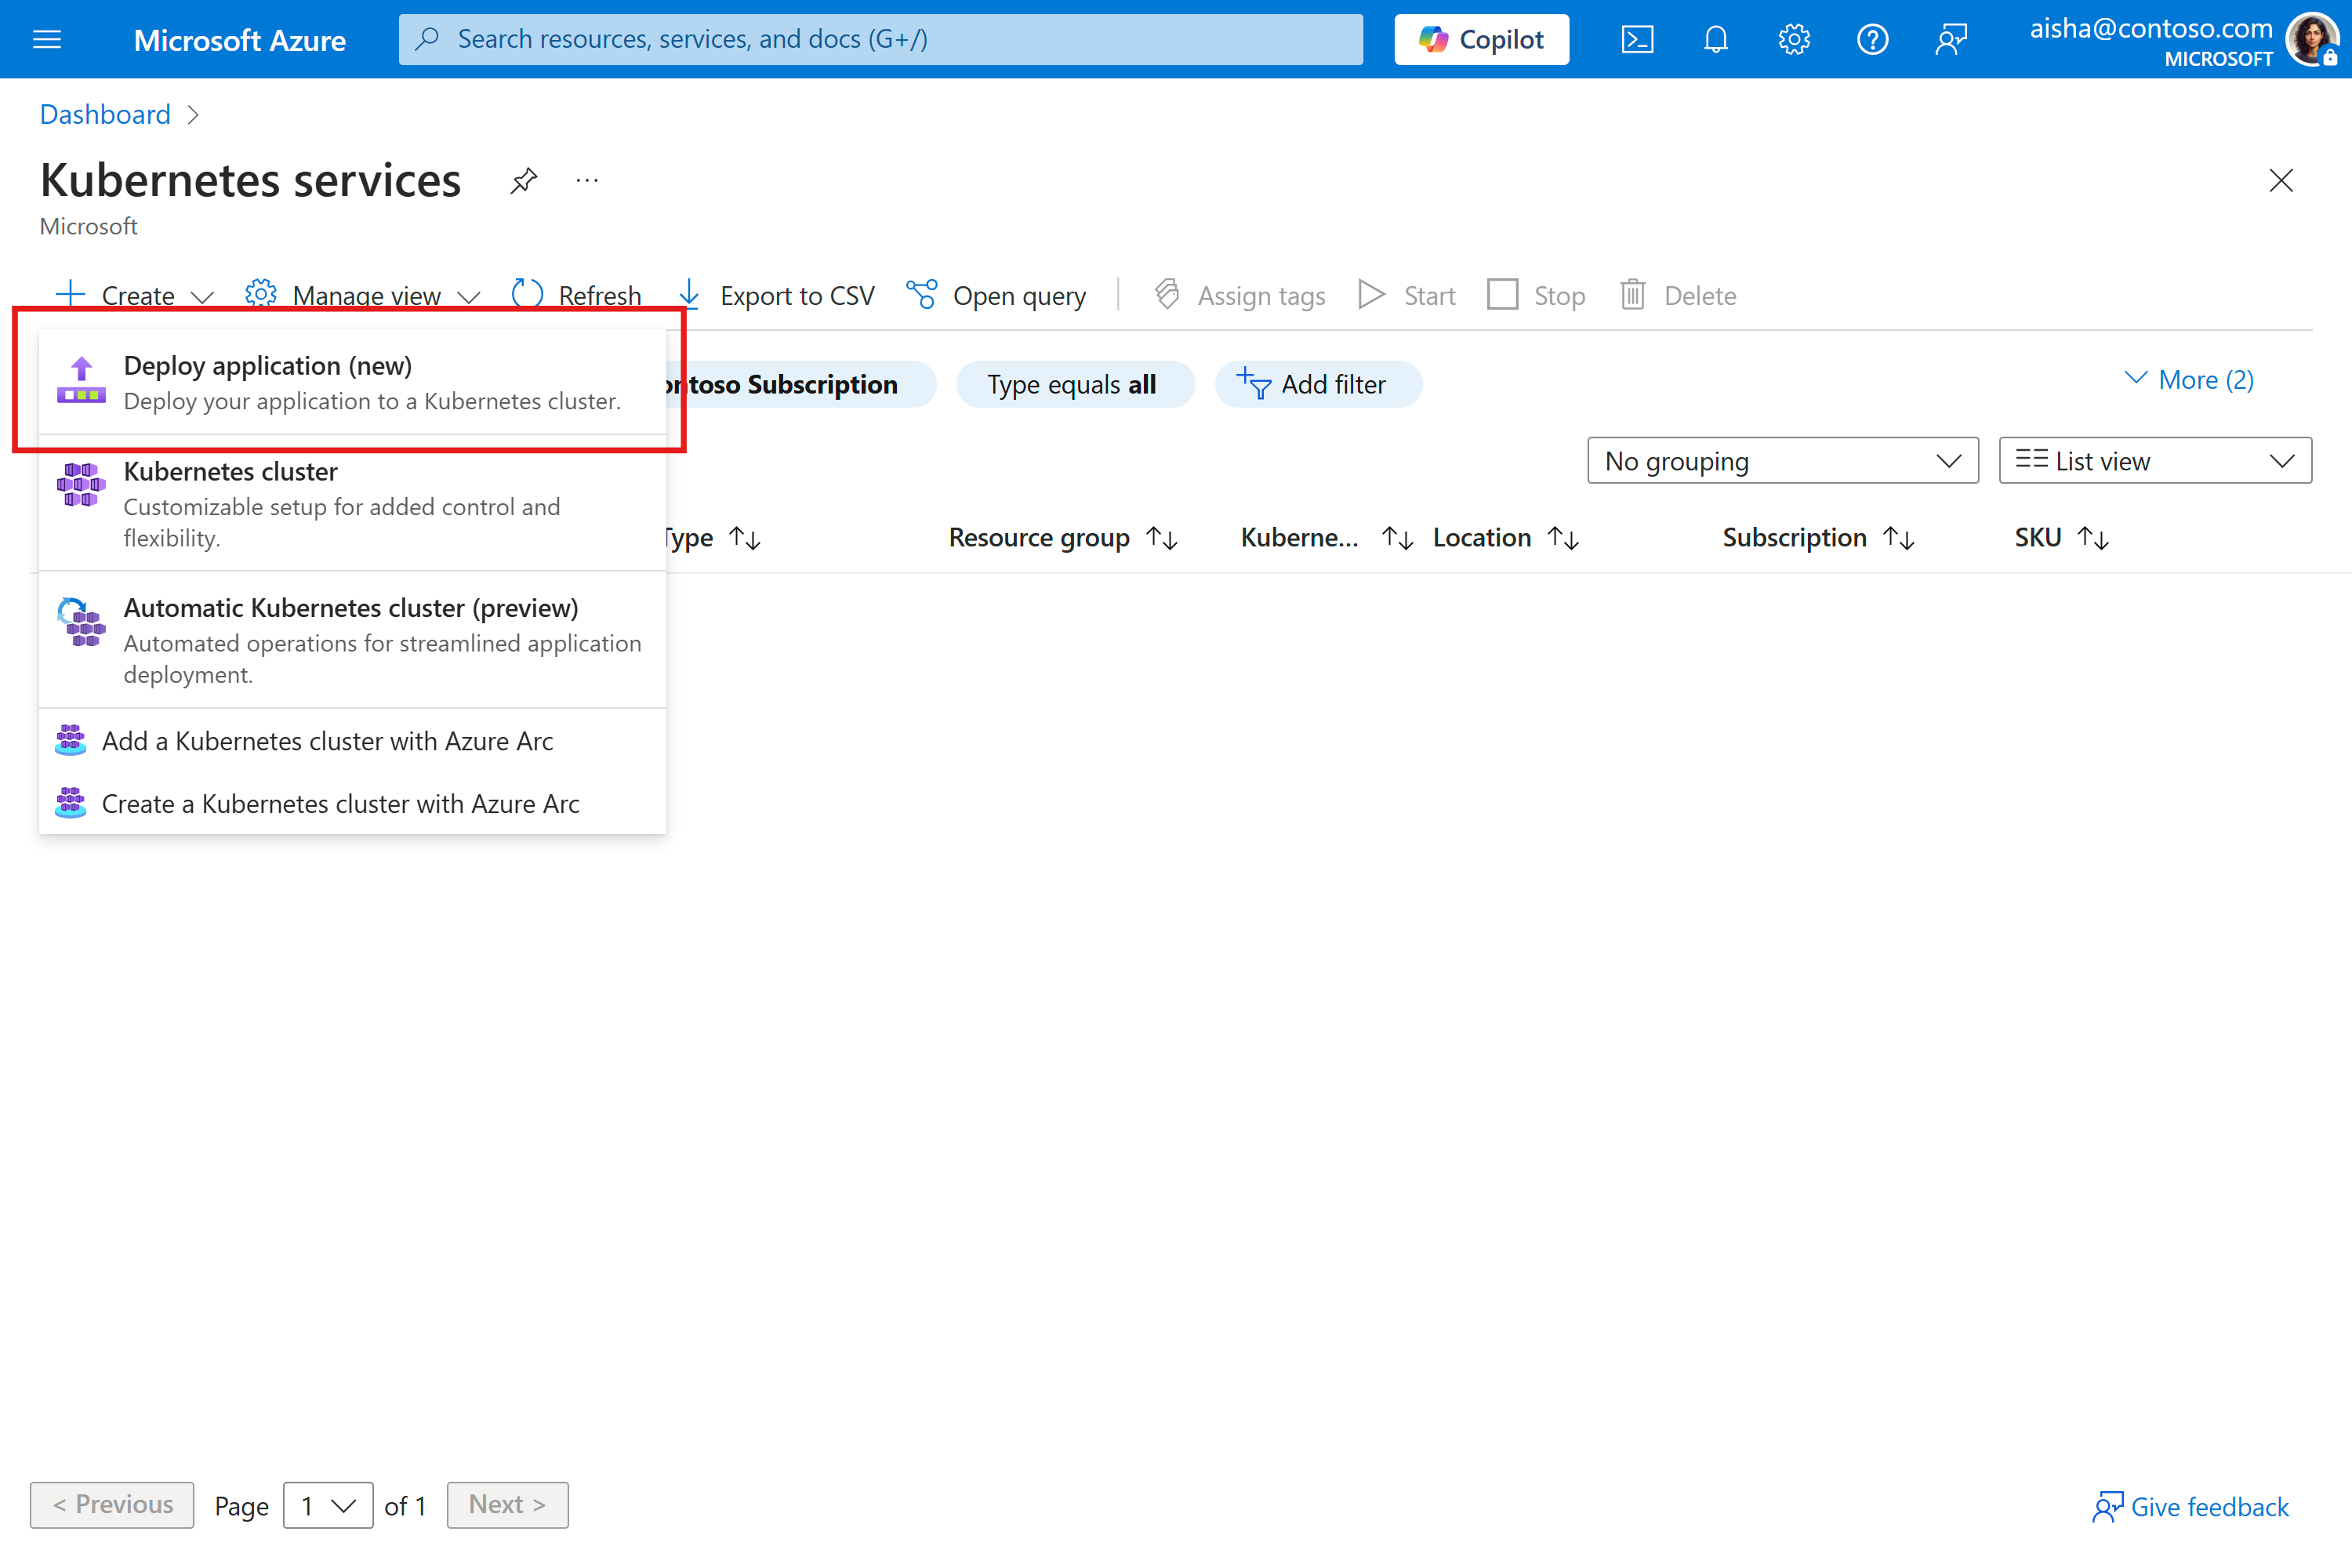
- Select the Create button and select Deploy application.
Create and automated deployment workflow and authorize it to connect to the desired source code repository.
- In the Basics tab, select Deploy your application.
- Under Project details, choose the Subscription, Resource Group, and Region.
- Under Repository details, enter a name for the workflow, then select Authorize access to connect to the desired GitHub repository.
- Choose the Repository and Branch.
- Select the Next button.
To get an application ready for Kubernetes, you need to build it into a container image and stored into a container registry. You use a Dockerfile to provide instructions on how to build the container image. If your source code repository doesn't already have a Dockerfile, Automated Deployments can generate one for you, otherwise, you can utilize an existing Dockerfile.
Use Automated Deployments to generate a Dockerfile for many languages and frameworks such as Go, C#, Node.js, Python, Java, Gradle, Clojure, PHP, Ruby, Erlang, Swift, and Rust. The language support is built on what's available in draft.sh.
- Select Auto-containerize (generate Dockerfile) for the container configuration.
- Select the location of where to save the generated Dockerfile in the repository.
- Choose the application environment from the list of supported languages and frameworks.
- Enter the application port.
- Select an existing Azure Container Registry or create a new one. This registry is used to store the built application image. The kubelet identity of the AKS Automatic cluster is given
AcrPullpermissions on that registry.
An application running on Kubernetes consists of many Kubernetes primitive components. These components describe what container image to use, how many replicas to run, if there's a public IP required to expose the application, etc. For more information, see the official Kubernetes documentation. If your source code repository doesn't already have the basic Kubernetes manifests to deploy, Automated Deployments can generate them for you, otherwise, you can utilize a set of existing manifests. You can also choose an existing Helm chart.
Use Automated Deployments to generate a set of basic Kubernetes manifest files to have your application up and running. At the moment, Automated Deployments creates a Deployment, a Service, and a ConfigMap.
The generated manifests are designed to apply recommendations of deployment safeguards, such as:
- Automatically generating liveness, readiness, and startup probes.
- Preferring pod anti-affinity and topology spread constraints that spread replicas onto different nodes for improved resiliency.
- Enforcing the
RuntimeDefaultsecure computing profile which establishes an extra layer of protection against common system call vulnerabilities exploited by malicious actors. - Dropping all Linux capabilities and only allowing a limited set following the baseline Kubernetes Pod Security Standards.
To generate Kubernetes manifests:
- Select Generate application deployment files for the deployment options.
- Enter the application port. This port is used on the generated
Service. - Select the location of where to save the generated Kubernetes manifests in the repository.
- Select the Next button.
If you don't have a cluster already, you can create a new AKS Automatic cluster as part of this deployment.
- Select Create Automatic Kubernetes cluster for the cluster configuration.
- Enter a cluster name.
- Choose the automatic upgrade maintenance schedule or leave the default selected.
- Enter the Kubernetes namespace where the application is deployed.
- Choose the monitoring and logging level or leave the default selected.
- Select the Next button.
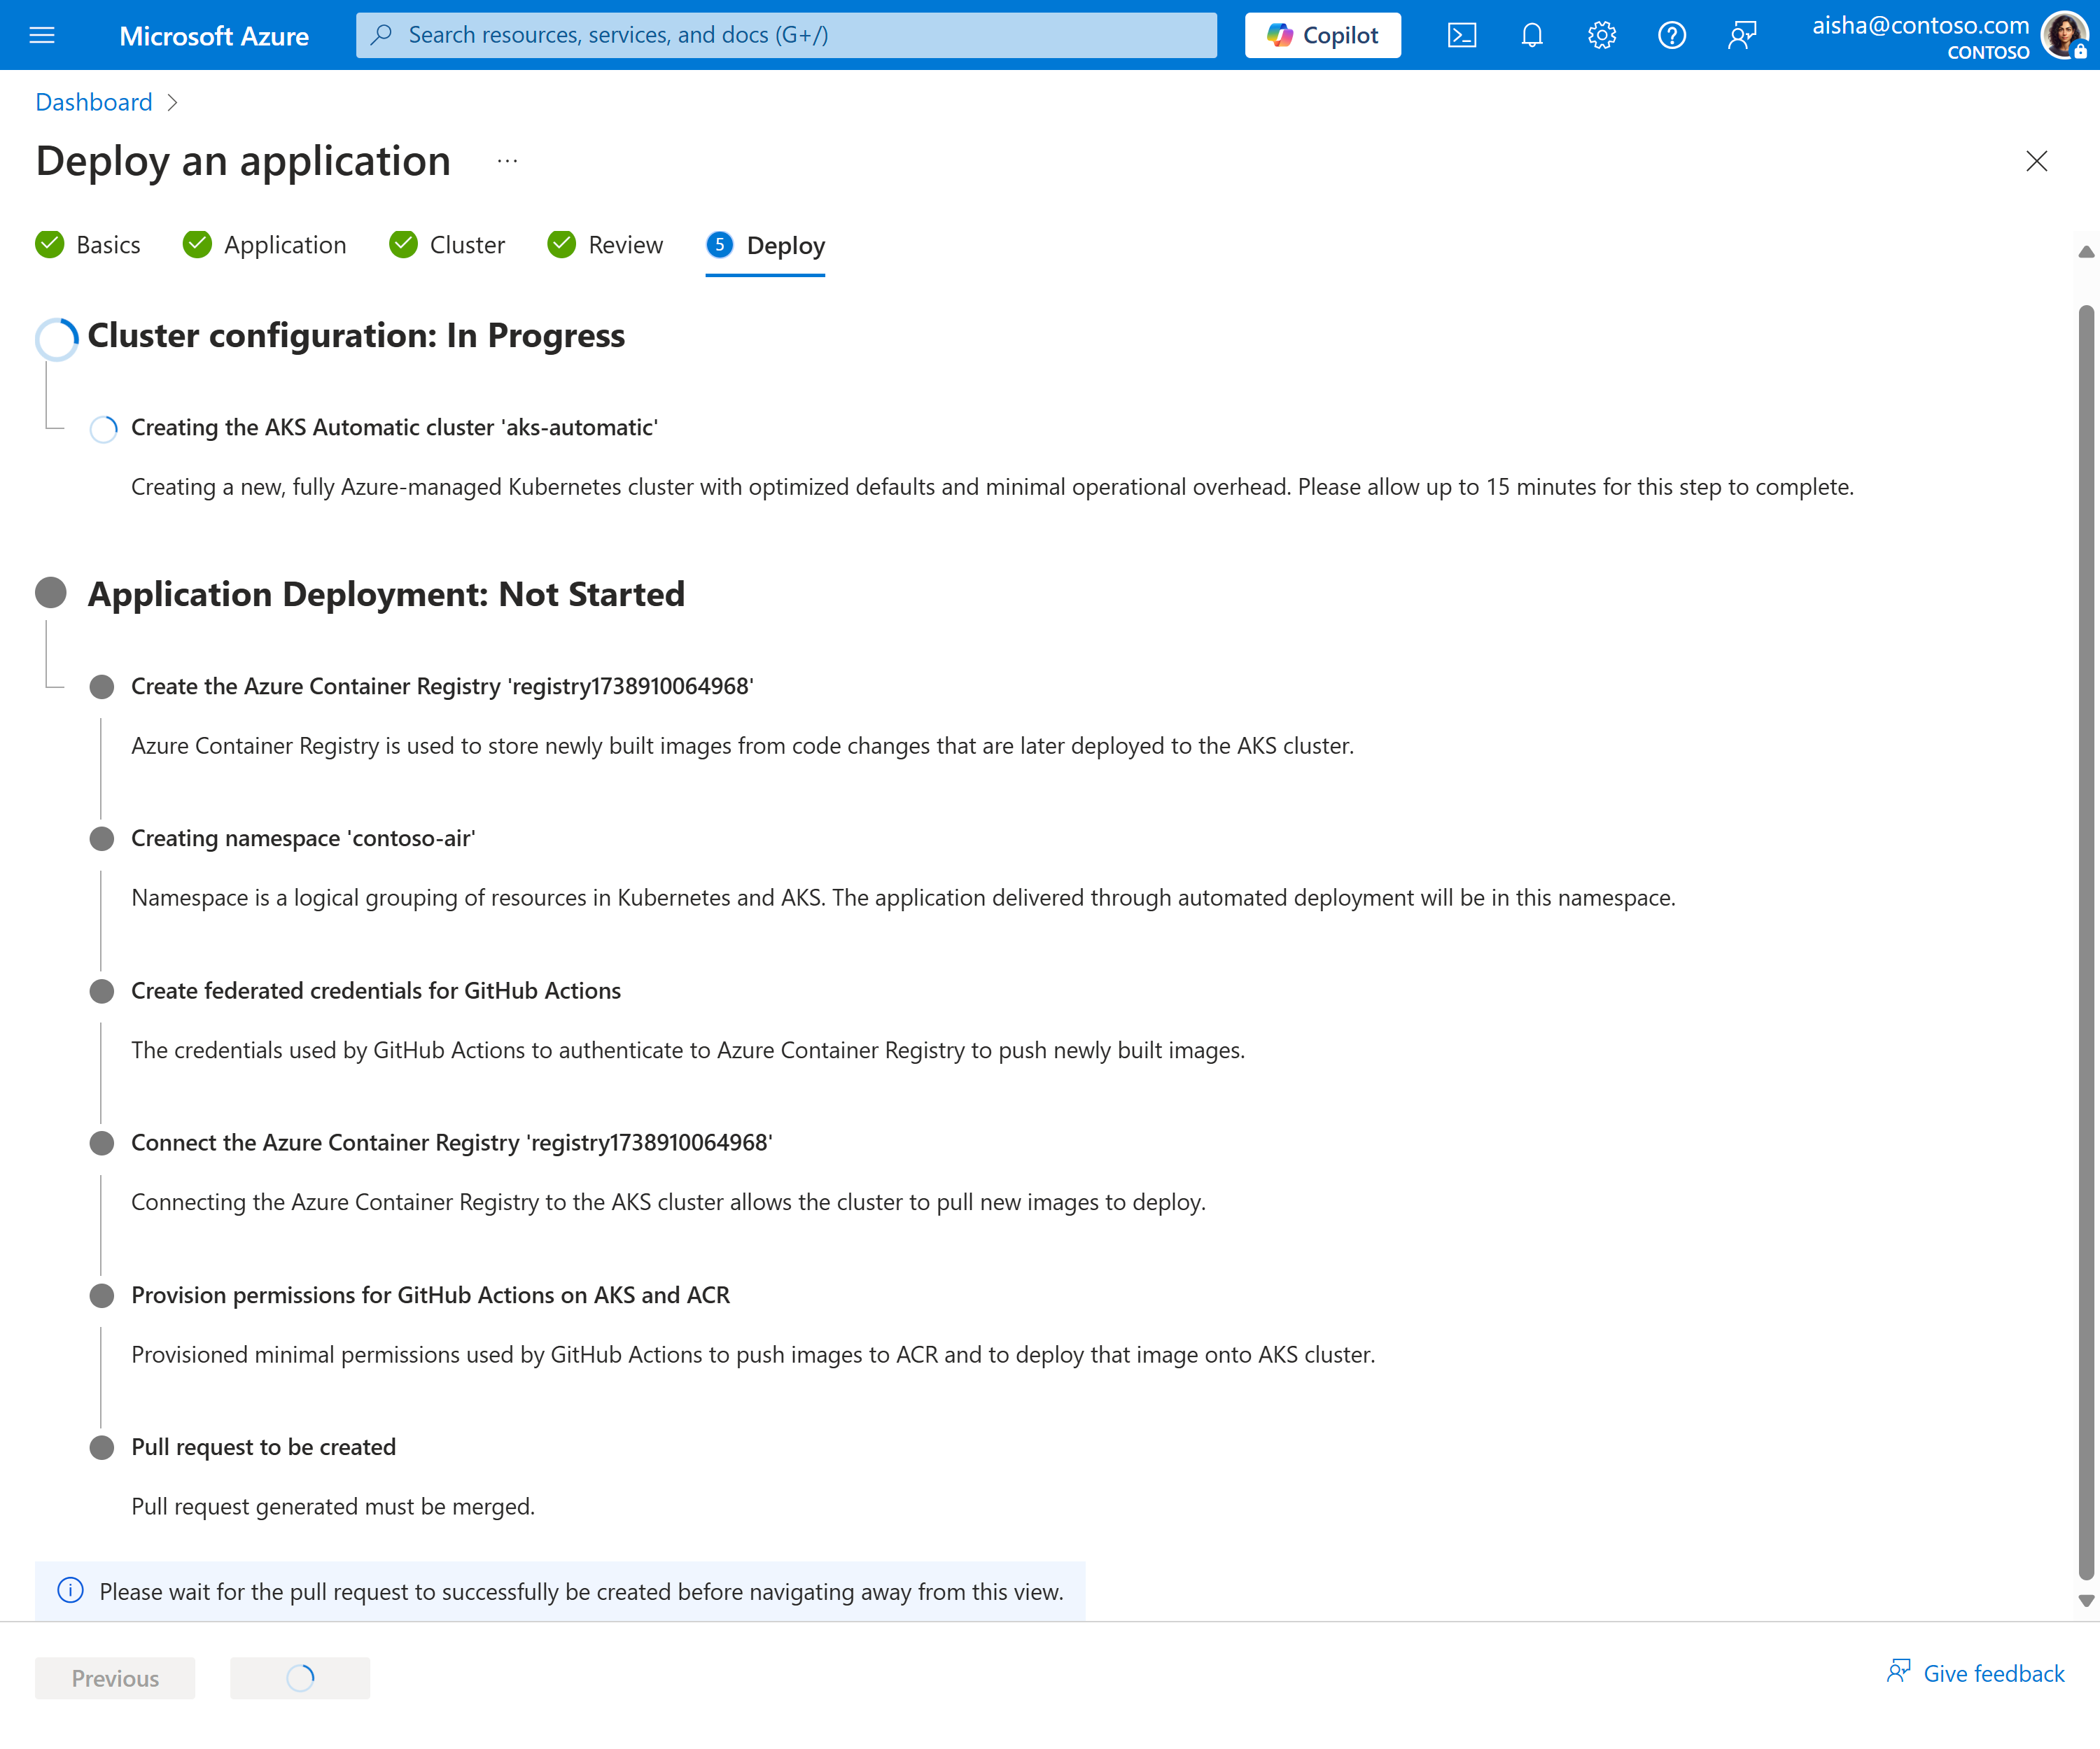
Review the configuration for the cluster, application, and Kubernetes manifests, then select Deploy. Creating a cluster takes a few minutes, don't navigate away from deployment page.
- A new AKS Automatic cluster is created or an existing one is configured.
- A container registry is created or an existing one is configured with the cluster.
- Federated credentials are created to allow the GitHub Action workflow to deploy to the cluster.
- A pull request is created on the code repository with any generated files and the workflow.
When the deployment succeeds, select the View pull request button to view the details of the generated pull request on your code repository.
- Review the changes under Files changed and make any desired edits.
- Select Merge pull request to merge the changes into your code repository.
Merging the change runs the GitHub Actions workflow that builds your application into a container image, store it in Azure Container Registry, and deploy it to the cluster.
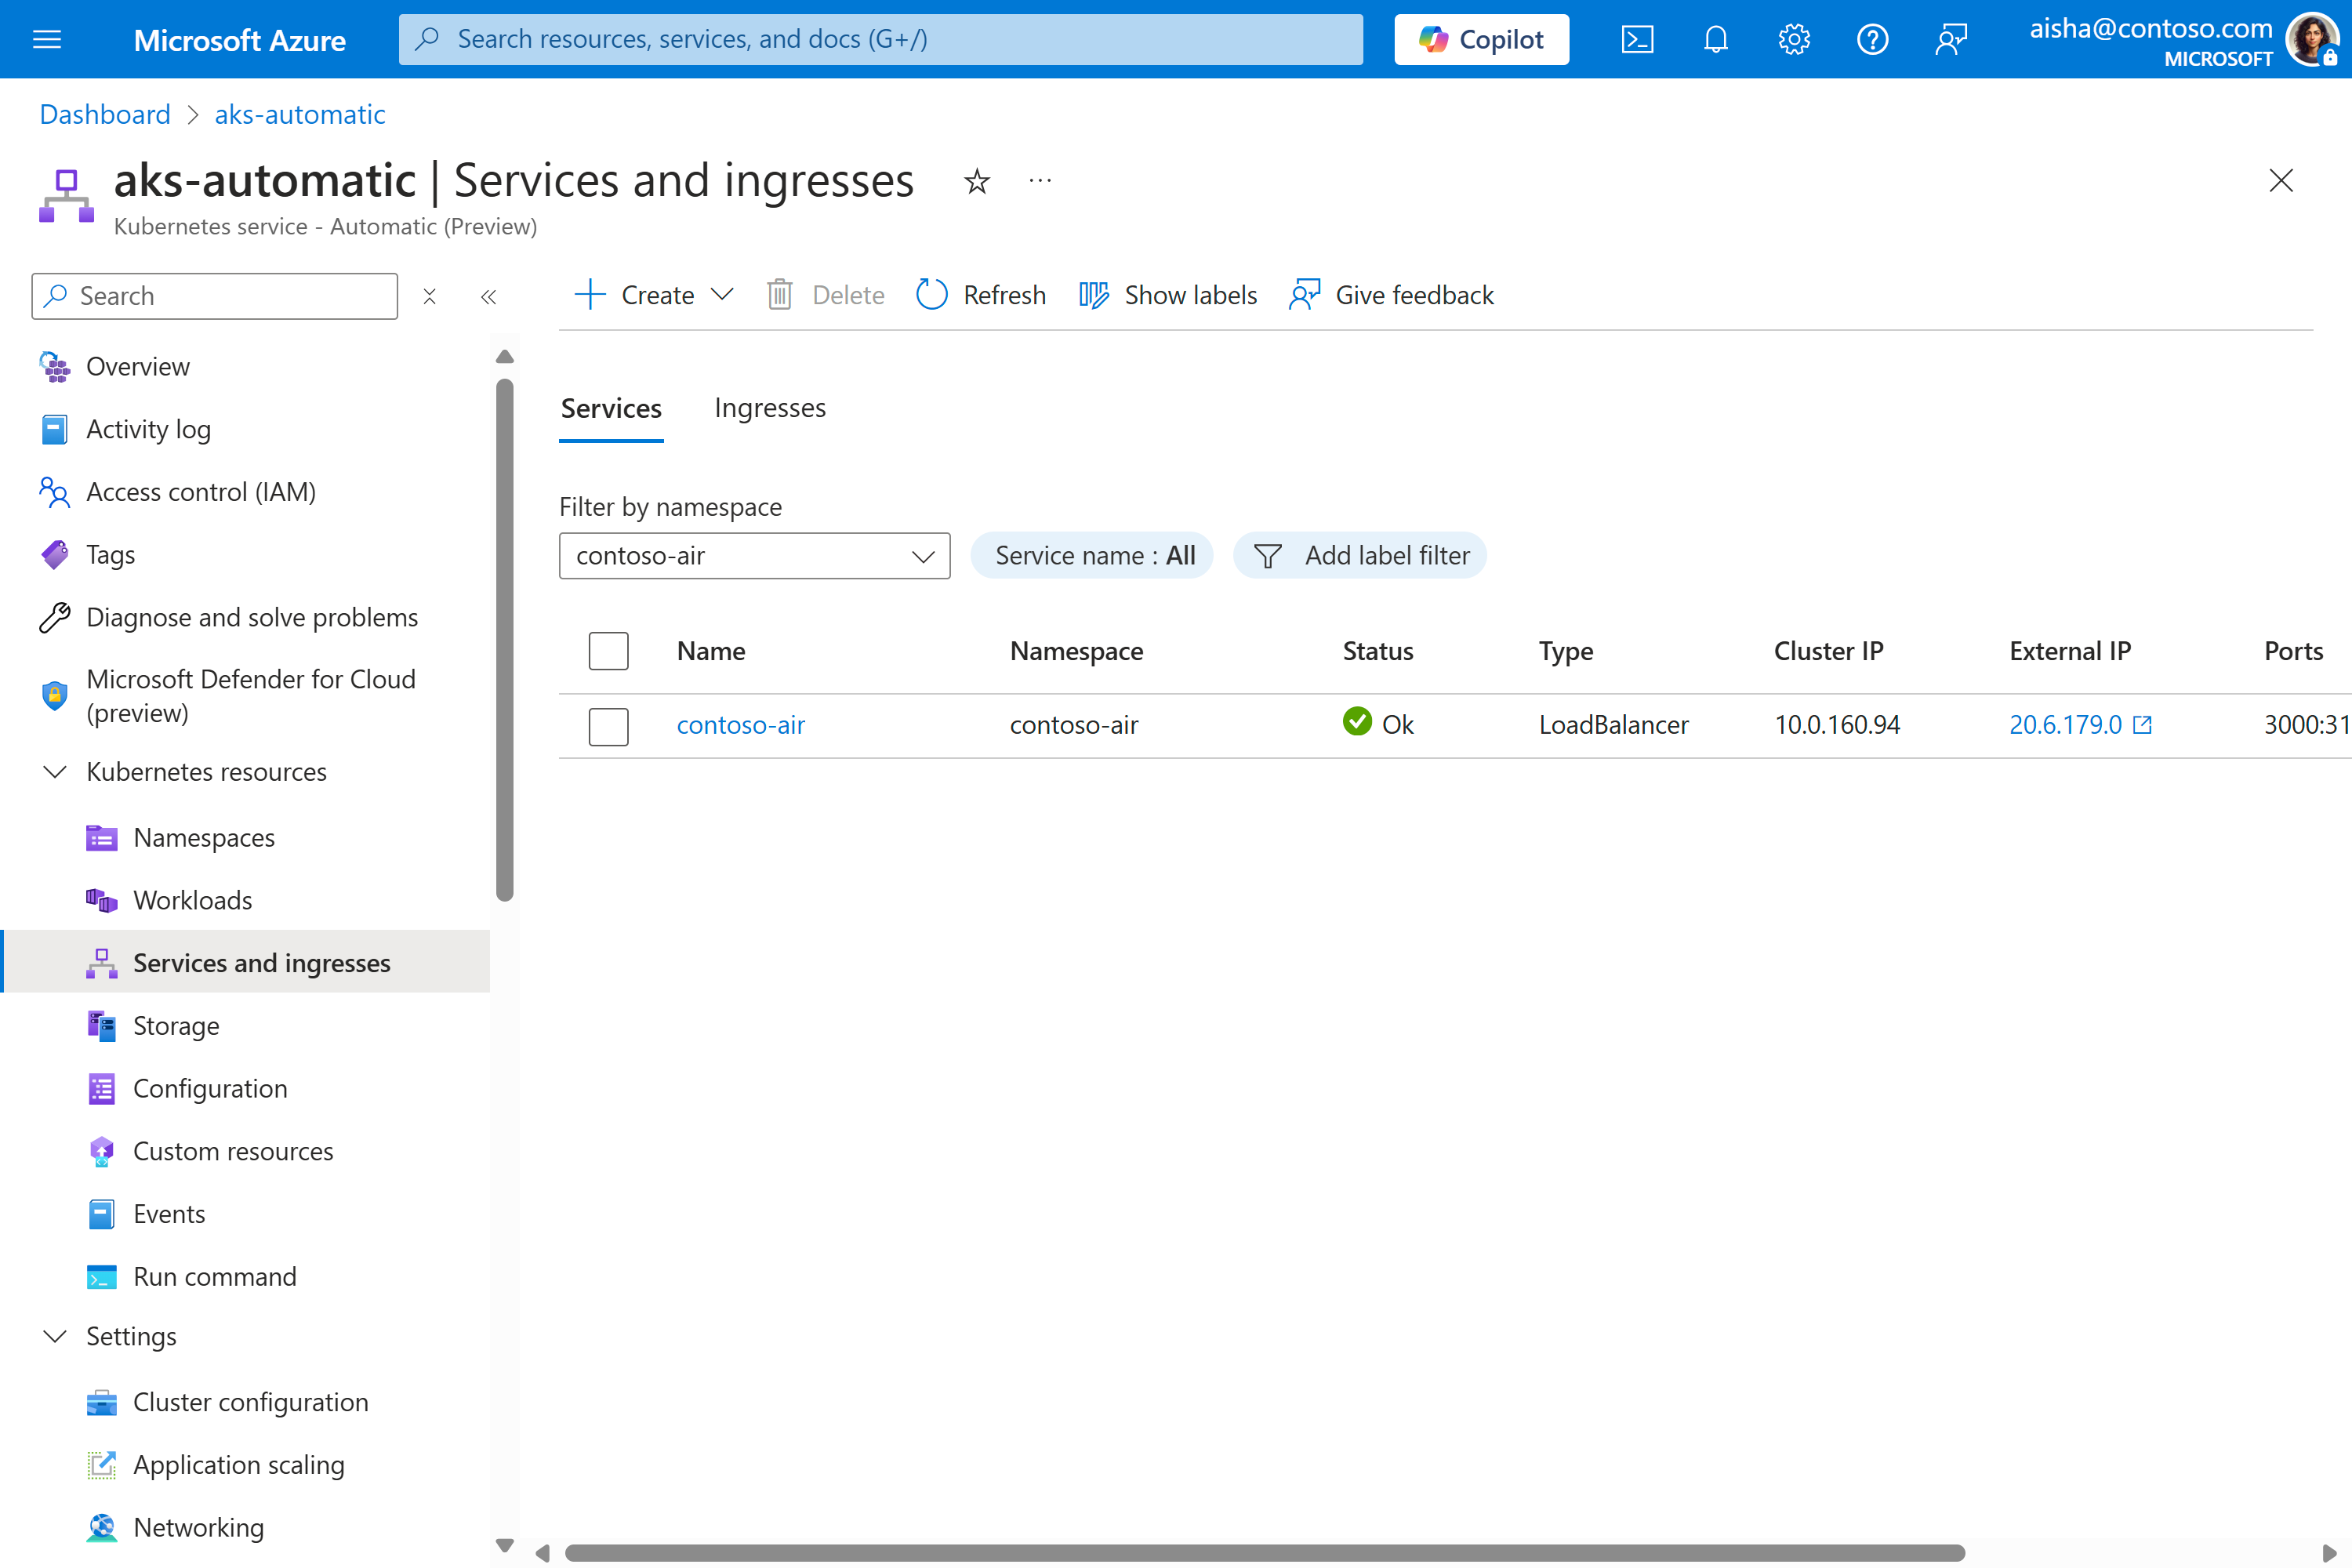
After the pipeline is completed, you can review the created Kubernetes Service on the Azure portal by selecting Services and ingresses under Kubernetes resources service menu.
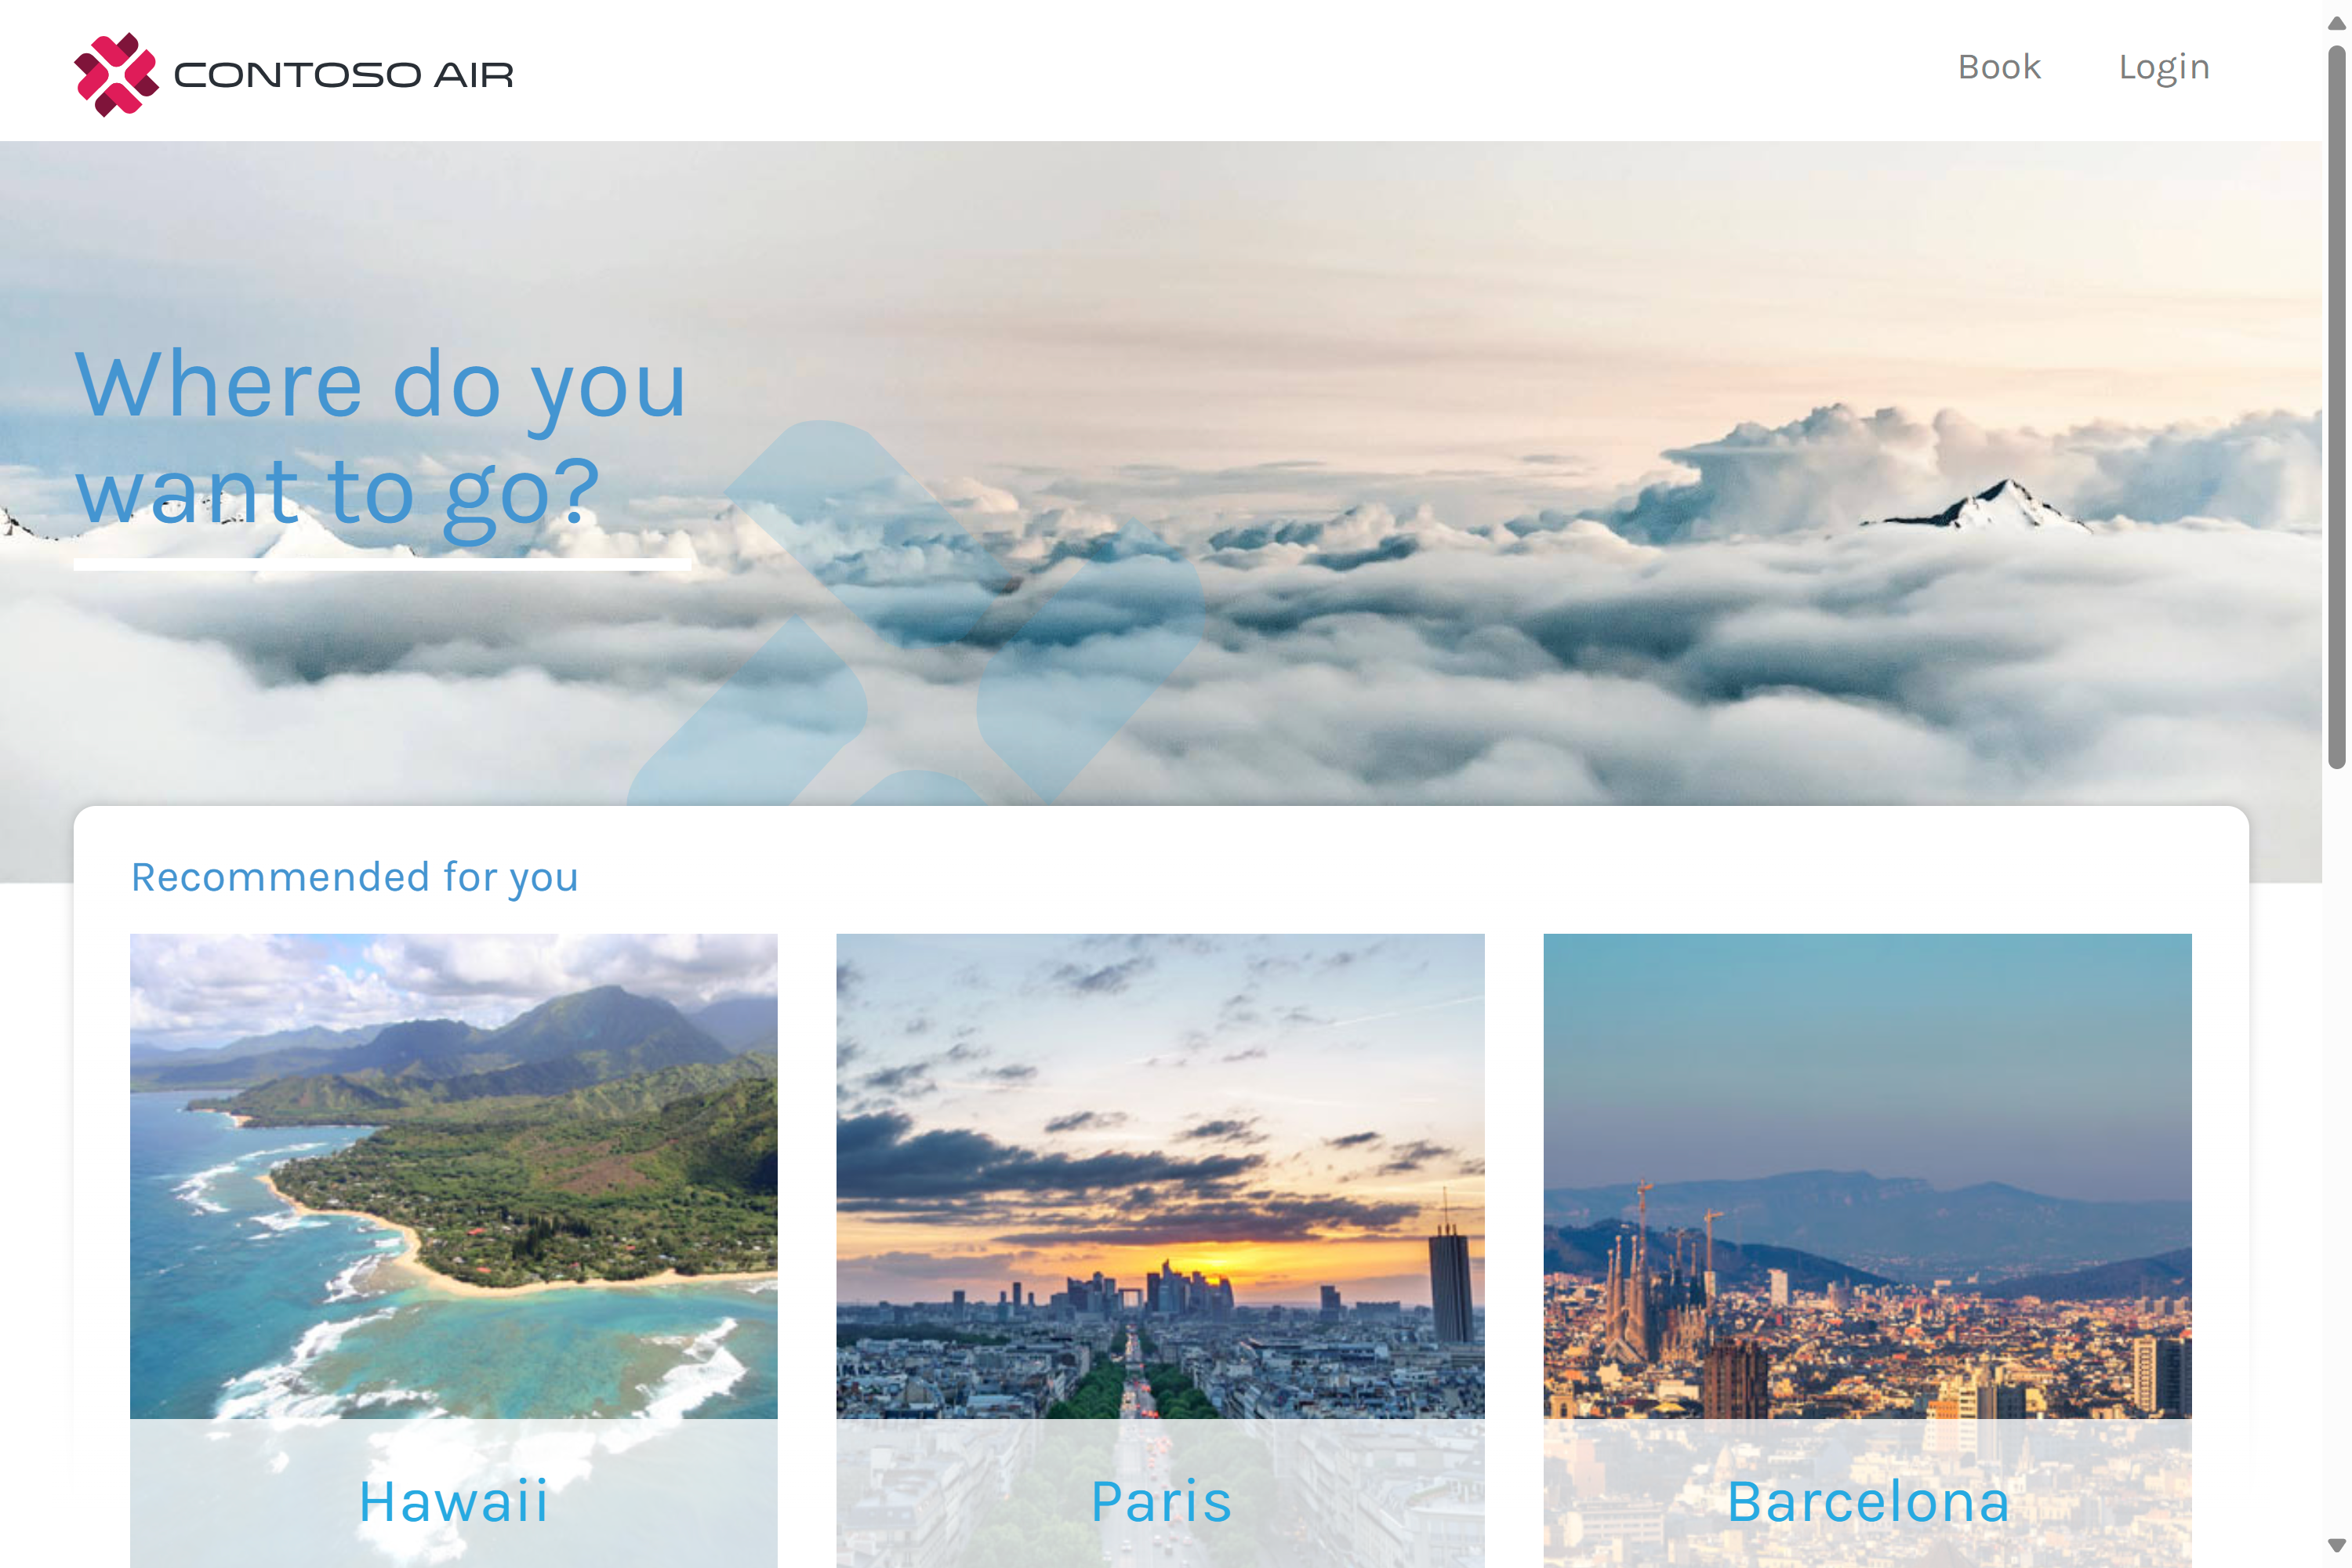
Selecting the External IP should open up a new browser page with the running application.
Once you're done with your cluster, can delete it to avoid incurring Azure charges.
- In the Azure portal, navigate to your resource group.
- Select Delete resource group.
- Enter the name of your resource group to confirm deletion and select Delete.
- In the Delete confirmation dialog box, select Delete.
In this quickstart, you deployed an application to a Kubernetes cluster using AKS Automatic and set up a continuous integration/continious deployment (CI/CD) pipeline from a code repository.
To learn more about AKS Automatic, continue to the introduction.


