Note
Access to this page requires authorization. You can try signing in or changing directories.
Access to this page requires authorization. You can try changing directories.
Important
Azure Cache for Redis announced its retirement timeline for all SKUs. We recommend moving your existing Azure Cache for Redis instances to Azure Managed Redis as soon as you can.
Migration guidance:
For more details about the retirement:
Azure Cache for Redis import and export functionality imports or exports data to or from Azure Redis cache instances as Redis Database (RDB) snapshots. The snapshots are imported or exported using a blob in an Azure Storage account.
You can use Azure Redis import and export functionality for data management, to migrate between different cache instances, or to populate a cache with data before use. This article describes how to import and export data in Azure Redis, and answers commonly asked questions.
Scope of availability
| Tier | Basic, Standard | Premium |
|---|---|---|
| Available | No | Yes |
Import and export are supported in the Premium tiers.
Compatibility
Import
- You can import your RDB snapshots from either page blobs or block blobs.
Export
- You can export your snapshots as RDB page blobs in Premium tier.
- Blob storage accounts don't support export.
Versions
- Redis 4.0 caches support RDB version 8 and below. Redis 6.0 caches support RDB version 9 and below.
- You can't import exported backups from newer Redis versions like Redis 6.0 into older versions like Redis 4.0.
Prerequisites
- A Premium tier cache in Azure Cache for Redis.
- To import files, an RDB file or files uploaded into page or block blobs in Azure Storage, in the same region and subscription as your Azure Redis cache.
Note
If you use managed identity for storage account authentication, the storage account can be in a different subscription.
Import
You can use import to bring Redis-compatible RDB files from any Redis server running in any cloud or environment, including Linux, Windows, or other cloud providers such as Amazon Web Services. Importing data is an easy way to create a cache with prepopulated data.
During the import process, Azure Redis loads the RDB files from Azure Storage into memory and then inserts the keys into the cache.
Important
Importing data deletes preexisting cache data, and the cache isn't accessible by cache clients during the import process.
Note
Before importing, ensure that your RDB file or files are uploaded into page or block blobs in Azure Storage. If you follow the Export procedure first, your RDB file is already stored in a page blob and is ready for importing.
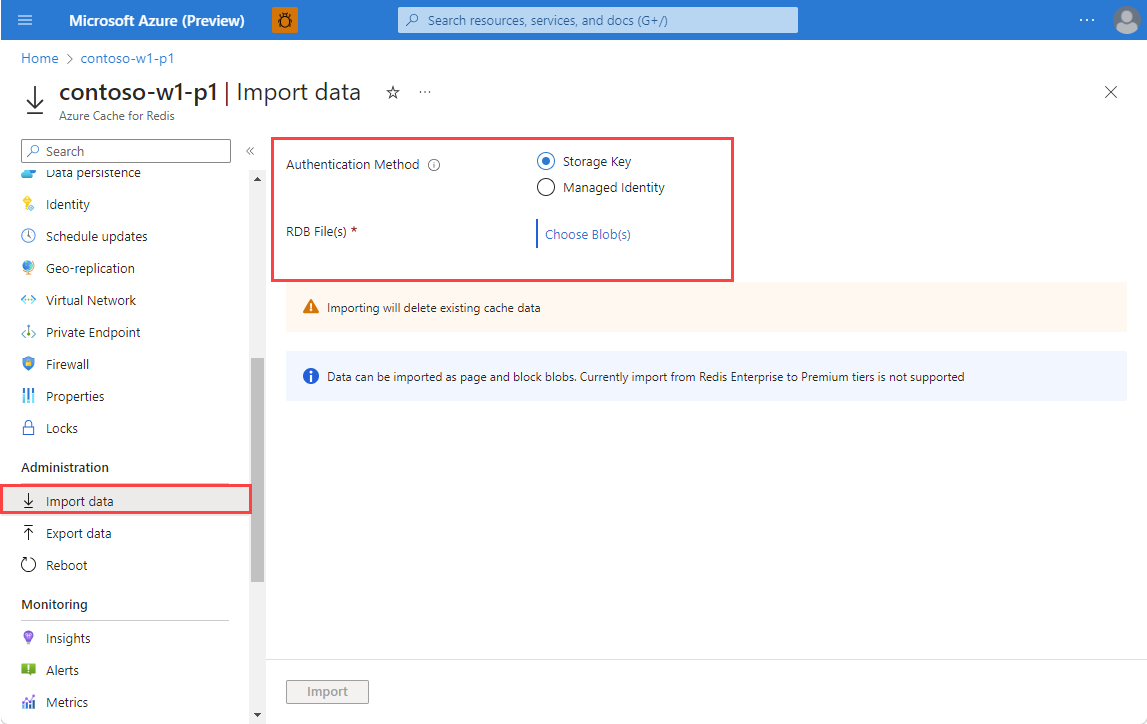
To import one or more cache blobs, on your Redis cache page in the Azure portal, select Import data under Administration on the left navigation menu.
On the Import data page, select an Authentication Method, and then select Choose Blob(s).
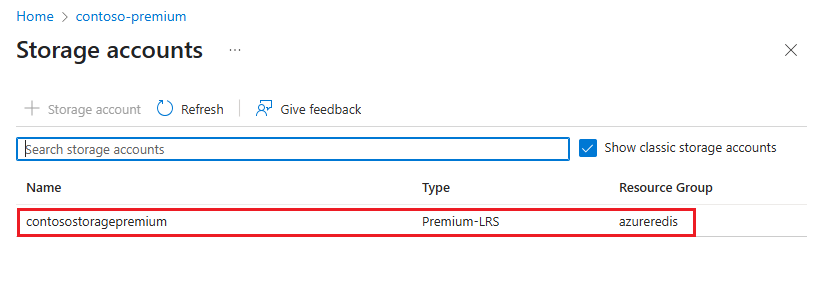
On the Storage accounts page, select the storage account that contains the data to import.
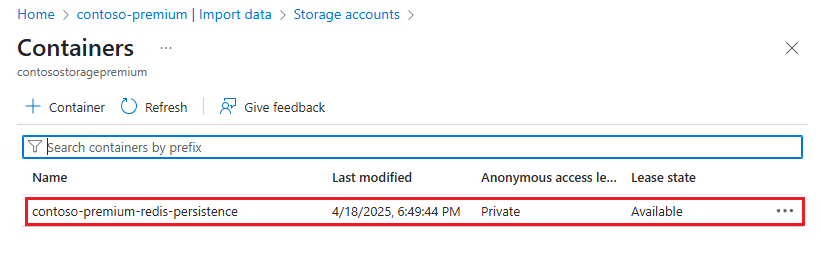
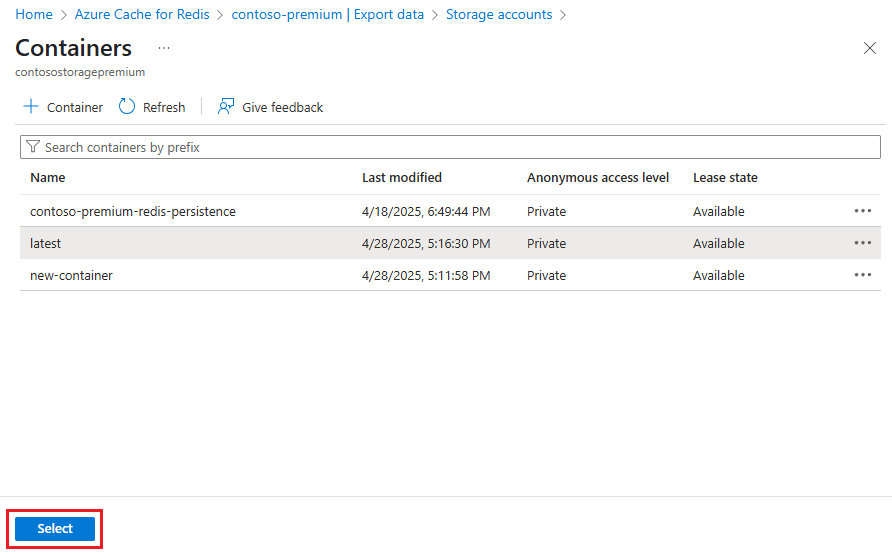
On the Containers page, select the container within the storage account that contains the data to import.
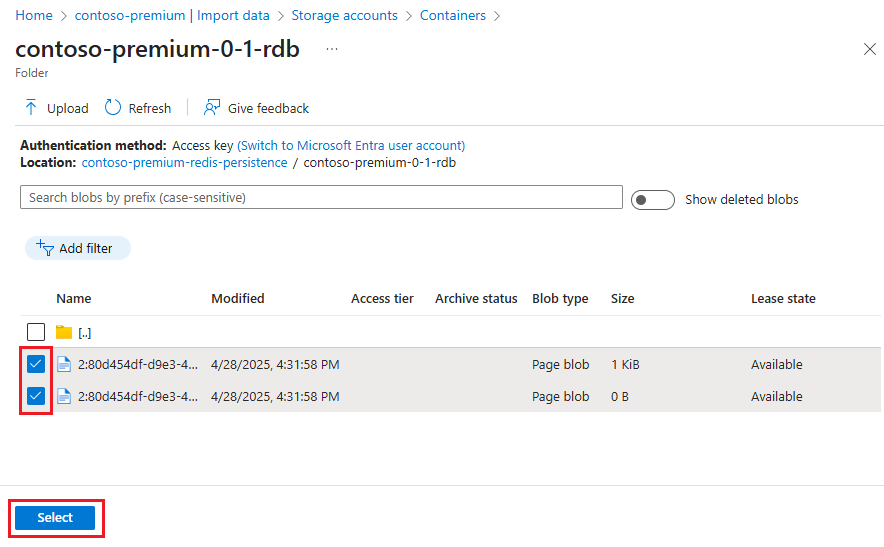
On the container page, select the checkboxes next to one or more blobs to import, and then select Select.
On the Import data page, select Import to begin the import process.
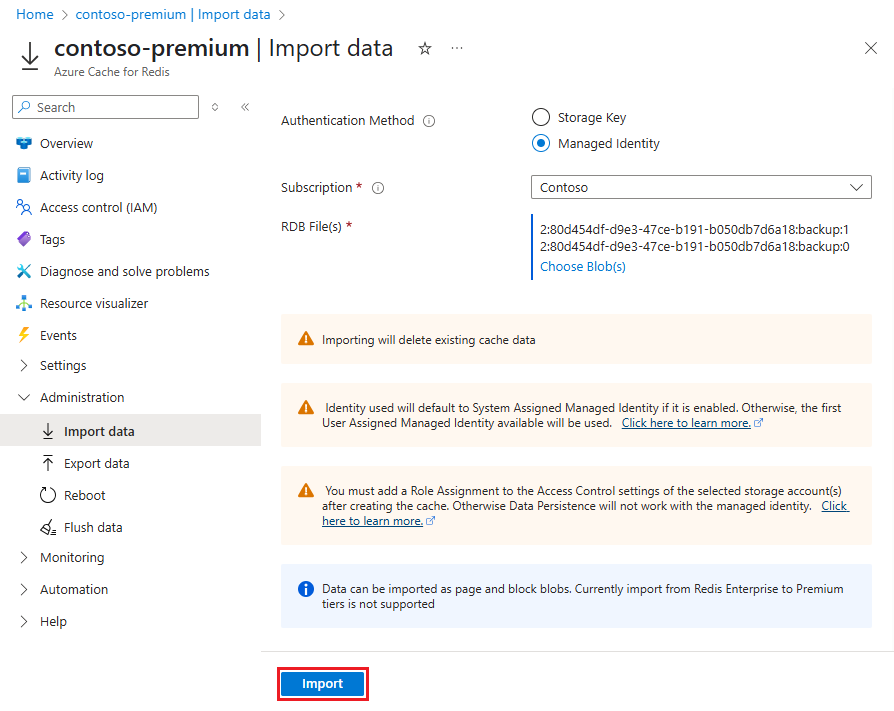
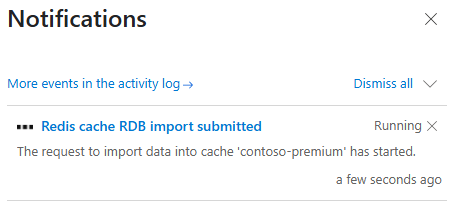
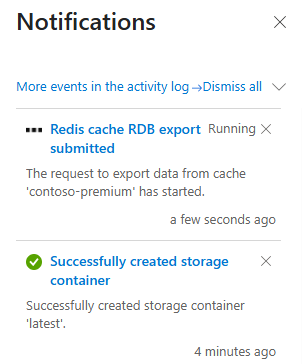
You can monitor import progress by following the notifications from the Azure portal, or by viewing events in the Activity log.
Export
The export process exports the data stored in your Azure Redis cache to RDB files. You can use this feature to move data from one Azure Redis cache or server to another.
During the export process, a temporary file is created on the virtual machine that hosts the Azure Redis server instance. The file is then uploaded to the chosen storage account. When the export operation completes with either success or failure, the temporary file is deleted.
Important
- Azure Redis doesn't support exporting to Azure Data Lake Storage Gen2 storage accounts.
- Blob storage accounts don't support Azure Redis export.
If your export to a firewall-enabled storage account fails, see What if I have firewall enabled on my storage account? For more information, see Azure storage account overview.
To export the current contents of the cache to storage, on your Redis cache page in the Azure portal, select Export data under Administration on the left navigation menu.
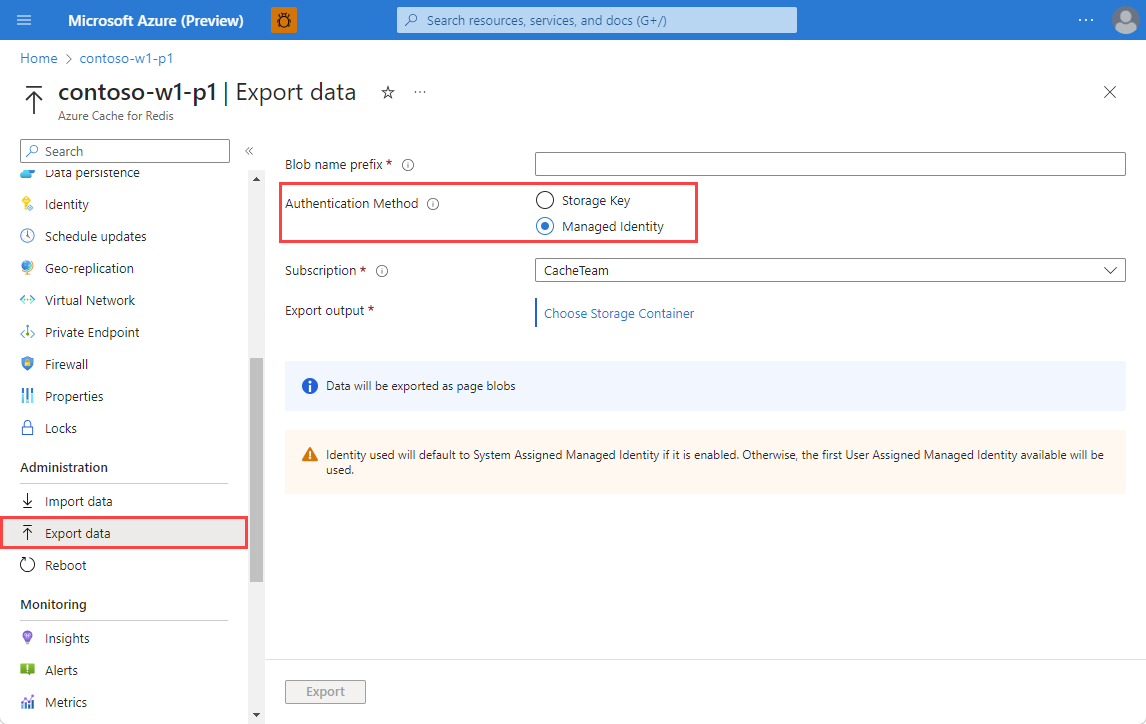
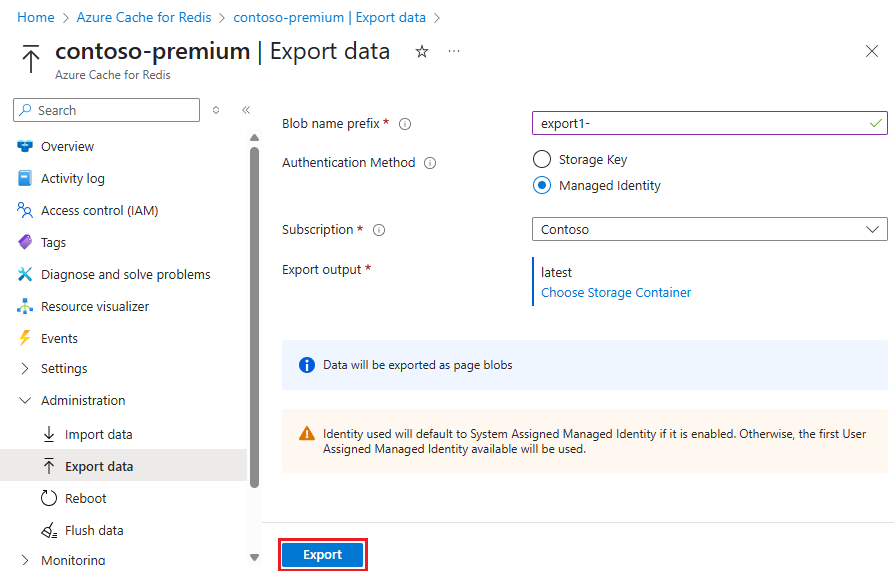
On the Export data page, for Blob name prefix, enter a prefix for names of files generated by this export operation. Select an Authentication Method, and then select Choose Storage Container.
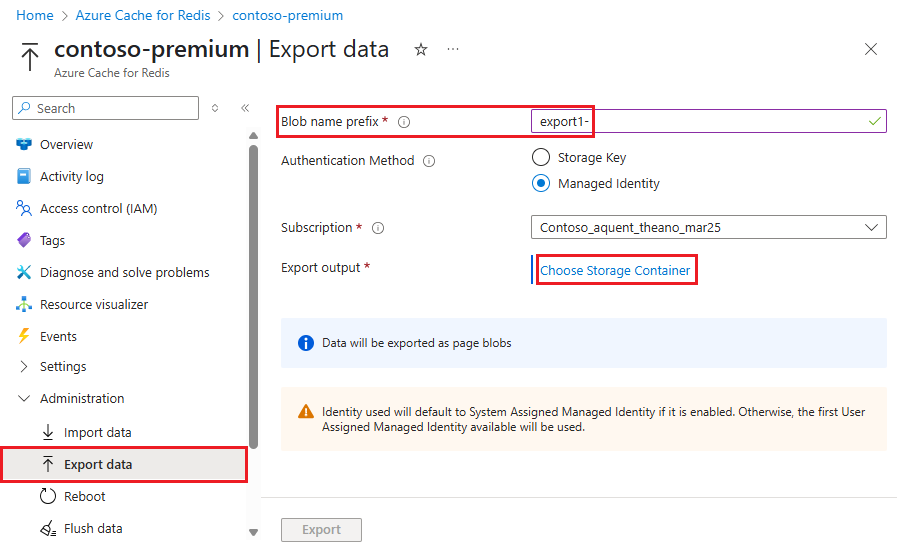
On the Storage accounts page, select the storage account that contains the data to export.
On the Containers page, if you want to create a new container for the export, select Container, and on the New Container page, enter a name for the container and select Create. Otherwise, select the existing container you want to use.
On the Containers page, select the container you want to use for the export, and select Select.
On the Export data page, select Export.
You can monitor the progress of the export operation by following the notifications from the Azure portal, or by viewing the events in the Activity log. Caches remain available for use during the export process.
Import-export FAQ
This section contains frequently asked questions about the import and export features.
- Can I automate import-export using Azure PowerShell or Azure CLI?
- Can I import data from any Redis server?
- Can I import or export data from a storage account in a different subscription than my cache?
- Can I use import-export with Redis clustering?
- How does import-export work with custom database settings?
- How is import-export different from Redis data persistence?
- Is my cache available during an import-export operation?
- What if I have a firewall enabled on my storage account?
- What RDB versions can I import?
- Which Azure Redis tiers support import-export?
- Which permissions does the storage account container shared access signature (SAS) token need to allow export?
- Why did I get an error when exporting my data to Azure Blob Storage?
Which tiers support import-export?
The import and export features are available only in the Premium tiers.
Can I import data from any Redis server?
Yes, you can import data that was exported from Azure Redis instances. You can import RDB files from any Redis server running in any cloud or environment, including Linux, Windows, or other cloud providers like Amazon Web Services.
To import this data, upload the RDB file from the Redis server into a page or block blob in an Azure Storage account. Then import it into your Azure Redis cache instance.
For example, you might want to export the data from your production cache, and then import it into a cache that's part of a staging environment for testing or migration.
Important
To successfully import page blob data exported from non-Azure Redis servers, the page blob size must be aligned on a 512-byte boundary. For sample code to perform any required byte padding, see Sample page blob upload.
What RDB versions can I import?
For more information on supported RDB versions for import, see Compatibility.
Is my cache available during an import-export operation?
- Caches remain available during export, and you can continue to use your cache during an export operation.
- Caches become unavailable when an import operation starts and become available again when the import operation completes.
Can I use import-export with Redis clustering?
Yes, and you can import and export between a clustered cache and a nonclustered cache. Since Redis cluster only supports database 0, any data in databases other than 0 isn't imported. When clustered cache data is imported, the keys are redistributed among the shards of the cluster.
How does import-export work with custom database settings?
Some pricing tiers have different database limits. If you configured a custom value for the databases setting during cache creation, there are some considerations when importing.
When you import to a pricing tier with a lower databases limit than the tier you exported from:
- If you use the default number of
databases, which is 16 for all pricing tiers, no data is lost. - If you use a custom number of
databasesthat falls within the limits for the tier you're importing to, no data is lost. - If your exported data is from a database that exceeds the limits of the new tier, the data from the excess databases isn't imported.
How is import-export different from Redis data persistence?
The Azure Cache for Redis data persistence feature is primarily for data durability, while the import-export functionality is designed for making periodic data backups for point-in-time recovery (PITR).
When you configure data persistence, your cache persists a snapshot of the data to disk, based on a configurable backup frequency. The data is written with a Redis-proprietary binary format.
On the Premium tier, the data persistence file is stored in Azure Storage, but you can't import the file into a different cache.
If a catastrophic event disables both the primary and the replica caches, the persisted cache data is restored automatically using the most recent snapshot. Data persistence is designed for disaster recovery, and isn't intended as a PITR mechanism.
To make periodic data backups for PITR, use the import-export functionality. For more information, see How to configure data persistence for Azure Cache for Redis.
Can I automate import-export using Azure PowerShell or Azure CLI?
Yes. For the Premium tier, see the following content:
- Import a Premium Azure Redis cache using Azure PowerShell
- Export a Premium Azure Redis cache using Azure PowerShell
- Import a Premium Azure Redis cache using Azure CLI
- Export a Premium Azure Redis cache using Azure CLI
Why did I get an error when exporting my data to Azure Blob Storage?
Export works only with RDB files stored as page blobs. Other blob types aren't supported, including blob storage accounts with hot and cool tiers. For more information, see Azure storage account overview.
If you use an access key to authenticate a storage account, having firewall exceptions on the storage account can cause the import-export processes to fail.
What if I have firewall enabled on my storage account?
For a Premium tier instance, you must select Allow Azure services on the trusted services list to access this storage account in your storage account settings. Then use the system-assigned or user-assigned managed identity and provision the Storage Blob Data Contributor role-based access control (RBAC) role for that object ID. For more information, see Managed identity for storage accounts.
Can I import or export data from a storage account in a different subscription than my cache?
In the Premium tier, you can import and export data from a storage account in a different subscription than your cache if you use managed identity as the authentication method. You need to select the subscription holding the storage account when you configure the import or export.
Which permissions need to be granted to the storage account container shared access signature (SAS) token to allow export?
For export to an Azure Storage account to work successfully, the shared access signature (SAS) token must have the following permissions:
readaddcreatewritedeletetagmove