Note
Access to this page requires authorization. You can try signing in or changing directories.
Access to this page requires authorization. You can try changing directories.
Virtual network address translation (NAT) simplifies outbound-only internet connectivity for virtual networks. When configured on a subnet, all outbound connectivity uses your specified static public IP addresses. An NAT can be useful for apps that need to consume a third-party service that uses an allowlist of IP address as a security measure. To learn more, see What is Azure NAT Gateway?.
This tutorial shows you how to use NAT gateways to route outbound traffic from an HTTP triggered function. This function lets you check its own outbound IP address. During this tutorial, you'll:
- Create a virtual network
- Create a Premium plan function app
- Create a public IP address
- Create a NAT gateway
- Configure function app to route outbound traffic through the NAT gateway
Note
You can't use a NAT gateway to route outbound traffic to an Azure Storage account in the same region as your function app. Services deployed in the same region your storage account use private Azure IP addresses for communication. For more information, see NAT Gateway frequenty asked questions.
Topology
The following diagram shows the architecture of the solution that you create:

Functions running in the Premium plan have the same hosting capabilities as web apps in Azure App Service, which includes the VNet Integration feature. To learn more about VNet Integration, including troubleshooting and advanced configuration, see Integrate your app with an Azure virtual network.
Prerequisites
For this tutorial, it's important that you understand IP addressing and subnetting. You can start with this article that covers the basics of addressing and subnetting. Many more articles and videos are available online.
If you don’t have an Azure subscription, create a Trial before you begin.
If you've already completed the integrate Functions with an Azure virtual network tutorial, you can skip to Create an HTTP trigger function.
Create a virtual network
From the Azure portal menu, select Create a resource. From the Azure Marketplace, select Networking > Virtual network.
In Create virtual network, enter or select the settings specified as shown in the following table:
Setting Value Subscription Select your subscription. Resource group Select Create new, enter myResourceGroup, then select OK. Name Enter myResourceGroup-vnet. Location Select China North 2. Select Next: IP Addresses, and for IPv4 address space, enter 10.10.0.0/16.
Select Add subnet, then enter Tutorial-Net for Subnet name and 10.10.1.0/24 for Subnet address range.
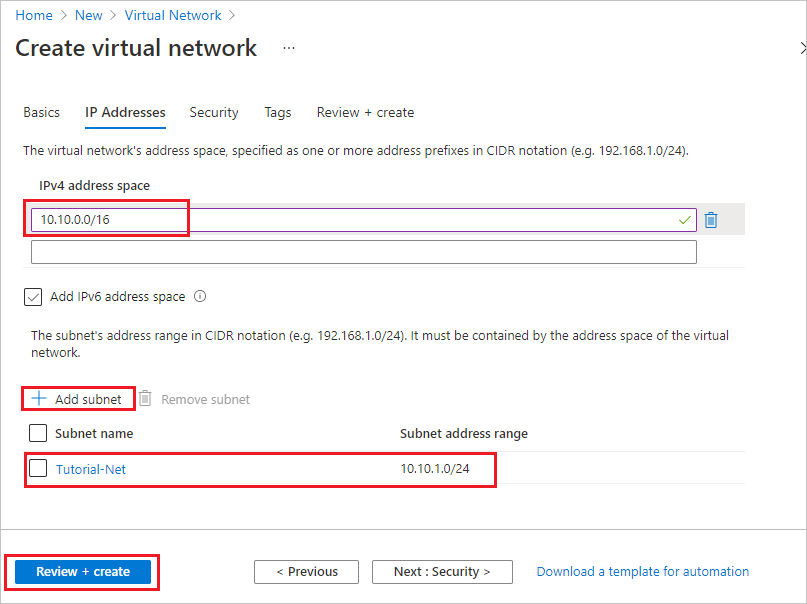
Select Add, then select Review + create. Leave the rest as default and select Create.
In Create virtual network, select Create.
Next, you create a function app in the Premium plan. This plan provides serverless scale while supporting virtual network integration.
Create a function app in a Premium plan
This tutorial shows you how to create your function app in a Premium plan. The same functionality is also available when you host your app in a Flex Consumption plan or in a Dedicated (App Service) plan.
Note
For the best experience in this tutorial, choose .NET for runtime stack and choose Windows for operating system. Also, create your function app in the same region as your virtual network.
From the Azure portal menu or the Home page, select Create a resource.
In the New page, select Compute > Function App.
Under Select a hosting option, select Functions Premium > Select to create your app in a Premium plan. In this serverless hosting option, you pay only for the time your functions run. To learn more about different hosting plans, see Overview of plans.
On the Basics page, use the function app settings as specified in the following table:
Setting Suggested value Description Subscription Your subscription The subscription under which this new function app is created. Resource Group myResourceGroup Name for the new resource group in which to create your function app. Function App name Globally unique name Name that identifies your new function app. Valid characters are a-z(case insensitive),0-9, and-. To guarantee a unique app name, you can optionally enable Secure unique default hostname, which is currently in preview.Do you want to deploy code or container image? Code Option to publish code files or a Docker container. Operating system Preferred OS Choose either Linux or Windows. Runtime stack Preferred language Choose a runtime that supports your favorite function programming language. Version Supported language version Choose a supported version of your function programming language. Region Preferred region Choose a region near you or near other services your functions access. Under Environment details for either Windows Plan or Linux Plan, select Create new, Name your App Service plan, and select a Pricing plan. The default pricing plan is EP1, where EP stands for elastic premium. To learn more, see the list of Premium SKUs. When running JavaScript functions on a Premium plan, you should choose an instance that has fewer vCPUs. For more information, see Choose single-core Premium plans.
Unless you want to enable Zone Redundancy, keep the default value of Disabled.
Select Next: Storage. On the Storage page, create the default host storage account required by your function app. Storage account names must be between 3 and 24 characters in length and only can contain numbers and lowercase letters. You can also use an existing account, which must meet the storage account requirements.
Unless you're enabling virtual network integration, select Next: Monitoring to skip the Networking tab. On the Monitoring page, enter the following settings:
Setting Suggested value Description Enable Application Insights Yes Enables built-in Application Insight integration for monitoring your functions code. Application Insights Default Creates an Application Insights resource of the same App name in the nearest supported region. By expanding this setting, you can change the New resource name or choose a different Location in an Azure geography to store your data. Select Review + create to accept the defaults for the remaining pages and review the app configuration selections.
On the Review + create page, review your settings, and then select Create to provision and deploy the function app.
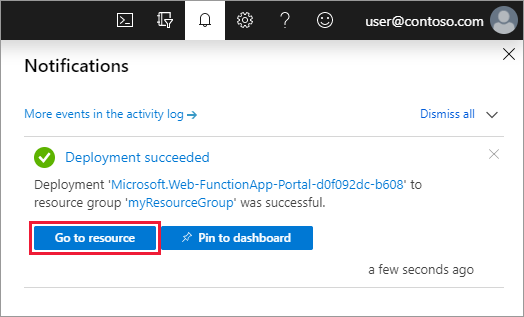
Select the Notifications icon in the upper-right corner of the portal and watch for the Deployment succeeded message.
Select Go to resource to view your new function app. You can also select Pin to dashboard. Pinning makes it easier to return to this function app resource from your dashboard.
Connect your function app to the virtual network
You can now connect your function app to the virtual network.
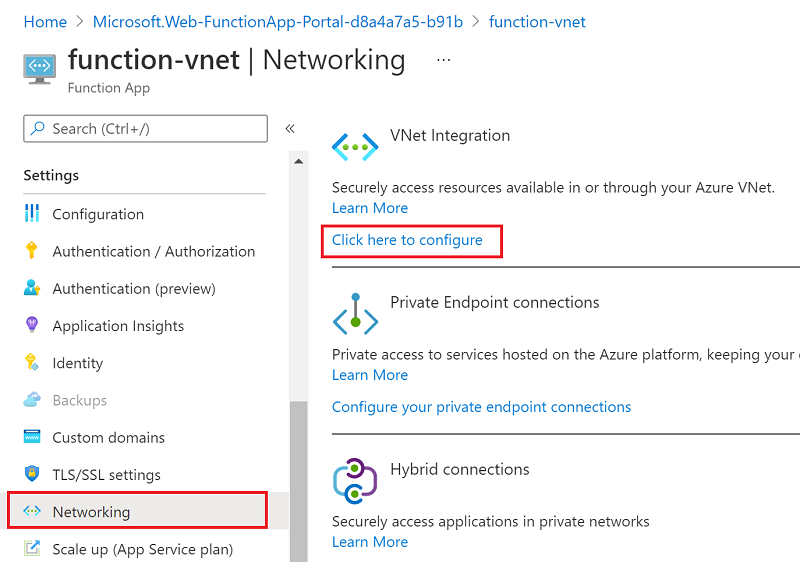
In your function app, select Networking in the left menu, then under VNet Integration, select Click here to configure.
On the VNET Integration page, select Add VNet.
In Network Feature Status, use the settings in the table below the image:
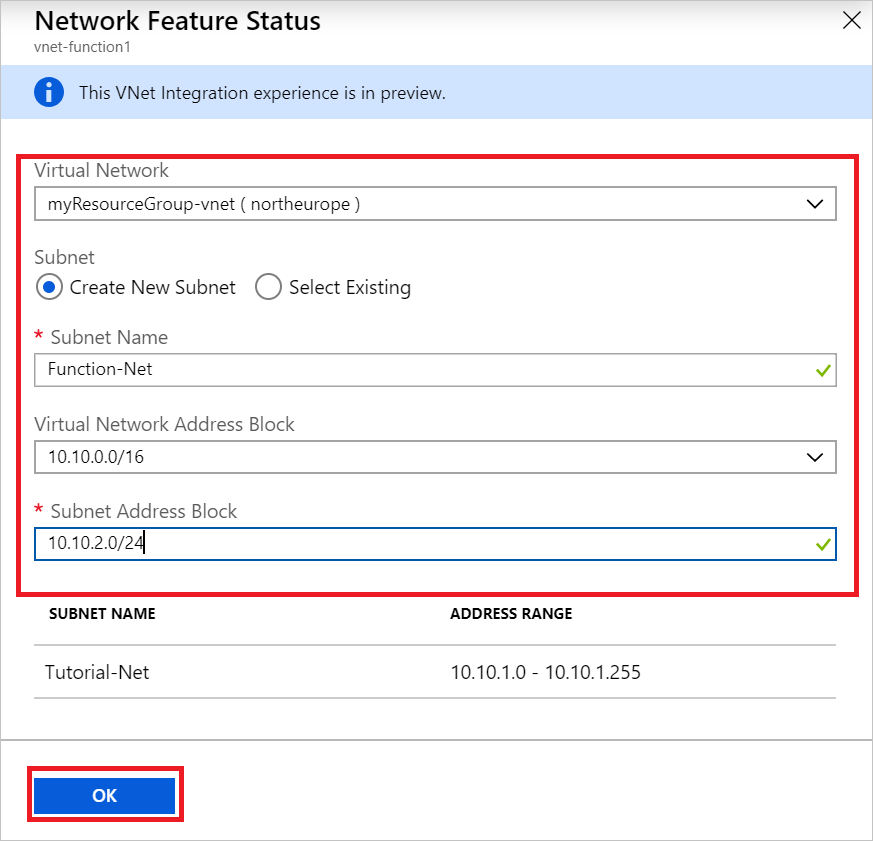
Setting Suggested value Description Virtual Network MyResourceGroup-vnet This virtual network is the one you created earlier. Subnet Create New Subnet Create a subnet in the virtual network for your function app to use. VNet Integration must be configured to use an empty subnet. Subnet name Function-Net Name of the new subnet. Virtual network address block 10.10.0.0/16 You should only have one address block defined. Subnet Address Block 10.10.2.0/24 The subnet size restricts the total number of instances that your Premium plan function app can scale out to. This example uses a /24subnet with 254 available host addresses. This subnet is over-provisioned, but easy to calculate.Select OK to add the subnet. Close the VNet Integration and Network Feature Status pages to return to your function app page.
The function app can now access the virtual network. When connectivity is enabled, the vnetrouteallenabled site setting is set to 1. You must have either this site setting or the legacy WEBSITE_VNET_ROUTE_ALL application setting set to 1.
Next, you'll add an HTTP-triggered function to the function app.
Create an HTTP trigger function
From the left menu of the Functions window, select Functions, then select Add from the top menu.
From the New Function window, select Http trigger and accept the default name for New Function, or enter a new name.
In Code + Test, replace the template-generated C# script (.csx) code with the following code:
#r "Newtonsoft.Json"

using System.Net;
using Microsoft.AspNetCore.Mvc;
using Microsoft.Extensions.Primitives;
using Newtonsoft.Json;

public static async Task<IActionResult> Run(HttpRequest req, ILogger log)
{
    log.LogInformation("C# HTTP trigger function processed a request.");

    var client = new HttpClient();
    var response = await client.GetAsync(@"https://ifconfig.me");
    var responseMessage = await response.Content.ReadAsStringAsync();

    return new OkObjectResult(responseMessage);
}
This code calls an external website that returns the IP address of the caller, which in this case is this function. This method lets you easily determine the outbound IP address being used by your function app.
Now you're ready to run the function and check the current outbound IPs.
Verify current outbound IPs
Now, you can run the function. But first, check in the portal and see what outbound IPs are being use by the function app.
In your function app, select Properties and review the Outbound IP Addresses field.
Now, return to your HTTP trigger function, select Code + Test and then Test/Run.
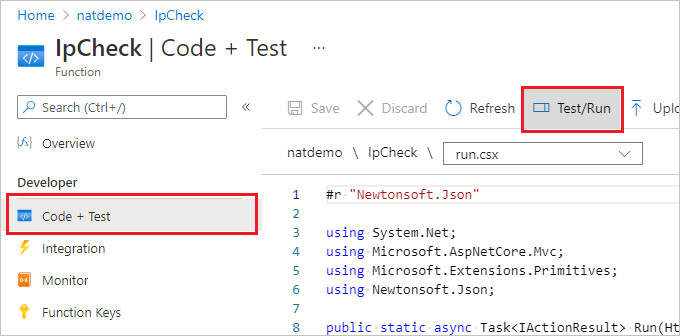
Select Run to execute the function, then switch to the Output and verify that IP address in the HTTP response body is one of the values from the outbound IP addresses you viewed earlier.
Now, you can create a public IP and use a NAT gateway to modify this outbound IP address.
Create public IP
From your resource group, select Add, search the Azure Marketplace for Public IP address, and select Create. Use the settings in the table below the image:
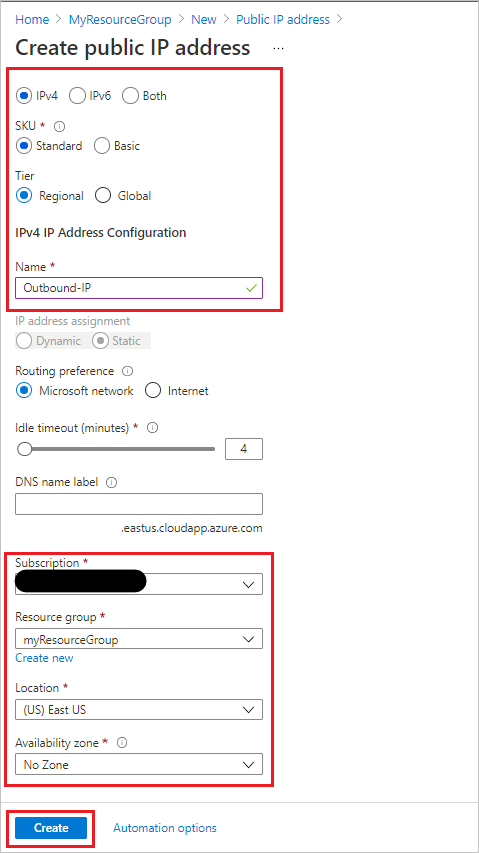
Setting Suggested value IP Version IPv4 SKU Standard Tier Regional Name Outbound-IP Subscription ensure your subscription is displayed Resource group myResourceGroup (or name you assigned to your resource group) Location China North 2 (or location you assigned to your other resources) Availability Zone No Zone Select Create to submit the deployment.
Once the deployment completes, navigate to your newly created Public IP Address resource and view the IP Address in the Overview.

Create NAT gateway
Now, let's create the NAT gateway. When you start with the previous virtual networking tutorial, Function-Net was the suggested subnet name and MyResourceGroup-vnet was the suggested virtual network name in that tutorial.
From your resource group, select Add, search the Azure Marketplace for NAT gateway, and select Create. Use the settings in the table below the image to populate the Basics tab:
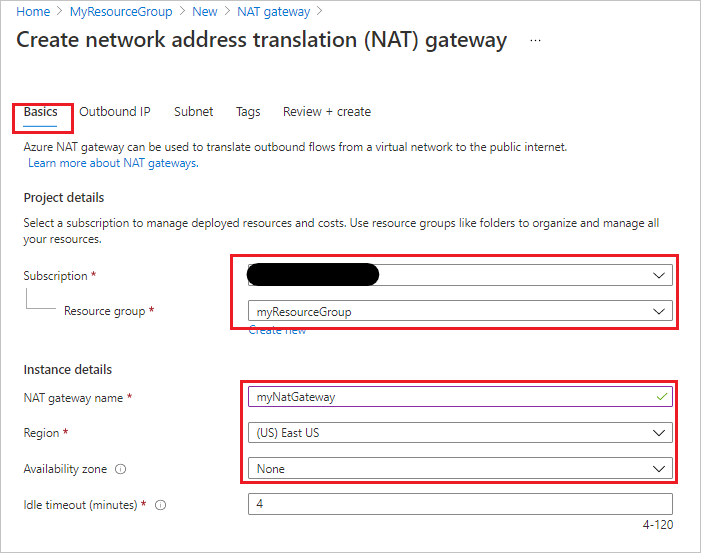
Setting Suggested value Subscription Your subscription Resource group myResourceGroup (or name you assigned to your resource group) NAT gateway name myNatGateway Region China North 2 (or location you assigned to your other resources) Availability Zone None Select Next: Outbound IP. In the Public IP addresses field, select the previously created public IP address. Leave Public IP Prefixes unselected.
Select Next: Subnet. Select the myResourceGroup-vnet resource in the Virtual network field and Function-Net subnet.
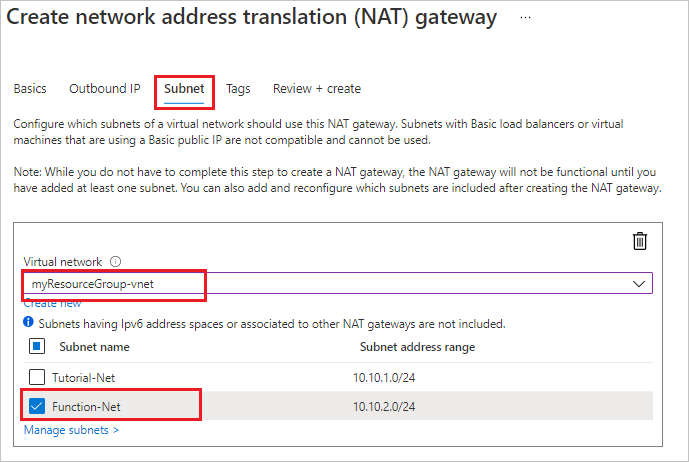
Select Review + Create then Create to submit the deployment.
Once the deployment completes, the NAT gateway is ready to route traffic from your function app subnet to the Internet.
Verify new outbound IPs
Repeat the steps earlier to run the function again. You should now see the outbound IP address that you configured in the NAT shown in the function output.
Clean up resources
You created resources to complete this tutorial. You'll be billed for these resources, depending on your account status and service pricing. To avoid incurring extra costs, delete the resources when you know longer need them.
In the Azure portal, go to the Resource group page.
To get to that page from the function app page, select the Overview tab, and then select the link under Resource group.
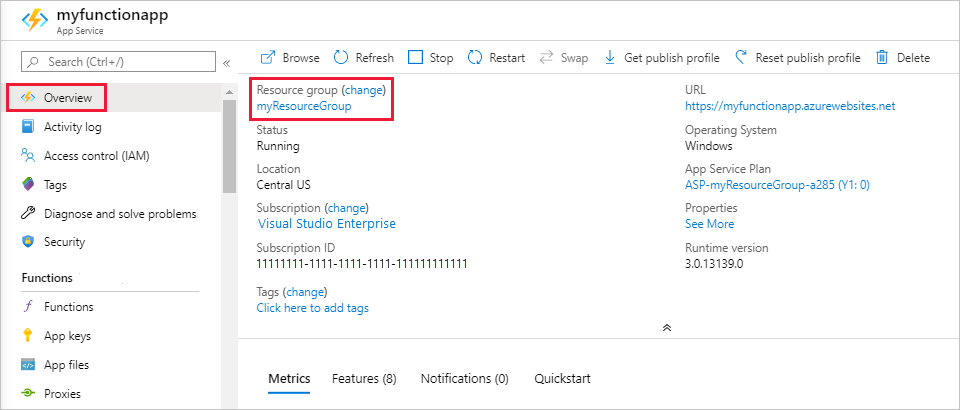
To get to that page from the dashboard, select Resource groups, and then select the resource group that you used for this article.
In the Resource group page, review the list of included resources, and verify that they're the ones you want to delete.
Select Delete resource group and follow the instructions.
Deletion might take a couple of minutes. When it's done, a notification appears for a few seconds. You can also select the bell icon at the top of the page to view the notification.