Note
Access to this page requires authorization. You can try signing in or changing directories.
Access to this page requires authorization. You can try changing directories.
To automate deploying your function app, use a Bicep file or an Azure Resource Manager template (ARM template). During deployment, you can use existing Azure resources or create new ones.
By using deployment automation, both infrastructure as code (IaC) and continuous integration and deployment (CI/CD), you can bring these benefits to your production apps:
- Consistency: Define your infrastructure in code to ensure consistent deployments across environments.
- Version Control: Track changes to your infrastructure and application configurations in source control, along with your project code.
- Automation: Automate deployment, which reduces manual errors and shortens the release process.
- Scalability: Easily replicate infrastructure for multiple environments, such as development, testing, and production.
- Disaster Recovery: Quickly recreate infrastructure after failures or during migrations.
This article shows you how to automate the creation of Azure resources and deployment configurations for Azure Functions.
The template code to create the required Azure resources depends on the desired hosting options for your function app. This article supports the following hosting options:
| Hosting option | Deployment type | Sample templates |
|---|---|---|
| Premium plan | Code | Container | Bicep ARM template |
| Dedicated plan | Code | Container | Bicep ARM template |
| Consumption plan(legacy) | Code-only | Bicep ARM template |
Make sure to select your hosting plan at the top of the article.
Important
After 30 September 2028, the option to host your function app on Linux in a Consumption plan is retired. Apps running on Windows in a Consumption plan aren't affected by this change.
When using this article, keep these considerations in mind:
There's no canonical way to structure an ARM template.
You can modularize a Bicep deployment into multiple Bicep files and Azure Verified Modules (AVMs).
This article assumes that you have a basic understanding of creating Bicep files or authoring Azure Resource Manager templates.
- Examples are shown as individual sections for specific resources. For a broad set of complete Bicep file and ARM template examples, see these function app deployment examples.
Required resources
You must create or configure these resources for an Azure Functions-hosted deployment:
| Resource | Requirement | Syntax and properties reference |
|---|---|---|
| A storage account | Required | Microsoft.Storage/storageAccounts |
| An Application Insights component | Recommended | Microsoft.Insights/components* |
| A hosting plan | Required | Microsoft.Web/serverfarms |
| A function app | Required | Microsoft.Web/sites |
You must create or configure these resources for an Azure Functions-hosted deployment:
| Resource | Requirement | Syntax and properties reference |
|---|---|---|
| A storage account | Required | Microsoft.Storage/storageAccounts |
| An Application Insights component | Recommended | Microsoft.Insights/components* |
| A function app | Required | Microsoft.Web/sites |
*If you don't already have a Log Analytics Workspace that your Application Insights instance can use, you also need to create this resource.
When you deploy multiple resources in a single Bicep file or ARM template, the order in which resources are created is important. This requirement results from dependencies between resources. For such dependencies, make sure to use the dependsOn element to define the dependency in the dependent resource. For more information, see either Define the order for deploying resources in ARM templates or Resource dependencies in Bicep.
Prerequisites
- These examples work in the context of an existing resource group.
- Both Application Insights and storage logs require an existing Azure Log Analytics workspace. You can share workspaces between services. To improve performance, create a workspace in each geographic region. For an example of how to create a Log Analytics workspace, see Create a Log Analytics workspace. You can find the fully qualified workspace resource ID on a workspace page in the Azure portal under Settings > Properties > Resource ID.
Create storage account
All function apps require an Azure storage account. You need a general-purpose account that supports blobs, tables, queues, and files. For more information, see Azure Functions storage account requirements.
Important
The storage account is used to store important app data, sometimes including the application code itself. You should limit access from other apps and users to the storage account.
This example section creates a Standard general-purpose v2 storage account:
resource storageAccount 'Microsoft.Storage/storageAccounts@2023-05-01' = {
  name: storageAccountName
  location: location
  kind: 'StorageV2'
  sku: {
    name: 'Standard_LRS'
  }
  properties: {
    supportsHttpsTrafficOnly: true
    defaultToOAuthAuthentication: true
    allowBlobPublicAccess: false
    minimumTlsVersion: 'TLS1_2'
  }
}
For more context, see the complete main.bicep file in the templates repository.
The function app needs a connection to this storage account. Configure this connection by using the AzureWebJobsStorage setting. For more information, see Application configuration.
Tip
For better security, set allowSharedKeyAccess to false on your storage account and use managed identity-based connections instead of connection strings. For more information, see Connecting to host storage with an identity.
Important
The Elastic Premium and Consumption plans use Azure Files for content sharing, and Azure Files doesn't currently support managed identity-based connections. This limitation means these plans require shared key access to the storage account, so don't set allowSharedKeyAccess to false. When you must use connection strings, store them in Azure Key Vault and use Key Vault references in your app settings instead of storing keys directly. If you want to remove the Azure Files dependency, see Create an app without Azure Files.
Enable storage logs
Because the storage account is used for important function app data, monitor the account for modification of that content. To monitor your storage account, configure Azure Monitor resource logs for Azure Storage. In this example section, a Log Analytics workspace named myLogAnalytics is used as the destination for these logs.
resource blobService 'Microsoft.Storage/storageAccounts/blobServices@2023-05-01' existing = {
  name:'default'
  parent:storageAccountName
}

resource storageDataPlaneLogs 'Microsoft.Insights/diagnosticSettings@2021-05-01-preview' = {
  name: '${storageAccountName}-logs'
  scope: blobService
  properties: {
    workspaceId: myLogAnalytics.id
    logs: [
      {
        category: 'StorageWrite'
        enabled: true
      }
    ]
    metrics: [
      {
        category: 'Transaction'
        enabled: true
      }
    ]
  }
}
You can use the same workspace for the Application Insights resource defined later. For more information, including how to work with these logs, see Monitoring Azure Storage.
Create Application Insights
Use Application Insights for monitoring your function app executions. Application Insights now requires an Azure Log Analytics workspace, which can be shared. These examples assume you're using an existing workspace and have the fully qualified resource ID for the workspace, which uses the format /subscriptions/{subscription-id}/resourceGroups/{resource-group}/providers/Microsoft.OperationalInsights/workspaces/{workspace-name}. For more information, see Azure Log Analytics workspace.
In this example section, define the Application Insights resource with the type Microsoft.Insights/components and the kind web:
resource applicationInsight 'Microsoft.Insights/components@2020-02-02' = {
  name: applicationInsightsName
  location: appInsightsLocation
  tags: tags
  kind: 'web'
  properties: {
    Application_Type: 'web'
    WorkspaceResourceId: '<FULLY_QUALIFIED_RESOURCE_ID>'
  }
}
For more context, see the complete main.bicep file in the templates repository.
You must provide the connection to the function app by using the APPLICATIONINSIGHTS_CONNECTION_STRING application setting. For more information, see Application configuration.
The examples in this article get the connection string value for the created instance. Older versions might instead use APPINSIGHTS_INSTRUMENTATIONKEY to set the instrumentation key, which is no longer recommended.
In the Dedicated (App Service) plan, your function app runs on dedicated virtual machines on Basic, Standard, and Premium SKUs in App Service plans, similar to web apps. For more information, see Dedicated plan.
For a sample Bicep file/Azure Resource Manager template, see Function app on Azure App Service plan.
In Functions, the Dedicated plan is just a regular App Service plan, which is defined by a serverfarm resource. You must provide at least the name value. For a list of supported plan names, see the --sku setting in az appservice plan create for the current list of supported values for a Dedicated plan.
The way that you define the hosting plan depends on whether your function app runs on Windows or on Linux:
resource hostingPlanName 'Microsoft.Web/serverfarms@2024-04-01' = {
  name: hostingPlanName
  location: location
  sku: {
    tier: 'Standard'
    name: 'S1'
    size: 'S1'
    family: 'S'
    capacity: 1
  }
}
For more context, see the complete main.bicep file in the templates repository.
Create the hosting plan (optional)
You don't need to explicitly define a Consumption hosting plan resource. When you skip this resource definition, the portal automatically creates or selects a plan on a per-region basis when you create the function app resource itself.
You can explicitly define a Consumption plan as a special type of serverfarm resource. Set the computeMode and sku properties to Dynamic. This example section shows you how to explicitly define a consumption plan. The way that you define a hosting plan depends on whether your function app runs on Windows or on Linux.
resource hostingPlan 'Microsoft.Web/serverfarms@2024-04-01' = {
  name: hostingPlanName
  location: location
  sku: {
    name: 'Y1'
    tier: 'Dynamic'
    size: 'Y1'
    family: 'Y'
    capacity: 0
  }
  properties: {
    computeMode: 'Dynamic'
  }
}
For more context, see the complete main.bicep file in the templates repository.
Create the function app
Define the function app resource as a resource of type Microsoft.Web/sites with a kind property that includes functionapp.
The way you define a function app resource depends on whether you're hosting on Linux or on Windows:
For a list of application settings required when running on Windows, see Application configuration. For a sample Bicep file or Azure Resource Manager template, see the function app hosted on Windows in a Consumption plan template.
For a list of application settings required when running on Windows, see Application configuration.
Note
If you choose to optionally define your Consumption plan, you must set the serverFarmId property on the app so that it points to the resource ID of the plan. Make sure that the function app has a dependsOn setting that also references the plan. If you didn't explicitly define a plan, one gets created for you.
Set the serverFarmId property on the app so that it points to the resource ID of the plan. Make sure that the function app has a dependsOn setting that also references the plan.
resource functionAppName_resource 'Microsoft.Web/sites@2024-04-01' = {
  name: functionAppName
  location: location
  kind: 'functionapp'
  properties: {
    serverFarmId: hostingPlanName.id
    siteConfig: {
      appSettings: [
        {
          name: 'APPLICATIONINSIGHTS_CONNECTION_STRING'
          value: applicationInsightsName.properties.ConnectionString
        }
        {
          name: 'AzureWebJobsStorage'
          value: 'DefaultEndpointsProtocol=https;AccountName=${storageAccountName};EndpointSuffix=${environment().suffixes.storage};AccountKey=${storageAccount.listKeys().keys[0].value}'
        }
        {
          name: 'WEBSITE_CONTENTAZUREFILECONNECTIONSTRING'
          value: 'DefaultEndpointsProtocol=https;AccountName=${storageAccountName};EndpointSuffix=${environment().suffixes.storage};AccountKey=${storageAccount.listKeys().keys[0].value}'
        }
        {
          name: 'WEBSITE_CONTENTSHARE'
          value: toLower(functionAppName)
        }
        {
          name: 'FUNCTIONS_EXTENSION_VERSION'
          value: '~4'
        }
        {
          name: 'FUNCTIONS_WORKER_RUNTIME'
          value: 'node'
        }
        {
          name: 'WEBSITE_NODE_DEFAULT_VERSION'
          value: '~22'
        }
      ]
    }
  }
}
For a complete end-to-end example, see this main.bicep file.
resource functionApp 'Microsoft.Web/sites@2024-04-01' = {
  name: functionAppName
  location: location
  kind: 'functionapp'
  properties: {
    serverFarmId: hostingPlan.id
    siteConfig: {
      alwaysOn: true
      appSettings: [
        {
          name: 'APPLICATIONINSIGHTS_CONNECTION_STRING'
          value: applicationInsightsName.properties.ConnectionString
        }
        {
          name: 'AzureWebJobsStorage'
          value: 'DefaultEndpointsProtocol=https;AccountName=${storageAccountName};EndpointSuffix=${environment().suffixes.storage};AccountKey=${storageAccount.listKeys().keys[0].value}'
        }
        {
          name: 'FUNCTIONS_EXTENSION_VERSION'
          value: '~4'
        }
        {
          name: 'FUNCTIONS_WORKER_RUNTIME'
          value: 'node'
        }
        {
          name: 'WEBSITE_NODE_DEFAULT_VERSION'
          value: '~22'
        }
      ]
    }
  }
}
For a complete end-to-end example, see this main.bicep file.
Deployment sources
Your Bicep file or ARM template can optionally also define a deployment for your function code. This deployment can include these methods:
Your Bicep file or ARM template can optionally also define a deployment for your function code by using a zip deployment package.
To successfully deploy your application by using Azure Resource Manager, you need to understand how resources are deployed in Azure. In most examples, you apply top-level configurations by using siteConfig. Set these configurations at a top level, because they convey information to the Functions runtime and deployment engine. The deployment engine requires top-level information before it applies the child sourcecontrols/web resource. Although you can configure these settings in the child-level config/appSettings resource, in some cases your function app must be deployed before config/appSettings is applied.
Zip deployment package
Zip deployment is the recommended way to deploy your function app code. By default, functions that use zip deployment run in the deployment package itself. For more information, including the requirements for a deployment package, see Zip deployment for Azure Functions. When using resource deployment automation, you can reference the .zip deployment package in your Bicep or ARM template.
To use zip deployment in your template, set the WEBSITE_RUN_FROM_PACKAGE setting in the app to 1 and include the /zipDeploy resource definition.
For a Consumption plan on Linux, instead set the URI of the deployment package directly in the WEBSITE_RUN_FROM_PACKAGE setting, as shown in this example template.
This example adds a zip deployment source to an existing app:
@description('The name of the function app.')
param functionAppName string

@description('The location into which the resources should be deployed.')
param location string = resourceGroup().location

@description('The zip content url.')
param packageUri string

resource functionAppName_ZipDeploy 'Microsoft.Web/sites/extensions@2024-04-01' = {
  name: '${functionAppName}/ZipDeploy'
  location: location
  properties: {
    packageUri: packageUri
  }
}
Keep the following considerations in mind when including zip deployment resources in your template:
- Consumption plans on Linux don't support
WEBSITE_RUN_FROM_PACKAGE = 1. You must instead set the URI of the deployment package directly in theWEBSITE_RUN_FROM_PACKAGEsetting. For more information, see WEBSITE_RUN_FROM_PACKAGE. For an example template, see Function app hosted on Linux in a Consumption plan.
The
packageUrimust be a location that Functions can access. Consider using Azure Blob storage with a shared access signature (SAS). After the SAS expires, Functions can no longer access the share for deployments. When you regenerate your SAS, remember to update theWEBSITE_RUN_FROM_PACKAGEsetting with the new URI value.When setting
WEBSITE_RUN_FROM_PACKAGEto a URI, you must manually sync triggers.Always set all required application settings in the
appSettingscollection when adding or updating settings. The update removes existing settings that you don't explicitly set. For more information, see Application configuration.Functions doesn't support Web Deploy (
msdeploy) for package deployments. You must instead use zip deployment in your deployment pipelines and automation. For more information, see Zip deployment for Azure Functions.
Remote builds
The deployment process assumes that the .zip file you use or a zip deployment contains a ready-to-run app. This assumption means that by default no customizations are run.
Some scenarios require you to rebuild your app remotely. One example is when you need to include Linux-specific packages in Python or Node.js apps that you developed on a Windows computer. In this case, you can configure Functions to perform a remote build on your code after the zip deployment.
The way that you request a remote build depends on the operating system to which you're deploying:
When you deploy an app to Windows, the deployment process runs language-specific commands, like dotnet restore for C# apps or npm install for Node.js apps.
To enable the same build processes that you get with continuous integration, add SCM_DO_BUILD_DURING_DEPLOYMENT=true to your application settings in your deployment code and remove the WEBSITE_RUN_FROM_PACKAGE setting entirely.
Linux containers
If you're deploying a containerized function app to an Azure Functions Premium or Dedicated plan, you must:
- Set the
linuxFxVersionsite setting with the identifier of your container image. - Set any required
DOCKER_REGISTRY_SERVER_*settings when obtaining the container from a private registry. - Set
WEBSITES_ENABLE_APP_SERVICE_STORAGEapplication setting tofalse.
If some settings are missing, the application provisioning might fail with this HTTP/500 error:
Function app provisioning failed.
For more information, see Application configuration.
resource functionApp 'Microsoft.Web/sites@2024-04-01' = {
  name: functionAppName
  location: location
  kind: 'functionapp'
  properties: {
    serverFarmId: hostingPlan.id
    siteConfig: {
      appSettings: [
        {
          name: 'AzureWebJobsStorage'
          value: 'DefaultEndpointsProtocol=https;AccountName=${storageAccountName};AccountKey=${storageAccount.listKeys().keys[0].value}'
        }
        {
          name: 'FUNCTIONS_WORKER_RUNTIME'
          value: 'node'
        }
        {
          name: 'WEBSITE_NODE_DEFAULT_VERSION'
          value: '~22'
        }
        {
          name: 'FUNCTIONS_EXTENSION_VERSION'
          value: '~4'
        }
        {
          name: 'DOCKER_REGISTRY_SERVER_URL'
          value: dockerRegistryUrl
        }
        {
          name: 'DOCKER_REGISTRY_SERVER_USERNAME'
          value: dockerRegistryUsername
        }
        {
          name: 'DOCKER_REGISTRY_SERVER_PASSWORD'
          value: dockerRegistryPassword
        }
        {
          name: 'WEBSITES_ENABLE_APP_SERVICE_STORAGE'
          value: 'false'
        }
      ]
      linuxFxVersion: 'DOCKER|myacr.azurecr.io/myimage:mytag'
    }
  }
  dependsOn: [
    storageAccount
  ]
}
Application configuration
These application settings are required (or recommended) for a specific operating system and hosting option:
Keep these considerations in mind when working with site and application settings using Bicep files or ARM templates:
- Consider when to set
WEBSITE_CONTENTSHAREin an automated deployment. For detailed guidance, see theWEBSITE_CONTENTSHAREreference.
- For container deployments, also set
WEBSITES_ENABLE_APP_SERVICE_STORAGEtofalse, since your app content is provided in the container itself.
Always define your application settings as a
siteConfig/appSettingscollection of theMicrosoft.Web/sitesresource you're creating, as shown in the examples in this article. This definition guarantees the settings your function app needs to run are available on initial startup.When adding or updating application settings by using templates, make sure that you include all existing settings with the update. You must do this because the underlying update REST API calls replace the entire
/config/appsettingsresource. If you remove the existing settings, your function app won't run. To programmatically update individual application settings, you can instead use the Azure CLI, Azure PowerShell, or the Azure portal to make these changes. For more information, see Work with application settings.When possible, use managed identity-based connections to other Azure services, including the
AzureWebJobsStorageconnection. For more information, see Configure an identity-based connection.
Slot deployments
Functions lets you deploy different versions of your code to unique endpoints in your function app. This option makes it easier to develop, validate, and deploy functions updates without impacting functions running in production. Deployment slots is a feature of Azure App Service. The number of slots available depends on your hosting plan. For more information, see Azure Functions deployment slots.
You define a slot resource in the same way as a function app resource (Microsoft.Web/sites), but instead you use the Microsoft.Web/sites/slots resource identifier. For an example deployment (in both Bicep and ARM templates) that creates both a production and a staging slot in a Premium plan, see Azure Function App with a Deployment Slot.
To learn about how to swap slots by using templates, see Automate with Resource Manager templates.
Keep the following considerations in mind when working with slot deployments:
Don't explicitly set the
WEBSITE_CONTENTSHAREsetting in the deployment slot definition. The app creation process in the deployment slot generates this setting for you.When you swap slots, some application settings are considered "sticky," in that they stay with the slot and not with the code being swapped. You can define such a slot setting by including
"slotSetting":truein the specific application setting definition in your template. For more information, see Manage settings.
When you create a deployment that uses a secured storage account, you must both explicitly set the WEBSITE_CONTENTSHARE setting and create the file share resource named in this setting. Make sure you create a Microsoft.Storage/storageAccounts/fileServices/shares resource by using the value of WEBSITE_CONTENTSHARE, as shown in this example (ARM template|Bicep file). You also need to set the site property vnetContentShareEnabled to true.
Note
When these settings aren't part of a deployment that uses a secured storage account, you see this error during deployment validation: Could not access storage account using provided connection string.
These projects provide both Bicep and ARM template examples of how to deploy your function apps in a virtual network, including with network access restrictions:
| Restricted scenario | Description |
|---|---|
| Create a function app with virtual network integration | You create your function app in a virtual network with full access to resources in that network. Inbound and outbound access to your function app isn't restricted. For more information, see Virtual network integration. |
| Create a function app that accesses a secured storage account | Your created function app uses a secured storage account, which Functions accesses by using private endpoints. For more information, see Restrict your storage account to a virtual network. |
| Create a function app and storage account that both use private endpoints | Your created function app can only be accessed by using private endpoints, and it uses private endpoints to access storage resources. For more information, see Private endpoints. |
Restricted network settings
You might also need to use these settings when your function app has network restrictions:
| Setting | Value | Description |
|---|---|---|
WEBSITE_CONTENTOVERVNET |
1 |
Application setting that enables your function app to scale when the storage account is restricted to a virtual network. For more information, see Restrict your storage account to a virtual network. |
vnetrouteallenabled |
1 |
Site setting that forces all traffic from the function app to use the virtual network. For more information, see Regional virtual network integration. This site setting supersedes the application setting WEBSITE_VNET_ROUTE_ALL. |
Function access keys
Define host-level function access keys as Azure resources. This approach lets you create and manage host keys in your ARM templates and Bicep files. A host key is defined as a resource of type Microsoft.Web/sites/host/functionKeys. The following example creates a host-level access key named my_custom_key when the function app is created:
resource functionKey 'Microsoft.Web/sites/host/functionKeys@2022-09-01' = {
  name: '${parameters('name')}/default/my_custom_key'
  properties: {
    name: 'my_custom_key'
  }
  dependsOn: [
    resourceId('Microsoft.Web/Sites', parameters('name'))
  ]
}
In this example, the name parameter is the name of the new function app. You must include a dependsOn setting to guarantee that the key is created with the new function app. Finally, the properties object of the host key can also include a value property that you can use to set a specific key.
When you don't set the value property, Functions automatically generates a new key for you when the resource is created, which is recommended. To learn more about access keys, including security best practices for working with access keys, see Work with access keys in Azure Functions.
Create your template
Experts with Bicep or ARM templates can manually code their deployments by using a simple text editor. For the rest of us, several options make the development process easier:
Visual Studio Code: Extensions are available to help you work with both Bicep files and ARM templates. Use these tools to help make sure that your code is correct. They provide some basic validation.
Azure portal: When you create your function app and related resources in the portal, the final Review + create screen has a Download a template for automation link.
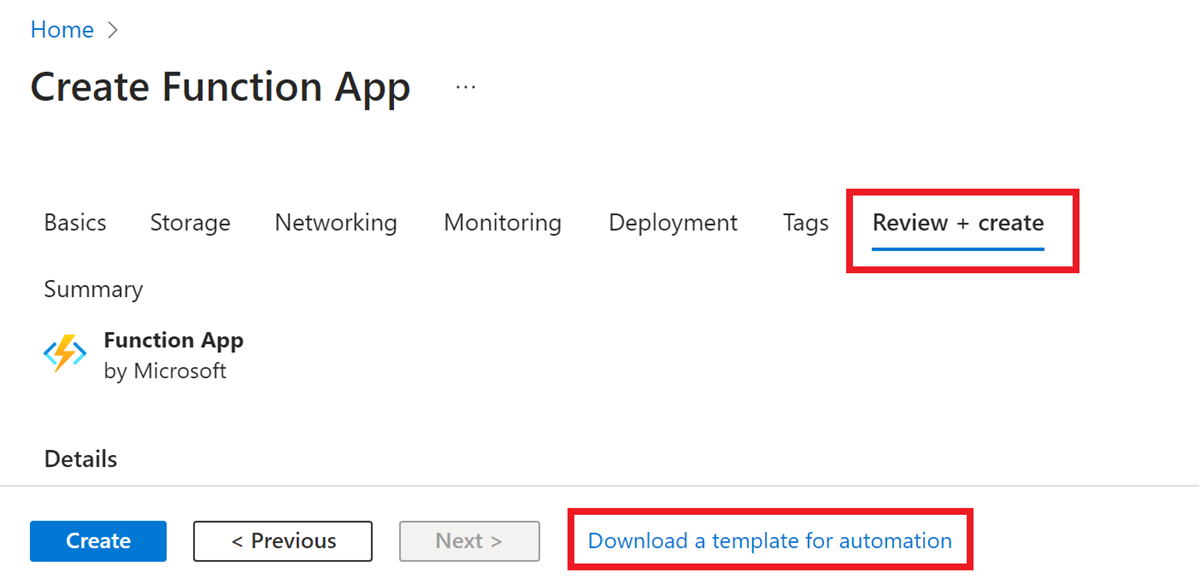
This link shows you the ARM template generated based on the options you chose in portal. This template can seem a bit complex when you're creating a function app with many new resources. However, it can provide a good reference for how your ARM template might look.
Validate your template
When you manually create your deployment template file, it's important to validate your template before deployment. All deployment methods validate your template syntax and raise a validation failed error message as shown in the following JSON formatted example:
{"error":{"code":"InvalidTemplate","message":"Deployment template validation failed: 'The resource 'Microsoft.Web/sites/func-xyz' is not defined in the template. Please see https://aka.ms/arm-template for usage details.'.","additionalInfo":[{"type":"TemplateViolation","info":{"lineNumber":0,"linePosition":0,"path":""}}]}}
Use the following methods to validate your template before deployment:
The following Azure resource group deployment v2 task with deploymentMode: 'Validation' instructs Azure Pipelines to validate the template.
- task: AzureResourceManagerTemplateDeployment@3
  inputs:
    deploymentScope: 'Resource Group'
    subscriptionId: # Required subscription ID
    action: 'Create Or Update Resource Group'
    resourceGroupName: # Required resource group name
    location: # Required when action == Create Or Update Resource Group
    templateLocation: 'Linked artifact'
    csmFile: # Required when  TemplateLocation == Linked Artifact
    csmParametersFile: # Optional
    deploymentMode: 'Validation'
You can also create a test resource group to find preflight and deployment errors.
Deploy your template
Use any of the following methods to deploy your Bicep file and template:
Deploy to Azure button
Note
This method doesn't support deploying Bicep files currently.
Replace <url-encoded-path-to-azuredeploy-json> with a URL-encoded version of the raw path of your azuredeploy.json file in GitHub.
Here's an example that uses markdown:
[](https://portal.azure.cn/#create/Microsoft.Template/uri/<url-encoded-path-to-azuredeploy-json>)
Here's an example that uses HTML:
<a href="https://portal.azure.cn/#create/Microsoft.Template/uri/<url-encoded-path-to-azuredeploy-json>" target="_blank"><img src="https://azuredeploy.net/deploybutton.png"></a>
Deploy by using PowerShell
The following PowerShell commands create a resource group and deploy a Bicep file or ARM template that creates a function app with its required resources. To run the commands locally, you must have Azure PowerShell installed. To sign in to Azure, first run Connect-AzAccount.
# Register Resource Providers if they're not already registered
Register-AzResourceProvider -ProviderNamespace "microsoft.web"
Register-AzResourceProvider -ProviderNamespace "microsoft.storage"

# Create a resource group for the function app
New-AzResourceGroup -Name "MyResourceGroup" -Location 'China North 2'

# Deploy the template
New-AzResourceGroupDeployment -ResourceGroupName "MyResourceGroup" -TemplateFile main.bicep  -Verbose
To test this deployment, use a template like this one that creates a function app on Windows in a Consumption plan.
Next steps
Learn more about how to develop and configure Azure Functions.