Note
Access to this page requires authorization. You can try signing in or changing directories.
Access to this page requires authorization. You can try changing directories.
Applies to: ![]() Azure SQL Database
Azure SQL Database
This article teaches you how to configure a failover group for single and pooled databases in Azure SQL Database by using the Azure portal, Azure PowerShell, and the Azure CLI.
For end-to-end scripts, review how to add a single database to a failover group with Azure PowerShell or the Azure CLI.
Prerequisites
Consider the following prerequisites to create your failover group for a single database:
- Your primary database should already be created. Create single database to get started.
- If your secondary server already exists in a different region to the primary server, the server login and firewall settings must match that of your primary server.
Create failover group
You can create your failover group and add a single database to it by using the Azure portal, PowerShell, and the Azure CLI.
Important
If you need to delete a secondary database after it's been added to a failover group, remove it from the failover group before deleting the database. Deleting a secondary database before it is removed from the failover group can cause unpredictable behavior.
To create your failover group and add your single database to it by using the Azure portal, follow these steps:
If you know the logical server that hosts your database, go directly to it in the Azure portal. If you need to find the server, follow these steps:
- Select Azure SQL in the service menu. If Azure SQL isn't in the list, select All services, then type
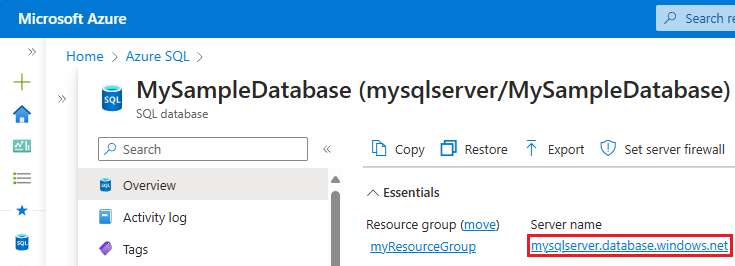
Azure SQLin the search box. (Optional) Select the star next to Azure SQL to favorite it and add it as an item in the service menu. - On the Azure SQL page, find the database you want to add to a failover group and select it to open the SQL database pane.
- On the Overview pane of SQL database, select the name of the server under Server name to open the SQL server pane.
- Select Azure SQL in the service menu. If Azure SQL isn't in the list, select All services, then type
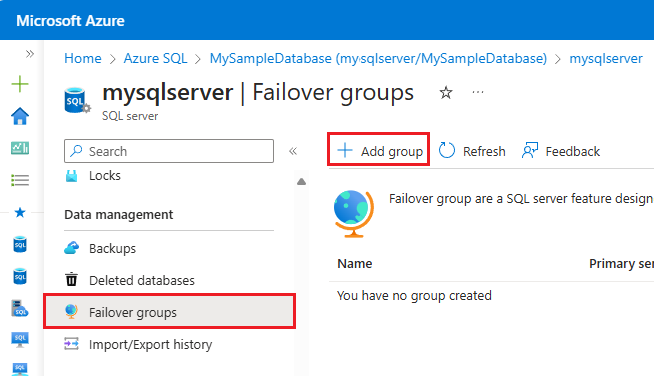
On the SQL server resource menu, select Failover groups under Data management. Select + Add group to open the Failover group page where you can create a new failover group.
On the Failover Group page:
- Provide a Failover group name.
- Choose an existing secondary server, or create a new server by selecting Create new under Server. The secondary server in the failover group must be in a different region than the primary server.
- Select Configure database to open the Databases for failover group page.

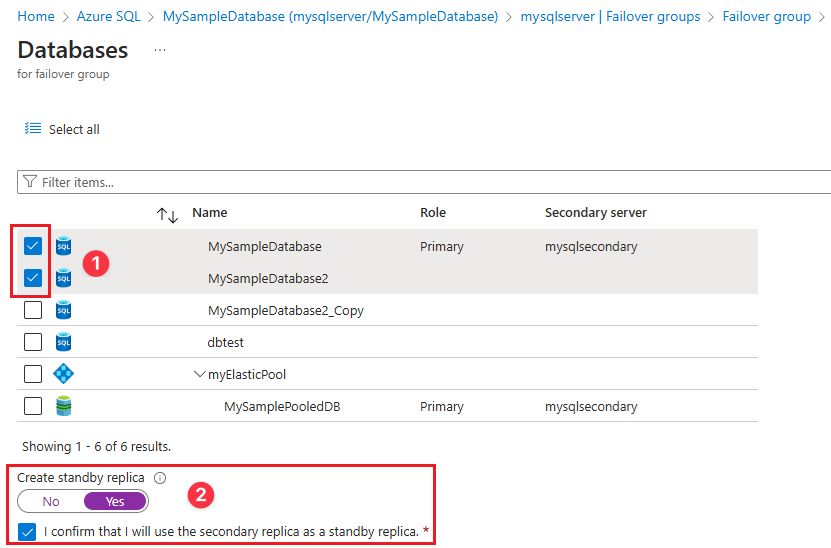
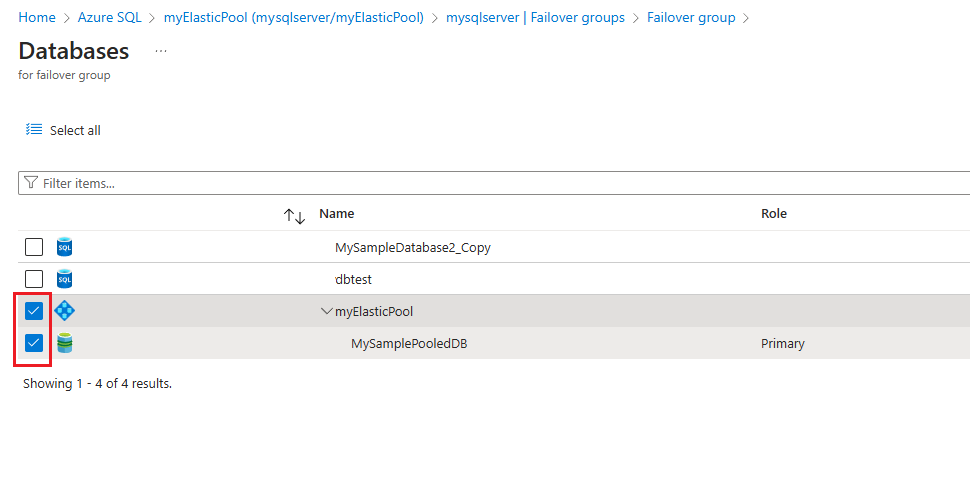
On the Databases for failover group page:
- Choose the databases you want to add to the failover group (#1 in screenshot).
- (Optional) Choose Yes if you intend to designate these databases as standby replicas to use for only disaster recovery (#2 in screenshot). Check the box to confirm that you'll use the replica for standby.
- Use Select to save your database selection and go back to the Failover group page (not visible in screenshot).
Use Create on the Failover group page to create your failover group.
Test planned failover
Test failover of your failover group with no data loss using the Azure portal or PowerShell.
To test failover of your failover group by using the Azure portal, follow these steps:
If you know the logical server that hosts your database, go directly to it in the Azure portal. If you need to find the server, follow these steps:
- Select Azure SQL in the service menu. If Azure SQL isn't in the list, select All services, then type
Azure SQLin the search box. (Optional) Select the star next to Azure SQL to favorite it and add it as an item in the service menu. - On the Azure SQL page, find the database to want to test failover for and select it to open the SQL database pane.
- On the Overview pane of SQL database, select the name of the server under Server name to open the SQL server pane.
- Select Azure SQL in the service menu. If Azure SQL isn't in the list, select All services, then type
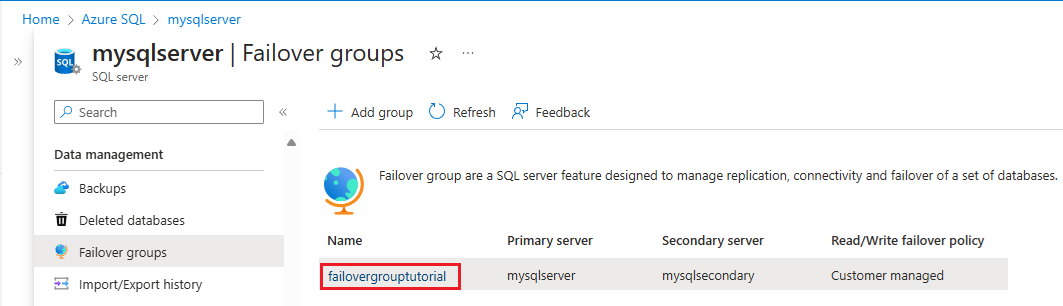
On the SQL server resource menu, select Failover groups under Data management, and then choose an existing failover group to open the Failover group page.
On the Failover group page:
- Review which server is primary and which server is secondary.
- Select Failover from the command bar to fail over your failover group containing your database.
- Select Yes on the warning that notifies you that TDS sessions will be disconnected.
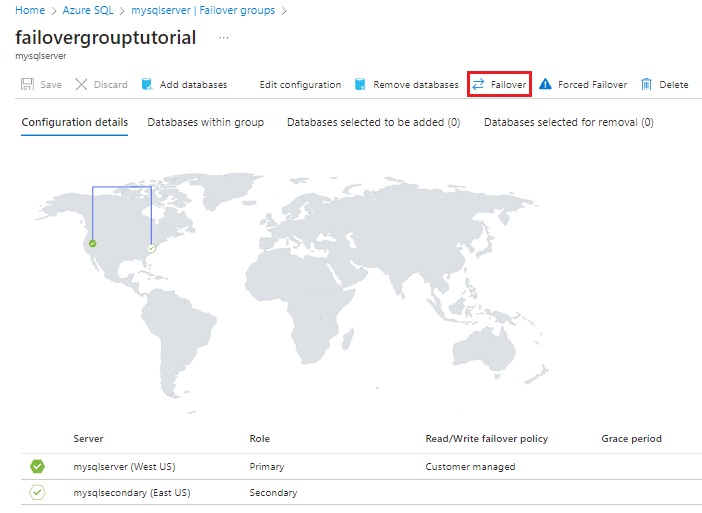
Review which server is now primary and which server is secondary. Once failover succeeds, the two servers swap roles, so that the former primary becomes the secondary.
(Optional) Select Failover again to fail the servers back to their original roles.
For end-to-end scripts, review how to add an elastic pool to a failover group with Azure PowerShell or the Azure CLI.
Prerequisites
Consider the following prerequisites for creating your failover group for a pooled database:
- Your primary elastic pool should already exist. Create elastic pool to get started.
- If your secondary server already exists, the server login and firewall settings must match that of your primary server.
Create failover group
Create the failover group for your elastic pool by using the Azure portal, PowerShell, or the Azure CLI.
Important
If you need to delete a secondary database after its been added to a failover group, remove it from the failover group before deleting the database. Deleting a secondary database before it is removed from the failover group can cause unpredictable behavior.
To create your failover group and add your elastic pool to it by using the Azure portal, follow these steps:
Go to the Create SQL Elastic pool page in the Azure portal. Create an elastic pool that:
- Has the same name as the elastic pool on the primary server.
- Uses a secondary server you intend to use for the failover group. The secondary server must be in a region different to the primary server, and the server login and firewall settings must match that of your primary server. Create a new server if the secondary server doesn't already exist.
If you know the logical server that hosts your primary elastic pool, go directly to it in the Azure portal. If you need to find the server, follow these steps:
- Select Azure SQL in the service menu. If Azure SQL isn't in the list, select All services, then type
Azure SQLin the search box. (Optional) Select the star next to Azure SQL to favorite it and add it as an item in the service menu. - On the Azure SQL page, find the elastic pool you want to add to the failover group and select it to open the SQL elastic pool pane.
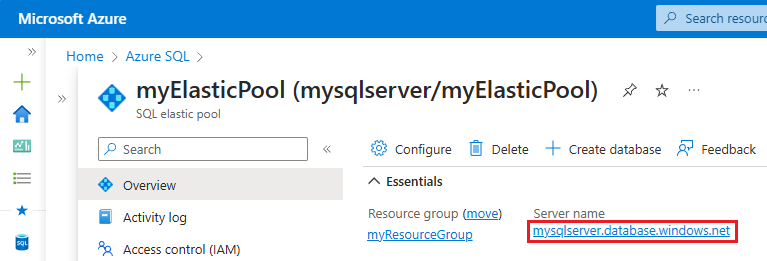
- On the Overview pane of SQL elastic pool, select the name of the server under Server name to open the SQL server pane.
- Select Azure SQL in the service menu. If Azure SQL isn't in the list, select All services, then type
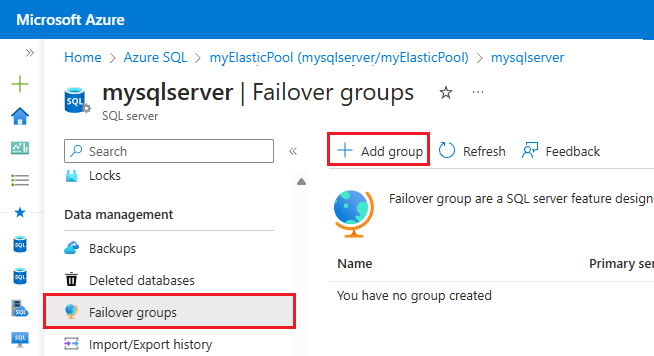
On the SQL server resource menu, select Failover groups under Data management. Select + Add group to open the Failover group page where you can create a new failover group.
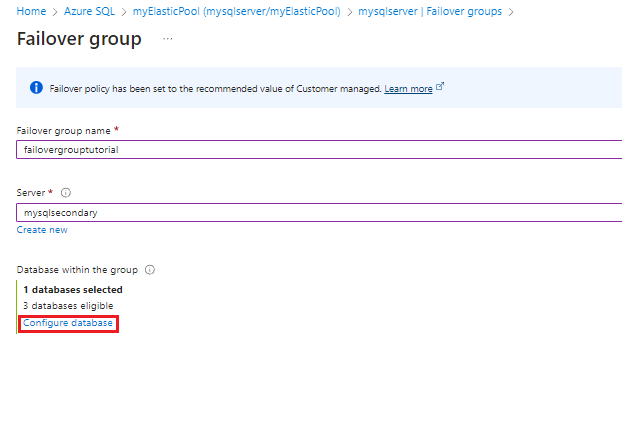
On the Failover Group page:
- Provide a Failover group name.
- Choose an existing secondary server. The secondary server in the failover group must be in a different region than the primary server, and contain an elastic pool with the same name as the primary server.
- Select Configure database to open the Databases for failover group page.
On the Databases for failover group page, choose the pooled databases you want to add to the failover group. Use Select to save your database selection and go back to the Failover group page.
Select Create on the Failover group page to create your failover group. Adding the elastic pool to the failover group automatically starts the geo-replication process.
Test planned failover
Test failover of your elastic pool with no data loss by using the Azure portal, PowerShell, or the Azure CLI.
Fail your failover group over to the secondary server, and then fail back using the Azure portal.
If you know the logical server that hosts your primary elastic pool, go directly to it in the Azure portal. If you need to find the server, follow these steps:
- Select Azure SQL in the service menu. If Azure SQL isn't in the list, select All services, then type
Azure SQLin the search box. (Optional) Select the star next to Azure SQL to favorite it and add it as an item in the service menu. - On the Azure SQL page, find the elastic pool you want to add to the failover group and select it to open the SQL elastic pool pane.
- On the Overview pane of SQL elastic pool, select the name of the server under Server name to open the SQL server pane.
- Select Azure SQL in the service menu. If Azure SQL isn't in the list, select All services, then type
On the SQL server resource menu, select Failover groups under Data management, and then choose an existing failover group to open the Failover group page.
On the Failover group page:
- Review which server is primary and which server is secondary.
- Select Failover from the command bar to fail over your failover group containing your database.
- Select Yes on the warning that notifies you that TDS sessions will be disconnected.
Review which server is now primary and which server is secondary. Once failover succeeds, the two servers swap roles, so that the former primary becomes the secondary.
(Optional) Select Failover again to fail the servers back to their original roles.
Modify existing failover group
You can add or remove databases from an existing failover group, or edit failover group configuration settings by using the Azure portal, PowerShell, and the Azure CLI.
To make changes to an existing failover group by using the Azure portal, follow these steps:
If you know the logical server that hosts your database, or elastic pool, go directly to it in the Azure portal. If you need to find the server, follow these steps:
- Select Azure SQL in the service menu. If Azure SQL isn't in the list, select All services, then type
Azure SQLin the search box. (Optional) Select the star next to Azure SQL to favorite it and add it as an item in the service menu. - On the Azure SQL page, find the database or elastic pool you want to modify and select it to open the SQL database or SQL elastic pool pane.
- On the Overview pane for SQL database or SQL elastic pool, select the name of the server under Server name to open the SQL server pane.
- Select Azure SQL in the service menu. If Azure SQL isn't in the list, select All services, then type
On the SQL server resource menu, select Failover groups under Data management, and then choose an existing failover group to open the Failover group page.
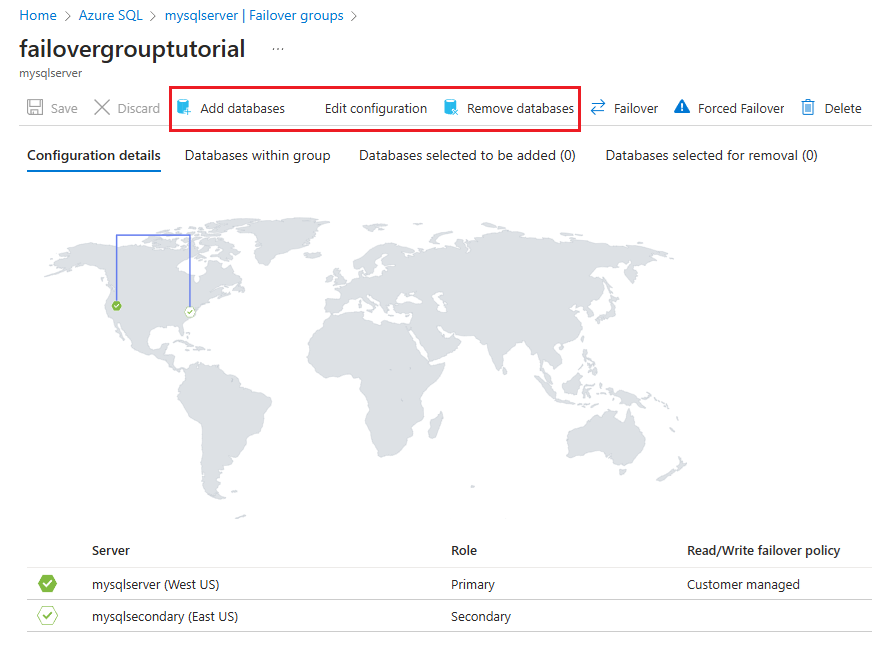
On the Failover group page, use the command bar:
- To add a database, select Add databases to open the Add databases to failover group pane and then expand #Databases to display the list of databases on the primary server. Check the box next to the database(s) you want to add to the failover group, and then use Select to save your changes and add your database(s).
- To remove a database, select Remove databases to open the Remove databases from failover group pane and then expand #Databases to list the databases in the failover group. Check the box next to the database(s) you want to remove from the failover group, and then use Select to save your changes and remove your database(s).
- To edit the failover policy, or configure a grace period, select Edit configuration to open the Edit configurations Failover groups pane and modify your settings. Use Select to save your changes.
Use Private Link
Using a private link allows you to associate a logical server to a specific private IP address within the virtual network and subnet.
To use a private link with your failover group, do the following:
- Ensure your primary and secondary servers are in a paired region.
- Create the virtual network and subnet in each region to host private endpoints for primary and secondary servers such that they have nonoverlapping IP address spaces. For example, the primary virtual network address range of 10.0.0.0/16 and the secondary virtual network address range of 10.0.0.1/16 overlaps. For more information about virtual network address ranges, see the blog designing Azure virtual networks.
- Create a private endpoint and Azure Private DNS zone for the primary server.
- Create a private endpoint for the secondary server as well, but this time choose to reuse the same Private DNS zone that was created for the primary server.
- Once the private link is established, you can create the failover group following the steps outlined previously in this article.
Locate listener endpoint
After your failover group is configured, update the connection string for your application to point to the Read/write listener endpoint so that your application continues to connect to whichever database is primary after failover. By using the listener endpoint, you don't have to manually update your connection string every time your failover group fails over since traffic is always routed to the current primary. You can also point read-only workload to the Read-only listener endpoint.
To locate the listener endpoint in the Azure portal, go to your logical server in the Azure portal and under Data management, select Failover groups. Select the failover group you're interested in.
Scroll down to find the listener endpoints:
- The Read/write listener endpoint, in the form of
fog-name.database.chinacloudapi.cn, routes traffic to the primary database. - The Read-only listener endpoint, in the form of
fog-name.secondary.database.chinacloudapi.cn, routes traffic to the secondary database.

Scaling databases in a failover group
You can scale the primary database up or down to a different compute size (within the same service tier) without disconnecting any geo-secondaries. When scaling up, we recommend that you scale up the geo-secondary first, and then scale up the primary. When scaling down, reverse the order: scale down the primary first, and then scale down the secondary. When you scale a database to a different service tier, this recommendation is enforced.
This sequence is recommended specifically to avoid the problem where the geo-secondary at a lower SKU gets overloaded and must be reseeded during an upgrade or downgrade process. You could also avoid the problem by making the primary read-only, at the expense of affecting all read-write workloads against the primary.
Note
If you created a geo-secondary as part of the failover group configuration, it's not recommended to scale down the geo-secondary. This is to ensure your data tier has sufficient capacity to process your regular workload after a geo-failover. You might not be able to scale a geo-secondary after an unplanned failover when the former geo-primary is unavailable due to outage. This is a known limitation.
The primary database in a failover group can't scale to a higher service tier (edition) unless the secondary database is first scaled to the higher tier. For example, if you want to scale up the primary from General Purpose to Business Critical, you have to first scale the geo-secondary to Business Critical. If you try to scale the primary or geo-secondary in a way that violates this rule, you will receive the following error:
The source database 'Primaryserver.DBName' cannot have higher edition than the target database 'Secondaryserver.DBName'. Upgrade the edition on the target before upgrading the source.
Prevent loss of critical data
Due to the high latency of wide area networks, geo-replication uses an asynchronous replication mechanism. Asynchronous replication makes the possibility of data loss unavoidable if the primary fails. To protect critical transactions from data loss, an application developer can call the sp_wait_for_database_copy_sync stored procedure immediately after committing the transaction. Calling sp_wait_for_database_copy_sync blocks the calling thread until the last committed transaction has been transmitted and hardened in the transaction log of the secondary database. However, it doesn't wait for the transmitted transactions to be replayed (redone) on the secondary. sp_wait_for_database_copy_sync is scoped to a specific geo-replication link. Any user with the connection rights to the primary database can call this procedure.
Note
sp_wait_for_database_copy_sync prevents data loss after geo-failover for specific transactions, but does not guarantee full synchronization for read access. The delay caused by a sp_wait_for_database_copy_sync procedure call can be significant and depends on the size of the not yet transmitted transaction log on the primary at the time of the call.
Change the secondary region
To illustrate the change sequence, we'll assume that server A is the primary server, server B is the existing secondary server, and server C is the new secondary in the third region. To make the transition, follow these steps:
- Create additional secondaries of each database on server A to server C using active geo-replication. Each database on server A will have two secondaries, one on server B and one on server C. This guarantees that the primary databases remain protected during the transition.
- Delete the failover group. At this point sign in attempts using failover group endpoints start to fail.
- Re-create the failover group with the same name between servers A and C.
- Add all primary databases on server A to the new failover group. At this point sign in attempts stop failing.
- Delete server B. All databases on B will be deleted automatically.
Change the primary region
To illustrate the change sequence, we'll assume server A is the primary server, server B is the existing secondary server, and server C is the new primary in the third region. To make the transition, follow these steps:
- Perform a planned geo-failover to switch the primary server to B. Server A becomes the new secondary server. The failover might result in several minutes of downtime. The actual time depends on the size of failover group.
- Create additional secondaries of each database on server B to server C using active geo-replication. Each database on server B will have two secondaries, one on server A and one on server C. This guarantees that the primary databases remain protected during the transition.
- Delete the failover group. At this point sign in attempts using failover group endpoints start to fail.
- Re-create the failover group with the same name between servers B and C.
- Add all primary databases on B to the new failover group. At this point login attempts stop failing.
- Perform a planned geo-failover of the failover group to switch B and C. Now server C becomes the primary and B the secondary. All secondary databases on server A will be automatically linked to the primaries on C. As in step 1, the failover might result in several minutes of downtime.
- Delete server A. All databases on A will be deleted automatically.
Important
When the failover group is deleted, the DNS records for the listener endpoints are also deleted. At that point, there is a non-zero probability of somebody else creating a failover group or a server DNS alias with the same name. Because failover group names and DNS aliases must be globally unique, this will prevent you from using the same name again. To minimize this risk, don't use generic failover group names.
Failover groups and network security
For some applications, the security rules require that the network access to the data tier is restricted to a specific component or components such as a VM, web service, etc. This requirement presents some challenges for business continuity design and the use of failover groups. Consider the following options when implementing such restricted access.
Use failover groups and virtual network service endpoints
If you're using Virtual Network service endpoints and rules to restrict access to your database, be aware that each virtual network service endpoint applies to only one Azure region. The endpoint doesn't enable other regions to accept communication from the subnet. Therefore, only the client applications deployed in the same region can connect to the primary database. Since a geo-failover results in the SQL Database client sessions being rerouted to a server in a different (secondary) region, these sessions might fail if originated from a client outside of that region. For that reason, the Azure managed failover policy can't be enabled if the participating servers are included in the Virtual Network rules. To support manual failover policy, follow these steps:
- Provision redundant copies of the frontend components of your application (web service, virtual machines etc.) in the secondary region.
- Configure virtual network rules individually for the primary and secondary server.
- Enable frontend failover using a Traffic manager configuration.
- Initiate a manual geo-failover when the outage is detected. This option is optimized for applications that require consistent latency between the frontend and the data tier and supports recovery when either frontend, data tier, or both are affected by the outage.
Note
If you're using the read-only listener to load-balance a read-only workload, make sure this workload is executed in a VM or other resource in the secondary region so it can connect to the secondary database.
Use failover groups and firewall rules
If your business continuity plan requires failover using failover groups, you can restrict access to your SQL Database by using public IP firewall rules. This configuration ensures that a geo-failover won't block connections from frontend components and assumes that the application can tolerate the longer latency between the frontend and the data tier.
To support failover group failover, follow these steps:
- Create a public IP.
- Create a public load balancer and assign the public IP to it.
- Create a virtual network and the virtual machines for your front-end components.
- Create network security group and configure inbound connections.
- Ensure that the outbound connections are open to Azure SQL Database in a region by using an
Sql.<Region>service tag. - Create a SQL Database firewall rule to allow inbound traffic from the public IP address you create in step 1.
For more information on how to configure outbound access and what IP to use in the firewall rules, see Load balancer outbound connections.
Important
To guarantee business continuity during regional outages you must ensure geographic redundancy for both frontend components and databases.
Permissions
Permissions for a failover group are managed via Azure role-based access control (Azure RBAC).
Azure RBAC write access is necessary to create and manage failover groups. The SQL Server Contributor role has all the necessary permissions to manage failover groups.
The following table lists specific permission scopes for Azure SQL Database:
| Action | Permission | Scope |
|---|---|---|
| Create failover group | Azure RBAC write access | Primary server Secondary server All databases in failover group |
| Update failover group | Azure RBAC write access | Failover group All databases on the current primary server |
| Fail over failover group | Azure RBAC write access | Failover group on new server |
Limitations
Be aware of the following limitations:
- Failover groups can only be created between logical servers in the same Microsoft Entra tenant.
- Failover groups can't be created between two servers in the same Azure region.
- Failover groups support geo-replication of all databases in the group to only one secondary logical server in a different region.
- Failover groups can't be renamed. You'll need to delete the group and re-create it with a different name.
- Database rename isn't supported for databases in a failover group. You'll need to temporarily delete the failover group to be able to rename a database, or remove the database, from the failover group.
- Removing a failover group for a single or pooled database doesn't stop replication, and it doesn't delete the replicated database. You'll need to manually stop geo-replication and delete the database from the secondary server if you wanted to add a single or pooled database back to a failover group after it's been removed. Failing to do either might result in an error similar to
The operation cannot be performed due to multiple errorswhen attempting to add the database to the failover group. - Failover group name is subject to naming restrictions.
- When creating a new failover group, or when adding databases to an existing failover group, you can only designate the databases as standby replicas when using the Azure portal - Azure PowerShell and the Azure CLI are not currently available.
- The Azure portal doesn't support creating failover groups across different subscriptions. Instead, use PowerShell cmdlets to programmatically manage failover groups.
Programmatically manage failover groups
Failover groups can also be managed programmatically by using Azure PowerShell, Azure CLI, and REST API. The following tables describe the set of commands available. Failover groups include a set of Azure Resource Manager APIs for management, including the Azure SQL Database REST API and Azure PowerShell cmdlets. These APIs require the use of resource groups and support Azure role-based access control (Azure RBAC). For more information on how to implement access roles, see Azure role-based access control (Azure RBAC).
| Cmdlet | Description |
|---|---|
| New-AzSqlDatabaseFailoverGroup | This command creates a failover group and registers it on both primary and secondary servers |
| Add-AzSqlDatabaseToFailoverGroup | Adds one or more databases to a failover group |
| Remove-AzSqlDatabaseFromFailoverGroup | Removes one or more databases from a failover group |
| Remove-AzSqlDatabaseFailoverGroup | Removes a failover group from the server |
| Get-AzSqlDatabaseFailoverGroup | Retrieves a failover group's configuration |
| Set-AzSqlDatabaseFailoverGroup | Modifies configuration of a failover group |
| Switch-AzSqlDatabaseFailoverGroup | Triggers failover of a failover group to the secondary server |
Note
It's possible to deploy your failover group across subscriptions by using the -PartnerSubscriptionId parameter in Azure Powershell starting with Az.SQL 3.11.0. To learn more, review the following Example.