Note
Access to this page requires authorization. You can try signing in or changing directories.
Access to this page requires authorization. You can try changing directories.
Applies to: ![]() SQL Server on Azure VM
SQL Server on Azure VM
Tip
There are many methods to deploy an availability group. Simplify your deployment and eliminate the need for an Azure Load Balancer or distributed network name (DNN) for your Always On availability group by creating your SQL Server virtual machines (VMs) in multiple subnets within the same Azure virtual network. If you've already created your availability group in a single subnet, you can migrate it to a multi-subnet environment.
This article describes how to use the Azure portal to configure an Always On availability group for SQL Server on Azure virtual machines (VMs) in multiple subnets by creating:
- New virtual machines with SQL Server.
- A Windows Server Failover Cluster.
- An Always On availability group.
- A listener.
Note
This deployment method supports SQL Server 2016 and later on Windows Server 2016 and later.
Deploying a multiple-subnet availability group through the Azure portal provides an easy end-to-end experience for users. It configures the virtual machines by following the Best practices for high availability and disaster recovery (HADR).
Although this article uses the Azure portal to configure the availability group environment, you can also do so manually.
Prerequisites
To configure an Always On availability group by using the Azure portal, you must have the following prerequisites:
A resource group
A virtual network configured with a custom DNS server IP address
A domain controller VM in the same virtual network
The following account permissions:
A domain user account that has Create Computer Object permissions in the domain. Use this account to create the cluster and availability group, and install SQL Server.
For example, a domain user account (
account@domain.com) typically has sufficient permission. This account should also be part of the local administrator group on each VM to create the cluster.A domain SQL Server service account to control SQL Server. This account should be the same for every SQL Server VM that you want to add to the availability group.
Note
This tutorial assumes that both the DNS Server and domain controller are on the same virtual machine. If the DNS Server is configured on a different VM than the domain controller VM, latency when syncing objects could result in automated deployment issues.
Choose an Azure image
Use the Azure portal to choose one of several preconfigured images from the gallery. There are two entry points to start an availability group deployment in the Azure portal:
The first option is to search Azure Marketplace for SQL Server High Availability and find the SQL Server with High Availability tile:
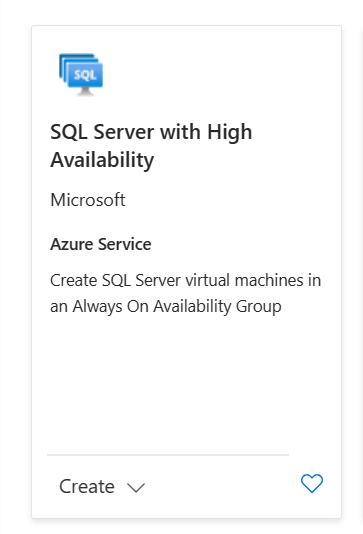
Select Create on the tile to continue.
The second option is to go to Azure SQL hub.
In the pane for SQL Server on Azure Virtual Machines, select Show options.
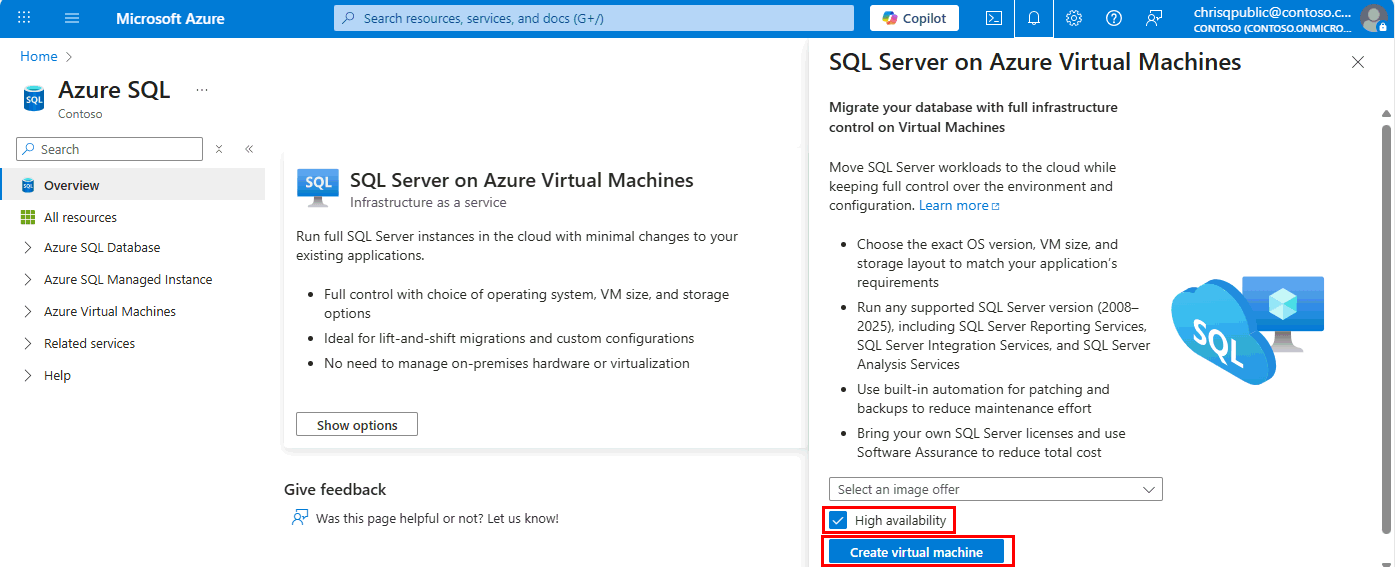
Under SQL virtual machines, select the High availability checkbox.
In the Select an image offer box, choose a SQL Server image (such as Free SQL Server License: SQL Server 2025 Enterprise Developer on Windows Server 2025).
Select Create virtual machine.

Choose basic settings
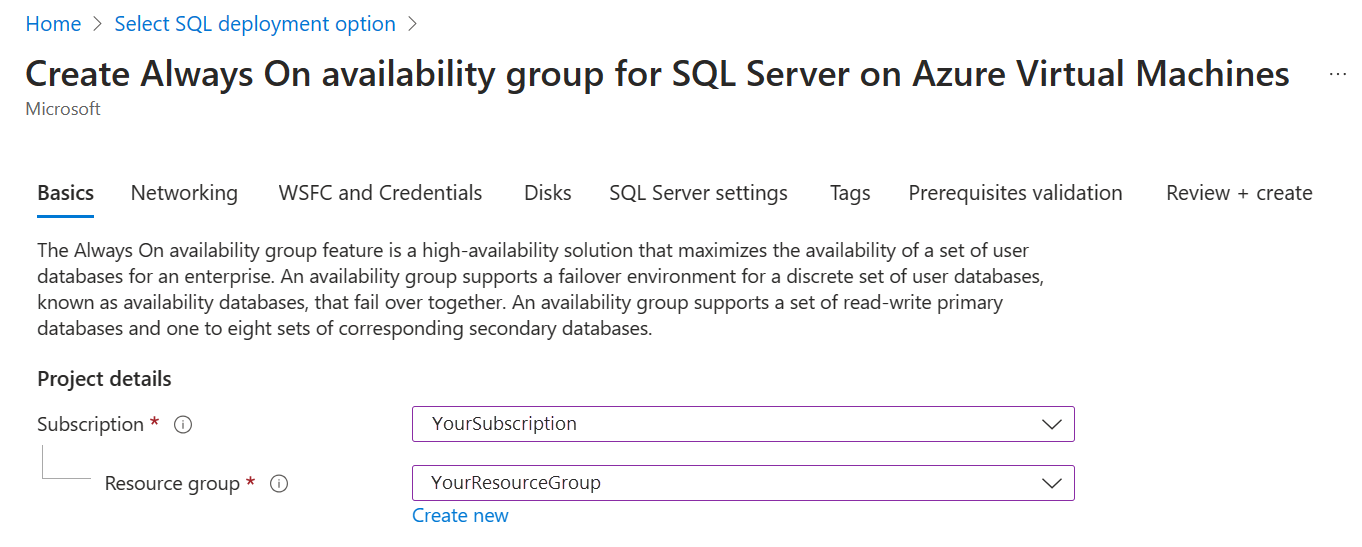
On the Basics tab, select the subscription and resource group. Also, provide details for the SQL Server instances that you're creating for your availability group.
From the dropdown lists, choose the subscription and resource group that contains your domain controller and where you intend to deploy your availability group.
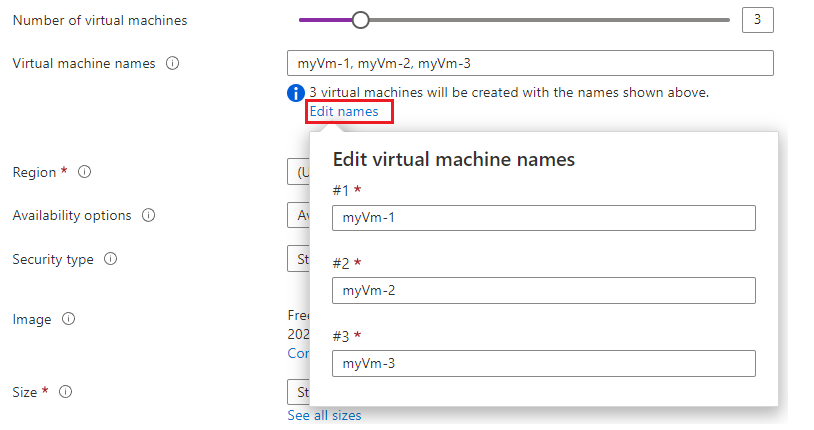
Use the slider to select the number of virtual machines that you want to create for the availability group. The minimum is 2, and the maximum is 9. The virtual machine names are prepopulated, but you can edit them by selecting Edit names.
For Region, select a region. All of the virtual machines are deployed to the same region.
For Availability options, select either Availability Zone or Availability Set. For more information about availability options, see Availability. When you choose Availability Zone, each virtual machine is assigned to a zone in the region, but the assignments can be customized later under the Networking tab.
In the Image list, select the image with the version of SQL Server and the operating system you want. Use the dropdown list to change the image to deploy. Select Configure VM generation to choose the VM generation.
Select See all sizes for the size of the virtual machines. All of the VMs will be the same size. For production workloads, see the recommended machine sizes and configuration in VM size: Performance best practices for SQL Server on Azure VMs.
Under Virtual machine administrator account, provide a username and password. The password must be at least 12 characters and meet the defined complexity requirements. This account will be the administrator of the VM.
Under Licensing, you can enable Azure Hybrid Benefit to allocate your existing Windows Server license to Azure. This option is available only if you're a Software Assurance customer.
Select Yes if you want to enable Azure Hybrid Benefit, and then confirm that you have Software Assurance by selecting the checkbox. This option is unavailable if you selected one of the free SQL Server images, such as the Developer edition.
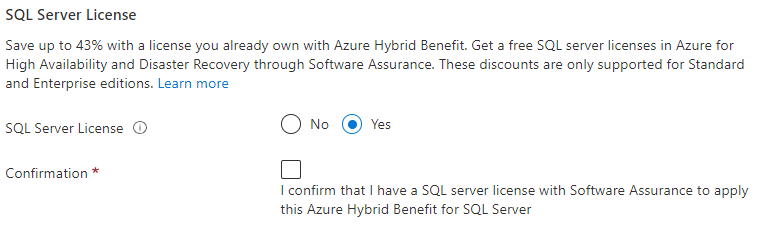
Under SQL Server License, you can enable Azure Hybrid Benefit to get a discount on the allocation of your own SQL Server license. This option is available only if you're a Software Assurance customer.
Select Yes if you want to enable Azure Hybrid Benefit, and then confirm that you have Software Assurance by selecting the checkbox. This option is unavailable if you selected one of the free SQL Server images, such as the developer edition.
Select Next: Networking.
Choose network settings
On the Networking tab, configure your network options:
Select the virtual network from the dropdown list. The list is prepopulated based on the region and resource group that you previously chose on the Basics tab. The selected virtual network should contain the domain controller VM.
Caution
If the domain controller doesn't exist in the selected virtual network, the deployment fails.
Under NIC network security group, select either a basic security group or the advanced security group. Choosing the basic option allows you to select inbound ports for the SQL Server VM. Selecting the advanced option allows you to choose an existing network security group, or create a new one.
Configure Public inbound ports, if needed, by selecting Allow selected ports. Then use the dropdown list to select the allowed common ports.
Choose a Public IP SKU type. All machines will use this public IP type.
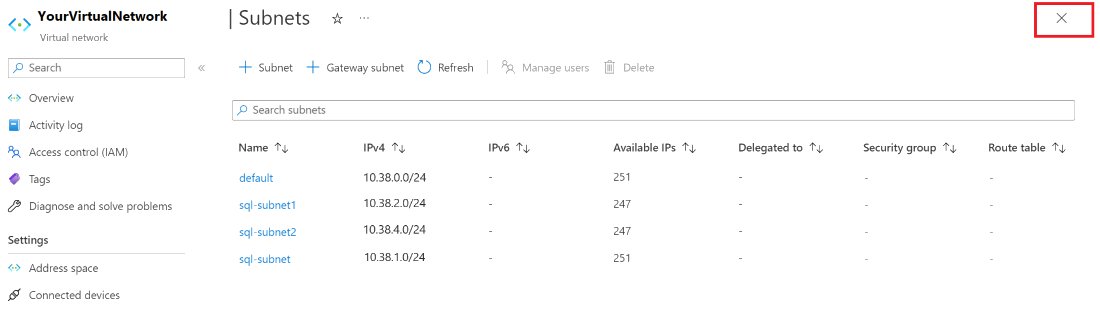
Each virtual machine that you create has to be in its own subnet.
Under Create subnets, select Manage subnet configuration to open the Subnets pane for the virtual network. Then, either create a subnet (+Subnet) for each virtual machine or validate that a subnet is available for each virtual machine that you want to create for the availability group.
When you're done, use the X to close the subnet management pane and go back to the availability group deployment page.
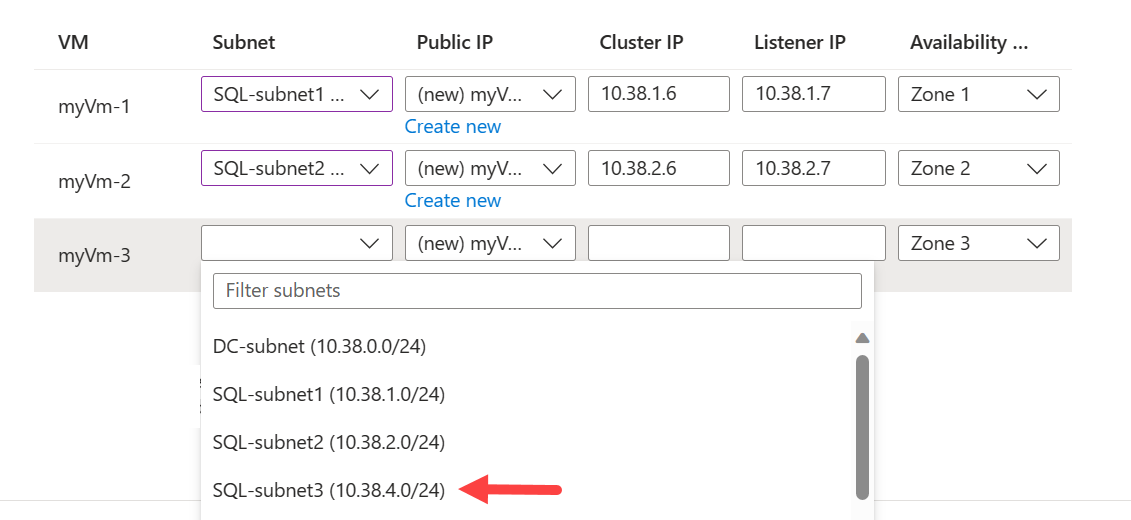
Use the dropdown lists to assign the subnet, public IP address, and listener IP address to each VM that you're creating. If you're using a Windows Server 2016 image, you also need to assign the cluster IP address. If you selected Availability Zone under the Basics tab as your availability option, then each VM is assigned to a different zone. If needed, reassign each VM to a zone, but note that the VMs can't be placed in the same availability zone.
When you're assigning a subnet to a virtual machine, the listener and cluster IP boxes are prepopulated with available IP addresses. Place your cursor in the box if you want to edit the IP address. Select Create new if you need to create a new IP address.
If you want to delete the newly created public IP address and NIC when you delete the VM, select the checkbox.
Select Next: WSFC and Credentials.
Choose failover cluster settings
On the WSFC and Credentials tab, provide account information to configure and manage the Windows Server failover cluster and SQL Server.
Caution
For the deployment to work, all the accounts need to already be present in Active Directory on the domain controller VM. This deployment process doesn't create any accounts and will fail if you provide an invalid account. For more information about the required permissions, review Configure cluster accounts in Active Directory.
Under Windows Server Failover Cluster details, provide the name that you want to use for the failover cluster.
From the dropdown list, select the storage account that you want to use for the cloud witness. If one doesn't exist, select Create a new storage account.
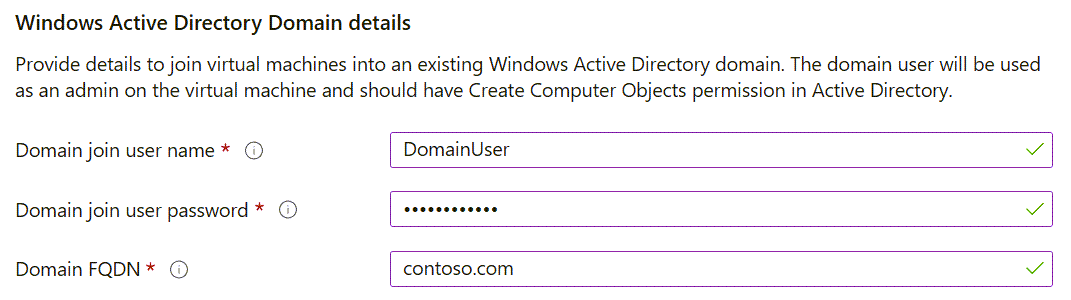
Under Windows Active Directory Domain details:
For Domain join user name and Domain join password, enter the credentials for the account that creates the Windows Server failover cluster name in Active Directory and joins the VMs to the domain. This account must have Create Computer Objects permissions.
For Domain FQDN, enter a fully qualified domain name, such as contoso.com.
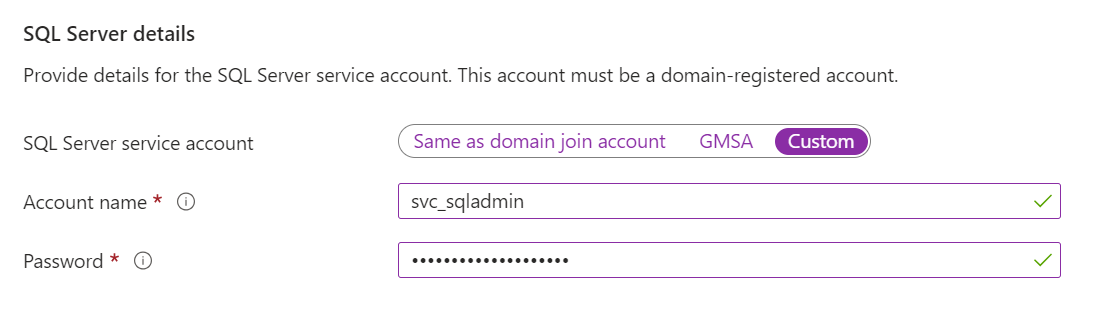
Under SQL Server details, provide the details of the account for the SQL Server service. There are several options available to choose from:
a. You can use the same domain-joined account that creates the cluster and joins the VMs to the domain by choosing Same as domain join account. This account is the same as in the previous step.
b. You can select Group Managed Service Account (GMSA). This option installs all the required tools and services on the VMs being created. Including, installing the ADDS tool, joining the VMs to the GMSA Security group, and installing the GMSA service. In order for the GMSA deployment to succeed, the domain-joined user must have, at least, write permission on the GMSA AD group.
c. Or you can select Custom and provide different account details to use with the SQL Server service account.
Select Next: Disks.
Choose disk settings
On the Disks tab, configure your disk options for both the virtual machines and the SQL Server storage configuration:
Under OS disk type, select the type of disk that you want for your operating system. We recommend Premium for production systems, but it isn't available for a Basic VM. To use a Premium SSD, change the virtual machine size.
Select an Encryption type value for the disks.
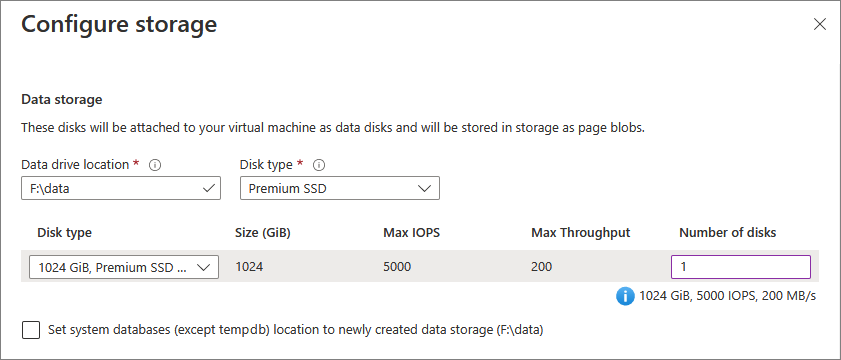
Under Storage configuration, select Change configuration to open the Configure storage pane and specify storage requirements. You can choose to leave the default values, or you can manually change the storage topology to suit your needs for input/output operations per second (IOPS). For more information, see Configure storage for SQL Server on Azure VMs.
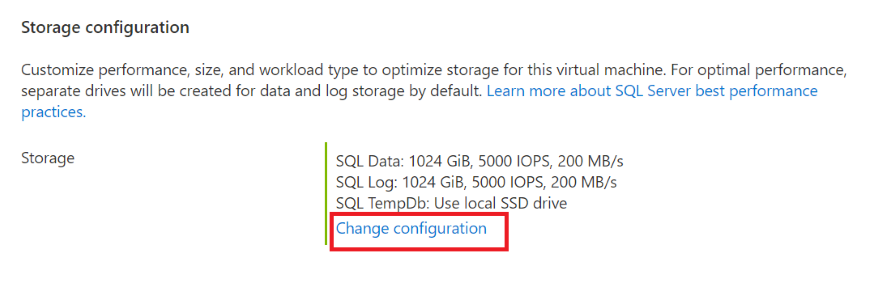
Under Data storage, choose the location for your data drive, the disk type, and the number of disks. You can also select the checkbox to store your system databases on your data drive instead of the local C drive.
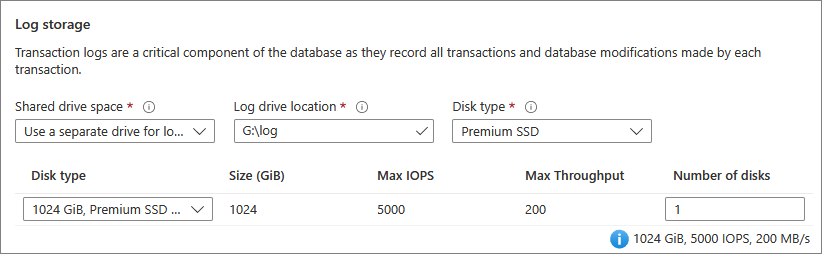
Under Log storage, you can choose to use the same drive as the data drive for your transaction log files, or you can select a separate drive from the dropdown list. You can also choose the name of the drive, the disk type, and the number of disks.
Under TempDb storage, configure your
tempdbdatabase settings. Choices include the location of the database files, the number of files, initial size, and autogrowth size in megabytes.Currently, during deployment, the maximum number of
tempdbfiles is eight. But you can add more files after the SQL Server VM is deployed.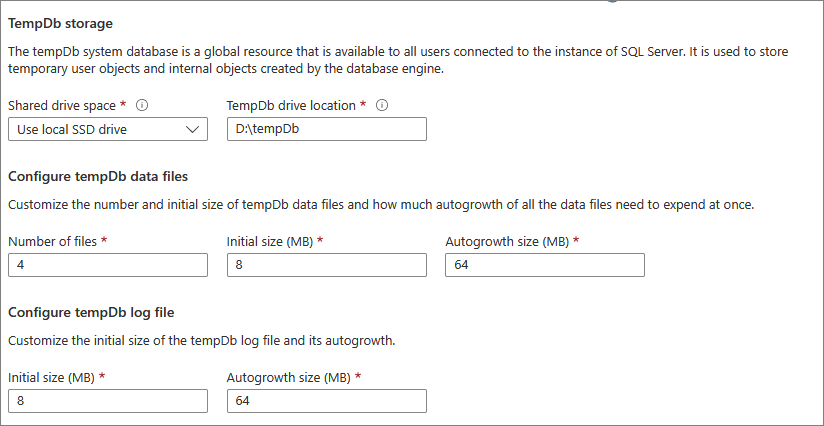
Select OK to save your storage configuration settings.
Select Next: SQL Server settings.
Choose SQL Server settings
On the SQL Server settings tab, configure specific settings and optimizations for SQL Server and the availability group:
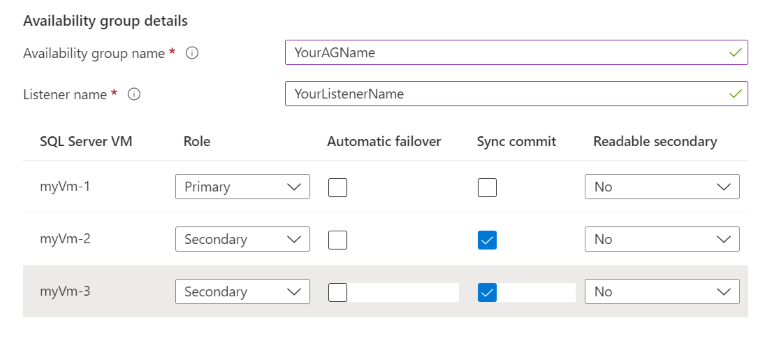
Under Availability group details:
Provide the name of the availability group and the listener.
Select the role, either Primary or Secondary, for each virtual machine to be created.
Choose the availability group settings that best suit your business needs.
Under Security & Networking, select SQL connectivity to access the SQL Server instance on the VMs. For more information about connectivity options, see Connectivity.
If you require SQL Server authentication, select Enable under SQL Server Authentication and provide the login name and password. Use these credentials across all the VMs that you're deploying. For more information about authentication options, see Authentication.
For Azure Key Vault integration, select Enable if you want to use Azure Key Vault to store security secrets for encryption. Then, fill in the requested information. To learn more, see Azure Key Vault integration.
Select Change SQL instance settings to modify SQL Server configuration options. These options include server collation, maximum degree of parallelism (
MAXDOP), minimum and maximum memory, and whether you want to optimize for ad hoc workloads.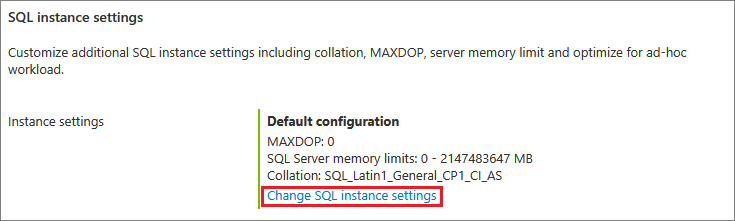
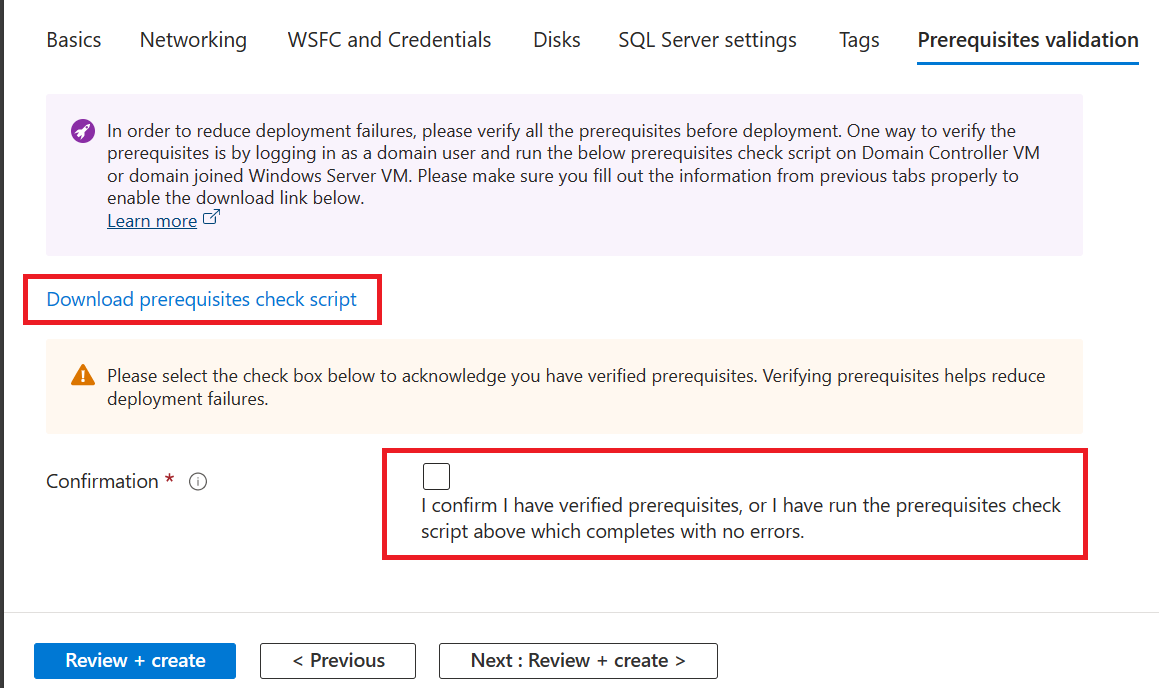
Choose Prerequisites Validation
In order for the deployment to be successful, there are several prerequisite that are required to be in place. To make it easier to validate that all permissions and requirements are correct, use the PowerShell prerequisite script that is available for download on this tab.
The script is prepopulated with the values provided in the previous steps. Run the PowerShell script as a domain user on the Domain Controller virtual machine or on a domain joined Windows Server VM.
After the script finishes executing and the prerequisites are validated, select the confirmation checkbox.
Select Review + Create.
On the Review + Create tab, review the summary. Then select Create to create the SQL Servers, failover cluster, availability group, and listener.
If needed, you can select Download a template for automation.
You can monitor the deployment from the Azure portal. The Notifications button at the top of the screen shows the basic status of the deployment.
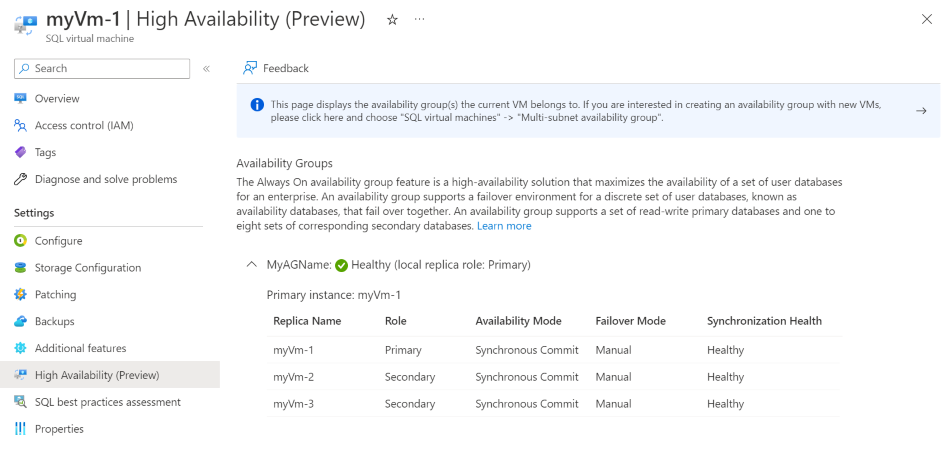
After the deployment finishes, you can browse to the SQL virtual machines resource in the portal. Under Settings, select High Availability to monitor the health of the availability group. Select the arrow next to the name of your availability group to see a list of all replicas.

Note
Synchronization Health on the High Availability page of the Azure portal shows Not Healthy until you add databases to your availability group.
Add databases to the availability group
Add databases to your availability group after deployment finishes. The following steps use SQL Server Management Studio, but you can also use Transact-SQL or PowerShell.
Connect to one of your SQL Server VMs by using your preferred method, such as Bastion. Use a domain account that's a member of the sysadmin fixed server role on all of the SQL Server instances.
Open SQL Server Management Studio.
Connect to your SQL Server instance.
In Object Explorer, expand Always On High Availability.
Expand Availability Groups, right-click your availability group, and then select Add Database.
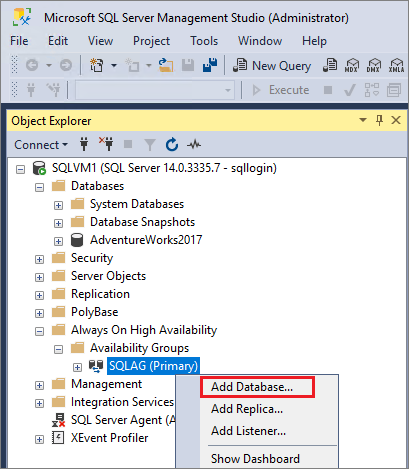
Follow the prompts to select the database that you want to add to your availability group.
Select OK to save your settings and add the database.
Refresh Object Explorer to confirm the status of your database as
synchronized.
After you add databases, you can check your availability group in the Azure portal and confirm that the status is Healthy.
Modify the availability group
After you deploy your availability group through the portal, all changes to the availability group need to be done manually. If you want to remove a replica, you can do so through SQL Server Management Studio or Transact-SQL, and then delete the VM through the Azure portal. If you want to add a replica, you have to deploy the virtual machine manually to the resource group, join it to the domain, and add the replica as you normally would in a traditional on-premises environment.
Remove a cluster
You can remove a cluster by using the latest version of the Azure CLI or PowerShell.
First, remove all of the SQL Server VMs from the cluster:
# Remove the VM from the cluster metadata
# example: az sql vm remove-from-group --name SQLVM2 --resource-group SQLVM-RG

az sql vm remove-from-group --name <VM1 name>  --resource-group <resource group name>
az sql vm remove-from-group --name <VM2 name>  --resource-group <resource group name>
If the SQL Server VMs that you remove are the only VMs in the cluster, then the cluster is destroyed. If any other VMs remain in the cluster, those VMs aren't removed and the cluster isn't destroyed.
Next, remove the cluster metadata from the SQL IaaS Agent extension:
# Remove the cluster from the SQL VM RP metadata
# example: az sql vm group delete --name Cluster --resource-group SQLVM-RG

az sql vm group delete --name <cluster name> --resource-group <resource group name>
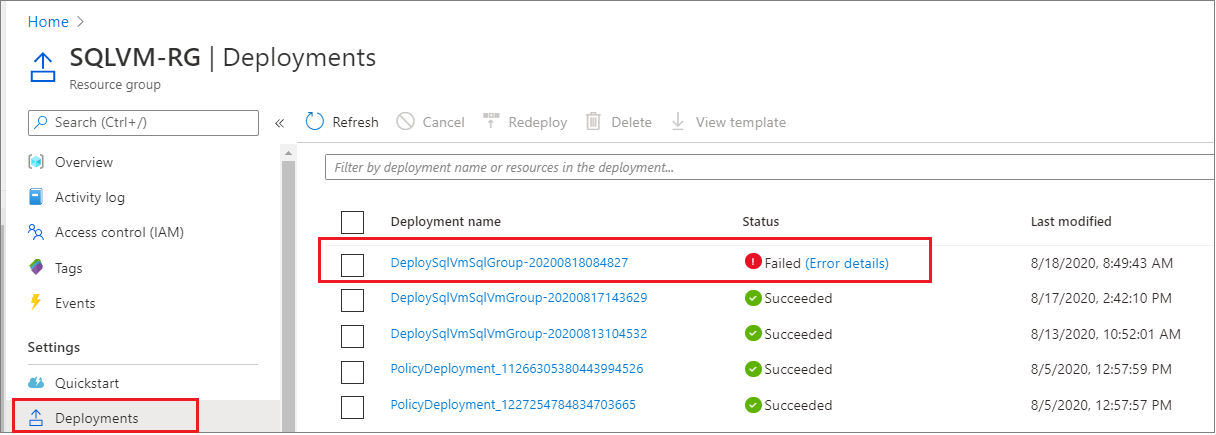
Troubleshoot
If you run into problems, you can check the deployment history and then review common errors and their resolutions.
Changes to the cluster and availability group via the portal happen through deployments. Deployment history can provide more detail if there are problems with creating or onboarding the cluster, or with creating the availability group.
To view the logs for the deployment and check the deployment history:
Sign in to the Azure portal.
Go to your resource group.
Under Settings, select Deployments.
Select the deployment of interest to learn more about it.
Deployment through the portal isn't idempotent (repeatable). So, if the deployment fails and you want to redeploy by using the portal, you need to manually clean up the resources. These clean-up tasks include deleting VMs and removing entries in Active Directory and/or DNS. However, if you use the Azure portal to create a template to deploy your availability group, and then use the template for automation, clean-up of resources isn't necessary because the template is idempotent.