Note
Access to this page requires authorization. You can try signing in or changing directories.
Access to this page requires authorization. You can try changing directories.
Azure Cosmos DB enforces a maximum logical partition key size of 20 GB. For example, if you have a container/collection partitioned by UserId, the data within the "Alice" logical partition can store up to 20 GB of data.
You can use alerts to monitor if you have any logical partition keys that are approaching the 20-GB logical partition limit. Alerts can send you a notification in the form of an email or execute an action, such as an Azure Function or Logic App, when the condition is triggered.
In this article, we create an alert that triggers if the storage for a logical partition key exceeds 70% of the 20-GB limit (has more than 14 GB of storage). You can set up alerts from the Alerts pane in a specific Azure Cosmos DB account or the Azure Monitor service in the Azure portal. Both the interfaces offer the same options. This article shows you how to set up the alert from Azure Monitor.
Prerequisites
We're using data from the PartitionKeyStatistics log category in Diagnostic Logs to create our alert. Diagnostic Logs is an opt-in feature, so you need to enable it before proceeding. In our example, we use the recommended Resource Specific Logs option.
Follow the instructions in Monitor Azure Cosmos DB data by using diagnostic settings in Azure to ensure:
- Diagnostic Logs is enabled on the Azure Cosmos DB account(s) you want to monitor
- You have configured collection of the PartitionKeyStatistics log category
- The Diagnostic logs are being sent to a Log Analytics workspace
Create the alert
Sign into the Azure portal.
Select Monitor from the left-hand navigation bar and select Alerts.
Select the New alert rule button to open the Create alert rule pane.
Fill out the Scope section:
Open the Select resource pane and configure the following:
Choose your subscription name.
Select Azure Cosmos DB accounts for the resource type.
The location of your Azure Cosmos DB account.
After filling in the details, a list of Azure Cosmos DB accounts in the selected scope is displayed. Choose the one for which you want to configure alerts and select Done.
Fill out the Condition section:
Open the Select condition pane to open the Select a signal page and configure the following:
Select Log for the Signal type.
Select Log analytics for the Monitor service.
Select Custom log search for the Signal name.
In the query editor, add this query. You can run the query to preview the result.
Note
It's perfectly ok if the query currently returns no results. The PartitionKeyStatistics logs only show data if there are logical partition keys with significant storage size, so if there are no results returned, it means that there are no such keys. If and when such keys do appear in the future, the alert is triggered then.
CDBPartitionKeyStatistics
// Get the latest storage size for each logical partition key value
| summarize arg_max(TimeGenerated, *) by AccountName, DatabaseName, CollectionName, _ResourceId, PartitionKey
| extend utilizationOf20GBLogicalPartition = SizeKb / (20.0 * 1024.0 * 1024.0) // Current storage / 20GB
| project TimeGenerated, AccountName, DatabaseName, CollectionName, _ResourceId, PartitionKey, SizeKb, utilizationOf20GBLogicalPartition
Select Continue Editing Alert.
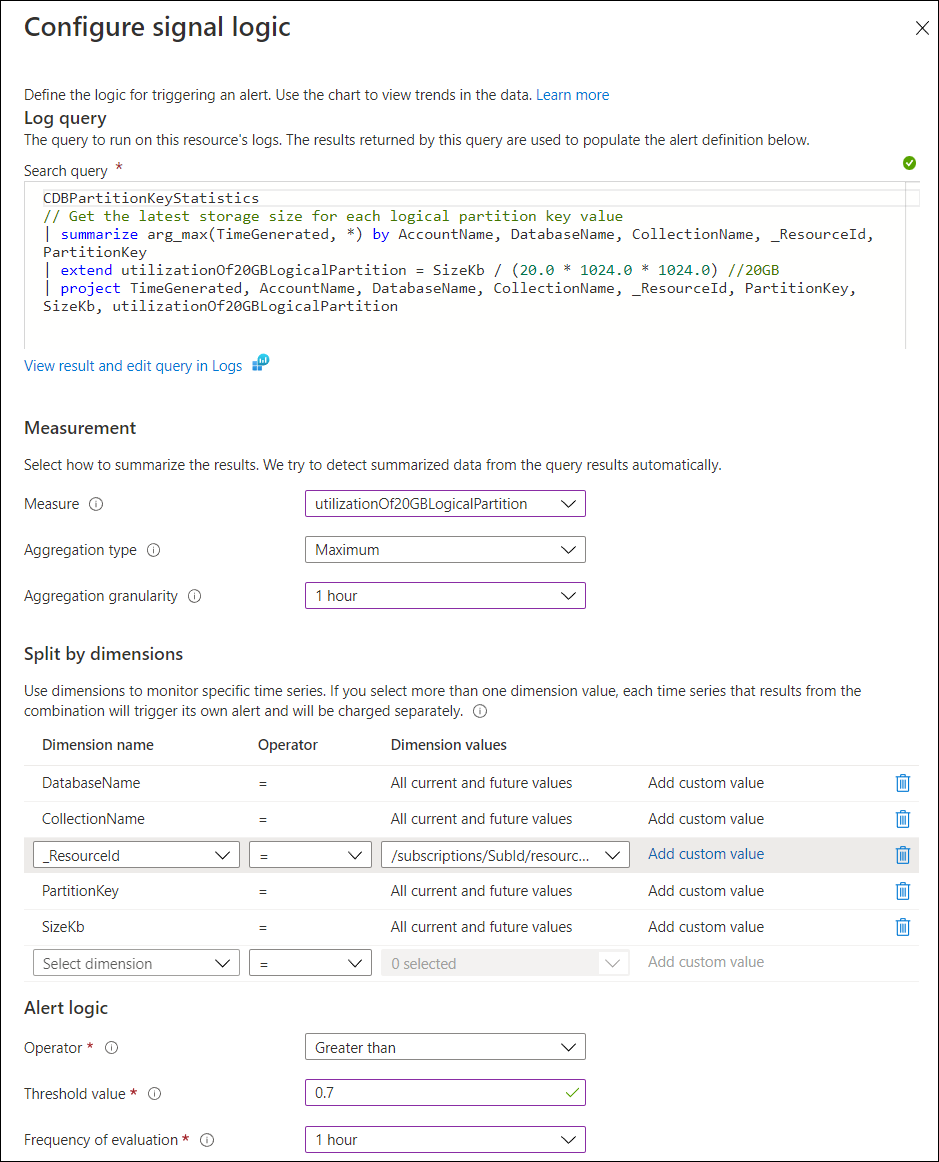
In the Measurement section:
Select utilizationOf20GBLogicalPartition for Measure.
Select Maximum for Aggregation type.
Select your desired Aggregation granularity based on your requirements. In our example, we select 1 hour. This means that the alert calculates the storage size of the logical partition using the highest storage value in the hour.
In the Split by dimensions section:
Add the following six dimensions: AccountName, DatabaseName, CollectionName, _ResourceId, PartitionKey, SizeKb. This ensures that when the alert is triggered, you are able to identify the specific Azure Cosmos DB account, database, collection, and partition key that triggered the alert.
For the SizeKb dimension, select Select all current and future values as the Dimension values.
For all other dimensions:
If you want to monitor only a specific Azure Cosmos DB account, database, collection, or partition key, select the specific value or Add custom value if the value doesn’t currently appear in the dropdown.
Otherwise, select Select all current and future values. For example, if your Azure Cosmos DB account currently has two databases and five collections, selecting all current and feature values for the Database and CollectionName dimension will ensure that the alert will apply to all existing databases and collections, as well as any you could create in the future.
In the Alert logic section:
Select Greater than for Operator.
Select your desired threshold value. Based on how we’ve written the query, a valid threshold is a number between 0 and 1 (inclusive). In our example, we want to trigger the alert if a logical partition key reaches 70% of the allowed storage, so we enter 0.7. You can tune this number based on your requirements.
Select your desired Frequency of evaluation based on your requirements. In our example, we select 1 hour. Note this value must be less than or equal to the alert evaluation period.
After completing Step 5, the Condition section will look like this example.
Fill out the Actions section:
Select an existing action group or create a new action group. An action group enables you to define the action(s) to be taken when the alert is triggered. For this example, create a new action group to receive an email notification when the alert is triggered. Open the Create action group pane.
In the Basics section:
Choose the subscription and the resource group in which this action group will be created.
Action group name - The action group name must be unique within a resource group.
Display name - This value is included in email and SMS notifications to identify which action group was the source of the notification.
In the Notifications section:
Provide a name for your notification.
Select Email/SMS message as the Notification Type and enter your email, SMS, Push Notification, or Voice information.
Optional: In the Actions section, you can select an Action that will be run, such as an Azure Function or Logic App in the Actions section.
Select Review + create to create the Action Group.
Fill out the Details section:
- Define a name for the alert, provide an optional description, the severity level of the alert, and choose whether to enable the rule upon rule creation.
- Select Review + create and select Create to finish creating the alert.
After creating the alert, it will be active within 10 minutes.
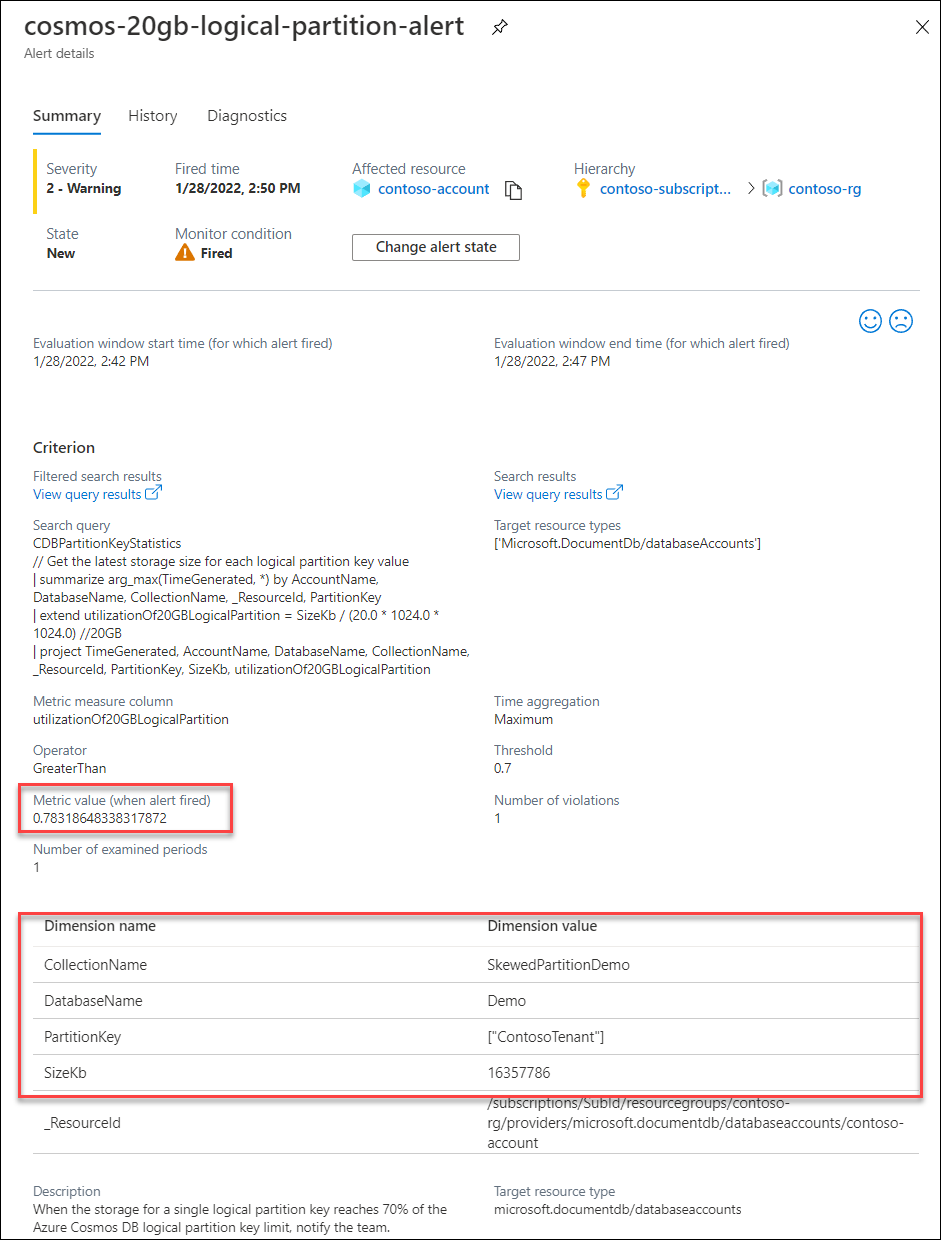
Example alert
To see your alerts in the Azure portal:
Sign into the Azure portal.
Select Monitor from the left-hand navigation bar and select Alerts.
When the alert is fired, it includes:
- Database account name
- Database name
- Collection name
- Logical partition key
- Storage in KB of the logical partition key
- Utilization of the 20-GB limit
For example, in the alert that was fired, we see the logical partition of "ContosoTenant" has reached 0.78 of the 20-GB logical partition storage limit, with 16GB of data in a particular database and collection.
Remediation steps
When the 20-GB logical partition size limit is reached, you won't be able to write any more data to that logical partition.
To help give time for this, you can request a temporary increase in the logical partition key limit for your existing application. File an Azure support ticket and select quota type Temporary increase in container's logical partition key size. Note this is intended as a temporary mitigation and not recommended as a long-term solution, as service level agreement (SLA) guarantees aren't honored when the limit is increased. To remove the configuration, file a support ticket and select quota type Restore container’s logical partition key size to default (20 GB). This can be done after you have either deleted data to fit the 20-GB logical partition limit or have rearchitected your application with a different partition key.
Next steps
- How to create alerts for Azure Cosmos DB using Azure Monitor.
- How to monitor normalized RU/s metric in Azure Cosmos DB container.
- How to monitor throughput or request unit usage of an operation in Azure Cosmos DB.
- How to interpret and debut 429 exceptions in Azure Cosmos DB container.