Note
Access to this page requires authorization. You can try signing in or changing directories.
Access to this page requires authorization. You can try changing directories.
APPLIES TO:
![]() MongoDB
MongoDB
Azure Cosmos DB is a multi-model database service that lets you quickly create and query document, table, key-value, and graph databases with multiple-region distribution and horizontal scale capabilities. The sample presented in this article is a simple command-line based application that uses the Rust driver for MongoDB. Since Azure Cosmos DB's API for MongoDB is compatible with the MongoDB wire protocol, it is possible for any MongoDB client driver to connect to it.
You will learn how to use the MongoDB Rust driver to interact with Azure Cosmos DB's API for MongoDB by exploring CRUD (create, read, update, delete) operations implemented in the sample code. Finally, you can run the application locally to see it in action.
Prerequisites
An Azure account with an active subscription. Create a trial subscription. You can also use the Azure Cosmos DB Emulator with the connection string
.mongodb://localhost:C2y6yDjf5/R+ob0N8A7Cgv30VRDJIWEHLM+4QDU5DE2nQ9nDuVTqobD4b8mGGyPMbIZnqyMsEcaGQy67XIw/Jw==@localhost:10255/admin?ssl=true.Rust (version 1.39 or above)
Set up Azure Cosmos DB
To set up an Azure Cosmos DB account, follow the instructions here. The application will need the MongoDB connection string which you can fetch using the Azure portal. For details, see Get the MongoDB connection string to customize.
Run the application
Clone the sample application
Run the following commands to clone the sample repository.
Open a command prompt, create a new folder named
git-samples, then close the command prompt.mkdir "C:\git-samples"Open a git terminal window, such as git bash, and use the
cdcommand to change to the new folder to install the sample app.cd "C:\git-samples"Run the following command to clone the sample repository. This command creates a copy of the sample app on your computer.
git clone https://github.com/Azure-Samples/cosmosdb-rust-mongodb-quickstart
Build the application
To build the binary:
cargo build --release
Configure the application
Export the connection string, MongoDB database, and collection names as environment variables.
export MONGODB_URL="mongodb://<COSMOSDB_ACCOUNT_NAME>:<COSMOSDB_PASSWORD>@<COSMOSDB_ACCOUNT_NAME>.mongo.cosmos.azure.cn:10255/?ssl=true&replicaSet=globaldb&maxIdleTimeMS=120000&appName=@<COSMOSDB_ACCOUNT_NAME>@"
Note
The ssl=true option is important because of Cosmos DB requirements. For more information, see Connection string requirements.
For the MONGODB_URL environment variable, replace the placeholders for <COSMOSDB_ACCOUNT_NAME> and <COSMOSDB_PASSWORD>
<COSMOSDB_ACCOUNT_NAME>: The name of the Azure Cosmos DB account you created<COSMOSDB_PASSWORD>: The database key extracted in the previous step
export MONGODB_DATABASE=todos_db
export MONGODB_COLLECTION=todos
You can choose your preferred values for MONGODB_DATABASE and MONGODB_COLLECTION or leave them as is.
To run the application, change to the correct folder (where the application binary exists):
cd target/release
To create a todo
./todo create "Create an Azure Cosmos DB database account"
If successful, you should see an output with the MongoDB _id of the newly created document:
inserted todo with id = ObjectId("5ffd1ca3004cc935004a0959")
Create another todo
./todo create "Get the MongoDB connection string using the Azure CLI"
List all the todos
./todo list all
You should see the ones you just added:
todo_id: 5ffd1ca3004cc935004a0959 | description: Create an Azure Cosmos DB database account | status: pending
todo_id: 5ffd1cbe003bcec40022c81c | description: Get the MongoDB connection string using the Azure CLI | status: pending
To update the status of a todo (for example, change it to completed status), use the todo ID as such:
./todo update 5ffd1ca3004cc935004a0959 completed

#output
updating todo_id 5ffd1ca3004cc935004a0959 status to completed
updated status for todo id 5ffd1ca3004cc935004a0959
List only the completed todos
./todo list completed
You should see the one you just updated
listing 'completed' todos

todo_id: 5ffd1ca3004cc935004a0959 | description: Create an Azure Cosmos DB database account | status: completed
Delete a todo using it's ID
./todo delete 5ffd1ca3004cc935004a0959
List the todos to confirm
./todo list all
The todo you just deleted should not be present.
View data in Data Explorer
Data stored in Azure Cosmos DB is available to view and query in the Azure portal.
To view, query, and work with the user data created in the previous step, login to the Azure portal in your web browser.
In the top Search box, enter Azure Cosmos DB. When your Cosmos account blade opens, select your Cosmos account. In the left navigation, select Data Explorer. Expand your collection in the Collections pane, and then you can view the documents in the collection, query the data, and even create and run stored procedures, triggers, and UDFs.
Review the code (optional)
If you're interested in learning how the application works, you can review the code snippets in this section. The following snippets are taken from the src/main.rs file.
The main function is the entry point for the todo application. It expects the connection URL for Azure Cosmos DB's API for MongoDB to be provided by the MONGODB_URL environment variable. A new instance of TodoManager is created, followed by a match expression that delegates to the appropriate TodoManager method based on the operation chosen by the user - create, update, list, or delete.
fn main() {
    let conn_string = std::env::var_os("MONGODB_URL").expect("missing environment variable MONGODB_URL").to_str().expect("failed to get MONGODB_URL").to_owned();
    let todos_db_name = std::env::var_os("MONGODB_DATABASE").expect("missing environment variable MONGODB_DATABASE").to_str().expect("failed to get MONGODB_DATABASE").to_owned();
    let todos_collection_name = std::env::var_os("MONGODB_COLLECTION").expect("missing environment variable MONGODB_COLLECTION").to_str().expect("failed to get MONGODB_COLLECTION").to_owned();

    let tm = TodoManager::new(conn_string,todos_db_name.as_str(), todos_collection_name.as_str());

    let ops: Vec<String> = std::env::args().collect();
    let op = ops[1].as_str();

    match op {
        CREATE_OPERATION_NAME => tm.add_todo(ops[2].as_str()),
        LIST_OPERATION_NAME => tm.list_todos(ops[2].as_str()),
        UPDATE_OPERATION_NAME => tm.update_todo_status(ops[2].as_str(), ops[3].as_str()),
        DELETE_OPERATION_NAME => tm.delete_todo(ops[2].as_str()),
        _ => panic!(INVALID_OP_ERR_MSG)
    }
}
TodoManager is a struct that encapsulates a mongodb::sync::Collection. When you try to instantiate a TodoManager using the new function, it initiates a connection to Azure Cosmos DB's API for MongoDB.
struct TodoManager {
    coll: Collection
}
....
impl TodoManager{
    fn new(conn_string: String, db_name: &str, coll_name: &str) -> Self{
        let mongo_client = Client::with_uri_str(&*conn_string).expect("failed to create client");
        let todo_coll = mongo_client.database(db_name).collection(coll_name);

        TodoManager{coll: todo_coll}
    }
....
Most importantly, TodoManager has methods to help manage todos. Let's go over them one by one.
The add_todo method takes in a todo description provided by the user and creates an instance of Todo struct, which looks like below. The serde framework is used to map (serialize/de-serialize) BSON data into instances of Todo structs. Notice how serde field attributes are used to customize the serialization/de-serialzation process. For example, todo_id field in the Todo struct is an ObjectId and it is stored in MongoDB as _id.
#[derive(Serialize, Deserialize)]
struct Todo {
    #[serde(rename = "_id", skip_serializing_if = "Option::is_none")]
    todo_id: Option<bson::oid::ObjectId>,
    #[serde(rename = "description")]
    desc: String,
    status: String,
}
Collection.insert_one accepts a Document representing the todo details to be added. Note that the conversion from Todo to a Document is a two-step process, achieved using a combination of to_bson and as_document.
fn add_todo(self, desc: &str) {
    let new_todo = Todo {
        todo_id: None,
        desc: String::from(desc),
        status: String::from(TODO_PENDING_STATUS),
    };

    let todo_doc = mongodb::bson::to_bson(&new_todo).expect("struct to BSON conversion failed").as_document().expect("BSON to Document conversion failed").to_owned();

    let r = self.coll.insert_one(todo_doc, None).expect("failed to add todo");
    println!("inserted todo with id = {}", r.inserted_id);
}
Collection.find is used to get the retrieve all the todos or filters them based on the user provided status (pending or completed). Note how in the while loop, each Document obtained as a result of the search is converted into a Todo struct using bson::from_bson. This is the opposite of what was done in the add_todo method.
fn list_todos(self, status_filter: &str) {
    let mut filter = doc!{};
    if status_filter == TODO_PENDING_STATUS ||  status_filter == TODO_COMPLETED_STATUS{
        println!("listing '{}' todos",status_filter);
        filter = doc!{"status": status_filter}
    } else if status_filter != "all" {
        panic!(INVALID_FILTER_ERR_MSG)
    }

    let mut todos = self.coll.find(filter, None).expect("failed to find todos");

    while let Some(result) = todos.next() {
        let todo_doc = result.expect("todo not present");
        let todo: Todo = bson::from_bson(Bson::Document(todo_doc)).expect("BSON to struct conversion failed");
        println!("todo_id: {} | description: {} | status: {}", todo.todo_id.expect("todo id missing"), todo.desc, todo.status);
    }
}
A todo status can be updated (from pending to completed or vice versa). The todo is converted to a
bson::oid::ObjectId which then used by theCollection.update_one method to locate the document that needs to be
updated.
fn update_todo_status(self, todo_id: &str, status: &str) {

    if status != TODO_COMPLETED_STATUS && status != TODO_PENDING_STATUS {
        panic!(INVALID_FILTER_ERR_MSG)
    }

    println!("updating todo_id {} status to {}", todo_id, status);

    let id_filter = doc! {"_id": bson::oid::ObjectId::with_string(todo_id).expect("todo_id is not valid ObjectID")};

    let r = self.coll.update_one(id_filter, doc! {"$set": { "status": status }}, None).expect("update failed");
    if r.modified_count == 1 {
        println!("updated status for todo id {}",todo_id);
    } else if r.matched_count == 0 {
        println!("could not update. check todo id {}",todo_id);
    }
}
Deleting a todo is straightforward using the Collection.delete_one method.
fn delete_todo(self, todo_id: &str) {
    println!("deleting todo {}", todo_id);

    let id_filter = doc! {"_id": bson::oid::ObjectId::with_string(todo_id).expect("todo_id is not valid ObjectID")};

    self.coll.delete_one(id_filter, None).expect("delete failed").deleted_count;
}
Clean up resources
When you're done with your app and Azure Cosmos DB account, you can delete the Azure resources you created so you don't incur more charges. To delete the resources:
In the Azure portal Search bar, search for and select Resource groups.
From the list, select the resource group you created for this quickstart.
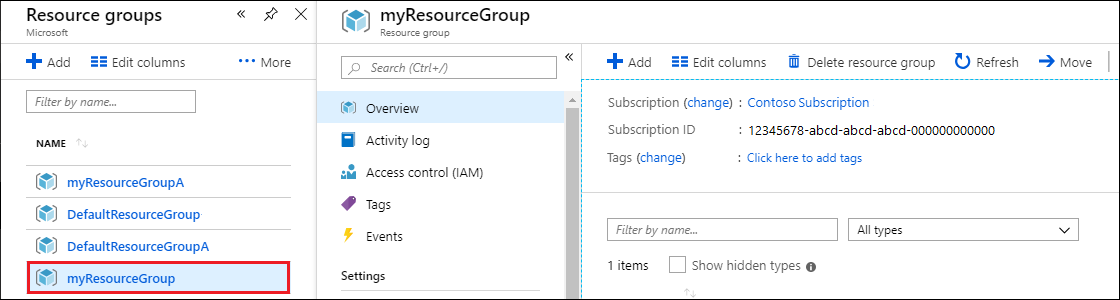
On the resource group Overview page, select Delete resource group.
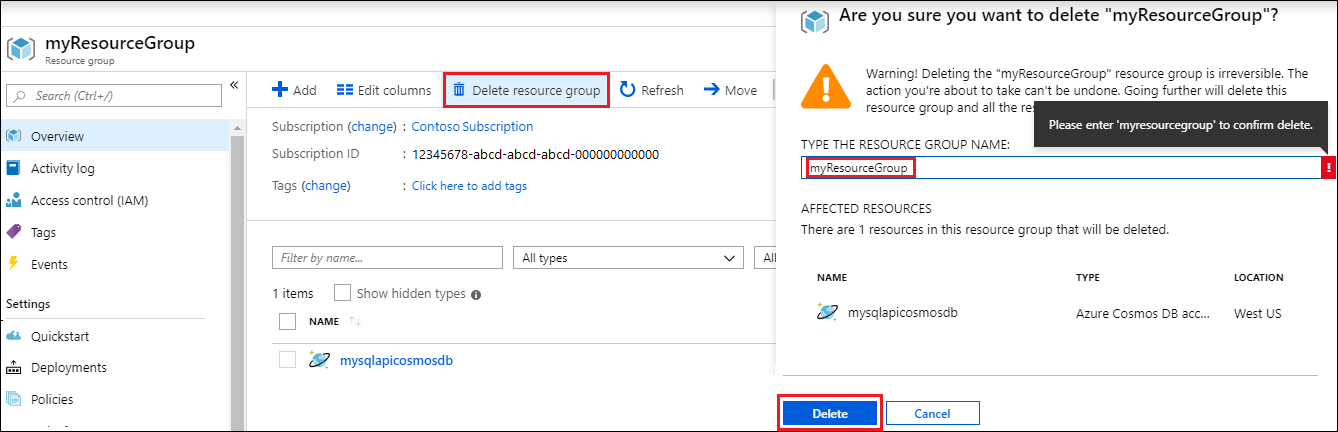
In the next window, enter the name of the resource group to delete, and then select Delete.
Next steps
In this quickstart, you learned how to create an Azure Cosmos DB MongoDB API account using the Azure local Shell, and create and run a Rust command-line app to manage todos. You can now import additional data to your Azure Cosmos DB account.
Trying to do capacity planning for a migration to Azure Cosmos DB? You can use information about your existing database cluster for capacity planning.
- If all you know is the number of vcores and servers in your existing database cluster, read about estimating request units using vCores or vCPUs
- If you know typical request rates for your current database workload, read about estimating request units using Azure Cosmos DB capacity planner