Note
Access to this page requires authorization. You can try signing in or changing directories.
Access to this page requires authorization. You can try changing directories.
Learn how to connect Azure Cosmos DB data to Power BI Desktop, and create insightful reports for actionable business insights.
Important
Synapse Link for Cosmos DB is no longer supported for new projects. Don't use this feature.
Please use Azure Cosmos DB Mirroring for Microsoft Fabric which is now GA. Mirroring provides the same zero-ETL benefits and is fully integrated with Microsoft Fabric.
Connecting
Connect to Azure Cosmos DB from Power BI Desktop by using this option:
- Connect Power BI Desktop to Azure Cosmos DB account with the Azure Cosmos DB connector for Power BI. This option is only available in import mode and consumes request units (RUs) allocated for your transactional workloads.
Note
Publish reports created in Power BI Desktop to PowerBI.com. Direct extraction of Azure Cosmos DB data can't be performed from PowerBI.com.
Prerequisites
Before you follow the instructions in this Power BI tutorial, make sure you have access to these resources:
Create an Azure Cosmos DB database account and add data to your Azure Cosmos DB containers.
To share your reports in PowerBI.com, you need an account in PowerBI.com. To learn more about Power BI and Power BI Pro, see https://powerbi.microsoft.com/pricing.
Building BI reports using Mirroring in Microsoft Fabric
Enable mirroring on your existing Azure Cosmos DB containers to build BI reports or dashboards on this data in near real time.
Building BI reports using Azure Synapse Link
You can enable Azure Synapse Link on your existing Azure Cosmos DB containers and build BI reports on this data, in just a few select using Azure Cosmos DB portal. Power BI connects to Azure Cosmos DB using Direct Query mode, letting you query live Azure Cosmos DB data without impacting transactional workloads.
To build a Power BI report/dashboard:
Sign in to the Azure portal and navigate to your Azure Cosmos DB account.
From the Integrations section, open the Power BI pane and select Get started.
Note
This option is currently available only for API for NoSQL accounts. You can create T-SQL views directly in Synapse serverless SQL pools and build BI dashboards for Azure Cosmos DB for MongoDB. For more information, see Use Power BI and serverless Synapse SQL pool to analyze Azure Cosmos DB data with Synapse.
From the Enable Azure Synapse Link tab, you can enable Azure Synapse Link on your account from Enable Azure Synapse Link for this account section. If Azure Synapse Link is already enabled for your account, you can't see this tab. This step is a prerequisite to start enabling Azure Synapse Link on your containers.
Note
Enabling Azure Synapse Link has cost implications. For more information, see Azure Synapse Link pricing.
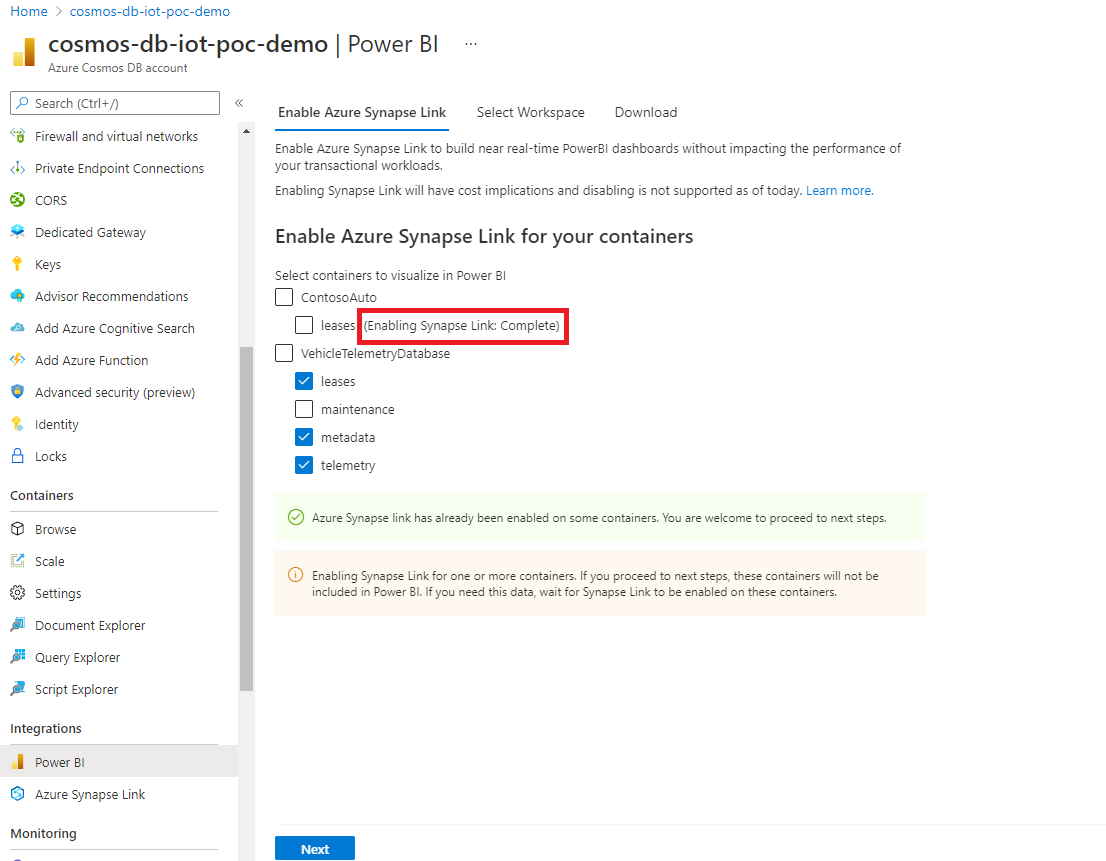
Next from the Enable Azure Synapse Link for your containers section, choose the required containers to enable Azure Synapse Link.
If you already enabled Azure Synapse Link on some containers, you see the checkbox next to the container name is selected. You might optionally deselect them, based on the data you'd like to visualize in Power BI.
If Azure Synapse Link isn't enabled, you can enable this feature on your existing containers. If enabling Azure Synapse Link is in progress on any of the containers, the data from those containers isn't included. You should come back to this tab later and import data when the containers are enabled.

Depending on the amount of data in your containers, it might take a while to enable Azure Synapse Link. To learn more, see enable Azure Synapse Link on existing containers article.
You can check the progress in the portal as shown in the following screen. Containers are enabled with Azure Synapse Link when the progress reaches 100%.
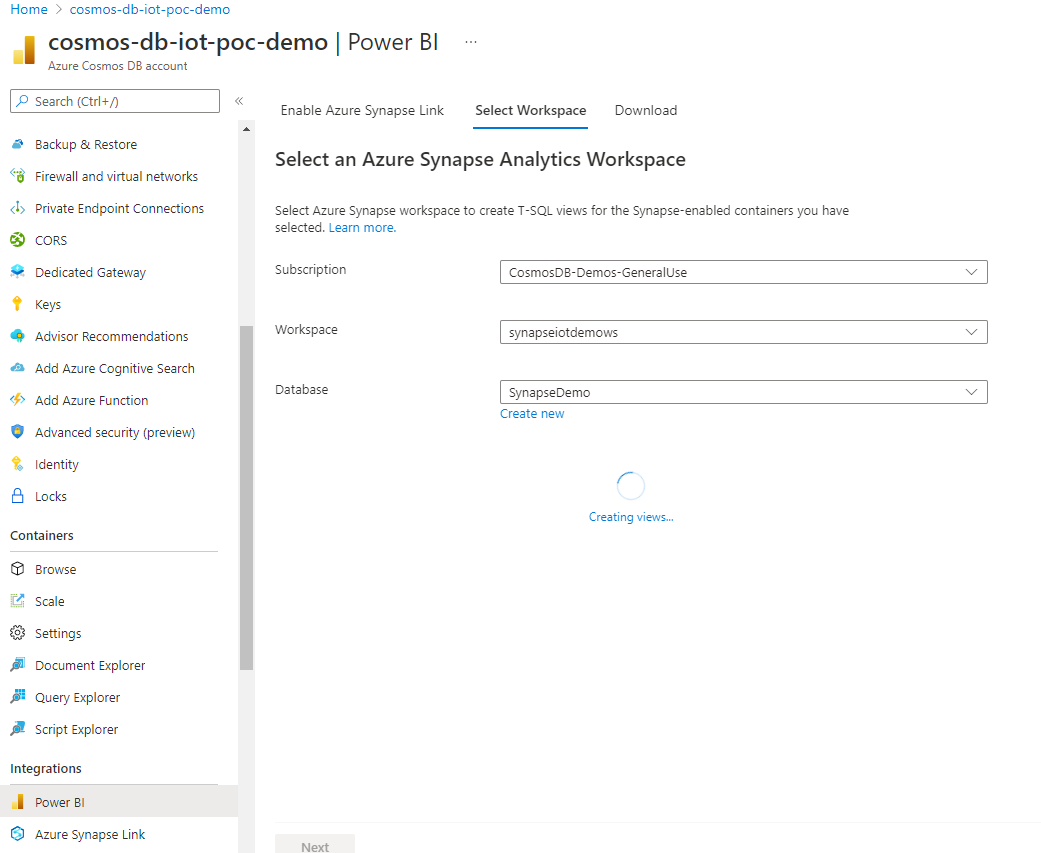
From the Select workspace tab, choose the Azure Synapse Analytics workspace and select Next. This step automatically creates T-SQL views in Synapse Analytics, for the containers selected earlier. For more information on T-SQL views required to connect your Azure Cosmos DB to Power BI, see Prepare views article.
Note
Your Azure Cosmos DB container proprieties are represented as columns in T-SQL views, including deep nested JSON data. This representation is a quick start for your BI dashboards. These views are available in your Synapse workspace/database; you can also use these exact same views in Synapse Workspace for data exploration, data science, or data engineering. Advanced scenarios might demand more complex views or fine tuning of these views, for better performance. For more information. see best practices for Azure Synapse Link when using Synapse serverless SQL pools article.
Choose an existing workspace or create a new one. To select an existing workspace, provide the Subscription, Workspace, and the Database details. Azure portal uses your Microsoft Entra credentials to automatically connect to your Synapse workspace and create T-SQL views. Make sure you have "Synapse administrator" permissions to this workspace.
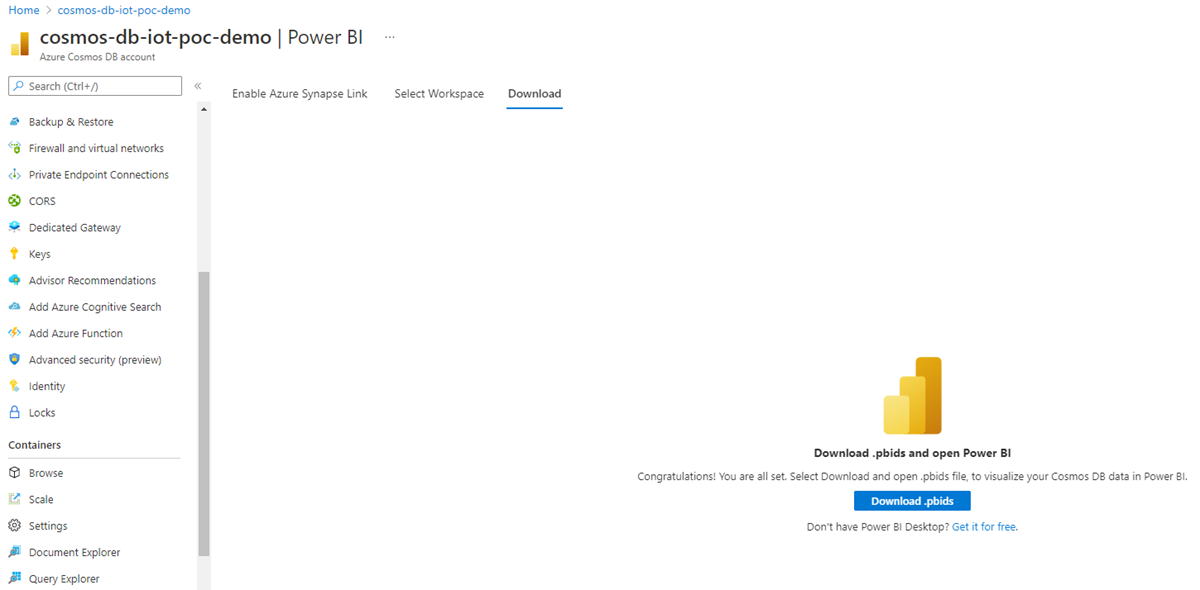
Next, select Download .pbids to download the Power BI data source file. Open the downloaded file. It contains the required connection information and opens Power BI desktop.
You can now connect to Azure Cosmos DB data from Power BI desktop. A list of T-SQL views corresponding to the data in each container are displayed.
For example, the following screen shows vehicle fleet data. You can load this data for further analysis or transform it before loading.
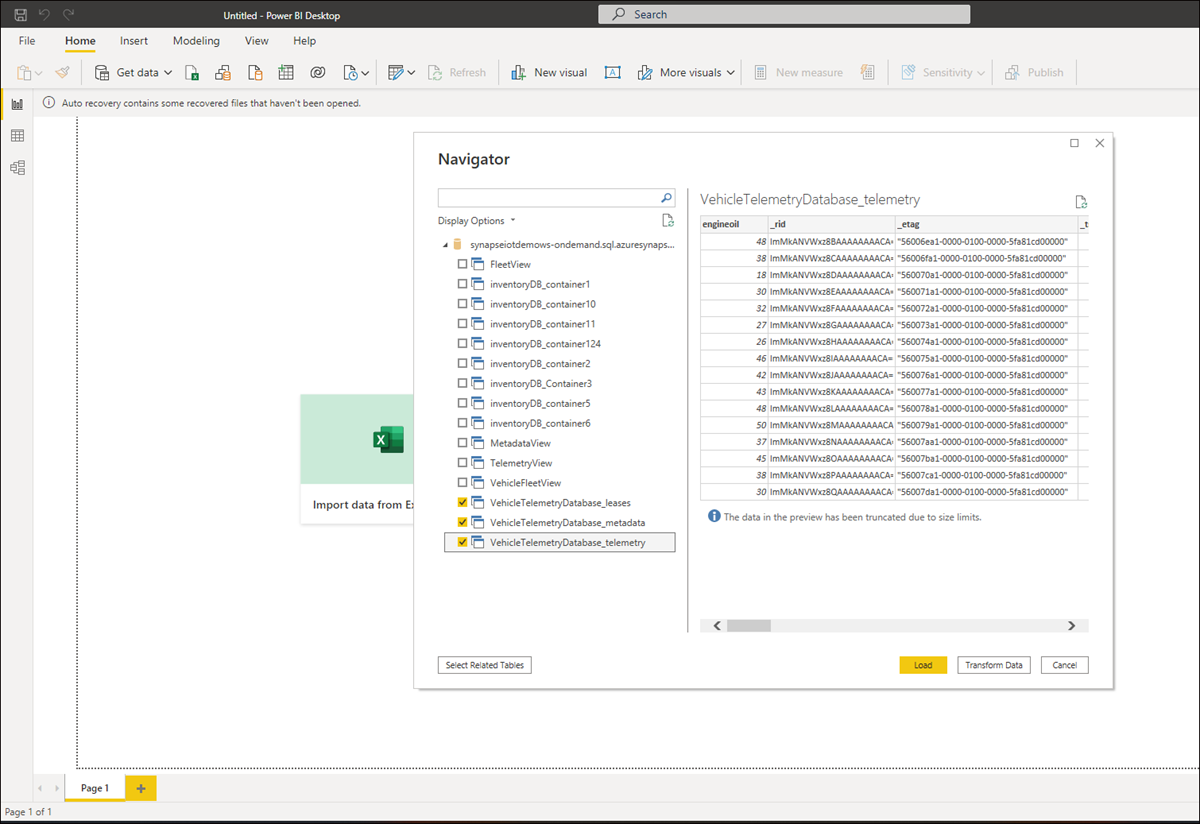
You can now start building the report using Azure Cosmos DB's analytical data. Any changes to your data aren't reflected in the report, as soon as the data is replicated to analytical store, which typically happens in a couple of minutes.


Building BI reports using Power BI connector
Connecting to Azure Cosmos DB with the Power BI connector is currently supported for Azure Cosmos DB for NoSQL and API for Gremlin accounts only.
Run Power BI Desktop.
You can Get Data, see Recent Sources, or Open Other Reports directly from the welcome screen. Close the screen by selecting the "X" option. The Report view of Power BI Desktop is displayed.

Select the Home ribbon, then select on Get Data. The Get Data window should appear.
Select on Azure, select Azure Cosmos DB (Beta), and then select Connect.

On the Preview Connector page, select Continue. The Azure Cosmos DB window appears.
Specify the Azure Cosmos DB account endpoint URL you would like to retrieve the data from, and then select OK. To use your own account, you can retrieve the URL from the URI box in the Keys section of the Azure portal. Optionally you can provide the database name, collection name or use the navigator to select the database and collection to identify where the data comes from.
If you're connecting to this endpoint for the first time, you're prompted for the account credentials.
When the account is successfully connected, the Navigator pane appears. The Navigator shows a list of databases under the account.
Select and expand on the database where the data for the report comes from. Now, select a collection that contains the data to retrieve.
The Preview pane shows a list of Record items. A Document is represented as a Record type in Power BI. Similarly, a nested JSON block inside a document is also a Record. To view the properties documents as columns, select the grey button with two arrows in opposite directions that symbolize the expansion of the record.
Power BI Desktop Report view is where you can start creating reports to visualize data. Create reports by dragging and dropping fields into the Report canvas.
There are two ways to refresh data: unplanned and scheduled. Select Refresh Now to refresh the data. Check Power BI documentation for more information about the scheduled refresh option.
Known issues and limitations
For partitioned Azure Cosmos DB containers, a SQL query with an aggregate function is passed to Azure Cosmos DB if the query contains a filter (
WHEREclause) on the partition key. If the aggregate query doesn't include a filter on the partition key, the connector performs the aggregation.The connector doesn't pass an aggregate function when it follows
TOPorLIMIT.Azure Cosmos DB processes the TOP operation at the end when processing a query. For example, in the following query, TOP is applied in the subquery, while the aggregate function is applied on top of that result set:
SELECT COUNT(1) FROM (SELECT TOP 4 - FROM EMP) EIf
DISTINCTis included in an aggregate function, the connector doesn't pass the aggregate function to Azure Cosmos DB.DISTINCTin an aggregate function isn't supported Azure Cosmos DB for NoSQL.For the
SUMaggregate function, Azure Cosmos DB returns undefined if any arguments in SUM are string, boolean, or null. If there are null values, the connector passes the query to Azure Cosmos DB to replace null values with zero during the SUM calculation.For the
AVGaggregate function, Azure Cosmos DB returns undefined as result set if any of the arguments in SUM are string, boolean, or null. The connector exposes a connection property to disable passing down the AVG aggregate function to Azure Cosmos DB in case this default Azure Cosmos DB behavior needs to be overridden. WhenAVGpass down is disabled, it isn't passed down to Azure Cosmos DB, and the connector handles performing the AVG aggregation operation itself. For more information, go to "EnableAVERAGEfunction Pass down" in Advanced options.Azure Cosmos DB containers with large partition keys aren't supported in the connector.
Aggregation pass down is disabled for the following syntax due to server limitations:
The query isn't filtering on a partition key or when the partition key filter uses the
ORoperator with another predicate at the top level in theWHEREclause.The query has one or more partition keys appear in an
IS NOT NULLclause in theWHEREclause.
The V2 connector doesn't support complex data types like arrays, objects, and hierarchical structures.
The V2 connector uses sampling of the first 1,000 documents to come up with the inferred schema. This approach isn't recommended for schema evolution scenarios where only some documents are updated. As an example, a newly added property to one document in a container with thousands of documents might not be included in the inferred schema.
The V2 connector doesn't support nonstring values in object properties.
Filter pass down is disabled for the following syntax because of server limitations:
- When the query containing one or more aggregate columns is referenced in the
WHEREclause
- When the query containing one or more aggregate columns is referenced in the
Related content
- Learn more about Power BI in Get started with Power BI.
- Learn more about Azure Cosmos DB on the Azure Cosmos DB documentation landing page.