Note
Access to this page requires authorization. You can try signing in or changing directories.
Access to this page requires authorization. You can try changing directories.
APPLIES TO:  Azure Data Factory
  Azure Synapse Analytics
By using Azure Private Link, you can connect to various platform as a service (PaaS) deployments in Azure via a private endpoint. A private endpoint is a private IP address within a specific virtual network and subnet. For a list of PaaS deployments that support Private Link functionality, see Private Link documentation.
Secure communication between customer networks and Data Factory
You can set up an Azure virtual network as a logical representation of your network in the cloud. Doing so provides the following benefits:
- You help protect your Azure resources from attacks in public networks.
- You let the networks and data factory securely communicate with each other.
You can also connect an on-premises network to your virtual network. Set up an Internet Protocol security VPN connection, which is a site-to-site connection. Or set up an Azure ExpressRoute connection. which is a private peering connection.
You can also install a self-hosted integration runtime (IR) on an on-premises machine or a virtual machine in the virtual network. Doing so lets you:
- Run copy activities between a cloud data store and a data store in a private network.
- Dispatch transform activities against compute resources in an on-premises network or an Azure virtual network.
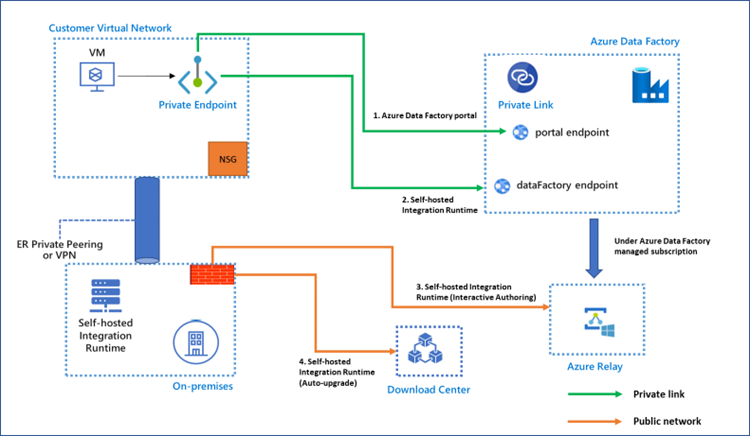
Several communication channels are required between Azure Data Factory and the customer virtual network, as shown in the following table:
| Domain | Port | Description |
|---|---|---|
adf.azure.cn |
443 | The Data Factory portal is required by Data Factory authoring and monitoring. |
*.{region}.datafactory.azure.cn |
443 | Required by the self-hosted IR to connect to Data Factory. |
*.servicebus.chinacloudapi.cn |
443 | Required by the self-hosted IR for interactive authoring. |
download.microsoft.com |
443 | Required by the self-hosted IR for downloading the updates. |
Note
Disabling public network access applies only to the self-hosted IR, not to Azure IR and SQL Server Integration Services IR.
The communications to Data Factory go through Private Link and help provide secure private connectivity.

Enabling Private Link for each of the preceding communication channels offers the following functionality:
Supported:
- You can author and monitor in the Data Factory portal from your virtual network, even if you block all outbound communications. If you create a private endpoint for the portal, others can still access the Data Factory portal through the public network.
- The command communications between the self-hosted IR and Data Factory can be performed securely in a private network environment. The traffic between the self-hosted IR and Data Factory goes through Private Link.
Not currently supported:
- Interactive authoring that uses a self-hosted IR, such as test connection, browse folder list and table list, get schema, and preview data, goes through Private Link. Please notice that the traffic goes through private link if the self-contained interactive authoring is enabled. See Self-contained Interactive Authoring.
Note
Both "Get IP" and "Send log" are not supported when self-contained interactive authoring is enabled.
- The new version of the self-hosted IR that can be automatically downloaded from Microsoft Download Center if you enable auto-update isn't supported at this time.
For functionality that isn't currently supported, you need to configure the previously mentioned domain and port in the virtual network or your corporate firewall.
Connecting to Data Factory via private endpoint is only applicable to self-hosted IR in Data Factory. It isn't supported for Azure Synapse Analytics.
Warning
If you enable Private Link Data Factory and block public access at the same time, store your credentials in Azure Key Vault to ensure they're secure.
Configure private endpoint for communication between self-hosted IR and Data Factory
This section describes how to configure the private endpoint for communication between self-hosted IR and Data Factory.
Create a private endpoint and set up a private link for Data Factory
The private endpoint is created in your virtual network for the communication between self-hosted IR and Data Factory. Follow the steps in Set up a private endpoint link for Data Factory.
Make sure the DNS configuration is correct
Follow the instructions in DNS changes for private endpoints to check or configure your DNS settings.
Put FQDNs of Azure Relay and Download Center into the allowed list of your firewall
If your self-hosted IR is installed on the virtual machine in your virtual network, allow outbound traffic to below FQDNs in the NSG of your virtual network.
If your self-hosted IR is installed on the machine in your on-premises environment, allow outbound traffic to below FQDNs in the firewall of your on-premises environment and NSG of your virtual network.
| Domain | Port | Description |
|---|---|---|
*.servicebus.chinacloudapi.cn |
443 | Required by the self-hosted IR for interactive authoring. |
download.microsoft.com |
443 | Required by the self-hosted IR for downloading the updates |
If you don't allow the preceding outbound traffic in the firewall and NSG, self-hosted IR is shown with a Limited status. But you can still use it to execute activities. Only interactive authoring and auto-update don't work.
Note
If one data factory (shared) has a self-hosted IR and the self-hosted IR is shared with other data factories (linked), you only need to create a private endpoint for the shared data factory. Other linked data factories can leverage this private link for the communications between self-hosted IR and Data Factory.
Note
We do not currently support establishing a private link between a self-hosted integration runtime and a Synapse Analytics workspace. And the self-hosted integration runtime can still communicate with Synapse even when data exfiltration protection is enabled on the Synapse workspace.
DNS changes for private endpoints
When you create a private endpoint, the DNS CNAME resource record for the data factory is updated to an alias in a subdomain with the prefix privatelink. By default, we also create a private DNS zone, corresponding to the privatelink subdomain, with the DNS A resource records for the private endpoints.
When you resolve the data factory endpoint URL from outside the virtual network with the private endpoint, it resolves to the public endpoint of Data Factory. When resolved from the virtual network hosting the private endpoint, the storage endpoint URL resolves to the private endpoint's IP address.
For the preceding illustrated example, the DNS resource records for the data factory called DataFactoryA, when resolved from outside the virtual network hosting the private endpoint, will be:
| Name | Type | Value |
|---|---|---|
| DataFactoryA.{region}.datafactory.azure.cn | CNAME | < Data Factory public endpoint > |
| < Data Factory public endpoint > | A | < Data Factory public IP address > |
The DNS resource records for DataFactoryA, when resolved in the virtual network hosting the private endpoint, will be:
| Name | Type | Value |
|---|---|---|
| DataFactoryA.{region}.datafactory.azure.cn | CNAME | DataFactoryA.{region}.privatelink.datafactory.azure.cn |
| DataFactoryA.{region}.privatelink.datafactory.azure.cn | A | < private endpoint IP address > |
If you're using a custom DNS server on your network, clients must be able to resolve the FQDN for the data factory endpoint to the private endpoint IP address. You should configure your DNS server to delegate your Private Link subdomain to the private DNS zone for the virtual network. Or you can configure the A records for DataFactoryA.{region}.datafactory.azure.cn with the private endpoint IP address.
Note
Currently, there's only one Data Factory portal endpoint, so there's only one private endpoint for the portal in a DNS zone. Attempting to create a second or subsequent portal private endpoint overwrites the previously created private DNS entry for portal.
Set up a private endpoint link for Data Factory
In this section, you'll set up a private endpoint link for Data Factory.
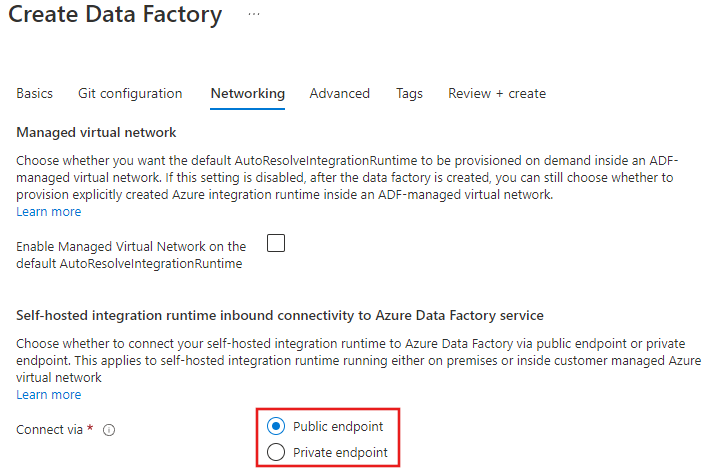
You can choose whether to connect your self-hosted IR to Data Factory by selecting Public endpoint or Private endpoint during the Data Factory creation step, shown here:

You can change the selection any time after creation from the Data Factory portal page on the Networking pane. After you enable Private endpoint there, you must also add a private endpoint to the data factory.
A private endpoint requires a virtual network and subnet for the link. In this example, a virtual machine within the subnet is used to run the self-hosted IR, which connects via the private endpoint link.
Create a virtual network
If you don't have an existing virtual network to use with your private endpoint link, you must create one and assign a subnet.
Sign in to the Azure portal.
In the upper-left corner of the screen, select Create a resource > Networking > Virtual network or search for Virtual network in the search box.
In Create virtual network, enter or select this information on the Basics tab:
Setting Value Project details Subscription Select your Azure subscription. Resource group Select a resource group for your virtual network. Instance details Name Enter a name for your virtual network. Region Important: Select the same region your private endpoint uses. Select the IP Addresses tab or select Next: IP Addresses at the bottom of the page.
On the IP Addresses tab, enter this information:
Setting Value IPv4 address space Enter 10.1.0.0/16. Under Subnet name, select the word default.
In Edit subnet, enter this information:
Setting Value Subnet name Enter a name for your subnet. Subnet address range Enter 10.1.0.0/24. Select Save.
Select the Review + create tab or select the Review + create button.
Select Create.
Create a virtual machine for the self-hosted IR
You must also create or assign an existing virtual machine to run the self-hosted IR in the new subnet created in the preceding steps.
In the upper-left corner of the portal, select Create a resource > Compute > Virtual machine or search for Virtual machine in the search box.
In Create a virtual machine, enter or select the values on the Basics tab:
Setting Value Project details Subscription Select your Azure subscription. Resource group Select a resource group. Instance details Virtual machine name Enter a name for the virtual machine. Region Select the region you used for your virtual network. Availability options Select No infrastructure redundancy required. Image Select Windows Server 2019 Datacenter - Gen1, or any other Windows image that supports the self-hosted IR. Azure spot instance Select No. Size Choose the VM size or use the default setting. Administrator account Username Enter a username. Password Enter a password. Confirm password Reenter the password. Select the Networking tab, or select Next: Disks > Next: Networking.
On the Networking tab, select or enter:
Setting Value Network interface Virtual network Select the virtual network you created. Subnet Select the subnet you created. Public IP Select None. NIC network security group Basic. Public inbound ports Select None. Select Review + create.
Review the settings, and then select Create.
Note
Azure provides a default outbound access IP for VMs that either aren't assigned a public IP address or are in the backend pool of an internal basic Azure load balancer. The default outbound access IP mechanism provides an outbound IP address that isn't configurable.
The default outbound access IP is disabled when one of the following events happens:
- A public IP address is assigned to the VM.
- The VM is placed in the backend pool of a standard load balancer, with or without outbound rules.
- An Azure Virtual Network NAT gateway resource is assigned to the subnet of the VM.
VMs that you create by using virtual machine scale sets in flexible orchestration mode don't have default outbound access.
For more information about outbound connections in Azure, see Default outbound access in Azure and Use Source Network Address Translation (SNAT) for outbound connections.
Create a private endpoint
Finally, you must create a private endpoint in your data factory.
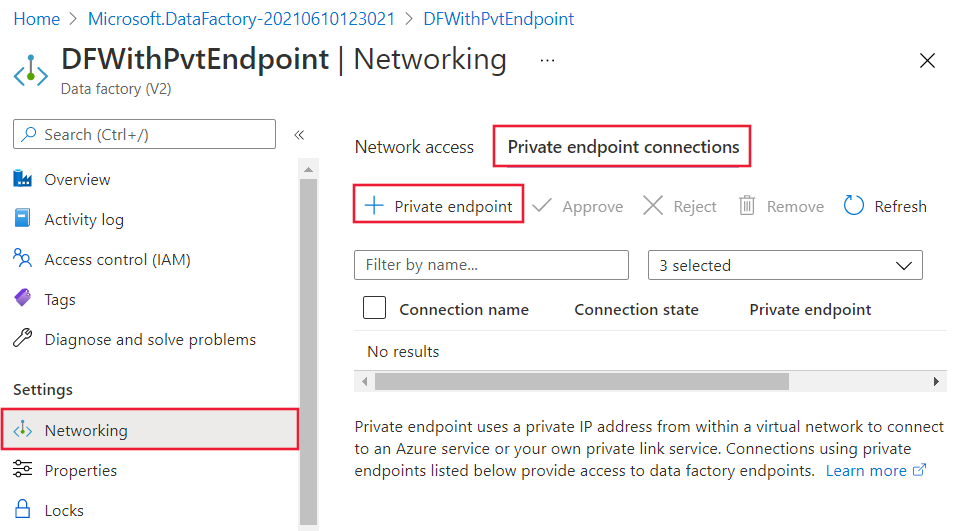
On the Azure portal page for your data factory, select Networking > Private endpoint connections and then select + Private endpoint.

On the Basics tab of Create a private endpoint, enter or select this information:
Setting Value Project details Subscription Select your subscription. Resource group Select a resource group. Instance details Name Enter a name for your endpoint. Region Select the region of the virtual network you created. Select the Resource tab or the Next: Resource button at the bottom of the screen.
In Resource, enter or select this information:
Setting Value Connection method Select Connect to an Azure resource in my directory. Subscription Select your subscription. Resource type Select Microsoft.Datafactory/factories. Resource Select your data factory. Target sub-resource If you want to use the private endpoint for command communications between the self-hosted IR and Data Factory, select datafactory as Target sub-resource. If you want to use the private endpoint for authoring and monitoring the data factory in your virtual network, select portal as Target sub-resource. Select the Configuration tab or the Next: Configuration button at the bottom of the screen.
In Configuration, enter or select this information:
Setting Value Networking Virtual network Select the virtual network you created. Subnet Select the subnet you created. Private DNS integration Integrate with private DNS zone Leave the default of Yes. Subscription Select your subscription. Private DNS zones Leave the default value in both Target sub-resources: 1. datafactory: (New) privatelink.datafactory.azure.cn. 2. portal: (New) privatelink.adf.azure.cn. Select Review + create.
Select Create.
Known issue
You're unable to access each PaaS resource when both sides are exposed to Private Link and a private endpoint. This issue is a known limitation of Private Link and private endpoints.
For example, customer A is using a private link to access the portal of data factory A in virtual network A. When data factory A doesn't block public access, customer B can access the portal of data factory A in virtual network B via public. But when customer B creates a private endpoint against data factory B in virtual network B, then customer B can't access data factory A via public in virtual network B anymore.