Note
Access to this page requires authorization. You can try signing in or changing directories.
Access to this page requires authorization. You can try changing directories.
Applies to: Azure Information Protection
Relevant for: Azure Information Protection classic client for Windows
If you have Windows 7 or Office 2010, see AIP and legacy Windows and Office versions.
Note
To provide a unified and streamlined customer experience, we are sunsetting the Azure Information Protection classic client and Label Management in the Azure Portal as of March 31, 2021. No further support is provided for the classic client, and maintenance versions will no longer be released.
- The classic client will be fully retired, and will stop functioning, on March 31, 2022.
- As of March 18, 2022, we are also sunsetting the AIP audit log and analytics, with a full retirement date of September 31, 2022.
The content in this article is provided to support customers with extended support only. For more information, see Removed and retired services.
To deploy the AIP classic client, open a support ticket to get download access.
Tip
If are using a different labeling client to the classic client, see the Microsoft 365 Compliance documentation for information about policy settings for sensitivity labels. For example, Learn about sensitivity labels.
In this tutorial, you learn how to:
- Configure policy settings that work together
- See your settings in action
Rather than relying on users to manually label their documents and emails, you can use Azure Information Protection policy settings to:
Ensure a base level of classification for new and edited content
Educate users about labels and make it easy for them to apply the correct label
You can finish this tutorial in about 15 minutes.
To complete this tutorial, you need:
A subscription that includes Azure Information Protection.
The Azure Information Protection pane is added to the Azure portal and you have one or more labels published in the Azure Information Protection global policy.
These steps are covered in the Quickstart: Add Azure Information Protection to the Azure portal and view the policy.
The Azure Information Protection classic client installed on your Windows computer (minimum of Windows 7 with Service Pack 1).
You are signed in to Office apps from one of the following categories:
Office apps, for the versions listed in the table of supported versions for Microsoft 365 Apps by update channel, from Microsoft 365 Apps for Business or Microsoft 365 Business Premium, when the user is assigned a license for Azure Rights Management (also known as Azure Information Protection for Office 365)
Microsoft 365 Apps for Enterprise.
Office Professional Plus 2019.
Office Professional Plus 2016.
Office Professional Plus 2013 with Service Pack 1.
Office Professional Plus 2010 with Service Pack 2.
For a full list of prerequisites to use Azure Information Protection, see Requirements for Azure Information Protection.
Let's get started. Continue with Edit the Azure Information Protection policy.
Note
Azure Information Protection is not currently supported on Microsoft Azure operated by 21Vianet portal. You can achieve the same functionality using the Azure Information Protection PowerShell commands.
Rather than relying on users to manually label their documents and emails, you can use some of the policy settings to ensure a base level of classification.
Using the Azure portal, we'll edit the global policy to change policy settings for all users.
Open a new browser window and sign in to the Azure portal as a global admin. Then navigate to Azure Information Protection.
For example, in the search box for resources, services, and docs: Start typing Information and select Azure Information Protection.
If you are not the global admin, use the following link for alternative roles: Signing in to the Azure portal
Select Classifications > Policies > Global to open the Policy: Global pane.
Locate the policy settings after the labels, in the Configure settings to display and apply on Information Protection end users section. Your settings might have different values to ones shown:

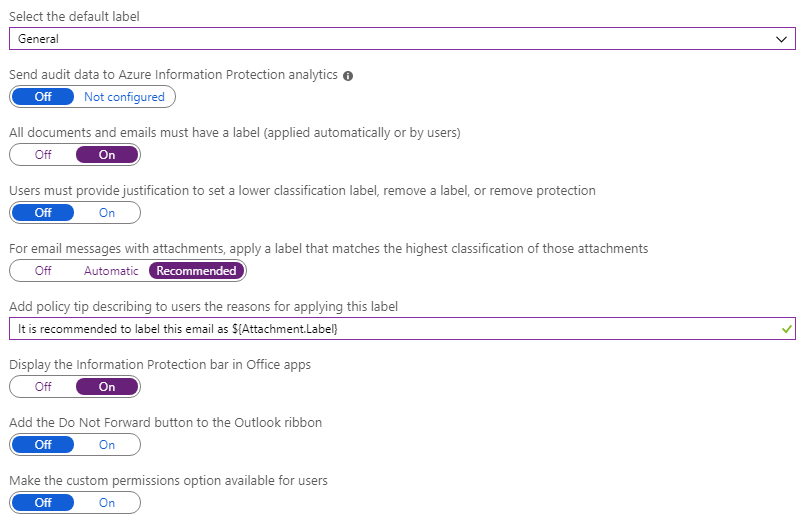
Change your settings to match the value in the following table. Make a note of the settings that you change in case you want to change them back again when you have finished this tutorial.
Setting Value Information Select the default label General The General label is one of the default labels that Azure Information Protection can create for you. This step is covered in the Create and publish labels quickstart. If you don't have a label named General, select another label from the dropdown list. Unlabeled documents and emails will have this label applied automatically as a base classification. However, users can change your selected label to a different one. All documents and emails must have a label On This setting is often referred to as mandatory labeling because it prevents users from saving documents or sending emails that are unlabeled. Together with the default label, documents and emails will have either the default label that you set, or a label that they choose. For email messages with attachments, apply a label that matches the highest classification of those attachments Recommended This setting prompts users to select a higher classification label for their emails when they attach documents that have a higher classification than your selected default label. Display the Information Protection bar in Office apps On Displaying the Information Protection bar makes it easier for users to see and change the default label. The settings should now look like this:
Select Save on this Policy: Global pane, and if you're prompted to confirm your action, select OK.
For this tutorial, we'll use Word and Outlook to see your policy changes in action. If these apps were already loaded before you changed the policy settings, restart them to download the changes.
Open a new document in Word. You see the document is automatically labeled as General rather than relying on users to select a label.
With the Information Protection bar displayed and showing the available labels, it's easy for users to see the currently selected label, and change it if the default label isn't appropriate:

Instead of changing the label, close the Information Protection bar to compare the experience if the bar is not shown:

The General label is still selected, but it's much less obvious. It's also less obvious how to select a different label. To do that, users must select the Protect button:
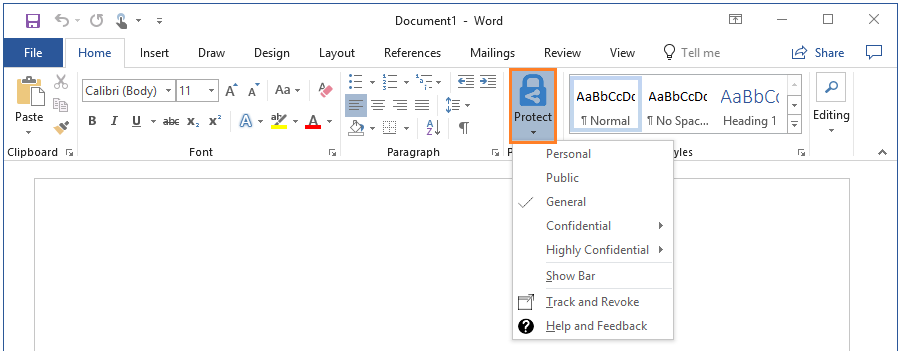
Now, from the pull-down menu, you see that the General label is selected because it has a check mark next to it. To change the currently selected label, users can select a different label from the list. When users are new to labeling, they probably won't remember to select the Protect button each time. They also might not realize that they can select another label.
To display the Information Protection bar again, select Show Bar from the pull-down menu.
Tip
You can select a different default label for Outlook, by configuring an advanced client setting.
You can change the currently selected General label to a different label, but you cannot remove it. Because we changed the All documents and emails must have a label setting to On, the Delete Label icon is not available on the Information Protection bar.
If we hadn't changed that setting, the Information Protection bar shows this icon:
![]()
Together with a default label, mandatory labeling ensures that new and edited documents (and emails) have a base classification of your choosing.
If we hadn't set a default label with the mandatory labeling setting, users are always prompted to select a label when they save an unlabeled document or send an unlabeled email. For many users, these continual prompts can be frustrating and also result in less accurate labeling. For them to be prompted to select a label when they've finished working on a document or email interrupts their workflows, and there's then a temptation for them to select any label at random so they can move onto the next thing they need to do.
For the open Word document, choose a label that has a higher classification than General. For example, one of the sublabels under Confidential, such as Confidential - Anyone (not protected). Save the document locally and give it any name.
Start Outlook and create a new email message. Just as we saw with Word, the new email message is automatically labeled as General and the Information Protection bar is displayed.
Add the Word document you just labeled as an attachment to the email message. You see a prompt to change the email label to the Confidential label that matches the Word attachment. You can accept the recommendation or dismiss it:
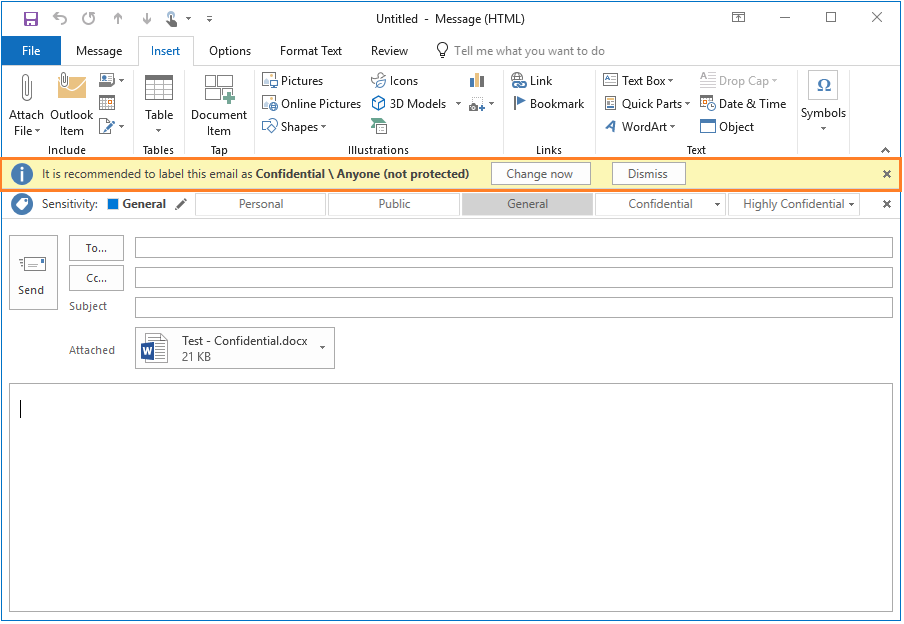
If you click Dismiss, the new label is not applied but you see how the email is still labeled with the default label that we configured, General. The available labels are still visible to select as an alternative.
If you select Change now, the email is relabeled to the Confidential sublabel. However, users can still change the label before sending the email, by selecting the Edit Label icon:
![]()
The Information Protection bar then displays again, for users to select an alternative label.
Because the label is selected before sending the email, there's no need to actually send the email to see how this policy setting works. You can close the email without sending or saving it.
However, you might want to try repeating this exercise but also attach another document that has a higher classification (a sublabel from the Highly Confidential label). Then, you'll see how the prompt changes to apply the higher classification label. If you test multiple attachments with sublabels that have same parent label, you must configure an advanced client setting to support their ordering in the Azure portal.
Do the following if you don't want to keep the changes that you made in this tutorial:
Select Classifications > Policies > Global to open the Policy: Global pane.
Return the policy settings to their original values that you took a note of, and then select Save.
Restart your Word and Outlook apps to download these changes.
For more information about editing the Azure Information Protection policy settings, see How to configure the policy settings for Azure Information Protection.
The policy settings that we changed helped to ensure a base level of classification, as well as encourage users to select an appropriate label. The next step is to augment this strategy by inspecting the contents of documents and emails, and then recommending or automatically applying an appropriate label. You do this by configuring labels for conditions. To learn more, see How to configure conditions for automatic and recommended classification for Azure Information Protection.