Note
Access to this page requires authorization. You can try signing in or changing directories.
Access to this page requires authorization. You can try changing directories.
Applies to: Azure Logic Apps (Consumption + Standard)
To help your workflow quickly find the correct business-to-business (B2B) artifacts to use at runtime, you can add custom metadata as key-value pairs to artifacts such as trading partners, agreements, schemas, and maps. Custom metadata for artifacts help you accomplish the following goals or tasks:
- Enforce naming conventions.
- Support reuse and avoid duplicate definitions.
- Route payloads to the correct encode or decode steps.
- Provide more control over moving artifacts through development, test, and production.
- Apply the correct validation or transformation without hardcoded logic.
- Facilitate tracking, traceability, governance, and auditing.
- Ease migration from BizTalk Server to Azure Logic Apps.
The following list describes example useful metadata, based on artifact type:
| Artifact | Metadata |
|---|---|
| Partner | - Business identity such as AS2, X12, or EDIFACT - Trading name - Contact and support information - Certificate thumbprints - Allowed protocols - Expected acknowledgments such as MDN, TA1, or 997 |
| Agreement | - Host and guest partners - Encryption or signature policies - Retry and timeout rules - Content type - Batching settings - Acknowledgment behavior |
| Schemas and maps | - Message type - Version - Namespace - Source control URL - Change notes - Compatibility matrix for which agreements or workflows consume these artifacts |
For tracking purposes and feeding B2B tracking tables or dashboards, useful metadata includes correlation properties such as interchange number, group number, transaction set ID as well as workflow run ID, partner and agreement IDs, status, and timestamps.
This guide shows how to add metadata to an artifact in an integration account, find the artifact using the Integration Account built-in action named Integration account artifact lookup, and reference the artifact metadata in your workflow.
Prerequisites
An Azure account and subscription. Get a Azure account.
The logic app resource and workflow where you want to get and use the artifact metadata.
Your workflow can start with any trigger and needs an action that works with the metadata after retrieval. This example uses the Request trigger named When an HTTP request is received, which can dynamically pass in the artifact name from an incoming HTTPS request.
For more information, see:
An integration account resource that contains the artifacts where you want to add metadata.
You can add custom metadata to the following artifacts:
This guide's example uses a partner artifact named TradingPartner1.
Both your integration account and logic app resource must exist in the same Azure subscription and Azure region.
Before you start working with the Integration account artifact lookup action, you must link your Consumption logic app or link your Standard logic app to the integration account. You can link an integration account to multiple Consumption or Standard logic app resources to share the same artifacts.
Add metadata to an artifact
Follow these steps to add custom metadata for a B2B artifact in your integration account.
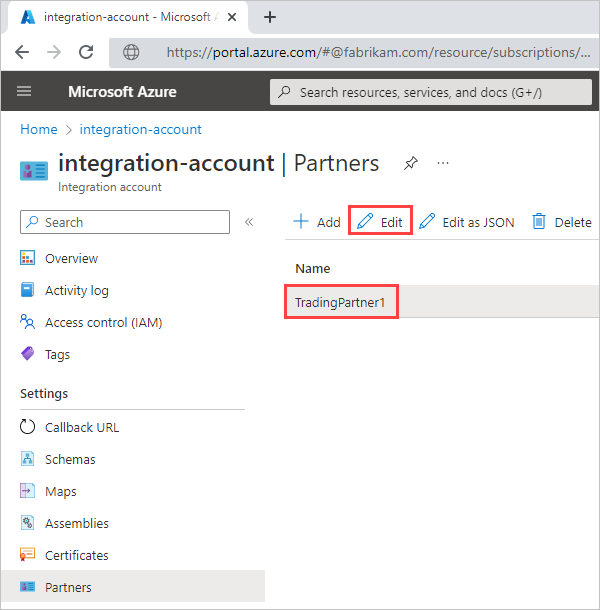
In the Azure portal, go to your integration account resource.
On the resource sidebar, under Settings, select the artifact category.
This example adds metadata to a trading partner artifact, so in this scenario, the example selects Partners.
On the artifact category page, select the artifact, then select Edit.
The following example shows the edit page for a partner artifact named TradingPartner1.
Under Metadata, in the Key and Value columns, enter your custom metadata as a key-value pair. When you're done, select OK.
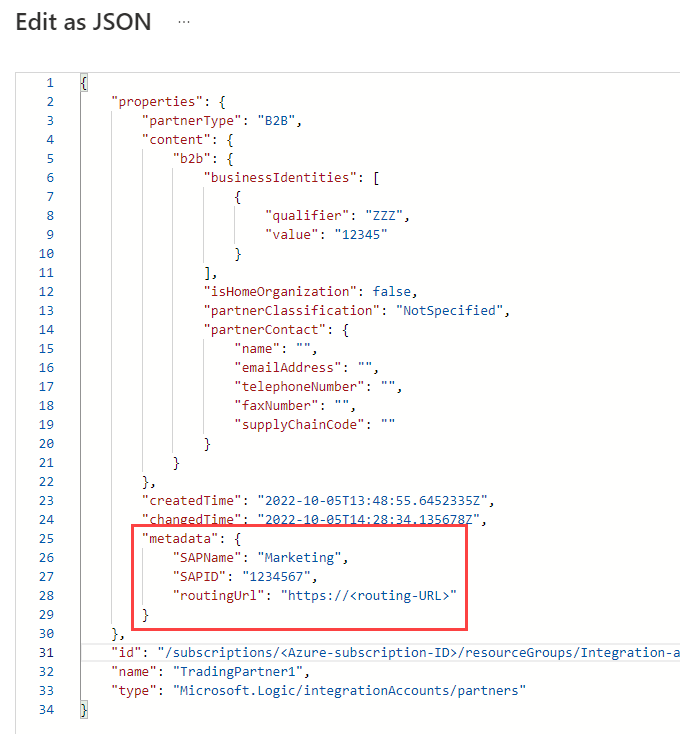
The following example shows sample metadata as key-value pairs:

To view this metadata in the JavaScript Object Notation (JSON) definition for the artifact, next to Edit, select Edit as JSON instead.
Find the artifact
Follow these steps to find the artifact and associated metadata in your integration account. The example looks up a specific trading partner artifact.
In the Azure portal, open your logic app resource. Open the workflow in the designer.
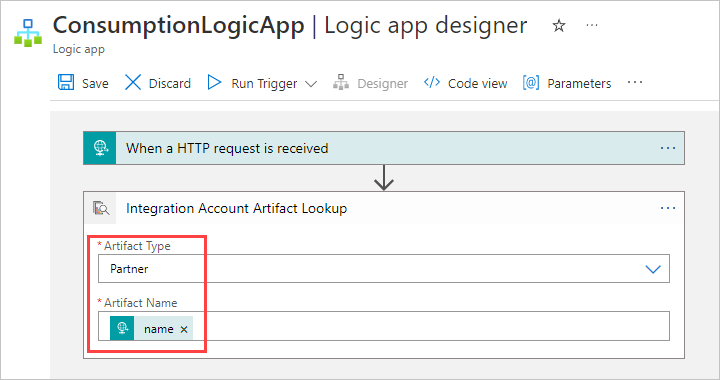
In the designer, follow these general steps to add the Integration Account built-in action named Integration account artifact lookup, which finds the specified artifact and metadata.
Provide the following information for the artifact, based on your workflow type:
Parameter Required Value Description - Consumption: artifactName
- Standard: Artifact nameYes <artifact-name> The artifact name, which you can enter as a hardcoded name or as dynamic output from the trigger or previous action in the workflow. - Consumption: artifactType
- Standard: Artifact typeYes Agreement, Map, Partner, or Schema The artifact type. To provide the artifact name as output from the trigger or previous action, follow these steps:
Select inside the artifactName or Artifact name box, then select the lightning icon to open the dynamic content list.
In the dynamic list, under the trigger or action name, select the output that specifies the artifact name.
For artifactType or Artifact type, select the artifact type. In this example, the type is Partner.
Save your workflow.

Reference artifact metadata in workflow
Follow these steps to use the retrieved artifact metadata in your workflow. The example references the metadata from the retrieved artifact in the previous section.
In the designer, under the Integration account artifact lookup action, follow these general steps to add the action you want.
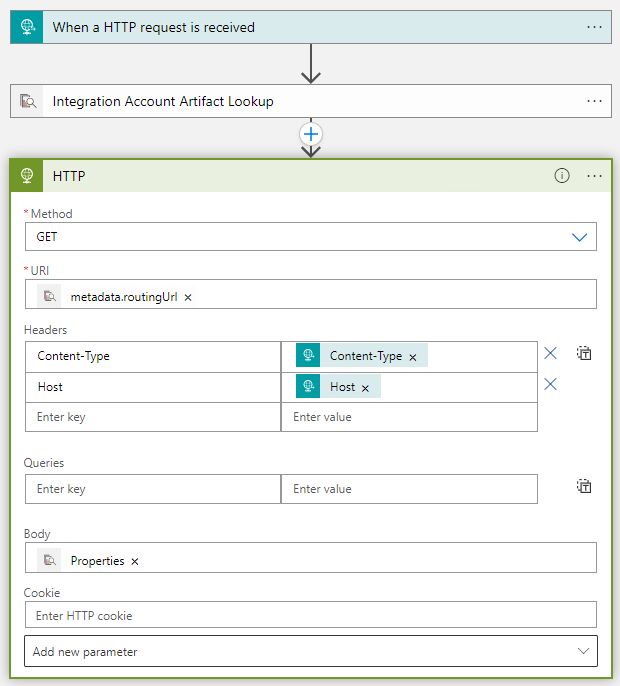
This example continues with the HTTP built-in action, which sends an HTTP request from the workflow to a specified destination.
In the action pane, provide information about how you want to use the artifact metadata.
This example uses the
routingUrlmetadata as the HTTP request destination. The following table specifies sample values for the HTTP action in this example:Parameter Required Value Description Example value URI Yes <destination-URL> The endpoint URL for where you want to send the request. To reference the partner's routingUrlmetadata, follow these steps:
1. Select inside the URI box.
2. Select the function icon to open the expression editor.
3. In the editor, enter an expression like the following example, based on your workflow type:
Consumptionoutputs('Integration_Account_Artifact_Lookup')?['properties']?['metadata']['routingUrl']
Standardoutputs('Integration_account_artifact_lookup')?['properties']?['metadata']['routingUrl']
4. When you're done, select Add.Method Yes <HTTP-method> The HTTP operation to run. This example uses the GET operation. Headers No <header-values> Any header outputs from the trigger to pass through the HTTP action. To pass in the Content-Typevalue from the trigger header, under Headers, follow these steps for the first row:
1. In the first column, enterContent-Typeas the header name.
2. In the second column, use the expression editor to enter the following expression as the header value:triggeroutputs()?['headers']['Content-Type']
To pass in theHostvalue from the trigger header, under Headers, follow these steps for the second row:
1. In the first column, enterHostas the header name.
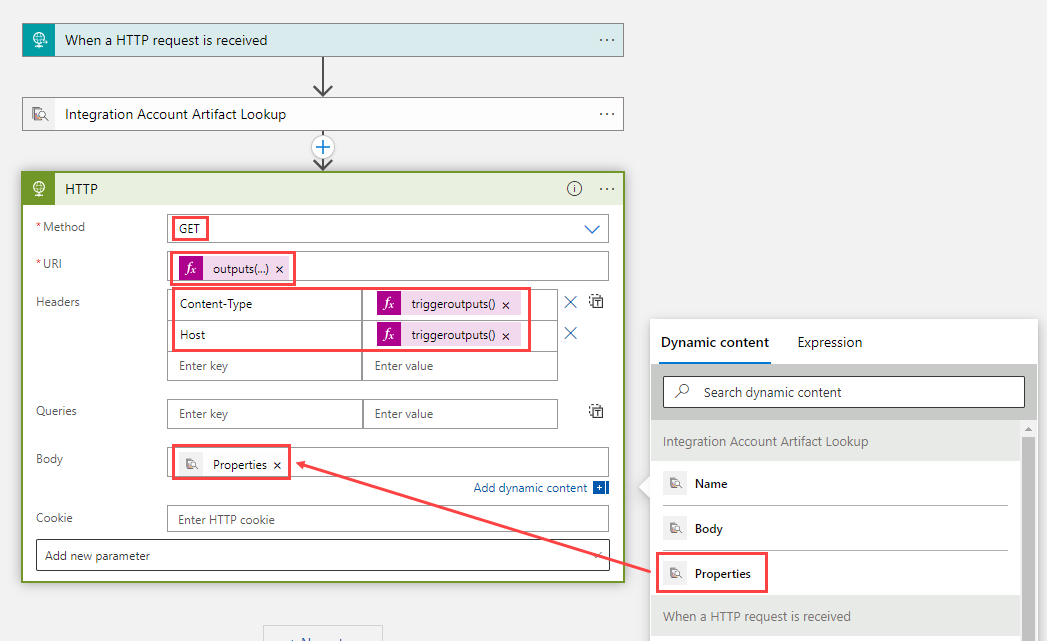
2. In the second column, use the expression editor to enter the following expression as the header value:triggeroutputs()?['headers']['Host']Body No <body-content> Any other content to pass through the HTTP action's bodyproperty.To pass the artifact's propertiesvalues to the HTTP action, follow these steps:
1. Select inside the Body box, then select the lightning icon to open the dynamic content list. If no outputs appear, select See more.
2. From the dynamic content list, under Integration Account Artifact Lookup, select Properties.For the example scenario, the HTTP action uses the following sample values:
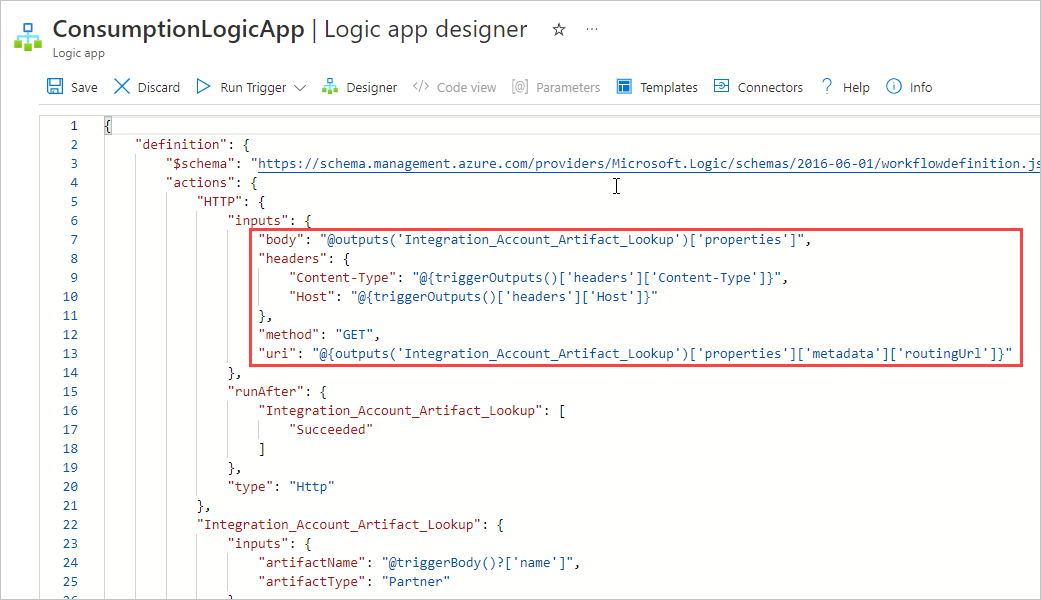
To confirm the information in the HTTP action, view your workflow's underlying JSON definition. On the designer toolbar, select Code view.
The workflow's underlying JSON definition appears, for example:
Return to the designer. On the code view toolbar, select Designer.
Any expressions that you entered in the designer now appear resolved, for example: