Note
Access to this page requires authorization. You can try signing in or changing directories.
Access to this page requires authorization. You can try changing directories.
Images often contain useful information that's relevant in search scenarios. Azure AI Search doesn't query image content in real time, but you can extract information about an image during indexing and make that content searchable. To represent image content in a search index, you can use these approaches:
Vectorize images to represent visual content as a searchable vector.
Analyze images using an image analysis skill to generate a text representation of an image, such as dandelion for a photo of a dandelion, or the color yellow. You can also extract metadata about the image, such as its size.
Use OCR to extract text and from photos or pictures, such as the word STOP in a stop sign.
You can also create a custom skill to invoke any external image processing that you want to provide.
This article focuses on image analysis and OCR, custom skills that provide external processing, working with embedded images, and overlaying visualizations on original images. If verbalization or vectorization is your preferred approach, see Multimodal search instead.
To work with image content in a skillset, you need:
- Source files that include images
- A search indexer, configured for image actions
- A skillset with built-in or custom skills that invoke OCR or image analysis
- A search index with fields to receive the analyzed text output, plus output field mappings in the indexer that establish association
Optionally, you can define projections to accept image-analyzed output into a knowledge store for data mining scenarios.
Set up source files
Image processing is indexer-driven, which means that the raw inputs must be in a supported data source.
- Image analysis supports JPEG, PNG, GIF, and BMP
- OCR supports JPEG, PNG, BMP, and TIF
Images are either standalone binary files or embedded in documents, such as PDF, RTF, or Microsoft application files. A maximum of 1,000 images can be extracted from a given document. If there are more than 1,000 images in a document, the first 1,000 are extracted and then a warning is generated.
Azure Blob Storage is the most frequently used storage for image processing in Azure AI Search. There are three main tasks related to retrieving images from a blob container:
Enable access to content in the container. If you're using a full access connection string that includes a key, the key gives you permission to the content. Alternatively, you can authenticate using a managed identity or connect as a trusted service.
Create a data source of type azureblob that connects to the blob container storing your files.
Review service tier limits to make sure that your source data is under maximum size and quantity limits for indexers and enrichment.
Configure indexers for image processing
After the source files are set up, enable image normalization by setting the imageAction parameter in indexer configuration. Image normalization helps make images more uniform for downstream processing. Image normalization includes the following operations:
- Large images are resized to a maximum height and width to make them uniform.
- For images that have metadata that specifies orientation, image rotation is adjusted for vertical loading.
Note that enabling imageAction (setting this parameter to other than none) will incur an additional charge for image extraction according to Azure AI Search pricing.
Metadata adjustments are captured in a complex type created for each image. You can't opt out of the image normalization requirement. Skills that iterate over images, such as OCR and image analysis, expect normalized images.
Create or update an indexer to set the configuration properties:
{
  "parameters":
  {
    "configuration":
    {
       "dataToExtract": "contentAndMetadata",
       "parsingMode": "default",
       "imageAction": "generateNormalizedImages"
    }
  }
}
Set
dataToExtracttocontentAndMetadata(required).Verify that the
parsingModeis set to default (required).This parameter determines the granularity of search documents created in the index. The default mode sets up a one-to-one correspondence so that one blob results in one search document. If documents are large, or if skills require smaller chunks of text, you can add the Text Split skill that subdivides a document into paging for processing purposes. But for search scenarios, one blob per document is required if enrichment includes image processing.
Set
imageActionto enable thenormalized_imagesnode in an enrichment tree (required):generateNormalizedImagesto generate an array of normalized images as part of document cracking.generateNormalizedImagePerPage(applies to PDF only) to generate an array of normalized images where each page in the PDF is rendered to one output image. For non-PDF files, the behavior of this parameter is similar as if you had setgenerateNormalizedImages. However, settinggenerateNormalizedImagePerPagecan make indexing operation less performant by design (especially for large documents) since several images would have to be generated.
Optionally, adjust the width or height of the generated normalized images:
normalizedImageMaxWidthin pixels. Default is 2,000. Maximum value is 10,000.normalizedImageMaxHeightin pixels. Default is 2,000. Maximum value is 10,000.
The default of 2,000 pixels for the normalized images maximum width and height is based on the maximum sizes supported by the OCR skill and the image analysis skill. The OCR skill supports a maximum width and height of 4,200 for non-English languages, and 10,000 for English. If you increase the maximum limits, processing could fail on larger images depending on your skillset definition and the language of the documents.
Optionally, set file type criteria if the workload targets a specific file type. Blob indexer configuration includes file inclusion and exclusion settings. You can filter out files you don't want.
{
  "parameters" : {
      "configuration" : {
          "indexedFileNameExtensions" : ".pdf, .docx",
          "excludedFileNameExtensions" : ".png, .jpeg"
      }
  }
}
About normalized images
When imageAction is set to a value other than none, the new normalized_images field contains an array of images. Each image is a complex type that has the following members:
| Image member | Description |
|---|---|
| data | BASE64 encoded string of the normalized image in JPEG format. |
| width | Width of the normalized image in pixels. |
| height | Height of the normalized image in pixels. |
| originalWidth | The original width of the image before normalization. |
| originalHeight | The original height of the image before normalization. |
| rotationFromOriginal | Counter-clockwise rotation in degrees that occurred to create the normalized image. A value between 0 degrees and 360 degrees. This step reads the metadata from the image that is generated by a camera or scanner. Usually a multiple of 90 degrees. |
| contentOffset | The character offset within the content field where the image was extracted from. This field is only applicable for files with embedded images. The contentOffset for images extracted from PDF documents is always at the end of the text on the page it was extracted from in the document. This means images appear after all text on that page, regardless of the original location of the image in the page. |
| pageNumber | If the image was extracted or rendered from a PDF, this field contains the page number in the PDF it was extracted or rendered from, starting from 1. If the image isn't from a PDF, this field is 0. |
| boundingPolygon | If the image was extracted or rendered from a PDF, this field contains the coordinates of the bounding polygon that encloses the image on the page. The polygon is represented as a nested array of points, where each point has x and y coordinates normalized to the dimensions of the page. This only applies to images extracted using imageAction: generateNormalizedImages. |
Sample value of normalized_images:
[
  {
    "data": "BASE64 ENCODED STRING OF A JPEG IMAGE",
    "width": 500,
    "height": 300,
    "originalWidth": 5000,
    "originalHeight": 3000,
    "rotationFromOriginal": 90,
    "contentOffset": 500,
    "pageNumber": 2,
    "boundingPolygon": "[[{\"x\":0.0,\"y\":0.0},{\"x\":500.0,\"y\":0.0},{\"x\":0.0,\"y\":300.0},{\"x\":500.0,\"y\":300.0}]]"
  }
]
Bounding polygon data is represented as a string containing a double-nested, JSON-encoded array of polygons. Each polygon is an array of points, where each point has x and y coordinates. Coordinates are relative to the PDF page, with the origin (0, 0) at the upper-left corner.
Currently, images extracted using imageAction: generateNormalizedImages always produce a single polygon, but the double-nested structure is maintained for consistency with skills that support multiple polygons, such as the Azure Content Understanding skill.
Define skillsets for image processing
This section supplements the skill reference articles by providing context for working with skill inputs, outputs, and patterns, as they relate to image processing.
Create or update a skillset to add skills.
Add templates for OCR and image analysis from the Azure portal, or copy the definitions from the skill reference documentation. Insert them into the skills array of your skillset definition.
If necessary, include a Azure AI services resource key in the skillset. Azure AI Search makes calls to a billable Azure AI services resource for OCR and image analysis for transactions that exceed the free limit (20 per indexer per day). Unless you use a keyless connection (preview), the Azure AI services resource must be in the same region as your search service.
If original images are embedded in PDF or application files like PPTX or DOCX, you need to add a Text Merge skill if you want image output and text output together. Working with embedded images is discussed further on in this article.
Once the basic framework of your skillset is created and Azure AI services is configured, you can focus on each individual image skill, defining inputs and source context, and mapping outputs to fields in either an index or knowledge store.
Note
For an example skillset that combines image processing with downstream natural language processing, see REST Tutorial: Use REST and AI to generate searchable content from Azure blobs. It shows how to feed skill imaging output into entity recognition and key phrase extraction.
Inputs for image processing
As noted, images are extracted during document cracking and then normalized as a preliminary step. The normalized images are the inputs to any image processing skill, and are always represented in an enriched document tree in either one of two ways:
/document/normalized_images/*is for documents that are processed whole./document/normalized_images/*/pagesis for documents that are processed in chunks (pages).
Whether you're using OCR and image analysis in the same, inputs have virtually the same construction:
    {
      "@odata.type": "#Microsoft.Skills.Vision.OcrSkill",
      "context": "/document/normalized_images/*",
      "detectOrientation": true,
      "inputs": [
        {
          "name": "image",
          "source": "/document/normalized_images/*"
        }
      ],
      "outputs": [ ]
    },
    {
      "@odata.type": "#Microsoft.Skills.Vision.ImageAnalysisSkill",
      "context": "/document/normalized_images/*",
      "visualFeatures": [ "tags", "description" ],
      "inputs": [
        {
          "name": "image",
          "source": "/document/normalized_images/*"
        }
      ],
      "outputs": [ ]
    }
Map outputs to search fields
In a skillset, Image Analysis and OCR skill output is always text. Output text is represented as nodes in an internal enriched document tree, and each node must be mapped to fields in a search index, or to projections in a knowledge store, to make the content available in your app.
In the skillset, review the
outputssection of each skill to determine which nodes exist in the enriched document:{ "@odata.type": "#Microsoft.Skills.Vision.OcrSkill", "context": "/document/normalized_images/*", "detectOrientation": true, "inputs": [ ], "outputs": [ { "name": "text", "targetName": "text" }, { "name": "layoutText", "targetName": "layoutText" } ] }Create or update a search index to add fields to accept the skill outputs.
In the following fields collection example, content is blob content. Metadata_storage_name contains the name of the file (set
retrievableto true). Metadata_storage_path is the unique path of the blob and is the default document key. Merged_content is output from Text Merge (useful when images are embedded).Text and layoutText are OCR skill outputs and must be a string collection in order to the capture all of the OCR-generated output for the entire document.
  "fields": [
    {
      "name": "content",
      "type": "Edm.String",
      "filterable": false,
      "retrievable": true,
      "searchable": true,
      "sortable": false
    },
    {
      "name": "metadata_storage_name",
      "type": "Edm.String",
      "filterable": true,
      "retrievable": true,
      "searchable": true,
      "sortable": false
    },
    {
      "name": "metadata_storage_path",
      "type": "Edm.String",
      "filterable": false,
      "key": true,
      "retrievable": true,
      "searchable": false,
      "sortable": false
    },
    {
      "name": "merged_content",
      "type": "Edm.String",
      "filterable": false,
      "retrievable": true,
      "searchable": true,
      "sortable": false
    },
    {
      "name": "text",
      "type": "Collection(Edm.String)",
      "filterable": false,
      "retrievable": true,
      "searchable": true
    },
    {
      "name": "layoutText",
      "type": "Collection(Edm.String)",
      "filterable": false,
      "retrievable": true,
      "searchable": true
    }
  ],
Update the indexer to map skillset output (nodes in an enrichment tree) to index fields.
Enriched documents are internal. To externalize the nodes in an enriched document tree, set up an output field mapping that specifies which index field receives node content. Enriched data is accessed by your app through an index field. The following example shows a text node (OCR output) in an enriched document that's mapped to a text field in a search index.
  "outputFieldMappings": [
    {
      "sourceFieldName": "/document/normalized_images/*/text",
      "targetFieldName": "text"
    },
    {
      "sourceFieldName": "/document/normalized_images/*/layoutText",
      "targetFieldName": "layoutText"
    }
  ]
Run the indexer to invoke source document retrieval, image processing, and indexing.
Verify results
Run a query against the index to check the results of image processing. Use Search Explorer as a search client, or any tool that sends HTTP requests. The following query selects fields that contain the output of image processing.
POST /indexes/[index name]/docs/search?api-version=[api-version]
{
    "search": "*",
    "select": "metadata_storage_name, text, layoutText, imageCaption, imageTags"
}
OCR recognizes text in image files. This means that OCR fields (text and layoutText) are empty if source documents are pure text or pure imagery. Similarly, image analysis fields (imageCaption and imageTags) are empty if source document inputs are strictly text. Indexer execution emits warnings if imaging inputs are empty. Such warnings are to be expected when nodes are unpopulated in the enriched document. Recall that blob indexing lets you include or exclude file types if you want to work with content types in isolation. You can use these settings to reduce noise during indexer runs.
An alternate query for checking results might include the content and merged_content fields. Notice that those fields include content for any blob file, even those where there was no image processing performed.
About skill outputs
Skill outputs include text (OCR), layoutText (OCR), merged_content, captions (image analysis), tags (image analysis):
textstores OCR-generated output. This node should be mapped to field of typeCollection(Edm.String). There's onetextfield per search document consisting of comma-delimited strings for documents that contain multiple images. The following illustration shows OCR output for three documents. First is a document containing a file with no images. Second is a document (image file) containing one word, Microsoft. Third is a document containing multiple images, some without any text ("",)."value": [ { "@search.score": 1, "metadata_storage_name": "facts-about-microsoft.html", "text": [] }, { "@search.score": 1, "metadata_storage_name": "guthrie.jpg", "text": [ "Microsoft" ] }, { "@search.score": 1, "metadata_storage_name": "Azure AI services and Content Intelligence.pptx", "text": [ "", "Microsoft", "", "", "", "Azure AI Search and Augmentation Combining Azure AI services and Azure Search" ] } ]layoutTextstores OCR-generated information about text location on the page, described in terms of bounding boxes and coordinates of the normalized image. This node should be mapped to field of typeCollection(Edm.String). There's onelayoutTextfield per search document consisting of comma-delimited strings.merged_contentstores the output of a Text Merge skill, and it should be one large field of typeEdm.Stringthat contains raw text from the source document, with embeddedtextin place of an image. If files are text-only, then OCR and image analysis have nothing to do, andmerged_contentis the same ascontent(a blob property that contains the content of the blob).imageCaptioncaptures a description of an image as individuals tags and a longer text description.imageTagsstores tags about an image as a collection of keywords, one collection for all images in the source document.
The following screenshot is an illustration of a PDF that includes text and embedded images. Document cracking detected three embedded images: flock of seagulls, map, eagle. Other text in the example (including titles, headings, and body text) was extracted as text and excluded from image processing.
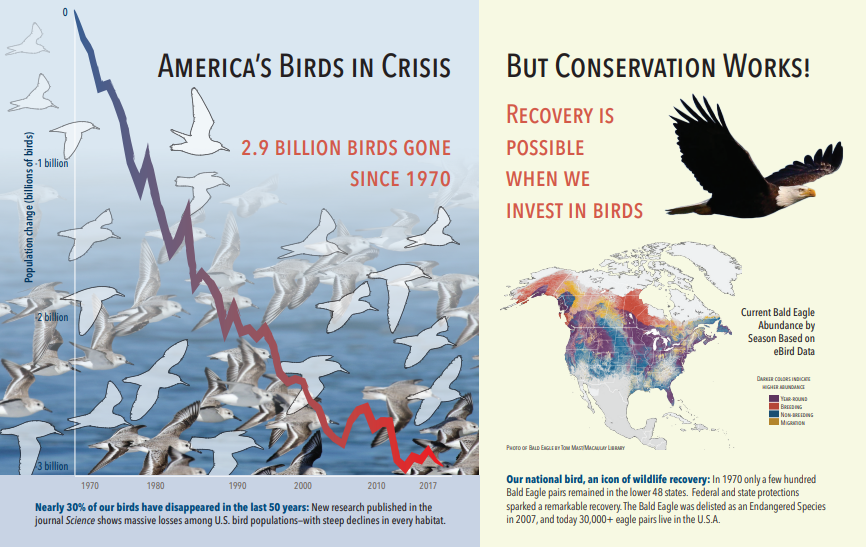
Image analysis output is illustrated in the following JSON (search result). The skill definition allows you to specify which visual features are of interest. For this example, tags and descriptions were produced, but there are more outputs to choose from.
imageCaptionoutput is an array of descriptions, one per image, denoted bytagsconsisting of single words and longer phrases that describe the image. Notice the tags consisting of a flock of seagulls are swimming in the water, or a close up of a bird.imageTagsoutput is an array of single tags, listed in the order of creation. Notice that tags repeat. There's no aggregation or grouping.
 "imageCaption": [
      "{\"tags\":[\"bird\",\"outdoor\",\"water\",\"flock\",\"many\",\"lot\",\"bunch\",\"group\",\"several\",\"gathered\",\"pond\",\"lake\",\"different\",\"family\",\"flying\",\"standing\",\"little\",\"air\",\"beach\",\"swimming\",\"large\",\"dog\",\"landing\",\"jumping\",\"playing\"],\"captions\":[{\"text\":\"a flock of seagulls are swimming in the water\",\"confidence\":0.70419257326275686}]}",
      "{\"tags\":[\"map\"],\"captions\":[{\"text\":\"map\",\"confidence\":0.99942880868911743}]}",
      "{\"tags\":[\"animal\",\"bird\",\"raptor\",\"eagle\",\"sitting\",\"table\"],\"captions\":[{\"text\":\"a close up of a bird\",\"confidence\":0.89643581933539462}]}",
    . . .

 "imageTags": [
    "bird",
    "outdoor",
    "water",
    "flock",
    "animal",
    "bunch",
    "group",
    "several",
    "drink",
    "gathered",
    "pond",
    "different",
    "family",
    "same",
    "map",
    "text",
    "animal",
    "bird",
    "bird of prey",
    "eagle"
    . . .
Scenario: Embedded images in PDFs
When the images you want to process are embedded in other files, such as PDF or DOCX, the enrichment pipeline extracts just the images and then passes them to OCR or image analysis for processing. Image extraction occurs during the document cracking phase, and once the images are separated, they remain separate unless you explicitly merge the processed output back into the source text.
Text Merge is used to put image processing output back into the document. Although Text Merge isn't a hard requirement, it's frequently invoked so that image output (OCR text, OCR layoutText, image tags, image captions) can be reintroduced into the document. Depending on the skill, the image output replaces an embedded binary image with an in-place text equivalent. Image Analysis output can be merged at image location. OCR output always appears at the end of each page.
The following workflow outlines the process of image extraction, analysis, merging, and how to extend the pipeline to push image-processed output into other text-based skills such as Entity Recognition or Text Translation.
After connecting to the data source, the indexer loads and cracks source documents, extracting images and text, and queuing each content type for processing. An enriched document consisting only of a root node (document) is created.
Images in the queue are normalized and passed into enriched documents as a document/normalized_images node.
Image enrichments execute, using
"/document/normalized_images"as input.Image outputs are passed into the enriched document tree, with each output as a separate node. Outputs vary by skill (text and layoutText for OCR; tags and captions for Image Analysis).
Optional but recommended if you want search documents to include both text and image-origin text together, Text Merge runs, combining the text representation of those images with the raw text extracted from the file. Text chunks are consolidated into a single large string, where the text is inserted first in the string and then the OCR text output or image tags and captions.
The output of Text Merge is now the definitive text to analyze for any downstream skills that perform text processing. For example, if your skillset includes both OCR and Entity Recognition, the input to Entity Recognition should be
"document/merged_text"(the targetName of the Text Merge skill output).After all skills have executed, the enriched document is complete. In the last step, indexers refer to output field mappings to send enriched content to individual fields in the search index.
The following example skillset creates a merged_text field containing the original text of your document with embedded OCRed text in place of embedded images. It also includes an Entity Recognition skill that uses merged_text as input.
Request body syntax
{
  "description": "Extract text from images and merge with content text to produce merged_text",
  "skills":
  [
    {
        "description": "Extract text (plain and structured) from image.",
        "@odata.type": "#Microsoft.Skills.Vision.OcrSkill",
        "context": "/document/normalized_images/*",
        "defaultLanguageCode": "en",
        "detectOrientation": true,
        "inputs": [
          {
            "name": "image",
            "source": "/document/normalized_images/*"
          }
        ],
        "outputs": [
          {
            "name": "text"
          }
        ]
    },
    {
      "@odata.type": "#Microsoft.Skills.Text.MergeSkill",
      "description": "Create merged_text, which includes all the textual representation of each image inserted at the right location in the content field.",
      "context": "/document",
      "insertPreTag": " ",
      "insertPostTag": " ",
      "inputs": [
        {
          "name":"text", "source": "/document/content"
        },
        {
          "name": "itemsToInsert", "source": "/document/normalized_images/*/text"
        },
        {
          "name":"offsets", "source": "/document/normalized_images/*/contentOffset"
        }
      ],
      "outputs": [
        {
          "name": "mergedText", "targetName" : "merged_text"
        }
      ]
    },
    {
      "@odata.type": "#Microsoft.Skills.Text.V3.EntityRecognitionSkill",
      "context": "/document",
      "categories": [ "Person"],
      "defaultLanguageCode": "en",
      "minimumPrecision": 0.5,
      "inputs": [
        {
            "name": "text", "source": "/document/merged_text"
        }
      ],
      "outputs": [
        {
            "name": "persons", "targetName": "people"
        }
      ]
    }
  ]
}
Now that you have a merged_text field, you can map it as a searchable field in your indexer definition. All of the content of your files, including the text of the images, will be searchable.
Scenario: Visualize bounding boxes
Another common scenario is visualizing search results layout information. For example, you might want to highlight where a piece of text was found in an image as part of your search results.
Since the OCR step is performed on the normalized images, the layout coordinates are in the normalized image space, but if you need to display the original image, convert coordinate points in the layout to the original image coordinate system.
The following algorithm illustrates the pattern:
/// <summary>
///  Converts a point in the normalized coordinate space to the original coordinate space.
///  This method assumes the rotation angles are multiples of 90 degrees.
/// </summary>
public static Point GetOriginalCoordinates(Point normalized,
                            int originalWidth,
                            int originalHeight,
                            int width,
                            int height,
                            double rotationFromOriginal)
{
    Point original = new Point();
    double angle = rotationFromOriginal % 360;

    if (angle == 0 )
    {
        original.X = normalized.X;
        original.Y = normalized.Y;
    } else if (angle == 90)
    {
        original.X = normalized.Y;
        original.Y = (width - normalized.X);
    } else if (angle == 180)
    {
        original.X = (width -  normalized.X);
        original.Y = (height - normalized.Y);
    } else if (angle == 270)
    {
        original.X = height - normalized.Y;
        original.Y = normalized.X;
    }

    double scalingFactor = (angle % 180 == 0) ? originalHeight / height : originalHeight / width;
    original.X = (int) (original.X * scalingFactor);
    original.Y = (int)(original.Y * scalingFactor);

    return original;
}
Scenario: Custom image skills
Images can also be passed into and returned from custom skills. A skillset base64-encodes the image being passed into the custom skill. To use the image within the custom skill, set "/document/normalized_images/*/data" as the input to the custom skill. Within your custom skill code, base64-decode the string before converting it to an image. To return an image to the skillset, base64-encode the image before returning it to the skillset.
The image is returned as an object with the following properties.
 {
  "$type": "file",
  "data": "base64String"
 }
The Azure Search Python samples repository has a complete sample implemented in Python of a custom skill that enriches images.
Passing images to custom skills
For scenarios where you require a custom skill to work on images, you can pass images to the custom skill, and have it return text or images. The following skillset is from a sample.
The following skillset takes the normalized image (obtained during document cracking), and outputs slices of the image.
Sample skillset
{
  "description": "Extract text from images and merge with content text to produce merged_text",
  "skills":
  [
    {
          "@odata.type": "#Microsoft.Skills.Custom.WebApiSkill",
          "name": "ImageSkill",
          "description": "Segment Images",
          "context": "/document/normalized_images/*",
          "uri": "https://your.custom.skill.url",
          "httpMethod": "POST",
          "timeout": "PT30S",
          "batchSize": 100,
          "degreeOfParallelism": 1,
          "inputs": [
            {
              "name": "image",
              "source": "/document/normalized_images/*"
            }
          ],
          "outputs": [
            {
              "name": "slices",
              "targetName": "slices"
            }
          ],
          "httpHeaders": {}
        }
  ]
}
Custom skill example
The custom skill itself is external to the skillset. In this case, it's Python code that first loops through the batch of request records in the custom skill format, then converts the base64-encoded string to an image.
# deserialize the request, for each item in the batch
for value in values:
  data = value['data']
  base64String = data["image"]["data"]
  base64Bytes = base64String.encode('utf-8')
  inputBytes = base64.b64decode(base64Bytes)
  # Use numpy to convert the string to an image
  jpg_as_np = np.frombuffer(inputBytes, dtype=np.uint8)
  # you now have an image to work with
Similarly to return an image, return a base64 encoded string within a JSON object with a $type property of file.
def base64EncodeImage(image):
    is_success, im_buf_arr = cv2.imencode(".jpg", image)
    byte_im = im_buf_arr.tobytes()
    base64Bytes = base64.b64encode(byte_im)
    base64String = base64Bytes.decode('utf-8')
    return base64String

 base64String = base64EncodeImage(jpg_as_np)
 result = {
  "$type": "file",
  "data": base64String
}