Note
Access to this page requires authorization. You can try signing in or changing directories.
Access to this page requires authorization. You can try changing directories.
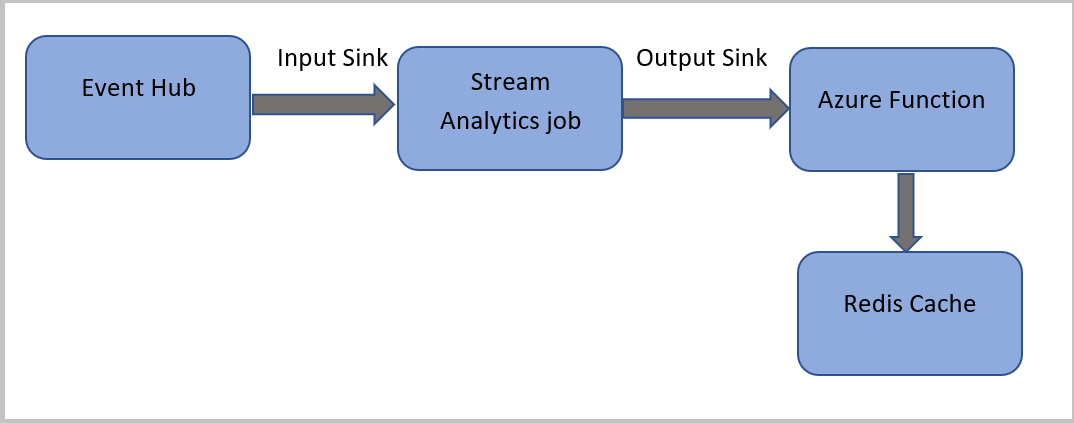
In this tutorial, you create an Azure Stream Analytics job that reads events from Azure Event Hubs, runs a query on the event data, and then invokes an Azure function, which writes to an Azure Cache for Redis instance.
Note
- You can run Azure Functions from Azure Stream Analytics by configuring Functions as one of the sinks (outputs) to the Stream Analytics job. Functions are an event-driven, compute-on-demand experience that lets you implement code that is triggered by events occurring in Azure or third-party services. This ability of Functions to respond to triggers makes it a natural output to Stream Analytics jobs.
- Stream Analytics invokes Functions through HTTP triggers. The Functions output adapter allows users to connect Functions to Stream Analytics, such that the events can be triggered based on Stream Analytics queries.
- Connection to Azure Functions inside a virtual network (VNet) from a Stream Analytics job that's running in a multitenant cluster isn't supported.
In this tutorial, you learn how to:
- Create an Azure Event Hubs instance
- Create an Azure Cache for Redis instance
- Create an Azure Function
- Create a Stream Analytics job
- Configure event hub as input and function as output
- Run the Stream Analytics job
- Check Azure Cache for Redis for results
If you don’t have an Azure subscription, create a Trial before you begin.
Prerequisites
Before you start, make sure you complete the following steps:
- If you don't have an Azure subscription, create a Trial.
- Download the phone call event generator app, TelcoGenerator.zip from the Microsoft Download Center or get the source code from GitHub.
Sign in to Azure
Sign in to the Azure portal.
Create an event hub
You need to send some sample data to an event hub before Stream Analytics can analyze the fraudulent calls data stream. In this tutorial, you send data to Azure by using Azure Event Hubs.
Use the following steps to create an event hub and send call data to that event hub:
Sign in to the Azure portal.
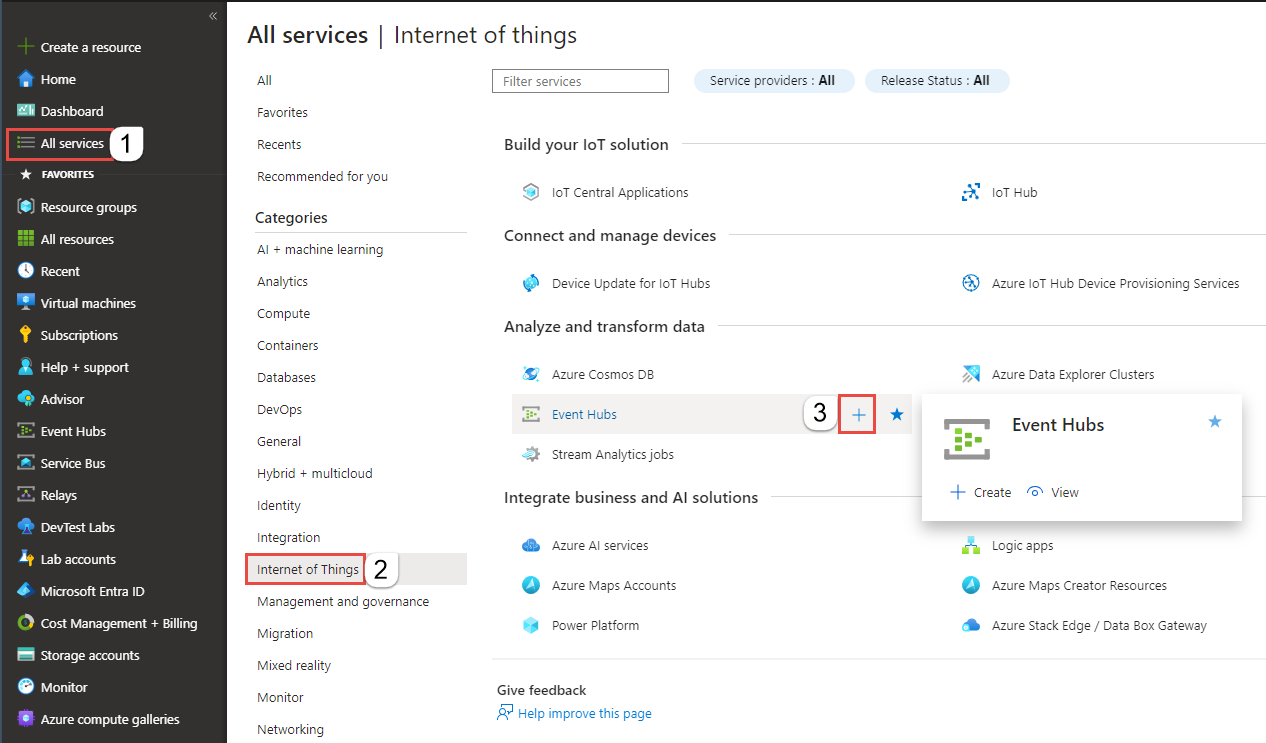
Select All services on the left menu, select Internet of things, mouse the mouse over Event Hubs, and then select + (Add) button.
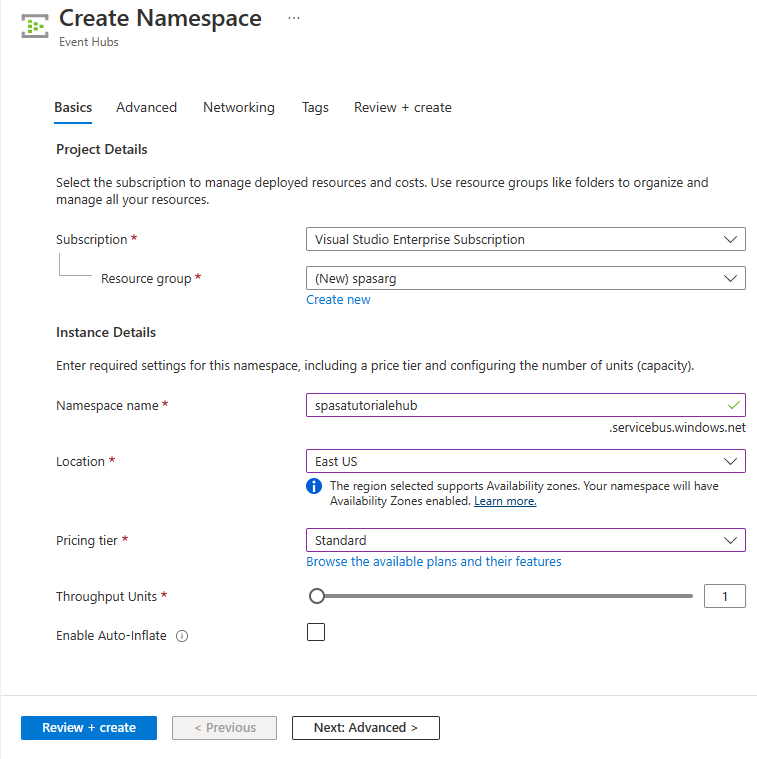
On the Create Namespace page, follow these steps:
Select an Azure subscription where you want to create the event hub.
For Resource group, select Create new and enter a name for the resource group. The Event Hubs namespace is created in this resource group.
For Namespace name, enter a unique name for the Event Hubs namespace.
For Location, select the region in which you want to create the namespace.
For Pricing tier, select Standard.
Select Review + create at the bottom of the page.
On the Review + create page of the namespace creation wizard, select Create at the bottom of the page after reviewing all settings.
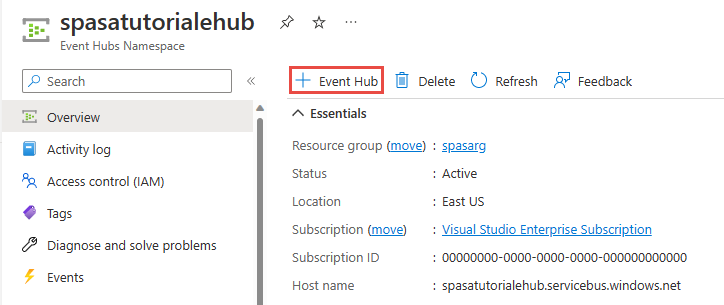
After the namespace is deployed successfully, select Go to resource to navigate to the Event Hubs Namespace page.
On the Event Hubs namespace page, select +Event Hub on the command bar.
On the Create Event Hub page, enter a Name for the event hub. Set the Partition Count to 2. Use the default options in the remaining settings and select Review + create.
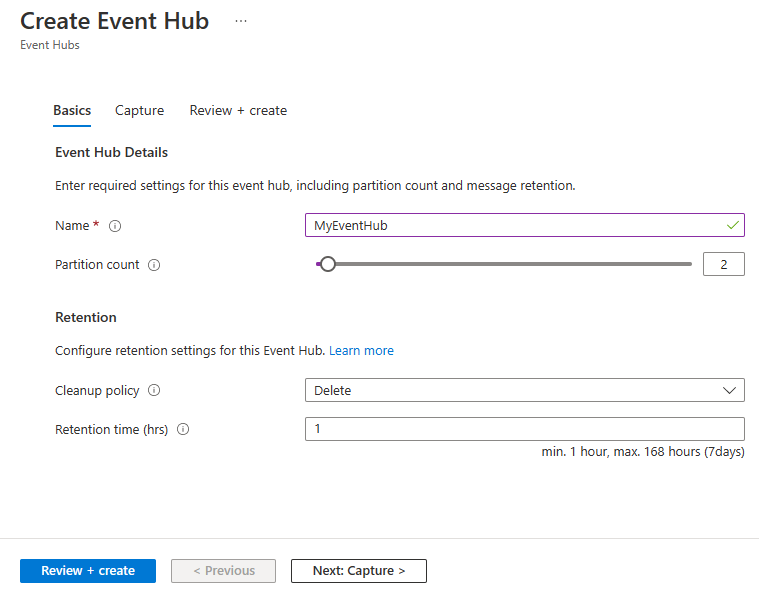
On the Review + create page, select Create at the bottom of the page. Then wait for the deployment to succeed.

Grant access to the event hub and get a connection string
Before an application can send data to Azure Event Hubs, the event hub must have a policy that allows access. The access policy produces a connection string that includes authorization information.
On the Event Hubs namespace page, select Shared access policies on the left menu.
Select RootManageSharedAccessKey from the list of policies.
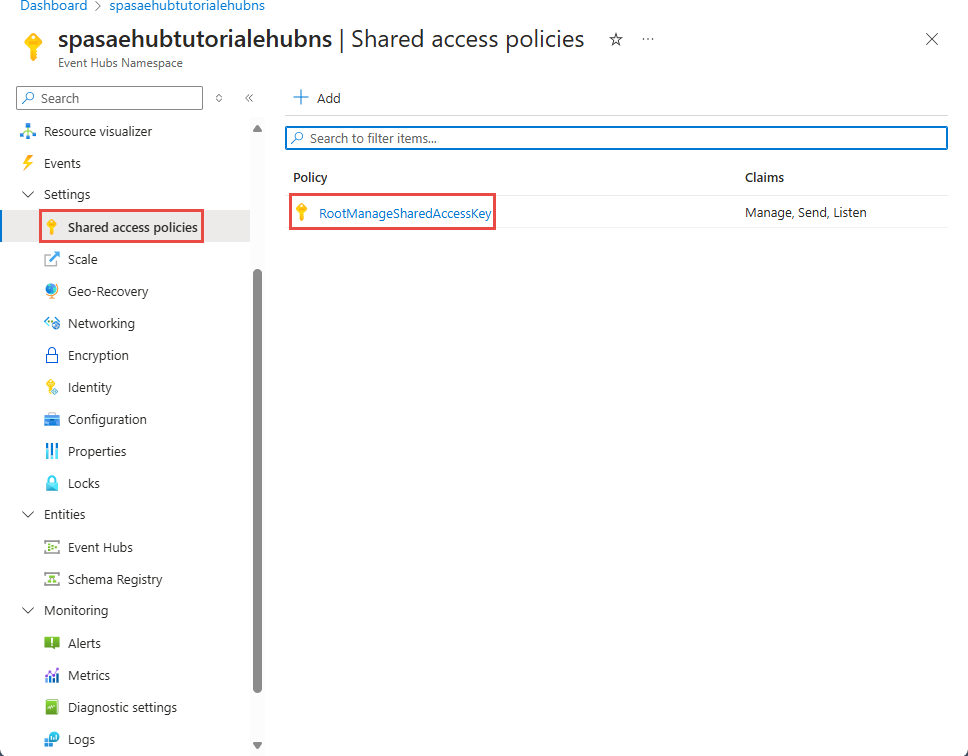
Then, select the copy button next to Connection string - primary key.
Paste the connection string into a text editor. You need this connection string in the next section.
The connection string looks as follows:
Endpoint=sb://<Your event hub namespace>.servicebus.chinacloudapi.cn/;SharedAccessKeyName=<Your shared access policy name>;SharedAccessKey=<generated key>Notice that the connection string contains multiple key-value pairs separated with semicolons: Endpoint, SharedAccessKeyName, and SharedAccessKey.
Start the event generator application
Before you start the TelcoGenerator app, you should configure it to send data to the Azure Event Hubs you created earlier.
Extract the contents of TelcoGenerator.zip file.
Open the
TelcoGenerator\TelcoGenerator\telcodatagen.exe.configfile in a text editor of your choice There's more than one.configfile, so be sure that you open the correct one.Update the
<appSettings>element in the config file with the following details:- Set the value of the EventHubName key to the name of the event hub you created in the previous section.
- Set the value of the Microsoft.ServiceBus.ConnectionString key to the connection string to the namespace. If you use a connection string to an event hub, not a namespace, remove
EntityPathvalue (;EntityPath=myeventhub) at the end. Don't forget to remove the semicolon that precedes the EntityPath value.
Save the file.
Next open a command window and change to the folder where you unzipped the TelcoGenerator application. Then enter the following command:
.\telcodatagen.exe 1000 0.2 2This command takes the following parameters:
- Number of call data records per hour.
- Percentage of fraud probability, which is how often the app should simulate a fraudulent call. The value 0.2 means that about 20% of the call records look fraudulent.
- Duration in hours, which is the number of hours that the app should run. You can also stop the app at any time by ending the process (Ctrl+C) at the command line.
After a few seconds, the app starts displaying phone call records on the screen as it sends them to the event hub. The phone call data contains the following fields:
Record Definition CallrecTime The timestamp for the call start time. SwitchNum The telephone switch used to connect the call. For this example, the switches are strings that represent the country/region of origin (US, China, UK, Germany, or Australia). CallingNum The phone number of the caller. CallingIMSI The International Mobile Subscriber Identity (IMSI). It's a unique identifier of the caller. CalledNum The phone number of the call recipient. CalledIMSI International Mobile Subscriber Identity (IMSI). It's a unique identifier of the call recipient.
Create a Stream Analytics job
Now that you have a stream of call events, you can create a Stream Analytics job that reads data from the event hub.
To create a Stream Analytics job, navigate to the Azure portal.
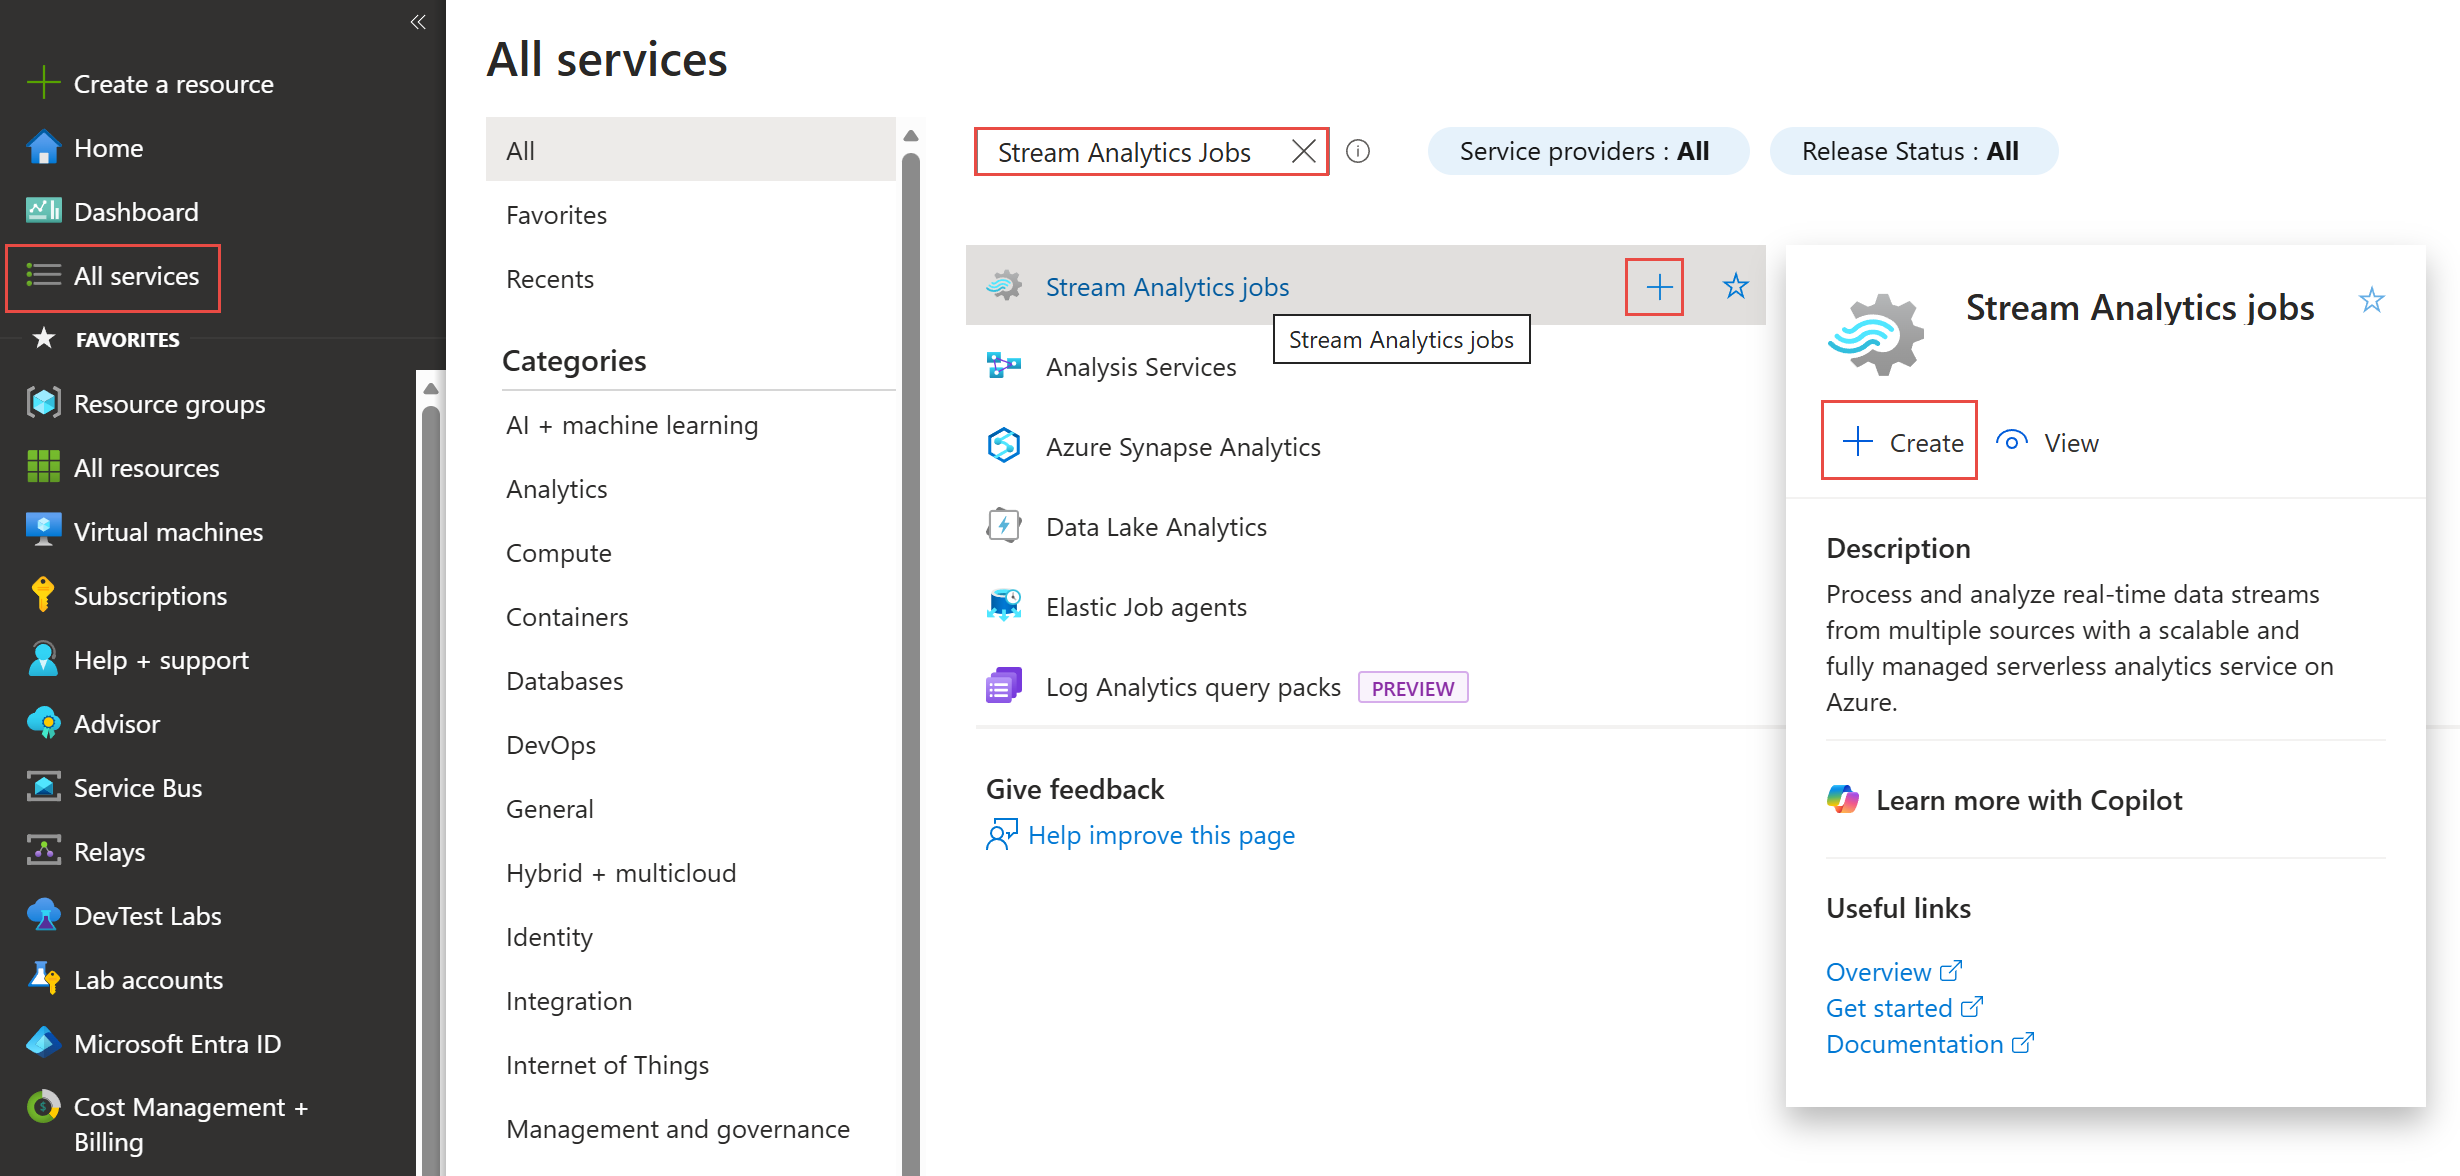
Select All services in the left menu, search for Stream Analytics jobs, hover the mouse over the Stream Analytics jobs tile, and then select + button or select Create in the pop-up window.
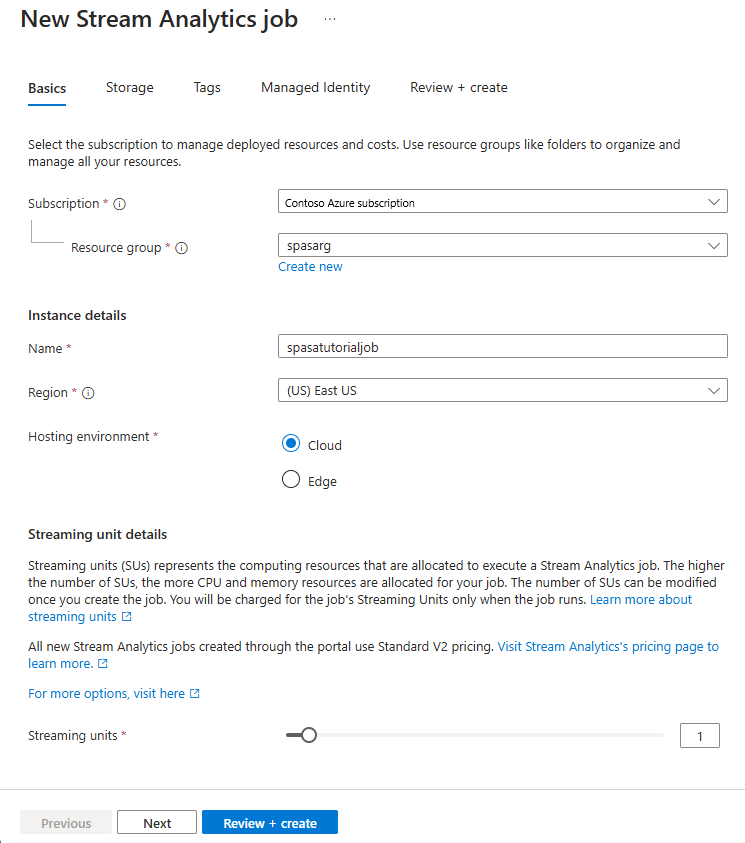
On the New Stream Analytics job page, follow these steps:
For Subscription, select the subscription that contains the Event Hubs namespace.
For Resource group, select the resource group you created earlier.
In the Instance details section, For Name, enter a unique name for the Stream Analytics job.
For Region, select the region in which you want to create the Stream Analytics job. We recommend that you place the job and the event hub in the same region for best performance and so that you don't pay to transfer data between regions.
For Hosting environment< select Cloud if it's not already selected. Stream Analytics jobs can be deployed to cloud or edge. Cloud allows you to deploy to Azure Cloud, and Edge allows you to deploy to an IoT Edge device.
For Streaming units, select 1. Streaming units represent the computing resources that are required to execute a job. By default, this value is set to 1. To learn about scaling streaming units, see understanding and adjusting streaming units article.
Select Review + create at the bottom of the page.
On the Review + create page, review settings, and then select Create to create the Stream Analytics job.
After the job is deployed, select Go to resource to navigate to the Stream Analytics job page.
Configure job input
The next step is to define an input source for the job to read data using the event hub you created in the previous section.
On the Stream Analytics job page, in the Job Topology section on the left menu, select Inputs.
On the Inputs page, select + Add input and Event hub.

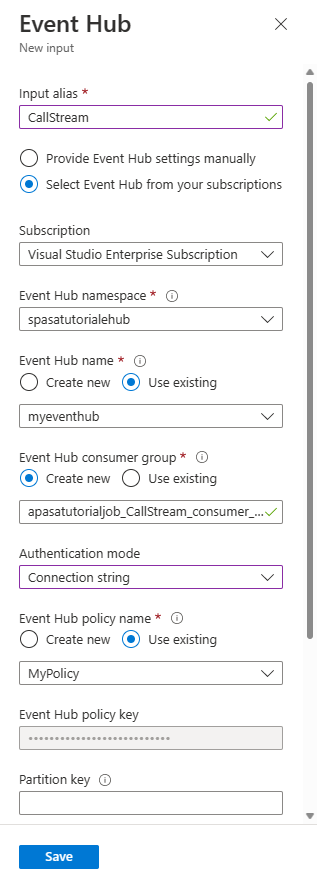
On the Event hub page, follow these steps:
For Input alias, enter CallStream. Input alias is a friendly name to identify your input. Input alias can only contain alphanumeric characters and hyphens, and must be 3-63 characters long.
For Subscription, select the Azure subscription where you created the event hub. The event hub can be in same or a different subscription as the Stream Analytics job.
For Event Hubs namespace, select the Event Hubs namespace you created in the previous section. All the namespaces available in your current subscription are listed in the dropdown.
For Event hub name, select the event hub you created in the previous section. All the event hubs available in the selected namespace are listed in the dropdown.
For Event hub consumer group, keep the Create new option selected so that a new consumer group is created on the event hub. We recommend that you use a distinct consumer group for each Stream Analytics job. If no consumer group is specified, the Stream Analytics job uses the
$Defaultconsumer group. When a job contains a self-join or has multiple inputs, some inputs later might be read by more than one reader. This situation affects the number of readers in a single consumer group.For Authentication mode, select Connection string. It's easier to test the tutorial with this option.
For Event hub policy name, select Use existing, and then select the default policy: RootManageSharedAccessKey.
Select Save at the bottom of the page.

Create an Azure Cache for Redis instance
Create a cache in Azure Cache for Redis by using the steps described in Create a Azure Cache for Redis instance.
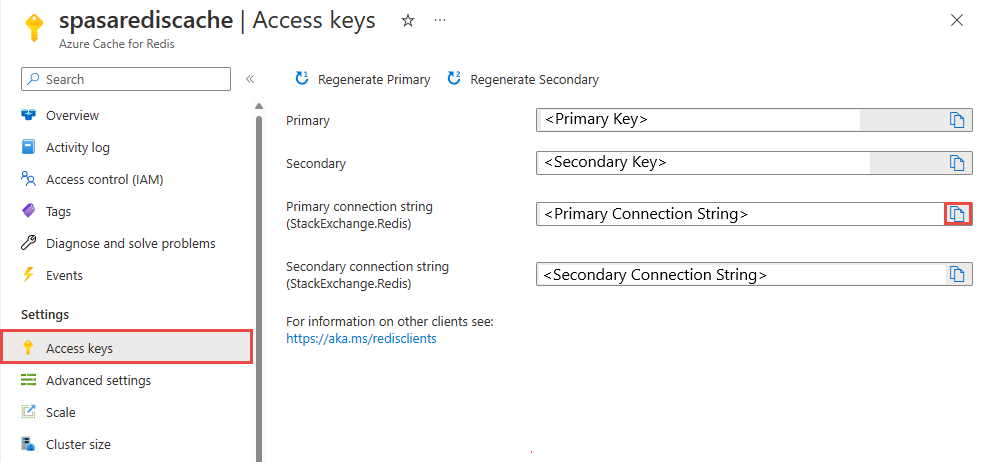
After you create the cache, under Settings, select Access Keys. Make a note of the Primary connection string.
Create a function in Azure Functions that writes data to Azure Cache for Redis
See the Create a function app section of the Functions documentation. This sample uses:
Create a default HttpTrigger function app in Visual Studio Code by following this tutorial. Use the following information: language:
C#, runtime:.NET 6(under function v4), template:HTTP trigger.Install the Redis client library by running the following command in a terminal located in the project folder:
dotnet add package StackExchange.Redis --version 2.2.88Add the
RedisConnectionStringandRedisDatabaseIndexitems in theValuessection of yourlocal.settings.json, filling in the connection string of the destination server:{ "IsEncrypted": false, "Values": { "AzureWebJobsStorage": "", "FUNCTIONS_WORKER_RUNTIME": "dotnet", "RedisConnectionString": "Your Redis Connection String", "RedisDatabaseIndex":"0" } }The Redis Database Index is the number from 0 to 15 identifying the database on the instance.
Replace the entire function (.cs file in the project) with the following code snippet. Update the namespace, class name, and function name with your own:
using System;
using System.IO;
using System.Threading.Tasks;
using Microsoft.AspNetCore.Mvc;
using Microsoft.Azure.WebJobs;
using Microsoft.Azure.WebJobs.Extensions.Http;
using Microsoft.AspNetCore.Http;
using Microsoft.Extensions.Logging;
using Newtonsoft.Json;

using StackExchange.Redis;

namespace Company.Function
{
    public static class HttpTrigger1{
        [FunctionName("HttpTrigger1")]
        public static async Task<IActionResult> Run(
            [HttpTrigger(AuthorizationLevel.Function, "get","post", Route = null)] HttpRequest req,
            ILogger log)
        {
            // Extract the body from the request
            string requestBody = await new StreamReader(req.Body).ReadToEndAsync();
            if (string.IsNullOrEmpty(requestBody)) {return new StatusCodeResult(204);} // 204, ASA connectivity check

            dynamic data = JsonConvert.DeserializeObject(requestBody);

            // Reject if too large, as per the doc
            if (data.ToString().Length > 262144) {return new StatusCodeResult(413);} //HttpStatusCode.RequestEntityTooLarge

            string RedisConnectionString = Environment.GetEnvironmentVariable("RedisConnectionString");
            int RedisDatabaseIndex = int.Parse(Environment.GetEnvironmentVariable("RedisDatabaseIndex"));

            using (var connection = ConnectionMultiplexer.Connect(RedisConnectionString))
            {
                // Connection refers to a property that returns a ConnectionMultiplexer
                IDatabase db = connection.GetDatabase(RedisDatabaseIndex);

                // Parse items and send to binding
                for (var i = 0; i < data.Count; i++)
                {
                    string key = data[i].Time + " - " + data[i].CallingNum1;

                    db.StringSet(key, data[i].ToString());
                    log.LogInformation($"Object put in database. Key is {key} and value is {data[i].ToString()}");

                    // Simple get of data types from the cache
                    string value = db.StringGet(key);
                    log.LogInformation($"Database got: {key} => {value}");

                }
            }
            return new OkResult(); // 200
        }
    }
}
When Stream Analytics receives the "HTTP Request Entity Too Large" exception from the function, it reduces the size of the batches it sends to functions. The following code ensures that Stream Analytics doesn't send oversized batches. Make sure that the maximum batch count and size values used in the function are consistent with the values entered in the Stream Analytics portal.
Publish the function to Azure.
Open the function on the Azure portal, and set application settings for
RedisConnectionStringandRedisDatabaseIndex.
Update the Stream Analytics job with the function as output
Open your Stream Analytics job in the Azure portal.
Browse to your function, and select Overview > Outputs > Add. To add a new output, select Azure Function for the sink option. The Functions output adapter has the following properties:
Property name Description Output alias A user-friendly name that you use in the job's query to reference the output. Import option You can use the function from the current subscription, or provide the settings manually if the function is located in another subscription. Function App Name of your Functions app. Function Name of the function in your Functions app (name of your run.csx function). Max Batch Size Sets the maximum size for each output batch, which is sent to your function in bytes. By default, this value is set to 262,144 bytes (256 KB). Max Batch Count Specifies the maximum number of events in each batch that is sent to the function. The default value is 100. This property is optional. Key Allows you to use a function from another subscription. Provide the key value to access your function. This property is optional. Provide a name for the output alias. In this tutorial, it's named saop1, but you can use any name of your choice. Fill in other details.
Open your Stream Analytics job, and update the query to the following.
Important
The following sample script assumes that you used CallStream for input name and saop1 for the output name. If you used different names, update the query.
 SELECT
         System.Timestamp as Time, CS1.CallingIMSI, CS1.CallingNum as CallingNum1,
         CS2.CallingNum as CallingNum2, CS1.SwitchNum as Switch1, CS2.SwitchNum as Switch2
     INTO saop1
     FROM CallStream CS1 TIMESTAMP BY CallRecTime
        JOIN CallStream CS2 TIMESTAMP BY CallRecTime
         ON CS1.CallingIMSI = CS2.CallingIMSI AND DATEDIFF(ss, CS1, CS2) BETWEEN 1 AND 5
     WHERE CS1.SwitchNum != CS2.SwitchNum
Start the telcodatagen.exe application by running the following command in command line. The command uses the format
telcodatagen.exe [#NumCDRsPerHour] [SIM Card Fraud Probability] [#DurationHours].telcodatagen.exe 1000 0.2 2Start the Stream Analytics job.
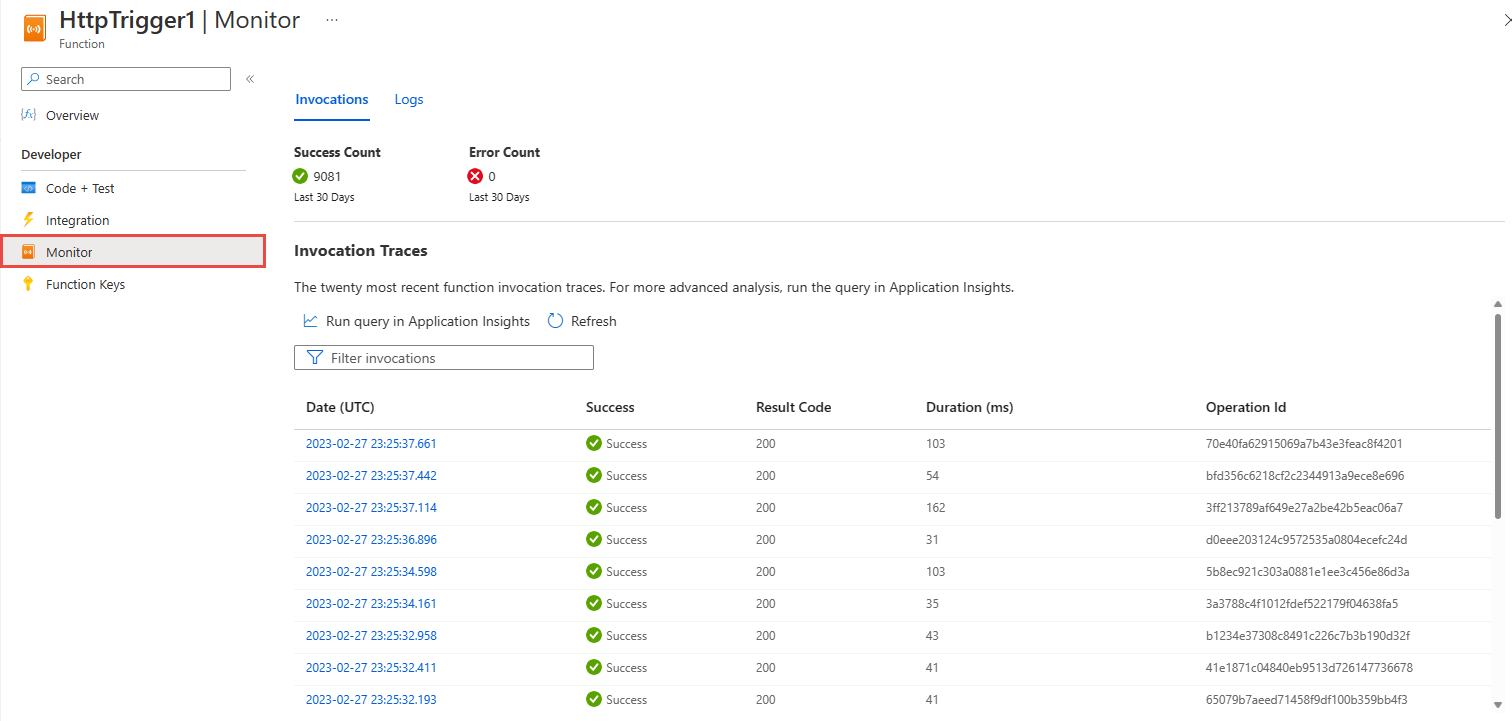
On the Monitor page for your Azure function, you see that the function is invoked.
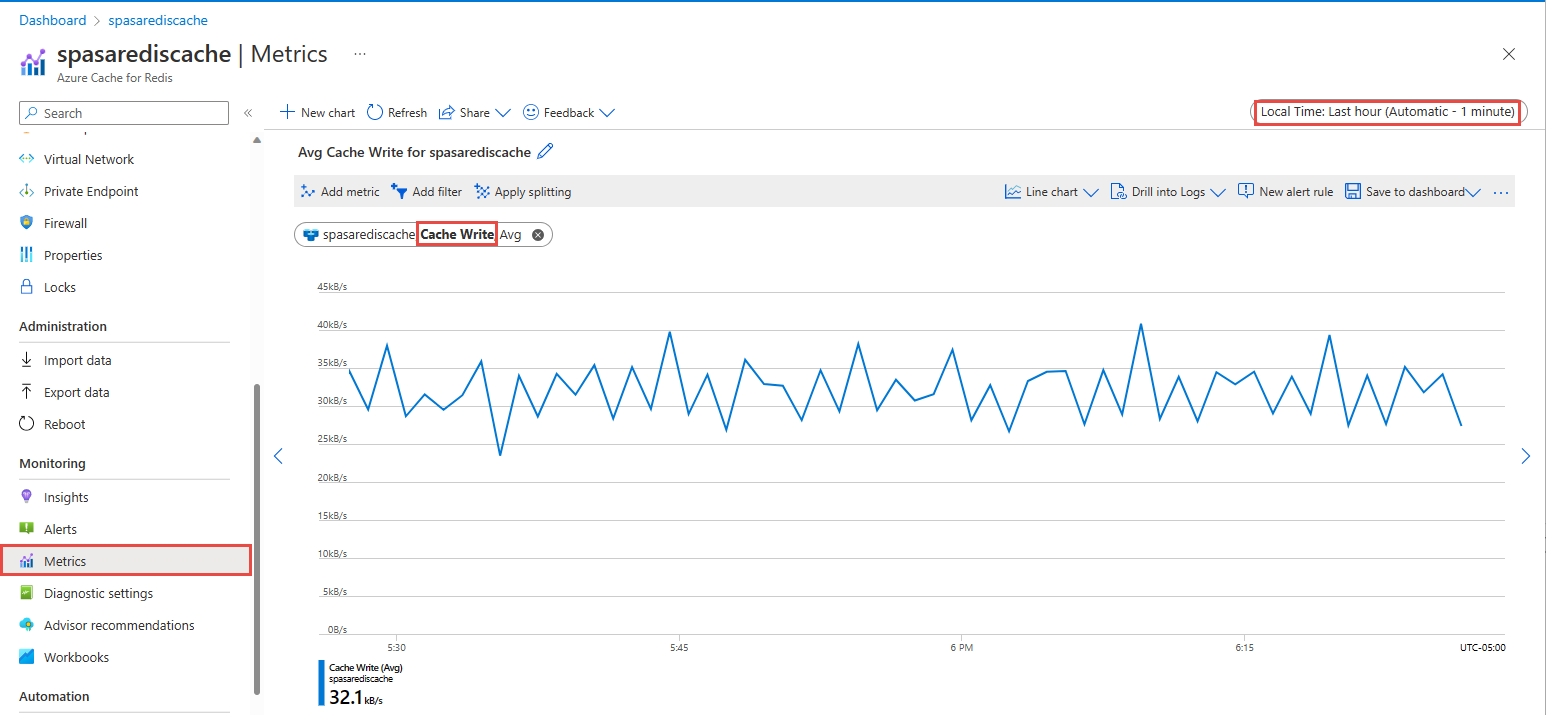
On the Azure Cache for Redis page your cache, select Metrics on the left menu, add Cache Write metric, and set the duration to last hour. You see the chart similar to the following image.
Check Azure Cache for Redis for results
Get the key from Azure Functions logs
First, get the key for a record inserted into Azure Cache for Redis. In the code, the key is calculated in the Azure function as shown in the following code snippet:
string key = data[i].Time + " - " + data[i].CallingNum1;

db.StringSet(key, data[i].ToString());
log.LogInformation($"Object put in database. Key is {key} and value is {data[i].ToString()}");
Browse to the Azure portal, and find your Azure Functions app.
Select Functions on the left menu.
Select HTTPTrigger1 from the list of functions.
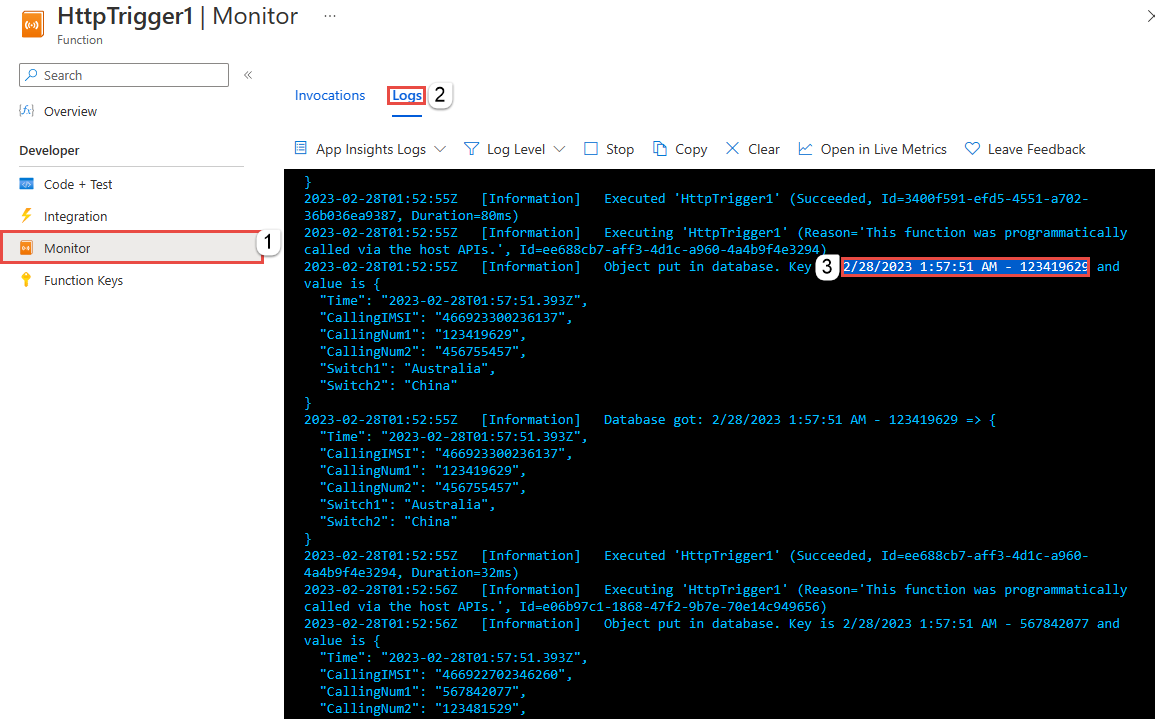
Select Monitor on the left menu.
Switch to the Logs tab.
Note down a key from the informational message as shown in the following screenshot. You use this key to find the value in Azure Cache for Redis.
Use the key to find the record in Azure Cache for Redis
Browse to the Azure portal, and find your Azure Cache for Redis. Select Console.
Use Azure Cache for Redis commands to verify that your data is in Azure Cache for Redis. (The command takes the format Get {key}.) Use the key you copied from the Monitor logs for the Azure function (in the previous section).
Get "KEY-FROM-THE-PREVIOUS-SECTION"
This command prints the value for the specified key:

Error handling and retries
If a failure occurs while sending events to Azure Functions, Stream Analytics retries most operations. It retries all HTTP exceptions until success, except for HTTP error 413 (entity too large). An entity too large error is treated as a data error that's subject to the retry or drop policy.
Note
The timeout for HTTP requests from Stream Analytics to Azure Functions is set to 100 seconds. If your Azure Functions app takes more than 100 seconds to process a batch, Stream Analytics returns an error and retries the batch.
Retrying for timeouts might result in duplicate events written to the output sink. When Stream Analytics retries a failed batch, it retries all the events in the batch. For example, consider a batch of 20 events that Stream Analytics sends to Azure Functions. Assume that Azure Functions takes 100 seconds to process the first 10 events in that batch. After 100 seconds, Stream Analytics suspends the request since it didn't receive a positive response from Azure Functions, and sends another request for the same batch. Azure Functions processes the first 10 events in the batch again, which causes a duplicate.
Known issues
In the Azure portal, when you try to reset the Max Batch Size or Max Batch Count value to empty (default), the value changes back to the previously entered value upon save. Manually enter the default values for these fields in this case.
Stream Analytics doesn't currently support the use of HTTP routing on your Azure Functions.
Support to connect to Azure Functions hosted in a virtual network isn't enabled.
Clean up resources
When you no longer need the resources, delete the resource group, the streaming job, and all related resources. Deleting the job stops billing for the streaming units the job consumes. If you plan to use the job in the future, you can stop it and restart it later when you need. If you aren't going to continue to use this job, delete all resources created by this quickstart by using the following steps:
- From the left-hand menu in the Azure portal, select Resource groups and then select the name of the resource you created.
- On your resource group page, select Delete, type the name of the resource to delete in the text box, and then select Delete.
Next steps
In this tutorial, you created a simple Stream Analytics job that runs an Azure Function. To learn more about Stream Analytics jobs, continue to the next tutorial: