Note
Access to this page requires authorization. You can try signing in or changing directories.
Access to this page requires authorization. You can try changing directories.
This tutorial shows you how to use Virtual WAN to connect to your resources in Azure over an ExpressRoute circuit. For more conceptual information about ExpressRoute in Virtual WAN, see About ExpressRoute in Virtual WAN. You can also create this configuration using the PowerShell steps.
In this tutorial, you learn how to:
- Create a virtual WAN
- Create a hub and a gateway
- Connect a VNet to a hub
- Connect a circuit to a hub gateway
- Test connectivity
- Change a gateway size
- Advertise a default route
Prerequisites
Verify that you've met the following criteria before beginning your configuration:
You have a virtual network that you want to connect to. Verify that none of the subnets of your on-premises networks overlap with the virtual networks that you want to connect to. To create a virtual network in the Azure portal, see the Quickstart.
Your virtual network doesn't have any virtual network gateways. If your virtual network has a gateway (either VPN or ExpressRoute), you must remove all gateways. This configuration requires that virtual networks are connected instead to the Virtual WAN hub gateway.
Obtain an IP address range for your hub region. The hub is a virtual network that is created and used by Virtual WAN. The address range that you specify for the hub can't overlap with any of your existing virtual networks that you connect to. It also can't overlap with your address ranges that you connect to on-premises. If you're unfamiliar with the IP address ranges located in your on-premises network configuration, coordinate with someone who can provide those details for you.
The following ExpressRoute circuit SKUs can be connected to the hub gateway: Local, Standard, and Premium.
If you don't have an Azure subscription, create a trial subscription.
Create a virtual WAN
In the portal, in the Search resources bar, type Virtual WAN in the search box and select Enter.
Select Virtual WANs from the results. On the Virtual WANs page, select + Create to open the Create WAN page.
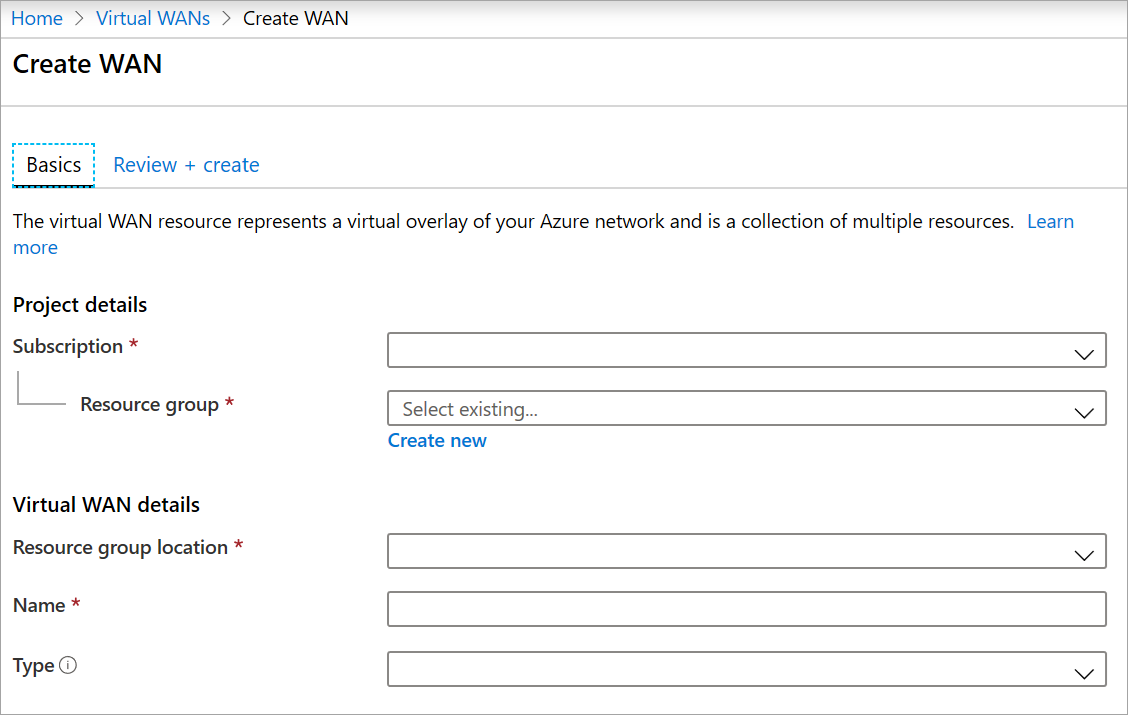
On the Create WAN page, on the Basics tab, fill in the fields. Modify the example values to apply to your environment.

- Subscription: Select the subscription that you want to use.
- Resource group: Create new or use existing.
- Resource group location: Choose a resource location from the dropdown. A WAN is a global resource and doesn't live in a particular region. However, you must select a region in order to manage and locate the WAN resource that you create.
- Name: Type the Name that you want to call your virtual WAN.
- Type: Basic or Standard. Select Standard. If you select Basic, understand that Basic virtual WANs can only contain Basic hubs. Basic hubs can only be used for site-to-site connections.
After you finish filling out the fields, at the bottom of the page, select Review +Create.
Once validation passes, click Create to create the virtual WAN.
Create a virtual hub and gateway
In this section, you'll create an ExpressRoute gateway for your virtual hub. You can either create the gateway when you create a new virtual hub, or you can create the gateway in an existing hub by editing it.
To create a new virtual hub and a gateway
Create a new virtual hub. Once a hub is created, you'll be charged for the hub, even if you don't attach any sites.
Basics page
Go to the virtual WAN that you created. On the virtual WAN page left pane, under the Connectivity, select Hubs.
On the Hubs page, select +New Hub to open the Create virtual hub page.
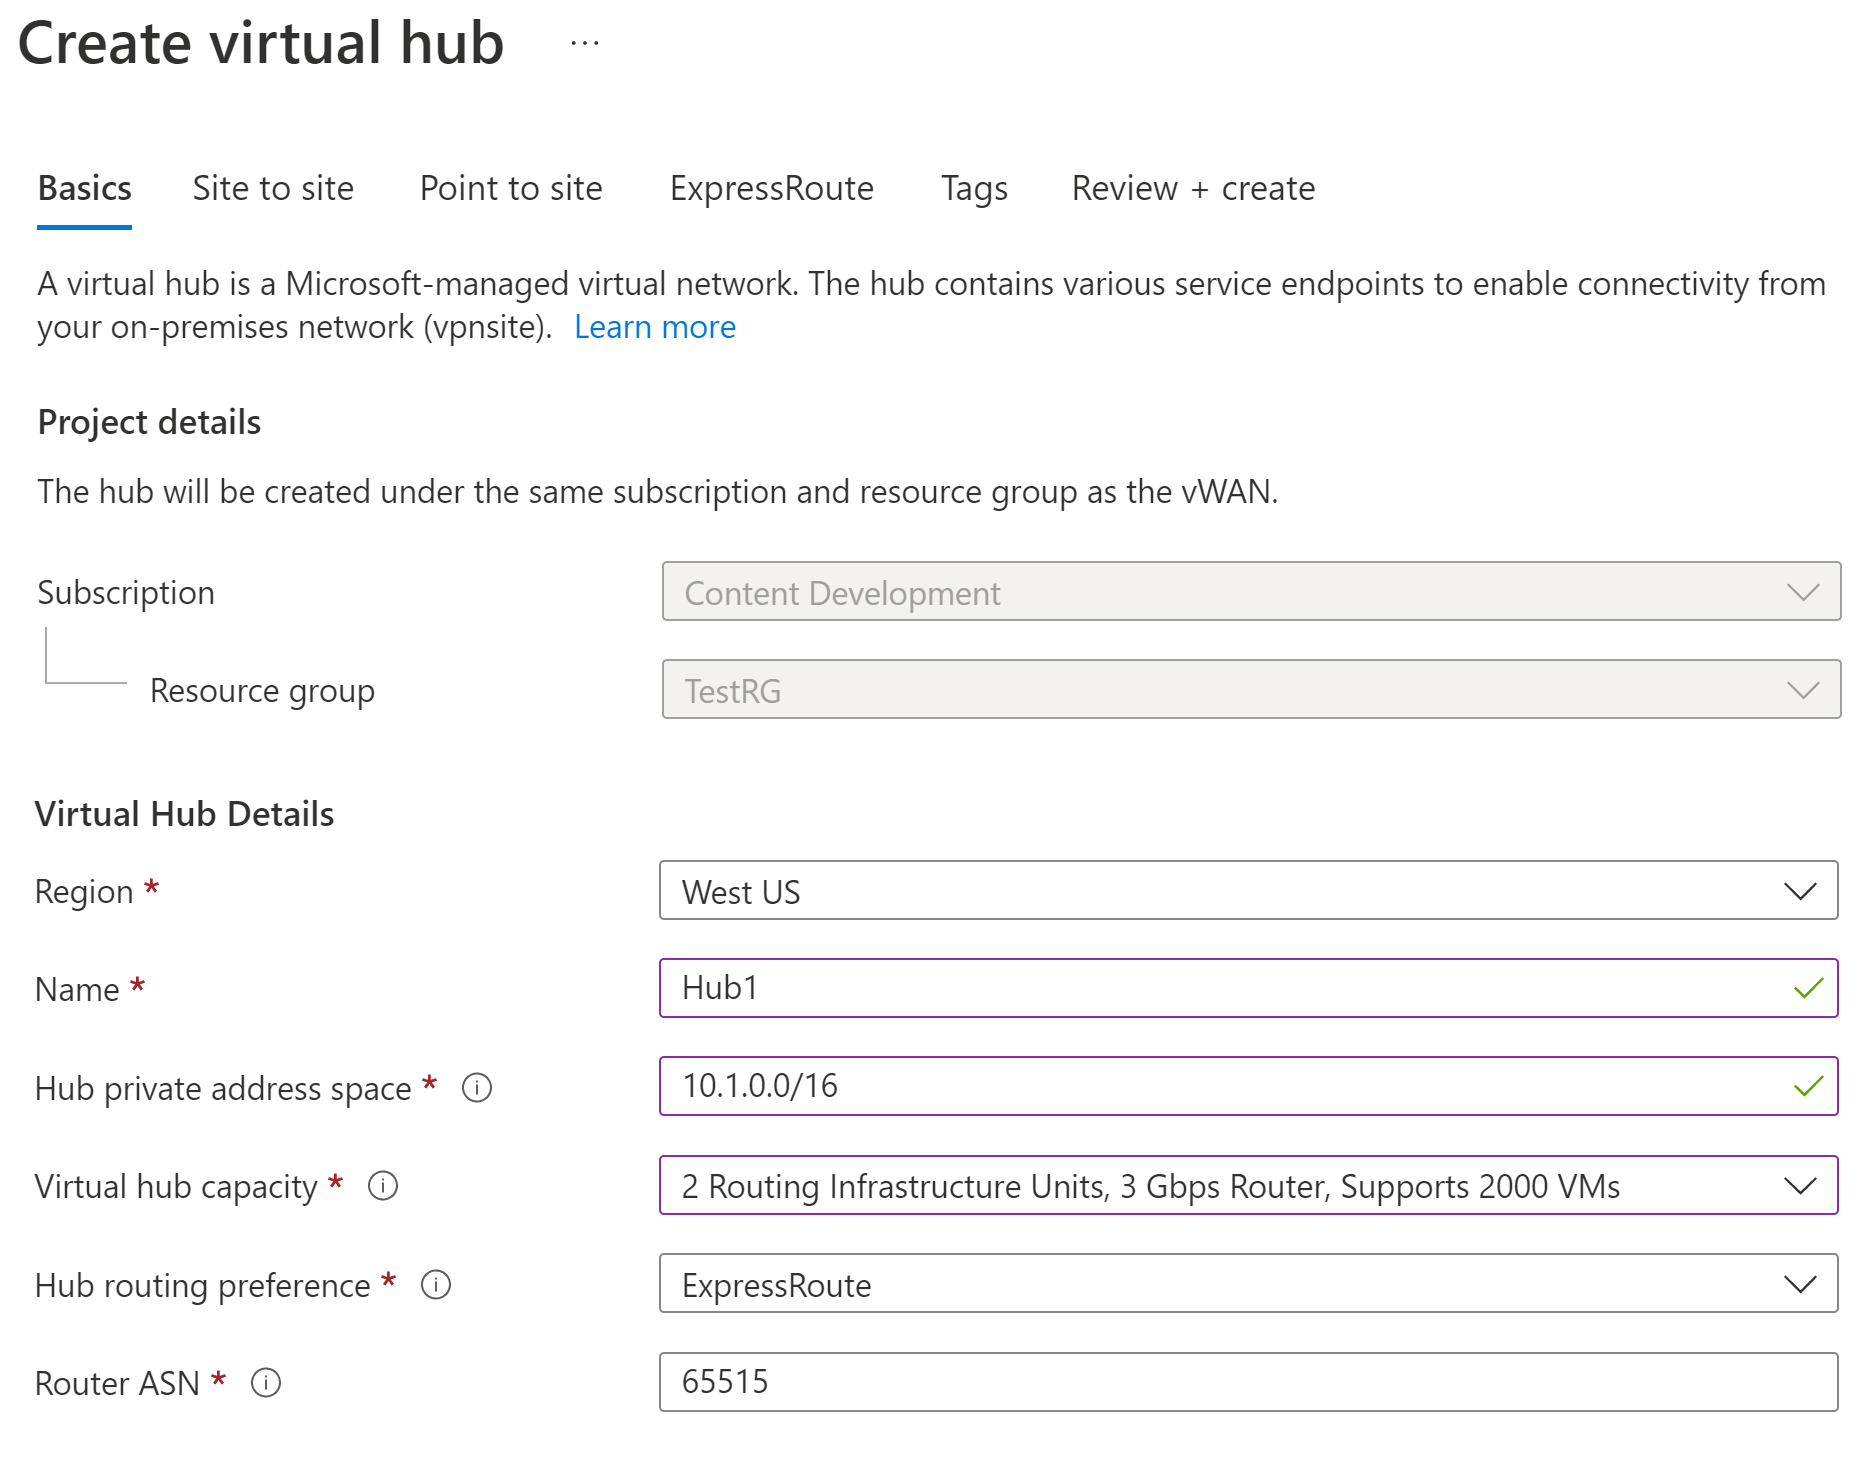
On the Create virtual hub page Basics tab, complete the following fields:
- Region: Select the region in which you want to deploy the virtual hub.
- Name: The name by which you want the virtual hub to be known.
- Hub private address space: The hub's address range in CIDR notation. The minimum address space is /24 to create a hub.
- Virtual hub capacity: Select from the dropdown. For more information, see Virtual hub settings.
ExpressRoute page
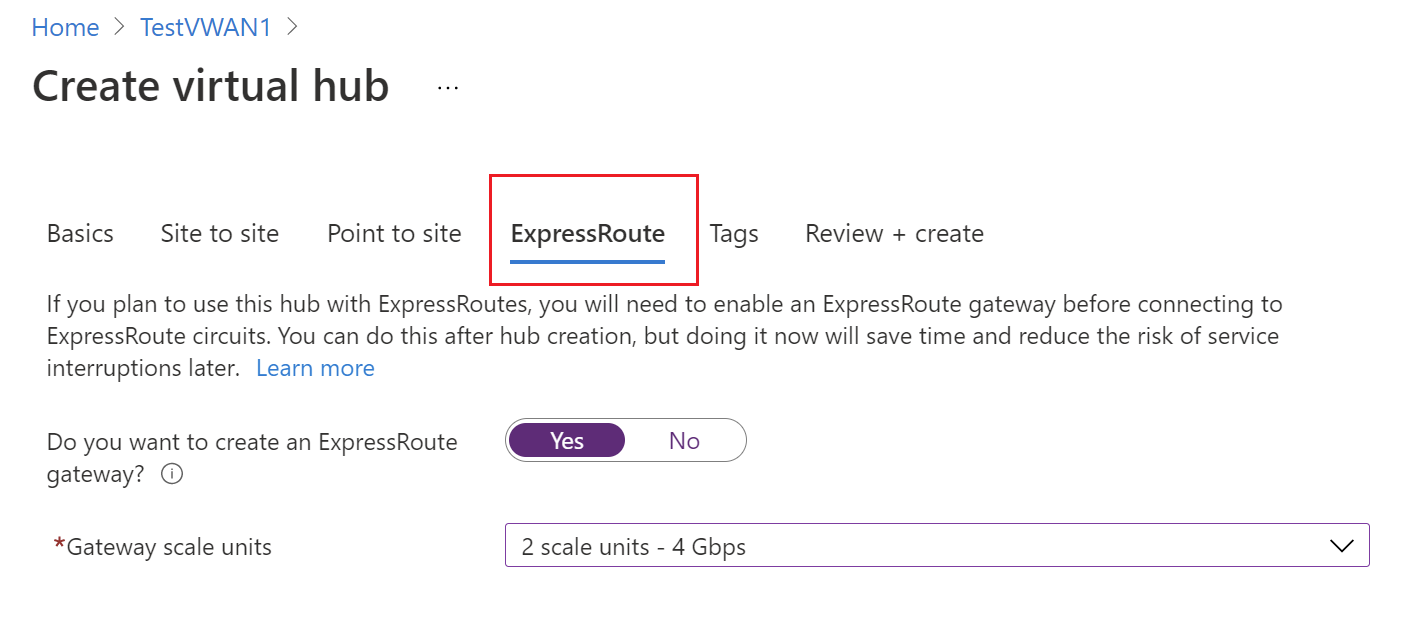
Select ExpressRoute to open the ExpressRoute page. Click Yes to reveal ExpressRoute configuration settings. Fill out the necessary fields. For information about gateway scale units, see the FAQ.

Select Review + Create to validate.
Select Create to create the hub with an ExpressRoute gateway. A hub can take about 30 minutes to complete. After 30 minutes, Refresh to view the hub on the Hubs page. Select Go to resource to navigate to the resource.
To create a gateway in an existing hub
You can also create a gateway in an existing hub by editing the hub.
- Go to the virtual WAN.
- In the left pane, select Hubs.
- On the Virtual WAN | Hubs page, select the hub that you want to edit.
- On the Virtual HUB page, at the top of the page, select Edit virtual hub.
- On the Edit virtual hub page, select the checkbox Include ExpressRoute gateway and adjust any other settings that you require.
- Select Confirm to confirm your changes. It takes about 30 minutes for the hub and hub resources to fully create.
To view a gateway
Once you've created an ExpressRoute gateway, you can view gateway details. Navigate to the hub, select ExpressRoute, and view the gateway.

Connect your VNet to the hub
In this section, you create the peering connection between your hub and a VNet. Repeat these steps for each VNet that you want to connect.
On the page for your virtual WAN, select Virtual network connection.
On the virtual network connection page, select +Add connection.
On the Add connection page, fill in the following fields:
- Connection name - Name your connection.
- Hubs - Select the hub you want to associate with this connection.
- Subscription - Verify the subscription.
- Virtual network - Select the virtual network you want to connect to this hub. The virtual network can't have an already existing virtual network gateway (neither VPN nor ExpressRoute).
Connect your circuit to the hub gateway
Once the gateway is created, you can connect an ExpressRoute circuit to it.
To connect the circuit to the hub gateway
In the portal, go to the Virtual hub -> Connectivity -> ExpressRoute page. If you have access in your subscription to an ExpressRoute circuit, you'll see the circuit you want to use in the list of circuits. If you don't see any circuits, but have been provided with an authorization key and peer circuit URI, you can redeem and connect a circuit. See To connect by redeeming an authorization key.
- Select the circuit.
- Select Connect circuit(s).
To connect by redeeming an authorization key
Use the authorization key and circuit URI you were provided in order to connect.
- On the ExpressRoute page, select +Redeem authorization key
- On the Redeem authorization key page, fill in the values.
- Select Add to add the key.
- View the circuit. A redeemed circuit only shows the name (without the type, provider and other information) because it is in a different subscription than that of the user.
To test connectivity
After the circuit connection is established, the hub connection status will indicate 'this hub', implying the connection is established to the hub ExpressRoute gateway. Wait approximately 5 minutes before you test connectivity from a client behind your ExpressRoute circuit, for example, a VM in the VNet that you created earlier.
To change the size of a gateway
If you want to change the size of your ExpressRoute gateway, locate the ExpressRoute gateway inside the hub, and select the scale units from the dropdown. Save your change. It will take approximately 30 minutes to update the hub gateway.
To advertise default route 0.0.0.0/0 to endpoints
If you would like the Azure virtual hub to advertise the default route 0.0.0.0/0 to your ExpressRoute end points, you'll need to enable 'Propagate default route'.
Select your Circuit ->…-> Edit connection.

Select Enable to propagate the default route.
Clean up resources
When you no longer need the resources that you created, delete them. Some of the Virtual WAN resources must be deleted in a certain order due to dependencies. Deleting can take about 30 minutes to complete.
Open the virtual WAN that you created.
Select a virtual hub associated to the virtual WAN to open the hub page.
Delete all gateway entities following the below order for each gateway type. This can take 30 minutes to complete.
VPN:
- Disconnect VPN sites
- Delete VPN connections
- Delete VPN gateways
ExpressRoute:
- Delete ExpressRoute connections
- Delete ExpressRoute gateways
Repeat for all hubs associated to the virtual WAN.
You can either delete the hubs at this point, or delete the hubs later when you delete the resource group.
Navigate to the resource group in the Azure portal.
Select Delete resource group. This deletes the other resources in the resource group, including the hubs and the virtual WAN.
Next steps
Next, to learn more about ExpressRoute in Virtual WAN, see:
