Note
Access to this page requires authorization. You can try signing in or changing directories.
Access to this page requires authorization. You can try changing directories.
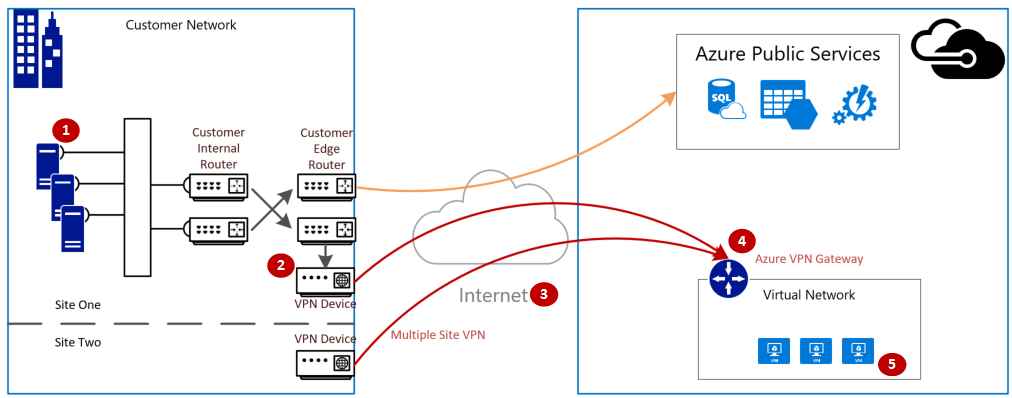
A VPN gateway connection enables you to establish secure, cross-premises connectivity between your Virtual Network within Azure and your on-premises IT infrastructure.
This article shows how to validate network throughput from the on-premises resources to an Azure virtual machine (VM).
Note
This article is intended to help diagnose and fix common issues. If you're unable to solve the issue by using the following information, contact support.
Overview
The VPN gateway connection involves the following components:
- On-premises VPN device (View a list of validated VPN devices.)
- Public internet
- Azure VPN gateway
- Azure VM
The following diagram shows the logical connectivity of an on-premises network to an Azure virtual network through VPN.
Calculate the maximum expected ingress/egress
- Determine your application's baseline throughput requirements.
- Determine your Azure VPN gateway throughput limits. For help, see the "Gateway SKUs" section of About VPN Gateway.
- Determine the Azure VM throughput guidance for your VM size.
- Determine your Internet Service Provider (ISP) bandwidth.
- Calculate your expected throughput by taking the least bandwidth of either the VM, VPN Gateway, or ISP; which is measured in Megabits-per-second (/) divided by eight (8). This calculation gives you Megabytes-per-second.
If your calculated throughput doesn't meet your application's baseline throughput requirements, you must increase the bandwidth of the resource that you identified as the bottleneck. To upgrade an Azure VPN Gateway, see Upgrade a gateway SKU. To resize a virtual machine, see Resize a VM. If you aren't experiencing the expected Internet bandwidth, you can also contact your ISP.
Note
VPN Gateway throughput is an aggregate of all Site-to-Site\VNET-to-VNET, or Point-to-Site connections.
Validate network throughput by using performance tools
This validation should be performed during nonpeak hours, as VPN tunnel throughput saturation during testing doesn't give accurate results.
The tool we use for this test is iPerf, which works on both Windows and Linux and has both client and server modes. It's limited to 3 Gbps for Windows VMs.
This tool doesn't perform any read/write operations to disk. It solely produces self-generated TCP traffic from one end to the other. It generates statistics based on experimentation that measures the bandwidth available between client and server nodes. When testing between two nodes, one node acts as the server, and the other node acts as a client. Once this test is completed, we recommend that you reverse the roles of the nodes to test both upload and download throughput on both nodes.
Download iPerf
Download iPerf. For details, see iPerf documentation.
Note
The third-party products discussed in this article are manufactured by companies that are independent of Microsoft. Microsoft makes no warranty, implied or otherwise, about the performance or reliability of these products.
Run iPerf (iperf3.exe)
Enable an NSG/ACL rule allowing the traffic (for public IP address testing on Azure VM).
On both nodes, enable a firewall exception for port 5001.
Windows: Run the following command as an administrator:
netsh advfirewall firewall add rule name="Open Port 5001" dir=in action=allow protocol=TCP localport=5001To remove the rule when testing is complete, run this command:
netsh advfirewall firewall delete rule name="Open Port 5001" protocol=TCP localport=5001Azure Linux: Azure Linux images have permissive firewalls. If there's an application listening on a port, the traffic is allowed through. Custom images that are secured might need ports opened explicitly. Common Linux OS-layer firewalls include
iptables,ufw, orfirewalld.On the server node, change to the directory where iperf3.exe is extracted. Then run iPerf in server mode, and set it to listen on port 5001 as the following commands:
cd c:\iperf-3.1.2-win65

iperf3.exe -s -p 5001
Note
Port 5001 is customizable to account for particular firewall restrictions in your environment.
On the client node, change to the directory where iperf tool is extracted and then run the following command:
iperf3.exe -c <IP of the iperf Server> -t 30 -p 5001 -P 32The client is directing 30 seconds of traffic on port 5001, to the server. The flag '-P ' indicates that we're making 32 simultaneous connections to the server node.
The following screen shows the output from this example:

(OPTIONAL) To preserve the testing results, run this command:
iperf3.exe -c IPofTheServerToReach -t 30 -p 5001 -P 32 >> output.txtAfter completing the previous steps, execute the same steps with the roles reversed, so that the server node will now be the client node, and vice-versa.
Note
Iperf is not the only tool. NTTTCP is an alternative solution for testing.
Test VMs running Windows
Load Latte.exe onto the VMs
Download the latest version of Latte.exe
Consider putting Latte.exe in separate folder, such as c:\tools
Allow Latte.exe through the Windows Firewall
On the receiver, create an Allow rule on the Windows Firewall to allow the Latte.exe traffic to arrive. It's easiest to allow the entire Latte.exe program by name rather than to allow specific TCP ports inbound.
Allow Latte.exe through the Windows Firewall like this
netsh advfirewall firewall add rule program=<PATH>\latte.exe name="Latte" protocol=any dir=in action=allow enable=yes profile=ANY
For example, if you copied latte.exe to the "c:\tools" folder, this would be the command
netsh advfirewall firewall add rule program=c:\tools\latte.exe name="Latte" protocol=any dir=in action=allow enable=yes profile=ANY
Run latency tests
Start latte.exe on the RECEIVER (run from CMD, not from PowerShell):
latte -a <Receiver IP address>:<port> -i <iterations>
Around 65k iterations is long enough to return representative results.
Any available port number is fine.
If the VM has an IP address of 10.0.0.4, it would look like this
latte -c -a 10.0.0.4:5005 -i 65100
Start latte.exe on the SENDER (run from CMD, not from PowerShell)
latte -c -a <Receiver IP address>:<port> -i <iterations>
The resulting command is the same as on the receiver except with the addition of "-c" to indicate that this is the "client" or sender
latte -c -a 10.0.0.4:5005 -i 65100
Wait for the results. Depending on how far apart the VMs are, it could take a few minutes to complete. Consider starting with fewer iterations to test for success before running longer tests.
Test VMs running Linux
Use SockPerf to test VMs.
Install SockPerf on the VMs
On the Linux VMs (both SENDER and RECEIVER), run these commands to prepare SockPerf on your VMs:
RHEL - Install GIT and other helpful tools
sudo yum install gcc -y -q
sudo yum install git -y -q
sudo yum install gcc-c++ -y
sudo yum install ncurses-devel -y
sudo yum install -y automake
Ubuntu - Install GIT and other helpful tools
sudo apt-get install build-essential -y
sudo apt-get install git -y -q
sudo apt-get install -y autotools-dev
sudo apt-get install -y automake
Bash - all
From bash command line (assumes git is installed)
git clone https://github.com/mellanox/sockperf
cd sockperf/
./autogen.sh
./configure --prefix=
Make is slower, and might take several minutes
make
Make install is fast
sudo make install
Run SockPerf on the VMs
Sample commands after installation. Server/Receiver - assumes server's IP is 10.0.0.4
sudo sockperf sr --tcp -i 10.0.0.4 -p 12345 --full-rtt
Client - assumes server's IP is 10.0.0.4
sockperf ping-pong -i 10.0.0.4 --tcp -m 1400 -t 101 -p 12345 --full-rtt
Note
Make sure there are no intermediate hops (e.g. Virtual Appliance) during the throughput testing in between the VM and Gateway. If there are poor results (in terms of overall throughput) coming from the iPERF/NTTTCP tests above, please refer to this article to understand the key factors behind the possible root causes of the problem:
In particular, analysis of packet capture traces (Wireshark/Network Monitor) collected in parallel from client and server during those tests help in the assessments of bad performance. These traces can include packet loss, high latency, MTU size. Fragmentation, TCP 0 Window, Out of Order fragments, and so on.
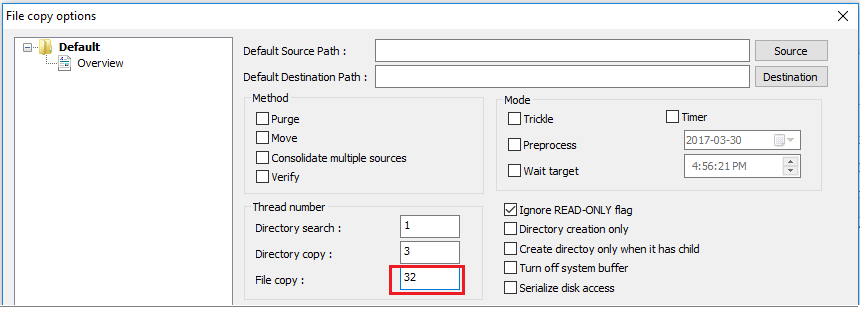
Address slow file copy issues
Even if the overall throughput assessed with the previous steps (iPERF/NTTTCP/etc.) was good, you might experience slow file coping when either using Windows Explorer, or dragging and dropping through an RDP session. This problem is normally due to one or both of the following factors:
File copy applications, such as Windows Explorer and RDP, don't use multiple threads when copying files. For better performance, use a multi-threaded file copy application such as Richcopy to copy files by using 16 or 32 threads. To change the thread number for file copy in Richcopy, click Action > Copy options > File copy.
Note
Not all application work same, and not all application/process utilizes all the threads. If you run the test, you could see some threads being empty and won't provide accurate throughput results. To check your application file transfer performance, use multi-thread by increasing the # of thread in succession or decrease in order to find the optimal throughput of the application or file transfer.
Insufficient VM disk read/write speed. For more information, see Azure Storage Troubleshooting.
On-premises device external facing interface
Mentioned the subnets of on-premises ranges that you would like Azure to reach via VPN on Local Network Gateway. Simultaneously, define the virtual network address space in Azure to the on-premises device.
Route Based Gateway: The policy or traffic selector for route-based VPNs are configured as any-to-any (or wild cards).
Policy Based Gateway: Policy-based VPNs encrypt and direct packets through IPsec tunnels based on the combinations of address prefixes between your on-premises network and the Azure VNet. The policy (or Traffic Selector) is usually defined as an access list in the VPN configuration.
UsePolicyBasedTrafficSelector connections: ("UsePolicyBasedTrafficSelectors" to $True on a connection configures the Azure VPN gateway to connect to policy-based VPN firewall on premises. If you enable PolicyBasedTrafficSelectors, you need to ensure your VPN device has the matching traffic selectors defined with all combinations of your on-premises network (local network gateway) prefixes to and from the Azure virtual network prefixes, instead of any-to-any.
Inappropriate configuration might lead to frequent disconnects within the tunnel, packet drops, bad throughput, and latency.
Check latency
You can check latency by using the following tools:
- WinMTR
- TCPTraceroute
pingandpsping(These tools can provide a good estimate of RTT, but they can't be used in all cases.)
If you notice a high latency spike at any of the hops before entering MS Network backbone, you might want to proceed with further investigations with your Internet Service Provider.
If a large, unusual latency spike is noticed from hops within "msn.net", contact MS support for further investigations.
Next steps
For more information or help, check out the following link: