了解如何从 Azure 应用服务上运行的 Web 应用访问 Microsoft Graph。
你希望为 Web 应用调用 Microsoft Graph。 向 Web 应用授予数据访问权限的安全方法是使用系统分配的托管标识。 Microsoft Entra ID 中的托管标识允许应用服务通过基于角色的访问控制 (RBAC) 访问资源,而不要求使用应用凭据。 向 Web 应用分配托管标识之后,Azure 会负责创建和分发证书。 你无需费心管理机密或应用凭据。
在本教程中,你将了解:
- 在 Web 应用上创建系统分配的托管标识。
- 为托管标识添加 Microsoft Graph API 权限。
- 使用托管标识从 Web 应用调用 Microsoft Graph。
如果没有 Azure 订阅,可在开始前创建一个试用帐户。
先决条件
- 在启用了应用服务身份验证/授权模块的 Azure 应用服务上运行的 Web 应用程序。
在应用上启用托管标识
如果通过 Visual Studio 创建和发布 Web 应用,则已在应用上启用了托管标识。
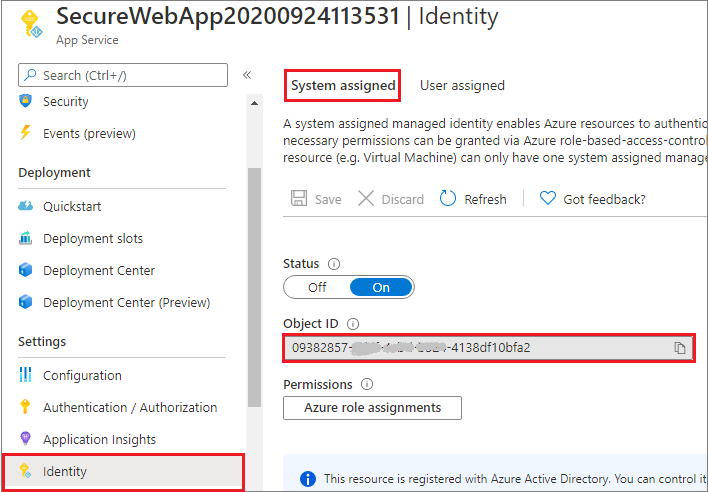
在应用服务中,在左侧窗格中选择“标识”,然后选择“系统分配” 。
验证“状态”是否设置为“打开” 。 如果不是,请依次选择“保存”和“是”以启用系统分配的托管标识 。 启用托管标识后,状态将设置为“启用”并且对象 ID 可用。
记下“对象 ID”值,下一步骤需要使用此值。

授予对 Microsoft Graph 的访问权限
在访问 Microsoft Graph 时,对于要执行的操作,托管标识需要具有适当的权限。 目前,无法通过 Microsoft Entra 管理中心分配此类权限。
运行下面的脚本以添加请求的对托管标识服务主体对象的 Microsoft Graph API 权限。
# Install the module. # Install-Module Microsoft.Graph -Scope CurrentUser # The tenant ID $TenantId = "aaaabbbb-0000-cccc-1111-dddd2222eeee" # The name of your web app, which has a managed identity. $webAppName = "SecureWebApp-20201106120003" $resourceGroupName = "SecureWebApp-20201106120003ResourceGroup" # The name of the app role that the managed identity should be assigned to. $appRoleName = "User.Read.All" # Get the web app's managed identity's object ID. Connect-AzAccount -Environment AzureChinaCloud -Tenant $TenantId $managedIdentityObjectId = (Get-AzWebApp -ResourceGroupName $resourceGroupName -Name $webAppName).identity.principalid Connect-MgGraph -Environment China -TenantId $TenantId -Scopes 'Application.Read.All','AppRoleAssignment.ReadWrite.All' # Get Microsoft Graph app's service principal and app role. $serverApplicationName = "Microsoft Graph" $serverServicePrincipal = (Get-MgServicePrincipal -Filter "DisplayName eq '$serverApplicationName'") $serverServicePrincipalObjectId = $serverServicePrincipal.Id $appRoleId = ($serverServicePrincipal.AppRoles | Where-Object {$_.Value -eq $appRoleName }).Id # Assign the managed identity access to the app role. New-MgServicePrincipalAppRoleAssignment ` -ServicePrincipalId $managedIdentityObjectId ` -PrincipalId $managedIdentityObjectId ` -ResourceId $serverServicePrincipalObjectId ` -AppRoleId $appRoleId执行该脚本后,可在 Microsoft Entra 管理中心内验证是否已将请求的 API 权限分配给托管标识。
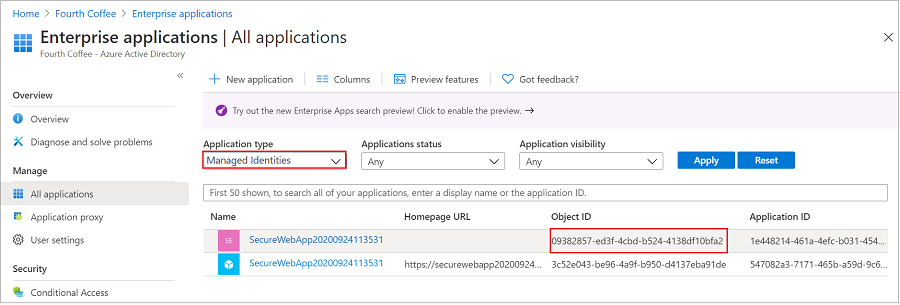
转到“应用程序”,然后选择“企业应用程序”。 此窗格显示租户中的所有服务主体。 为“应用程序类型==托管标识”添加筛选器,然后选择托管标识的服务主体。
如果遵循本教程,则有两个具有相同显示名称(例如“SecureWebApp2020094113531”)的服务主体。 具有主页 URL 的服务主体表示租户中的 Web 应用。 “托管标识”中显示的服务主体不应列出“主页 URL”,并且“对象 ID”应该与上一步中的托管标识的对象 ID 值匹配。
选择托管标识的服务主体。

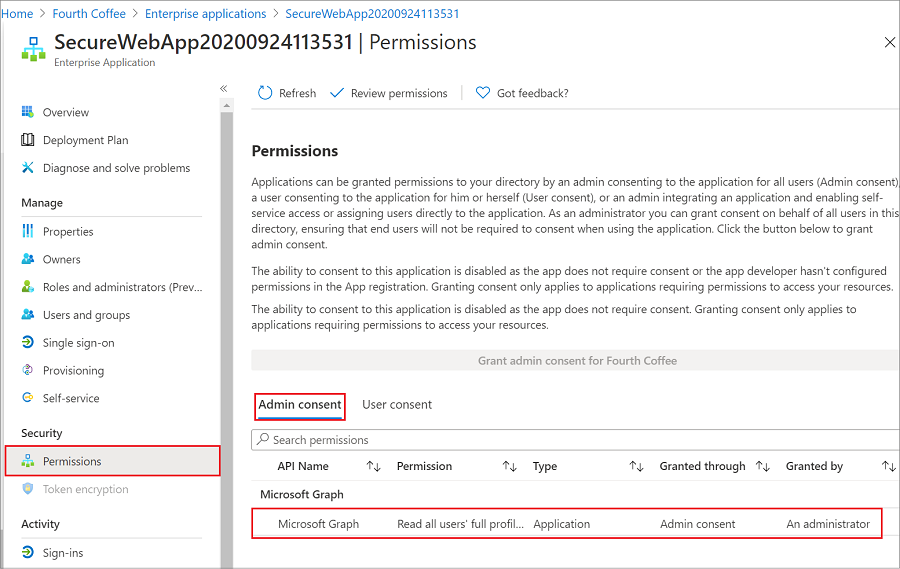
在“概述”中选择“权限”,你将看到添加的 Microsoft Graph 权限 。

使用 Node.js 调用 Microsoft Graph
Web 应用现在具有所需的权限,并且还将 Microsoft Graph 的客户端 ID 添加到登录参数中。
DefaultAzureCredential 包中的 DefaultAzureCredential 类用于获取代码的令牌凭据,以授权对 Azure 存储的请求。 创建 DefaultAzureCredential 类的实例,该类使用托管标识提取令牌并将其附加到服务客户端。 下面的代码示例获取经过身份验证的令牌凭据,并使用它创建服务客户端对象,该对象将获取组中的用户。
注意
Web 应用无需 @azure/identityWeb 包即可进行基础身份验证/授权或向 Microsoft Graph 验证请求。
但是,应用服务身份验证/授权旨在用于更基本的身份验证场景。 对于更复杂的场景(例如,处理自定义声明),需要 @azure/identity 包。 在一开始就有更多的设置和配置工作,但 @azure/identity 包可与应用服务身份验证/授权模块同时运行。 当 Web 应用以后需要处理更复杂的场景时,你可以禁用应用服务身份验证/授权模块,而 @azure/identity 将已是应用的一部分。
安装客户端库包
使用 npm 在项目中安装 @azure/identity 和 @microsoft/microsoft-graph-client 包。
npm install @azure/identity @microsoft/microsoft-graph-client
配置身份验证信息
// partial code in app.js
const appSettings = {
    appCredentials: {
        clientId: process.env.WEBSITE_AUTH_CLIENT_ID, // Enter the client Id here,
        tenantId: "common", // Enter the tenant info here,
        clientSecret: process.env.MICROSOFT_PROVIDER_AUTHENTICATION_SECRET // Enter the client secret here,
    },
    authRoutes: {
        redirect: "/.auth/login/aad/callback", // Enter the redirect URI here
        unauthorized: "/unauthorized" // enter the relative path to unauthorized route
    },
}
以应用身份调用 Microsoft Graph
下面的代码演示如何以应用身份调用 Microsoft Graph 控制器并获取一些用户信息。
// graphController.js

const graphHelper = require('../utils/graphHelper');
const { DefaultAzureCredential } = require("@azure/identity");

exports.getUsersPage = async(req, res, next) => {

    const defaultAzureCredential = new DefaultAzureCredential();

    try {
        // get app's access token scoped to Microsoft Graph
        const tokenResponse = await defaultAzureCredential.getToken("https://microsoftgraph.chinacloudapi.cn/.default");

        // use token to create Graph client
        const graphClient = graphHelper.getAuthenticatedClient(tokenResponse.token);

        // return profiles of users in Graph
        const users = await graphClient
            .api('/users')
            .get();

        res.render('users', { user: req.session.user, users: users });
    } catch (error) {
        next(error);
    }
}
前面的代码依赖于以下 getAuthenticatedClient 函数来返回 Microsoft Graph 客户端。
// utils/graphHelper.js

const graph = require('@microsoft/microsoft-graph-client');

getAuthenticatedClient = (accessToken) => {
    // Initialize Graph client
    const client = graph.Client.init({
        // Use the provided access token to authenticate requests
        authProvider: (done) => {
            done(null, accessToken);
        }
    });

    return client;
}
清理资源
如果已完成本教程,并且不再需要 Web 应用或相关资源,请清理创建的资源。
删除资源组
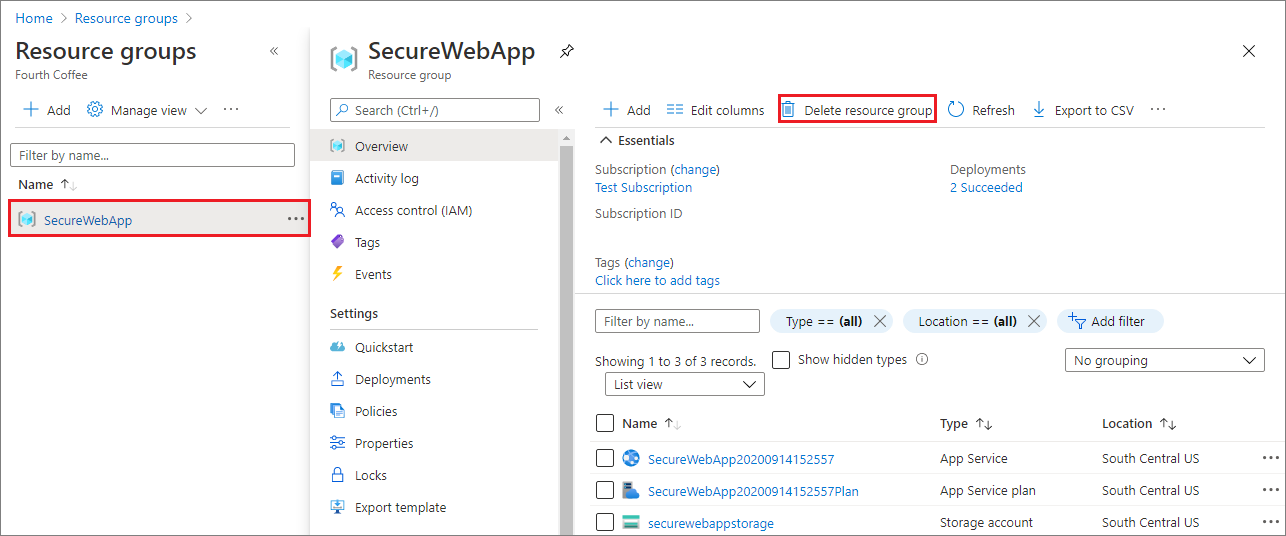
在 Azure 门户中,从门户菜单中选择“资源组”,然后选择包含应用服务和应用服务计划的资源组。
选择“删除资源组”,删除该资源组和所有资源。

此命令可能需要几分钟才能运行。
后续步骤
在本教程中,你了解了如何执行以下操作:
- 在 Web 应用上创建系统分配的托管标识。
- 向托管标识添加 Azure Graph API 权限。
- 使用托管标识从 Web 应用调用 Azure Graph。
了解如何将 .NET Core 应用、Python 应用、Java 应用或 Node.js 应用连接到数据库。