快速入门:在 Python 中使用 Azure Redis
在本快速入门中,会将 Azure Cache for Redis 合并到 Python 脚本中,以便能够访问 Azure 中的任何应用程序都可访问的安全专用缓存。
跳到 GitHub 上的代码
如果要直接跳到代码,请参阅 GitHub 上的 Python 快速入门。
先决条件
- Azure 订阅。 创建一个
- Python 3
- 对于 macOS 或 Linux,请从 python.org 下载。
- 对于Windows 11,请使用 Windows 应用商店。
创建用于 Redis 的 Azure 缓存实例
若要创建缓存,请登录到 Azure 门户并选择“创建资源” 。
在“入门”页上的搜索框中键入“Azure Cache for Redis”。 然后选择创建。
在“新建 Redis 缓存”页上配置缓存的设置。
设置 选择值 说明 订阅 单击下拉箭头并选择你的订阅。 要在其下创建此新的 Azure Cache for Redis 实例的订阅。 资源组 单击下拉箭头并选择一个资源组,或者选择新建并输入新的资源组名称。 要在其中创建缓存和其他资源的资源组的名称。 将所有应用资源放入一个资源组可以轻松地统一管理或删除这些资源。 DNS 名称 输入唯一名称。 缓存名称必须是包含 1 到 63 个字符的字符串,只能包含数字、字母或连字符。 该名称必须以数字或字母开头和结尾,且不能包含连续的连字符。 缓存实例的主机名是 <DNS name>.redis.cache.chinacloudapi.cn。 位置 单击下拉箭头并选择一个位置。 选择使用缓存的其他服务附近的区域。 缓存 SKU 打开下拉列表并选择一个 SKU。 此 SKU 决定可用于缓存的大小、性能和功能参数。 有关详细信息,请参阅用于 Redis 的 Azure 缓存概述。 缓存大小 打开下拉列表并选择缓存的大小 有关详细信息,请参阅用于 Redis 的 Azure 缓存概述。 选择网络选项卡,或选择网络按钮(位于页面底部) 。
在网络选项卡中,选择你的连接方法。
选择“下一步: 高级”选项卡,或选择页面底部的“下一步: 高级”按钮,以查看“高级”选项卡。
- 对于“基本”或“标准”缓存,请切换非 TLS 端口的选项。 还可以选择是否要启用“Microsoft Entra 身份验证”。
- 对于“高级”缓存,请配置非 TLS 端口、群集、托管标识和数据持久性的设置。 还可以选择是否要启用“Microsoft Entra 身份验证”。
选择下一步: 标记选项卡,或选择页面底部的下一步: 标记按钮 。
或者,在标记选项卡中,如果希望对资源分类,请输入名称或值。
选择“查看 + 创建”。 随后你会转到“查看 + 创建”选项卡,Azure 将在此处验证配置。
显示绿色的“已通过验证”消息后,选择创建。
创建缓存需要一段时间。 可以在 Azure Cache for Redis 的概述页上监视进度。 如果“状态”显示为“正在运行”,则表示该缓存可供使用。
安装 redis-py 库
Redis-py 是 Redis 的 Python 接口。 使用 Python 包工具 pip
从命令提示符安装 redis-py
包。
下面的示例使用了 Python 3 的 pip3
在 Windows 11 上从管理员命令提示符安装 redis-py
。
创建用于访问缓存的 Python 脚本
创建一个 Python 脚本,该脚本使用 Microsoft Entra ID 或访问密钥连接到你的 Redis 实例。 建议使用 Microsoft Entra ID。
在缓存上启用 Microsoft Entra ID 身份验证
如果已有缓存,则需要检查是否已启用 Microsoft Entra 身份验证。 如果未启用,请启用它。 建议为应用使用 Microsoft Entra ID。
在 Azure 门户中,选择你想要使用基于 Microsoft Entra 令牌的身份验证的 Azure Cache for Redis 实例。
从“资源”菜单中选择“身份验证”。
检查工作窗格,查看是否已选中“启用 Microsoft Entra 身份验证”。 如果已启用,可继续操作。
选择“启用 Microsoft Entra 身份验证”,然后输入有效用户的姓名。 选择“保存”时,系统会自动向你输入的用户默认分配数据所有者访问策略。 还可输入托管标识或服务主体以连接到缓存实例。
这会显示一个弹出对话框,询问是否要更新配置,并通知你这需要几分钟时间。 选择是。
重要
启用操作完成后,缓存实例中的节点将重新启动以加载新配置。 建议在维护时段或高峰营业时间外执行此操作。 此操作最多可能需要 30 分钟。
若要将 Microsoft Entra ID 与 Azure CLI 配合使用,请查看标识参考页面。
安装 Microsoft 身份验证库
安装 Microsoft 身份验证库 (MSAL)。 通过此库,可以从 Microsoft 标识获取安全令牌来对用户进行身份验证。
可以使用所提供的 Python Azure 标识客户端库,该库使用 MSAL 提供令牌身份验证支持。 使用
pip
安装此库:
pip install azure-identity
使用 Microsoft Entra ID 创建 Python 脚本
创建新的文本文件,添加以下脚本,并将文件另存为
PythonApplication1.py
。将
<Your Host Name>
替换为来自 Azure Cache for Redis 实例的值。 主机名采用<DNS name>.redis.cache.chinacloudapi.cn
形式。将
<Your Username>
替换为来自 Microsoft Entra ID 用户的值。import redis from azure.identity import DefaultAzureCredential scope = "https://redis.azure.com/.default" host = "<Your Host Name>" port = 6380 user_name = "<Your Username>" def hello_world(): cred = DefaultAzureCredential() token = cred.get_token(scope) r = redis.Redis(host=host, port=port, ssl=True, # ssl connection is required. username=user_name, password=token.token, decode_responses=True) result = r.ping() print("Ping returned : " + str(result)) result = r.set("Message", "Hello!, The cache is working with Python!") print("SET Message returned : " + str(result)) result = r.get("Message") print("GET Message returned : " + result) result = r.client_list() print("CLIENT LIST returned : ") for c in result: print(f"id : {c['id']}, addr : {c['addr']}") if __name__ == '__main__': hello_world()
在从终端运行 Python 代码之前,请确保授权终端使用 Microsoft Entra ID。
azd auth login
适用 Python 运行
PythonApplication1.py
。 应显示如以下示例所示的结果:
使用重新身份验证创建 Python 脚本
Microsoft Entra ID 访问令牌的有效期有限,平均 75 分钟。 为了保持与缓存的连接,需要刷新令牌。 此示例演示如何使用 Python 执行此操作。
创建新的文本文件,并添加以下脚本。 然后,将文件保存为
PythonApplication2.py
。将
<Your Host Name>
替换为来自 Azure Cache for Redis 实例的值。 主机名采用<DNS name>.redis.cache.chinacloudapi.cn
形式。将
<Your Username>
替换为来自 Microsoft Entra ID 用户的值。import time import logging import redis from azure.identity import DefaultAzureCredential scope = "https://redis.azure.com/.default" host = "<Your Host Name>" port = 6380 user_name = "<Your Username>" def re_authentication(): _LOGGER = logging.getLogger(__name__) cred = DefaultAzureCredential() token = cred.get_token(scope) r = redis.Redis(host=host, port=port, ssl=True, # ssl connection is required. username=user_name, password=token.token, decode_responses=True) max_retry = 3 for index in range(max_retry): try: if _need_refreshing(token): _LOGGER.info("Refreshing token...") tmp_token = cred.get_token(scope) if tmp_token: token = tmp_token r.execute_command("AUTH", user_name, token.token) result = r.ping() print("Ping returned : " + str(result)) result = r.set("Message", "Hello!, The cache is working with Python!") print("SET Message returned : " + str(result)) result = r.get("Message") print("GET Message returned : " + result) result = r.client_list() print("CLIENT LIST returned : ") for c in result: print(f"id : {c['id']}, addr : {c['addr']}") break except redis.ConnectionError: _LOGGER.info("Connection lost. Reconnecting.") token = cred.get_token(scope) r = redis.Redis(host=host, port=port, ssl=True, # ssl connection is required. username=user_name, password=token.token, decode_responses=True) except Exception: _LOGGER.info("Unknown failures.") break def _need_refreshing(token, refresh_offset=300): return not token or token.expires_on - time.time() < refresh_offset if __name__ == '__main__': re_authentication()
适用 Python 运行
PythonApplication2.py
。 应显示如以下示例所示的结果:与第一个示例不同,如果令牌过期,此示例会自动刷新它。
清理资源
要继续使用在本文中创建的资源,请保留资源组。
否则,如果已完成资源,可以删除创建的 Azure 资源组以避免产生费用。
重要
删除资源组的操作不可逆。 删除资源组时,包含在其中的所有资源会被永久删除。 请确保不会意外删除错误的资源组或资源。 如果在现有资源组(其中包含要保留的资源)内创建了此资源,可以逐个删除这些资源,而不是删除资源组。
删除资源组的步骤
登录到 Azure 门户,然后选择“资源组”。
选择要删除的资源组。
如果有多个资源组,请使用“筛选任何字段...”框,键入为本文创建的资源组的名称。 在结果列表中选择资源组。
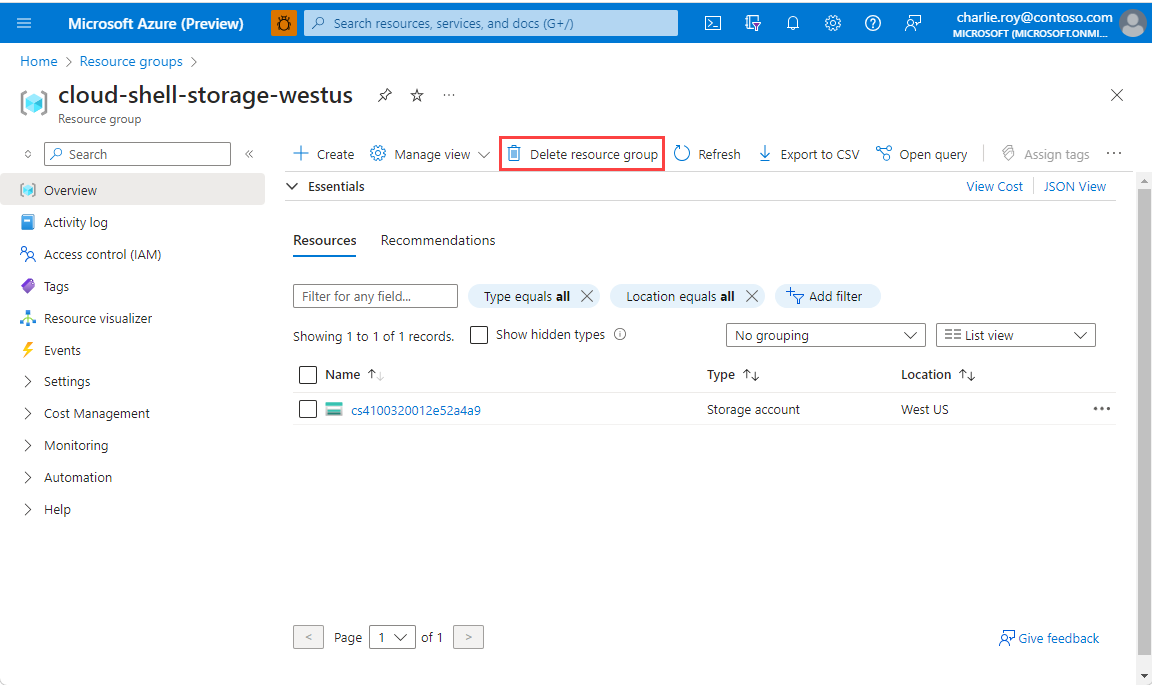
选择“删除资源组”。
系统会要求确认是否删除资源组。 键入资源组的名称进行确认,然后选择“删除”。
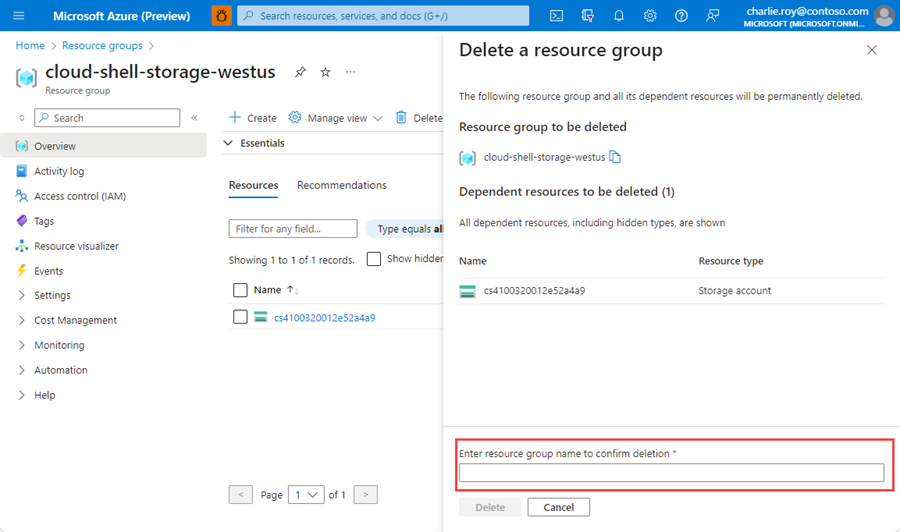
片刻之后,将会删除该资源组及其所有资源。