Application Insights 与 Log Analytics 集成,并将遥测数据发送到公共 Log Analytics 工作区。 此设置提供对Log Analytics功能的完全访问权限,将日志合并到一个位置,并允许统一Azure基于角色的访问控制这消除了跨应用/工作区查询的需求。
增强的功能包括:
-
客户管理的密钥 - 使用仅可访问的密钥加密静态数据。
-
Azure 专用链接 - 使用专用终结点将 Azure PaaS 服务安全地连接到您的虚拟网络。
-
-
此层级提供的定价相对于即用即付定价而言可以节省高达 30% 的费用。
本文介绍如何创建和配置 Application Insights 资源。 除了 Application Insights 资源本身,还可以添加各种配置,例如设置 每日 上限和 定价计划。 还可以创建 可用性测试、设置 metric alerts,并使用 Azure 资源管理器 自动执行该过程。
先决条件
其他需求
若要访问 Application Insights Azure CLI命令,首先需要运行:
az extension add -n application-insights
如果未运行az extension add该命令,则会看到一条错误消息,指出: az : ERROR: az monitor: 'app-insights' is not in the 'az monitor' command group. See 'az monitor --help'
可以通过Azure CLI、Azure PowerShell和Azure门户中部署Bicep模板。 检查相应的选项卡,了解其他要求。
可以通过 Azure CLI、Azure PowerShell 和 Azure 门户中部署 ARM 模板。 检查相应的选项卡,了解其他要求。
创建 Application Insights 资源
注意
如果在资源创建过程中未连接到现有Log Analytics工作区,则会随 Application Insights 资源一起自动创建新的Log Analytics资源。
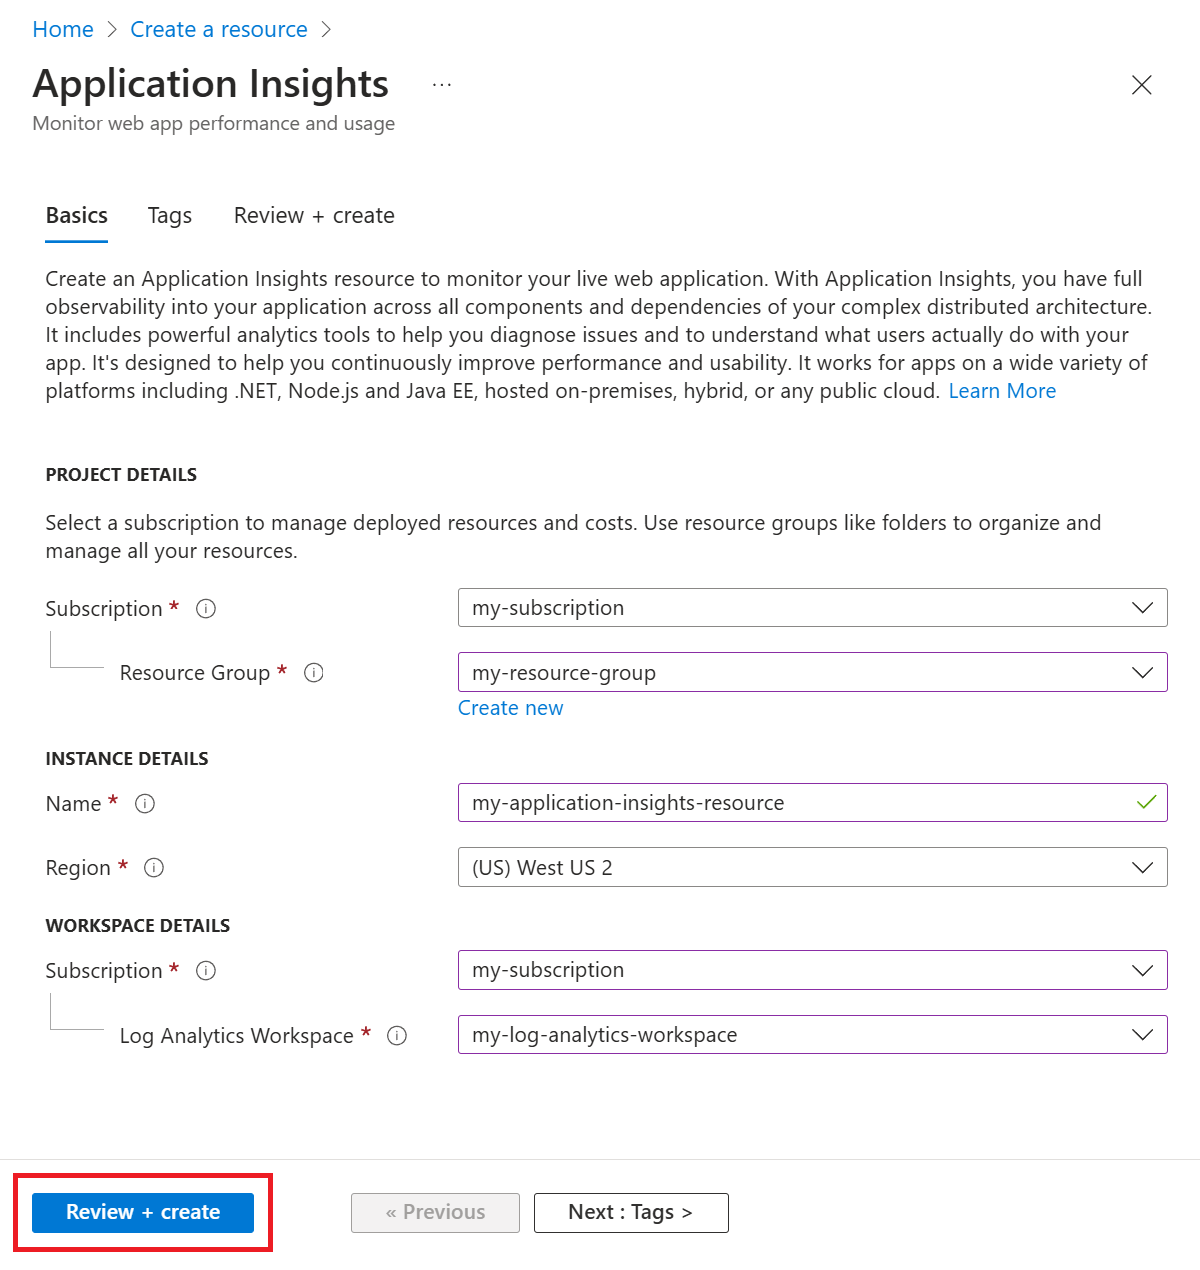
- 登录到 Azure 门户。
- 选择“ 创建资源”。
- 然后选择 Application Insights。
- 输入所有相关信息,然后 审核并创建 Application Insights 资源。
创建资源后,可以在 Application Insights “概述 ”窗格中找到相应的工作区信息。
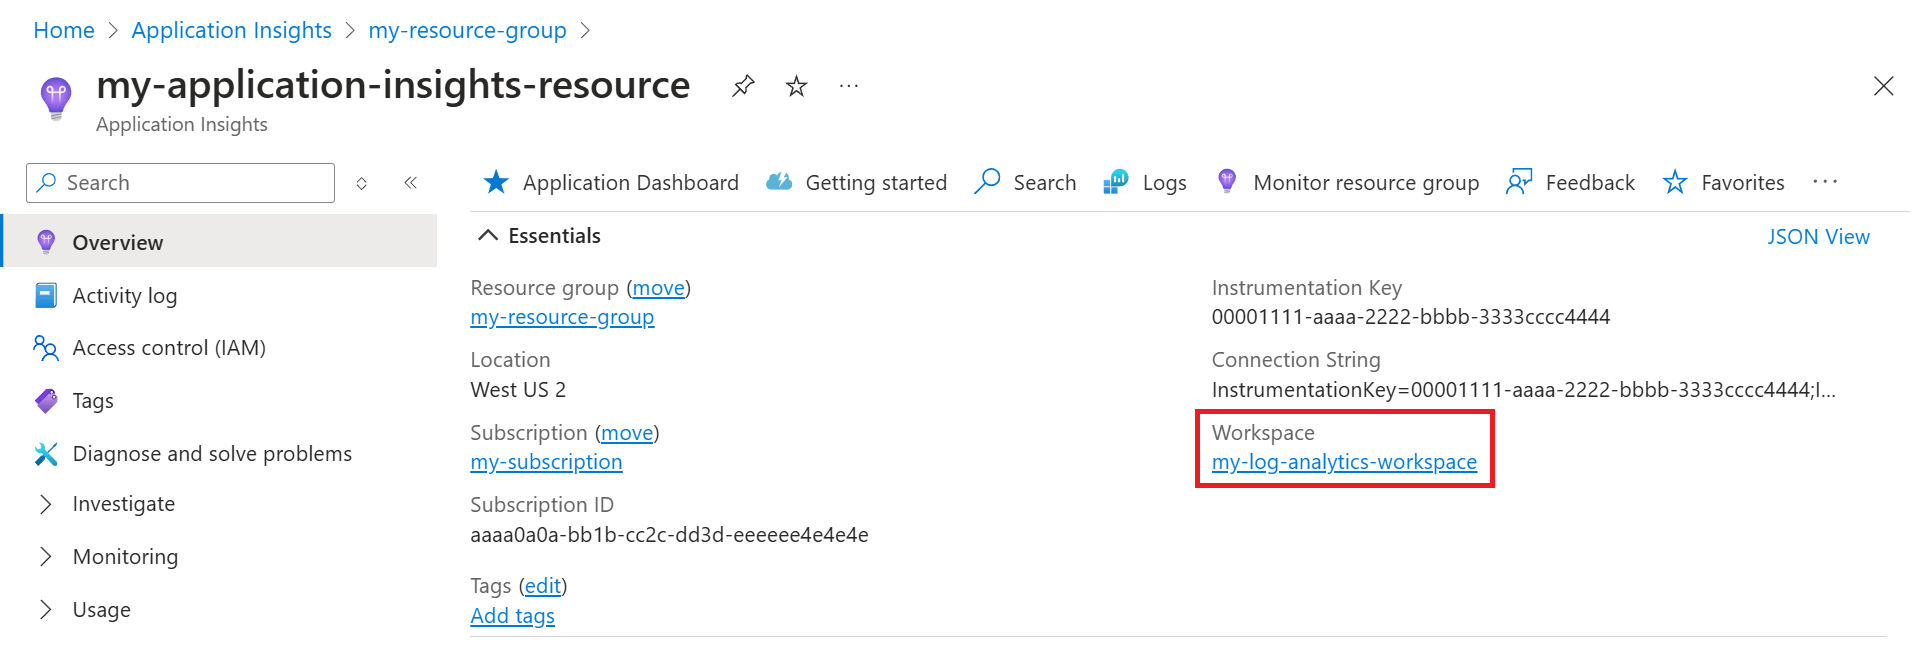
选择蓝色链接文本,转到关联的Log Analytics工作区,可以在其中利用新的统一工作区查询环境。
注意
我们仍为 Application Insights 经典资源查询、工作簿和基于日志的警报提供完全后向兼容性。 若要查询或查看 基于工作区的新表结构或架构,必须先转到Log Analytics工作区。 在“Application Insights”窗格中选择“日志(分析)”访问经典 Application Insights 查询体验。
以下Azure CLI示例使用 az monitor app-insights 组件 create 命令。
# Set variables
resourceGroupName="<ResourceGroupName>"
resourceName="<ResourceName>"
azureRegion="<AzureRegion>"
workspaceName="<WorkspaceName>"

# Get the subscription ID from the current Azure CLI context
subscriptionId=$(az account show --query id --output tsv)

# Build the full resource ID for the Log Analytics workspace
workspaceResourceId="/subscriptions/$subscriptionId/resourceGroups/$resourceGroupName/providers/Microsoft.OperationalInsights/workspaces/$workspaceName"

# Create a workspace-based Application Insights resource
az monitor app-insights component create \
  --app "$resourceName" \
  --location "$azureRegion" \
  --resource-group "$resourceGroupName" \
  --kind web \
  --application-type web \
  --workspace "$workspaceResourceId"
注意
Azure CLI命令使用当前 CLI 上下文中的Azure 资源管理器终结点,因此无需在命令语法中指定 management.chinacloudapi.cn。
以下Azure PowerShell示例使用 New-AzApplicationInsights cmdlet。
# Set variables
$resourceGroupName = "<ResourceGroupName>"
$resourceName = "<ResourceName>"
$azureRegion = "<AzureRegion>"
$workspaceName = "<WorkspaceName>"

# Get the subscription ID from the current Azure PowerShell context
$subscriptionId = (Get-AzContext).Subscription.Id

# Build the full resource ID for the Log Analytics workspace
$workspaceResourceId = "/subscriptions/$subscriptionId/resourceGroups/$resourceGroupName/providers/Microsoft.OperationalInsights/workspaces/$workspaceName"

# Define the parameters for the Application Insights resource
$newAzApplicationInsightsParams = @{
    ResourceGroupName   = $resourceGroupName
    Name                = $resourceName
    Location            = $azureRegion
    Kind                = "web"
    ApplicationType     = "web"
    WorkspaceResourceId = $workspaceResourceId
}

# Create a workspace-based Application Insights resource
New-AzApplicationInsights @newAzApplicationInsightsParams
注意
Azure PowerShell cmdlet 使用当前 Az 上下文中的Azure 资源管理器终结点,因此无需在 cmdlet 语法中指定management.chinacloudapi.cn。
以下 REST 示例使用 组件 - 创建或更新 REST API 操作。
PUT https://management.chinacloudapi.cn/subscriptions/{SubscriptionId}/resourceGroups/{ResourceGroupName}/providers/Microsoft.Insights/components/{ResourceName}?api-version=2020-02-02
Authorization: Bearer {AccessToken}
Content-Type: application/json

{
  "kind": "web",
  "location": "<AzureRegion>",
  "properties": {
    "Application_Type": "web",
    "WorkspaceResourceId": "/subscriptions/<SubscriptionId>/resourceGroups/<ResourceGroupName>/providers/Microsoft.OperationalInsights/workspaces/<WorkspaceName>"
  }
}
以下 Bicep 示例使用 Microsoft.Insights/components 资源类型。
param subscriptionId string = '<SubscriptionId>'
param resourceGroupName string = '<ResourceGroupName>'
param resourceName string = '<ResourceName>'
param azureRegion string = '<AzureRegion>'
param workspaceName string = '<WorkspaceName>'

var workspaceResourceId = '/subscriptions/${subscriptionId}/resourceGroups/${resourceGroupName}/providers/Microsoft.OperationalInsights/workspaces/${workspaceName}'

resource applicationInsightsComponent 'Microsoft.Insights/components@2020-02-02' = {
  name: resourceName
  location: azureRegion
  kind: 'web'
  properties: {
    Application_Type: 'web'
    WorkspaceResourceId: workspaceResourceId
  }
}
以下 ARM (JSON) 示例使用 Microsoft。Insights/components 资源类型。
{
  "$schema": "https://schema.management.azure.com/schemas/2019-04-01/deploymentTemplate.json#",
  "contentVersion": "1.0.0.0",
  "parameters": {
    "subscriptionId": {
      "type": "string",
      "defaultValue": "<SubscriptionId>"
    },
    "resourceGroupName": {
      "type": "string",
      "defaultValue": "<ResourceGroupName>"
    },
    "resourceName": {
      "type": "string",
      "defaultValue": "<ResourceName>"
    },
    "azureRegion": {
      "type": "string",
      "defaultValue": "<AzureRegion>"
    },
    "workspaceName": {
      "type": "string",
      "defaultValue": "<WorkspaceName>"
    }
  },
  "variables": {
    "workspaceResourceId": "[format('/subscriptions/{0}/resourceGroups/{1}/providers/Microsoft.OperationalInsights/workspaces/{2}', parameters('subscriptionId'), parameters('resourceGroupName'), parameters('workspaceName'))]"
  },
  "resources": [
    {
      "type": "Microsoft.Insights/components",
      "apiVersion": "2020-02-02",
      "name": "[parameters('resourceName')]",
      "location": "[parameters('azureRegion')]",
      "kind": "web",
      "properties": {
        "Application_Type": "web",
        "WorkspaceResourceId": "[variables('workspaceResourceId')]"
      }
    }
  ]
}
创建 Application Insights 资源后,可以配置监视。
获取连接字符串
连接字符串标识要与遥测数据关联的资源。 还可以使用它来修改你的资源用作遥测目标的终结点。 必须复制连接字符串并将其添加到应用程序的代码或环境变量。
获取 Application Insights 资源的连接字符串:
- 在 Azure 门户中打开 Application Insights 资源。
- 在“概要”部分中的“概述”窗格中,查找连接字符串。
- 如果将鼠标悬停在连接字符串上,将显示一个图标,用于将其复制到剪贴板。
以下Azure CLI示例使用 az monitor app-insights 组件 show 命令。
# Set variables
resourceGroupName="<ResourceGroupName>"
resourceName="<ResourceName>"

# Retrieve the Application Insights component
az monitor app-insights component show \
  --resource-group "$resourceGroupName" \
  --app "$resourceName"
在 JSON 响应中查找 connectionString 字段。
以下Azure PowerShell示例使用 Get-AzApplicationInsights cmdlet。
# Set variables
$resourceGroupName = "<ResourceGroupName>"
$resourceName = "<ResourceName>"

# Define parameters for Get-AzApplicationInsights
$getAzApplicationInsightsParams = @{
    ResourceGroupName = $resourceGroupName
    Name              = $resourceName
}

# Retrieve the Application Insights component
Get-AzApplicationInsights @getAzApplicationInsightsParams
在输出中查找 ConnectionString 属性。
以下 REST 示例使用 组件 - 获取 REST API 操作。
GET https://management.chinacloudapi.cn/subscriptions/{SubscriptionId}/resourceGroups/{ResourceGroupName}/providers/Microsoft.Insights/components/{ResourceName}?api-version=2020-02-02
Authorization: Bearer {AccessToken}
在 JSON 响应中查找 properties.connectionString 字段。
使用 OpenTelemetry 进行应用程序监视
若要使用 OpenTelemetry 进行应用程序监视,请安装相应的 Azure Monitor OpenTelemetry 发行版,并将连接字符串指向新创建的资源。
有关如何使用 OpenTelemetry 设置应用程序监视的信息,请参阅以下特定于语言的文档:
自动化仪器
对于监视服务(如 Azure Functions 和 Azure 应用服务,可以先创建 Application Insights 资源,然后在启用监视时指向它。 或者,可以在启用过程中创建新的 Application Insights 资源。
修改关联的工作区
创建 Application Insights 资源后,可以修改关联的Log Analytics工作区。
重要
REST 调用、ARM 模板和Bicep模板使用 create-or-update (PUT) 语义。 使用这些方法更新 Application Insights 组件时,请包含要保留的任何必需属性。 不包括的属性可能会重置或删除。
在 Application Insights 资源中,选择 Properties>Change workspace>Log Analytics Workspaces。
以下Azure CLI示例使用 az monitor app-insights 组件更新命令。
# Set variables
resourceGroupName="<ResourceGroupName>"
resourceName="<ResourceName>"
workspaceName="<WorkspaceName>"

# Get the subscription ID from the current Azure CLI context
subscriptionId=$(az account show --query id --output tsv)

# Build the full resource ID for the Log Analytics workspace
workspaceResourceId="/subscriptions/$subscriptionId/resourceGroups/$resourceGroupName/providers/Microsoft.OperationalInsights/workspaces/$workspaceName"

# Update a workspace-based Application Insights resource
az monitor app-insights component update \
  --resource-group "$resourceGroupName" \
  --app "$resourceName" \
  --workspace "$workspaceResourceId"
以下Azure PowerShell示例使用 Update-AzApplicationInsights cmdlet。
# Set variables
$resourceGroupName = "<ResourceGroupName>"
$resourceName = "<ResourceName>"
$workspaceName = "<WorkspaceName>"

# Get the subscription ID from the current Azure PowerShell context
$subscriptionId = (Get-AzContext).Subscription.Id

# Build the full resource ID for the Log Analytics workspace
$workspaceResourceId = "/subscriptions/$subscriptionId/resourceGroups/$resourceGroupName/providers/Microsoft.OperationalInsights/workspaces/$workspaceName"

# Define the parameters for the Application Insights resource
$updateAzApplicationInsightsParams = @{
    ResourceGroupName   = $resourceGroupName
    Name                = $resourceName
    WorkspaceResourceId = $workspaceResourceId
}

# Update a workspace-based Application Insights resource
Update-AzApplicationInsights @updateAzApplicationInsightsParams
以下 REST 示例使用 组件 - 创建或更新 REST API 操作。
PUT https://management.chinacloudapi.cn/subscriptions/{SubscriptionId}/resourceGroups/{ResourceGroupName}/providers/Microsoft.Insights/components/{ResourceName}?api-version=2020-02-02
Authorization: Bearer {AccessToken}
Content-Type: application/json

{
  "location": "<AzureRegion>",
  "kind": "web",
  "properties": {
    "Application_Type": "web",
    "WorkspaceResourceId": "/subscriptions/<SubscriptionId>/resourceGroups/<ResourceGroupName>/providers/Microsoft.OperationalInsights/workspaces/<WorkspaceName>"
  }
}
以下 Bicep 示例使用 Microsoft.Insights components 资源类型。
param subscriptionId string = '<SubscriptionId>'
param resourceGroupName string = '<ResourceGroupName>'
param resourceName string = '<ResourceName>'
param azureRegion string = '<AzureRegion>'
param workspaceName string = '<WorkspaceName>'

var workspaceResourceId = '/subscriptions/${subscriptionId}/resourceGroups/${resourceGroupName}/providers/Microsoft.OperationalInsights/workspaces/${workspaceName}'

resource applicationInsightsComponent 'Microsoft.Insights/components@2020-02-02' = {
  name: resourceName
  location: azureRegion
  kind: 'web'
  properties: {
    Application_Type: 'web'
    WorkspaceResourceId: workspaceResourceId
  }
}
以下 ARM (JSON) 示例使用 Microsoft.Insights components 资源类型。
{
  "$schema": "https://schema.management.azure.com/schemas/2019-04-01/deploymentTemplate.json#",
  "contentVersion": "1.0.0.0",
  "parameters": {
    "subscriptionId": {
      "type": "string",
      "defaultValue": "<SubscriptionId>"
    },
    "resourceGroupName": {
      "type": "string",
      "defaultValue": "<ResourceGroupName>"
    },
    "resourceName": {
      "type": "string",
      "defaultValue": "<ResourceName>"
    },
    "azureRegion": {
      "type": "string",
      "defaultValue": "<AzureRegion>"
    },
    "workspaceName": {
      "type": "string",
      "defaultValue": "<WorkspaceName>"
    }
  },
  "variables": {
    "workspaceResourceId": "[format('/subscriptions/{0}/resourceGroups/{1}/providers/Microsoft.OperationalInsights/workspaces/{2}', parameters('subscriptionId'), parameters('resourceGroupName'), parameters('workspaceName'))]"
  },
  "resources": [
    {
      "type": "Microsoft.Insights/components",
      "apiVersion": "2020-02-02",
      "name": "[parameters('resourceName')]",
      "location": "[parameters('azureRegion')]",
      "kind": "web",
      "properties": {
        "Application_Type": "web",
        "WorkspaceResourceId": "[variables('workspaceResourceId')]"
      }
    }
  ]
}
导出遥测数据
基于工作区的资源不支持旧版连续导出功能。 请改用 诊断设置。
在 Application Insights 资源中,选择“ 诊断设置>添加诊断设置”。
可以选择要存档到存储帐户的所有表或表子集。 还可以将其流式传输到事件中心。
以下Azure CLI示例使用 az monitor diagnostic-settings create 命令。 它创建一个诊断设置,用于将日志和指标从 Application Insights 资源发送到存储帐户。
# Set variables
resourceGroupName="<ResourceGroupName>"
resourceName="<ResourceName>"
storageAccountName="<StorageAccountName>"
diagnosticSettingName="<DiagnosticSettingName>"

# Get the subscription ID from the current Azure CLI context
subscriptionId=$(az account show --query id --output tsv)

# Build the full resource ID for the Application Insights component
resourceId="/subscriptions/$subscriptionId/resourceGroups/$resourceGroupName/providers/Microsoft.Insights/components/$resourceName"

# Build the full resource ID for the storage account
storageAccountId="/subscriptions/$subscriptionId/resourceGroups/$resourceGroupName/providers/Microsoft.Storage/storageAccounts/$storageAccountName"

# Create the diagnostic setting
az monitor diagnostic-settings create \
  --name "$diagnosticSettingName" \
  --resource "$resourceId" \
  --storage-account "$storageAccountId" \
  --logs '[{"category":"AppRequests","enabled":true}]' \
  --metrics '[{"category":"AllMetrics","enabled":true}]'
以下Azure PowerShell示例使用 New-AzDiagnosticSetting cmdlet。 它创建一个诊断设置,用于将日志和指标从 Application Insights 资源发送到存储帐户。
# Set variables
$resourceGroupName = "<ResourceGroupName>"
$resourceName = "<ResourceName>"
$storageAccountName = "<StorageAccountName>"
$diagnosticSettingName = "<DiagnosticSettingName>"

# Get the subscription ID from the current Azure PowerShell context
$subscriptionId = (Get-AzContext).Subscription.Id

# Build the full resource ID for the Application Insights component
$resourceId = "/subscriptions/$subscriptionId/resourceGroups/$resourceGroupName/providers/Microsoft.Insights/components/$resourceName"

# Build the full resource ID for the storage account
$storageAccountId = "/subscriptions/$subscriptionId/resourceGroups/$resourceGroupName/providers/Microsoft.Storage/storageAccounts/$storageAccountName"

# Create log and metric settings objects
$log = New-AzDiagnosticSettingLogSettingsObject `
  -Category 'AppRequests' `
  -Enabled $true

$metric = New-AzDiagnosticSettingMetricSettingsObject `
  -Category 'AllMetrics' `
  -Enabled $true

# Define parameters for New-AzDiagnosticSetting
$newAzDiagnosticSettingParams = @{
    Name             = $diagnosticSettingName
    ResourceId       = $resourceId
    StorageAccountId = $storageAccountId
    Log              = @($log)
    Metric           = @($metric)
}

# Create the diagnostic setting
New-AzDiagnosticSetting @newAzDiagnosticSettingParams
以下 REST 示例使用 诊断设置 - 创建或更新 REST API 操作。 它创建一个诊断设置,用于将日志和指标从 Application Insights 资源发送到存储帐户。
PUT https://management.chinacloudapi.cn/subscriptions/{SubscriptionId}/resourceGroups/{ResourceGroupName}/providers/Microsoft.Insights/components/{ResourceName}/providers/Microsoft.Insights/diagnosticSettings/{DiagnosticSettingName}?api-version=2021-05-01-preview
Authorization: Bearer {AccessToken}
Content-Type: application/json

{
  "properties": {
    "storageAccountId": "/subscriptions/<SubscriptionId>/resourceGroups/<ResourceGroupName>/providers/Microsoft.Storage/storageAccounts/<StorageAccountName>",
    "logs": [
      {
        "category": "AppRequests",
        "enabled": true
      }
    ],
    "metrics": [
      {
        "category": "AllMetrics",
        "enabled": true
      }
    ]
  }
}
以下 Bicep 示例使用 Microsoft.Insights diagnosticSettings 资源类型。 它创建一个诊断设置,用于将日志和指标从 Application Insights 资源发送到存储帐户。
param subscriptionId string = '<SubscriptionId>'
param resourceGroupName string = '<ResourceGroupName>'
param resourceName string = '<ResourceName>'
param storageAccountName string = '<StorageAccountName>'
param diagnosticSettingName string = '<DiagnosticSettingName>'

resource applicationInsightsComponent 'Microsoft.Insights/components@2020-02-02' existing = {
  name: resourceName
}

var storageAccountId = '/subscriptions/${subscriptionId}/resourceGroups/${resourceGroupName}/providers/Microsoft.Storage/storageAccounts/${storageAccountName}'

resource diagnosticSetting 'Microsoft.Insights/diagnosticSettings@2021-05-01-preview' = {
  name: diagnosticSettingName
  scope: applicationInsightsComponent
  properties: {
    storageAccountId: storageAccountId
    logs: [
      {
        category: 'AppRequests'
        enabled: true
      }
    ]
    metrics: [
      {
        category: 'AllMetrics'
        enabled: true
      }
    ]
  }
}
以下 ARM 模板示例使用 Microsoft。Insights diagnosticSettings 资源类型。 它创建一个诊断设置,用于将日志和指标从 Application Insights 资源发送到存储帐户。
{
  "$schema": "https://schema.management.azure.com/schemas/2019-04-01/deploymentTemplate.json#",
  "contentVersion": "1.0.0.0",
  "parameters": {
    "subscriptionId": {
      "type": "string",
      "defaultValue": "<SubscriptionId>"
    },
    "resourceGroupName": {
      "type": "string",
      "defaultValue": "<ResourceGroupName>"
    },
    "resourceName": {
      "type": "string",
      "defaultValue": "<ResourceName>"
    },
    "storageAccountName": {
      "type": "string",
      "defaultValue": "<StorageAccountName>"
    },
    "diagnosticSettingName": {
      "type": "string",
      "defaultValue": "<DiagnosticSettingName>"
    }
  },
  "variables": {
    "storageAccountId": "[format('/subscriptions/{0}/resourceGroups/{1}/providers/Microsoft.Storage/storageAccounts/{2}', parameters('subscriptionId'), parameters('resourceGroupName'), parameters('storageAccountName'))]"
  },
  "resources": [
    {
      "type": "Microsoft.Insights/components/providers/diagnosticSettings",
      "apiVersion": "2021-05-01-preview",
      "name": "[format('{0}/Microsoft.Insights/{1}', parameters('resourceName'), parameters('diagnosticSettingName'))]",
      "properties": {
        "storageAccountId": "[variables('storageAccountId')]",
        "logs": [
          {
            "category": "AppRequests",
            "enabled": true
          }
        ],
        "metrics": [
          {
            "category": "AllMetrics",
            "enabled": true
          }
        ]
      }
    }
  ]
}
设置数据保留期
以下 Bicep 示例使用了 Microsoft.OperationalInsights workspaces 资源类型。 它为关联的Log Analytics工作区设置数据保留期。
param workspaceName string = '<WorkspaceName>'
param azureRegion string = '<AzureRegion>'
param retentionInDays int = <RetentionInDays>

resource logAnalyticsWorkspace 'Microsoft.OperationalInsights/workspaces@2025-07-01' = {
  name: workspaceName
  location: azureRegion
  properties: {
    retentionInDays: retentionInDays
  }
}
以下 ARM (JSON) 示例使用 Microsoft。OperationalInsights 工作区资源类型。 它为关联的Log Analytics工作区设置数据保留期。
{
  "$schema": "https://schema.management.azure.com/schemas/2019-04-01/deploymentTemplate.json#",
  "contentVersion": "1.0.0.0",
  "parameters": {
    "workspaceName": {
      "type": "string",
      "defaultValue": "<WorkspaceName>"
    },
    "azureRegion": {
      "type": "string",
      "defaultValue": "<AzureRegion>"
    },
    "retentionInDays": {
      "type": "int",
      "defaultValue": <RetentionInDays>
    }
  },
  "resources": [
    {
      "type": "Microsoft.OperationalInsights/workspaces",
      "apiVersion": "2025-07-01",
      "name": "[parameters('workspaceName')]",
      "location": "[parameters('azureRegion')]",
      "properties": {
        "retentionInDays": "[parameters('retentionInDays')]"
      }
    }
  ]
}
设置每日上限
必须为 Application Insights 和基础Log Analytics工作区单独设置每日上限。 有效的每日上限是两个设置的最小值。
注意
目前,Azure不提供通过Azure CLI为 Application Insights 设置每日上限的方法。
Log Analytics:
以下Azure CLI示例使用 az monitor log-analytics 工作区更新命令。
# Set variables
resourceGroupName="<ResourceGroupName>"
workspaceName="<WorkspaceName>"
dailyCapInGb="<DailyCapInGb>"

# Update the daily cap for the Log Analytics workspace
az monitor log-analytics workspace update \
  --resource-group "$resourceGroupName" \
  --workspace-name "$workspaceName" \
  --set workspaceCapping.dailyQuotaGb=$dailyCapInGb
以下Azure PowerShell示例使用 Set-AzApplicationInsightsDailyCap 和 Set-AzOperationalInsightsWorkspace cmdlet。
Application Insights:
以下Azure PowerShell示例使用 Set-AzApplicationInsightsDailyCap cmdlet。
# Set variables
$resourceGroupName = "<ResourceGroupName>"
$resourceName = "<ResourceName>"
$dailyCapInGb = "<DailyCapInGb>"

# Define the parameters for the daily cap
$setAzApplicationInsightsDailyCapParams = @{
    ResourceGroupName = $resourceGroupName
    Name              = $resourceName
    DailyCapGB        = $dailyCapInGb
}

# Set the daily cap for the Application Insights resource
Set-AzApplicationInsightsDailyCap @setAzApplicationInsightsDailyCapParams
Log Analytics:
以下Azure PowerShell示例使用 Set-AzOperationalInsightsWorkspace cmdlet。
# Set variables
$resourceGroupName = "<ResourceGroupName>"
$workspaceName = "<WorkspaceName>"
$dailyCapInGb = "<DailyCapInGb>"

# Define the parameters for the daily cap
$setAzOperationalInsightsWorkspaceParams = @{
    ResourceGroupName = $resourceGroupName
    Name              = $workspaceName
    DailyQuotaGb      = $dailyCapInGb
}

# Set the daily cap for the Log Analytics workspace
Set-AzOperationalInsightsWorkspace @setAzOperationalInsightsWorkspaceParams
注意
目前,Azure不提供通过 REST API 为 Application Insights 设置每日上限的方法。
Log Analytics:
以下 REST 示例使用 工作区 - 更新 REST API 操作。
PATCH https://management.chinacloudapi.cn/subscriptions/{SubscriptionId}/resourceGroups/{ResourceGroupName}/providers/Microsoft.OperationalInsights/workspaces/{WorkspaceName}?api-version=2025-07-01
Authorization: Bearer {AccessToken}
Content-Type: application/json

{
  "properties": {
    "workspaceCapping": {
      "dailyQuotaGb": <DailyCapInGb>
    }
  }
}
注意
目前,Azure不提供使用 Bicep 模板为 Application Insights 设置每日上限的方法。
Log Analytics:
以下 Bicep 示例使用了 Microsoft.OperationalInsights workspaces 资源类型。
param workspaceName string = '<WorkspaceName>'
param azureRegion string = '<AzureRegion>'
param dailyCapInGb int

resource logAnalyticsWorkspace 'Microsoft.OperationalInsights/workspaces@2025-07-01' = {
  name: workspaceName
  location: azureRegion
  properties: {
    workspaceCapping: {
      dailyQuotaGb: dailyCapInGb
    }
  }
}
注意
目前,Azure不提供使用 ARM 模板为 Application Insights 设置每日上限的方法。
Log Analytics:
以下 ARM (JSON) 示例使用 Microsoft。OperationalInsights 工作区资源类型。
{
  "$schema": "https://schema.management.azure.com/schemas/2019-04-01/deploymentTemplate.json#",
  "contentVersion": "1.0.0.0",
  "parameters": {
    "workspaceName": {
      "type": "string",
      "defaultValue": "<WorkspaceName>"
    },
    "azureRegion": {
      "type": "string",
      "defaultValue": "<AzureRegion>"
    },
    "dailyCapInGb": {
      "type": "int"
    }
  },
  "resources": [
    {
      "type": "Microsoft.OperationalInsights/workspaces",
      "apiVersion": "2025-07-01",
      "name": "[parameters('workspaceName')]",
      "location": "[parameters('azureRegion')]",
      "properties": {
        "workspaceCapping": {
          "dailyQuotaGb": "[parameters('dailyCapInGb')]"
        }
      }
    }
  ]
}
设置定价计划
可以在关联的Log Analytics工作区中设置 Application Insights 资源的定价计划。 有关可用定价计划的详细信息,请参阅 Azure Monitor 日志成本计算和选项。
以下Azure CLI示例使用 az monitor log-analytics 工作区更新命令。
按使用量付费:
# Set variables
resourceGroupName="<ResourceGroupName>"
workspaceName="<WorkspaceName>"

# Set the pricing plan to pay-as-you-go
az monitor log-analytics workspace update \
  --resource-group "$resourceGroupName" \
  --workspace-name "$workspaceName" \
  --set PerGB2018
承诺层:
# Set variables
resourceGroupName="<ResourceGroupName>"
workspaceName="<WorkspaceName>"
capacityReservationInGb="<CapacityReservationInGb>"

# Set the pricing plan to commitment tier
az monitor log-analytics workspace update \
  --resource-group "$resourceGroupName" \
  --workspace-name "$workspaceName" \
  --set CapacityReservation \
  --level "$capacityReservationInGb"
以下Azure PowerShell示例使用 Set-AzOperationalInsightsWorkspace cmdlet。
按使用量付费:
# Set variables
$resourceGroupName = "<ResourceGroupName>"
$workspaceName = "<WorkspaceName>"

# Define the parameters for the pricing plan
$setAzOperationalInsightsWorkspaceParams = @{
    ResourceGroupName = $resourceGroupName
    Name              = $workspaceName
    Sku               = "PerGB2018"
}

# Set the pricing plan to pay-as-you-go
Set-AzOperationalInsightsWorkspace @setAzOperationalInsightsWorkspaceParams
承诺层:
# Set variables
$resourceGroupName = "<ResourceGroupName>"
$workspaceName = "<WorkspaceName>"
$capacityReservationInGb = "<CapacityReservationInGb>"

# Define the parameters for the pricing plan
$setAzOperationalInsightsWorkspaceParams = @{
    ResourceGroupName = $resourceGroupName
    Name              = $workspaceName
    Sku               = "CapacityReservation"
    SkuCapacity       = $capacityReservationInGb
}

# Set the pricing plan to commitment tier
Set-AzOperationalInsightsWorkspace @setAzOperationalInsightsWorkspaceParams
以下 REST 示例使用 定价计划 - 更新 REST API 操作。
按使用量付费:
PUT https://management.chinacloudapi.cn/subscriptions/{SubscriptionId}/resourceGroups/{ResourceGroupName}/providers/Microsoft.OperationalInsights/workspaces/{WorkspaceName}/pricingPlans/current?api-version=2017-10-01
Authorization: Bearer {AccessToken}
Content-Type: application/json

{
  "properties": {
    "sku": {
      "name": "pergb2018"
    }
  }
}
承诺层:
PUT https://management.chinacloudapi.cn/subscriptions/{SubscriptionId}/resourceGroups/{ResourceGroupName}/providers/Microsoft.OperationalInsights/workspaces/{WorkspaceName}/pricingPlans/current?api-version=2017-10-01
Authorization: Bearer {AccessToken}
Content-Type: application/json

{
  "properties": {
    "sku": {
      "name": "capacityreservation",
      "capacityReservationLevel": <CapacityReservationInGb>
    }
  }
}
以下 Bicep 示例使用 Microsoft.OperationalInsights workspaces 资源类型。
按使用量付费:
param workspaceName string = '<WorkspaceName>'
param azureRegion string = '<AzureRegion>'

resource logAnalyticsWorkspace 'Microsoft.OperationalInsights/workspaces@2025-07-01' = {
  name: workspaceName
  location: azureRegion
  properties: {
    sku: {
      name: 'pergb2018'
    }
  }
}
承诺层:
param workspaceName string = '<WorkspaceName>'
param azureRegion string = '<AzureRegion>'
param capacityReservationInGb int

resource logAnalyticsWorkspace 'Microsoft.OperationalInsights/workspaces@2025-07-01' = {
  name: workspaceName
  location: azureRegion
  properties: {
    sku: {
      name: 'capacityreservation'
      capacityReservationLevel: capacityReservationInGb
    }
  }
}
以下 ARM (JSON) 示例使用 Microsoft。OperationalInsights 工作区资源类型。
按使用量付费:
{
  "$schema": "https://schema.management.azure.com/schemas/2019-04-01/deploymentTemplate.json#",
  "contentVersion": "1.0.0.0",
  "parameters": {
    "workspaceName": {
      "type": "string",
      "defaultValue": "<WorkspaceName>"
    },
    "azureRegion": {
      "type": "string",
      "defaultValue": "<AzureRegion>"
    }
  },
  "resources": [
    {
      "type": "Microsoft.OperationalInsights/workspaces",
      "apiVersion": "2025-07-01",
      "name": "[parameters('workspaceName')]",
      "location": "[parameters('azureRegion')]",
      "properties": {
        "sku": {
          "name": "pergb2018"
        }
      }
    }
  ]
}
承诺层:
{
  "$schema": "https://schema.management.azure.com/schemas/2019-04-01/deploymentTemplate.json#",
  "contentVersion": "1.0.0.0",
  "parameters": {
    "workspaceName": {
      "type": "string",
      "defaultValue": "<WorkspaceName>"
    },
    "azureRegion": {
      "type": "string",
      "defaultValue": "<AzureRegion>"
    },
    "capacityReservationInGb": {
      "type": "int"
    }
  },
  "resources": [
    {
      "type": "Microsoft.OperationalInsights/workspaces",
      "apiVersion": "2025-07-01",
      "name": "[parameters('workspaceName')]",
      "location": "[parameters('azureRegion')]",
      "properties": {
        "sku": {
          "name": "capacityreservation",
          "capacityReservationLevel": "[parameters('capacityReservationInGb')]"
        }
      }
    }
  ]
}
禁用 IP 掩码
默认情况下,Application Insights 不会存储 IP 地址。 若要了解如何禁用 IP 掩码,请参阅 地理位置和 IP 地址处理。
创建其他资源
创建可用性测试
以下Azure CLI示例使用 az monitor app-insights web-test create 命令。 它使用默认设置创建标准可用性测试。
# Set variables
resourceGroupName="<ResourceGroupName>"
resourceName="<ResourceName>"
azureRegion="<AzureRegion>"
webTestName="<WebTestName>"
requestUrl="<RequestUrl>"

# Get the subscription ID from the current Azure CLI context
subscriptionId=$(az account show --query id --output tsv)

# Create a standard availability test
az monitor app-insights web-test create \
  --resource-group "$resourceGroupName" \
  --location "$azureRegion" \
  --web-test-kind standard \
  --name "$webTestName" \
  --defined-web-test-name "$webTestName" \
  --request-url "$requestUrl" \
  --retry-enabled true \
  --ssl-check true \
  --ssl-lifetime-check 7 \
  --frequency 300 \
  --locations Id="us-ca-sjc-azr" \
  --locations Id="apac-sg-sin-azr" \
  --locations Id="us-il-ch1-azr" \
  --locations Id="us-va-ash-azr" \
  --locations Id="emea-au-syd-edge" \
  --http-verb GET \
  --timeout 120 \
  --expected-status-code 200 \
  --enabled true \
  --tags "hidden-link:/subscriptions/$subscriptionId/resourceGroups/$resourceGroupName/providers/microsoft.insights/components/$resourceName=Resource"
注意
Web 测试区域(--location)不同于地理位置(--locations),后者可以选择多个(请注意复数形式)。
--location是指创建和托管 Web 测试的Azure区域,而 --locations是指执行 Web 测试的地理位置或位置。 有关所有地理位置的完整列表,请参阅 Application Insights 可用性测试。
以下Azure PowerShell示例使用 New-AzApplicationInsightsWebTest cmdlet。 它使用默认设置创建标准可用性测试。
# Set variables
$resourceGroupName = "<ResourceGroupName>"
$resourceName = "<ResourceName>"
$azureRegion = "<AzureRegion>"
$webTestName = "<WebTestName>"
$requestUrl = "<RequestUrl>"

# Get the subscription ID from the current Azure PowerShell context
$subscriptionId = (Get-AzContext).Subscription.Id

# Define the geographic locations from which the web test is executed
$geoLocation = @()
$geoLocation += New-AzApplicationInsightsWebTestGeolocationObject -Location "us-ca-sjc-azr"
$geoLocation += New-AzApplicationInsightsWebTestGeolocationObject -Location "apac-sg-sin-azr"
$geoLocation += New-AzApplicationInsightsWebTestGeolocationObject -Location "us-il-ch1-azr"
$geoLocation += New-AzApplicationInsightsWebTestGeolocationObject -Location "us-va-ash-azr"
$geoLocation += New-AzApplicationInsightsWebTestGeolocationObject -Location "emea-au-syd-edge"

# Define parameters for New-AzApplicationInsightsWebTest
$newAzApplicationInsightsWebTestParams = @{
    ResourceGroupName              = $resourceGroupName
    Location                       = $azureRegion
    Name                           = $webTestName
    TestName                       = $webTestName
    Kind                           = "standard"
    RequestUrl                     = $requestUrl
    RetryEnabled                   = $true
    RuleSslCheck                   = $true
    RuleSslCertRemainingLifetimeCheck = 7
    Frequency                      = 300
    GeoLocation                    = $geoLocation
    RequestHttpVerb                = "GET"
    Timeout                        = 120
    RuleExpectedHttpStatusCode     = 200
    Enabled                        = $true
    Tag                            = @{
        "hidden-link:/subscriptions/$subscriptionId/resourceGroups/$resourceGroupName/providers/microsoft.insights/components/$resourceName" = "Resource"
    }
}

# Create a standard availability test
New-AzApplicationInsightsWebTest @newAzApplicationInsightsWebTestParams
注意
Web 测试区域(-Location)不同于可以选择多个区域的地理位置(-GeoLocation)。
-Location是指创建和托管 Web 测试的Azure区域,而 -GeoLocation是指执行 Web 测试的地理位置或位置。 有关所有地理位置的完整列表,请参阅 Application Insights 可用性测试。
以下 REST 示例使用 Web 测试 - 创建或更新 REST API 操作。 它使用默认设置创建标准可用性测试。
PUT https://management.chinacloudapi.cn/subscriptions/{SubscriptionId}/resourceGroups/{ResourceGroupName}/providers/Microsoft.Insights/webtests/{WebTestName}?api-version=2022-06-15
Authorization: Bearer {AccessToken}
Content-Type: application/json

{
  "location": "<AzureRegion>",
  "tags": {
    "hidden-link:/subscriptions/<SubscriptionId>/resourceGroups/<ResourceGroupName>/providers/microsoft.insights/components/<ResourceName>": "Resource"
  },
  "properties": {
    "Name": "<WebTestName>",
    "SyntheticMonitorId": "<WebTestName>",
    "Enabled": true,
    "Frequency": 300,
    "Timeout": 120,
    "Kind": "standard",
    "RetryEnabled": true,
    "Request": {
      "RequestUrl": "<RequestUrl>",
      "HttpVerb": "GET"
    },
    "ValidationRules": {
      "ExpectedHttpStatusCode": 200,
      "SSLCheck": true,
      "SSLCertRemainingLifetimeCheck": 7
    },
    "Locations": [
      { "Id": "us-ca-sjc-azr" },
      { "Id": "apac-sg-sin-azr" },
      { "Id": "us-il-ch1-azr" },
      { "Id": "us-va-ash-azr" },
      { "Id": "emea-au-syd-edge" }
    ]
  }
}
注意
Web 测试区域(location)不同于地理位置(Locations),后者可以选择多个(请注意复数形式)。
location是指创建和托管 Web 测试的Azure区域,而 Locations是指执行 Web 测试的地理位置或位置。 有关所有地理位置的完整列表,请参阅 Application Insights 可用性测试。
以下 Bicep 示例使用 Microsoft.Insights webtests 资源类型。 它使用默认设置创建标准可用性测试。
param subscriptionId string = '<SubscriptionId>'
param resourceGroupName string = '<ResourceGroupName>'
param resourceName string = '<ResourceName>'
param azureRegion string = '<AzureRegion>'
param webTestName string = '<WebTestName>'
param requestUrl string = '<RequestUrl>'

resource webTest 'Microsoft.Insights/webtests@2022-06-15' = {
  name: webTestName
  location: azureRegion
  tags: {
    'hidden-link:/subscriptions/${subscriptionId}/resourceGroups/${resourceGroupName}/providers/microsoft.insights/components/${resourceName}': 'Resource'
  }
  properties: {
    SyntheticMonitorId: webTestName
    Name: webTestName
    Enabled: true
    Frequency: 300
    Timeout: 120
    Kind: 'standard'
    RetryEnabled: true
    Locations: [
      { Id: 'us-ca-sjc-azr' }
      { Id: 'apac-sg-sin-azr' }
      { Id: 'us-il-ch1-azr' }
      { Id: 'us-va-ash-azr' }
      { Id: 'emea-au-syd-edge' }
    ]
    Request: {
      RequestUrl: requestUrl
      HttpVerb: 'GET'
    }
    ValidationRules: {
      ExpectedHttpStatusCode: 200
      SSLCheck: true
      SSLCertRemainingLifetimeCheck: 7
    }
  }
}
注意
Web 测试区域(location)不同于可以选择多个区域的地理位置(Locations)。
location是指创建和托管 Web 测试的Azure区域,而 Locations是指执行 Web 测试的地理位置或位置。 有关所有地理位置的完整列表,请参阅 Application Insights 可用性测试。
有关使用 Bicep 创建可用性测试的详细信息,请参阅 Microsoft.Insights webtests。
以下 ARM (JSON) 示例使用 Microsoft。Insights webtests 资源类型。 它使用默认设置创建标准可用性测试。
{
  "$schema": "https://schema.management.azure.com/schemas/2019-04-01/deploymentTemplate.json#",
  "contentVersion": "1.0.0.0",
  "parameters": {
    "subscriptionId": {
      "type": "string",
      "defaultValue": "<SubscriptionId>"
    },
    "resourceGroupName": {
      "type": "string",
      "defaultValue": "<ResourceGroupName>"
    },
    "resourceName": {
      "type": "string",
      "defaultValue": "<ResourceName>"
    },
    "azureRegion": {
      "type": "string",
      "defaultValue": "<AzureRegion>"
    },
    "webTestName": {
      "type": "string",
      "defaultValue": "<WebTestName>"
    },
    "requestUrl": {
      "type": "string",
      "defaultValue": "<RequestUrl>"
    }
  },
  "resources": [
    {
      "type": "Microsoft.Insights/webtests",
      "apiVersion": "2022-06-15",
      "name": "[parameters('webTestName')]",
      "location": "[parameters('azureRegion')]",
      "tags": {
        "[format('hidden-link:/subscriptions/{0}/resourceGroups/{1}/providers/microsoft.insights/components/{2}', parameters('subscriptionId'), parameters('resourceGroupName'), parameters('resourceName'))]": "Resource"
      },
      "properties": {
        "SyntheticMonitorId": "[parameters('webTestName')]",
        "Name": "[parameters('webTestName')]",
        "Enabled": true,
        "Frequency": 300,
        "Timeout": 120,
        "Kind": "standard",
        "RetryEnabled": true,
        "Locations": [
          { "Id": "us-ca-sjc-azr" },
          { "Id": "apac-sg-sin-azr" },
          { "Id": "us-il-ch1-azr" },
          { "Id": "us-va-ash-azr" },
          { "Id": "emea-au-syd-edge" }
        ],
        "Request": {
          "RequestUrl": "[parameters('requestUrl')]",
          "HttpVerb": "GET"
        },
        "ValidationRules": {
          "ExpectedHttpStatusCode": 200,
          "SSLCheck": true,
          "SSLCertRemainingLifetimeCheck": 7
        }
      }
    }
  ]
}
注意
Web 测试区域(location)不同于可以选择多个区域的地理位置(Locations)。
location是指创建和托管 Web 测试的Azure区域,而 Locations是指执行 Web 测试的地理位置或位置。 有关所有地理位置的完整列表,请参阅 Application Insights 可用性测试。
添加指标警报
小窍门
每个 Application Insights 资源都附带了现成可用的指标。 如果不同的组件向同一个 Application Insights 资源报告,那么基于这些指标发出警报可能没有意义。
若要自动创建指标警报,请参阅指标警报模板一文。
创建更多 Application Insights 资源
应该部署多少个 Application Insights 资源?
部署 Web 应用程序的下一个版本时,不希望将新版本和已发布的版本中的 Application Insights 遥测混合使用。
为了避免混淆,请使用单独的连接字符串将来自不同开发阶段的遥测数据发送到单独的 Application Insights 资源。
如果你的系统是 Azure 云服务 的实例,则还有另一种方法来设置单独的连接字符串。
何时使用单个 Application Insights 资源
将单个 Application Insights 资源用于:
- 为部署在一起的应用程序(通常由同一团队开发和管理)简化 DevOps/ITOps 管理。
- 将响应时间和故障率等关键性能指标集中在一个仪表板中(默认情况下)。 如有必要,按指标资源管理器中的角色名分段。
- 当无需在应用程序组件之间进行不同的Azure基于角色的访问控制管理时。
- 当跨组件有相同的指标警报条件、连续导出和计费/配额管理都足够时。
- 一个 API 密钥可以平等地访问所有组件的数据且 10 个 API 密钥就能满足所有组件的需求。
- 可以对所有角色使用相同的智能检测和工作项集成设置时。
注意
如果要整合多个 Application Insights 资源,可以将现有的应用程序组件指向新的、合并的 Application Insights 资源。 存储在旧资源中的遥测数据不会传输到新资源。 仅当新资源中有了足够的遥测数据时才会删除旧资源,这样能保证业务连续性。
其他注意事项
若要激活门户体验,请添加自定义代码以将有意义的值分配给 Cloud_RoleName 属性。 如果没有这些值,门户功能将不起作用。
对于Azure Service Fabric应用程序和经典云服务,SDK 通过从Azure角色环境读取来自动配置服务。 对于不同类型的应用,通常需要显式地进行设置。
实时指标无法按角色名称拆分数据。
版本和发行版本跟踪
发布应用程序的新版本时,希望能够将遥测数据与不同的版本分开。 可以设置 应用程序版本 属性,以便筛选 搜索 和 指标资源管理器 结果。
可通过多种不同的方法设置“应用程序版本”属性。
选项 1: 直接设置版本
对于基于 OpenTelemetry 的检测,请使用 资源属性一致地设置应用程序元数据。
Option 2: 在 BuildInfo.config 中设置版本(仅限 ASP.NET)
Application Insights Web 模块从 BuildLabel 节点中选取版本。 在项目中包括此文件,并记得在 解决方案资源管理器 中设置 Copy Always 属性。
<?xml version="1.0" encoding="utf-8"?>
<DeploymentEvent xmlns:xsi="https://www.w3.org/2001/XMLSchema-instance" xmlns:xsd="https://www.w3.org/2001/XMLSchema" xmlns="http://schemas.microsoft.com/VisualStudio/DeploymentEvent/2013/06">
  <ProjectName>AppVersionExpt</ProjectName>
  <Build type="MSBuild">
    <MSBuild>
      <BuildLabel kind="label">1.0.0.2</BuildLabel>
    </MSBuild>
  </Build>
</DeploymentEvent>
在Microsoft Build引擎中自动生成 BuildInfo.config。 将以下行添加到 .csproj 文件:
<PropertyGroup>
  <GenerateBuildInfoConfigFile>true</GenerateBuildInfoConfigFile>
  <IncludeServerNameInBuildInfo>true</IncludeServerNameInBuildInfo>
</PropertyGroup>
此步骤会生成一个名为 yourProjectName 的文件。 发布过程会将此文件重命名为 BuildInfo.config。
生成标签在使用 Visual Studio 进行生成时包含占位符(*AutoGen_...*)。 使用 Microsoft Build 引擎生成时,占位符将填充正确的版本号。
若要允许Microsoft Build引擎生成版本号,请设置 1.0.* 中的 AssemblyReference.cs 等版本。
版本注释
如果使用Azure DevOps,在发布新版本时,可以在图表中添加批注标记。
自动化资源创建过程
可以通过将 Bicep 或 JSON 模板与 Azure 资源管理器 结合使用来自动执行资源创建过程。 可以将多个资源打包在一起,以在一个部署中创建它们。 例如,可以使用可用性测试、指标警报和诊断设置创建 Application Insights 资源,以便将遥测数据发送到Azure 存储帐户。
在 Azure 门户中生成模板
可以从现有资源生成模板。
仅 Application Insights
- 转到 Azure 门户中的 Application Insights 资源。
- 在左侧导航栏的“自动化”下打开“导出”模板。
- (可选):若要使用自己的参数,请取消选中 “包括”参数。
-
下载模板文件或直接在Azure门户中部署它。
多个资源
- 转到你的 Application Insights 资源的资源组。
- 在“ 概述 ”窗格中,标记要包含在模板中的所有资源,然后选择顶部导航栏中的 “导出模板 ”。
- (可选):若要使用自己的参数,请取消选中 “包括”参数。
-
下载模板文件或直接在Azure门户中部署它。
从头开始创建模板
若要了解如何从头开始创建 ARM 模板,请访问 ARM 模板文档 ,其中包含用于 创建模板、 添加资源、 添加参数等的教程。
Application Insights、可用性测试、指标警报、诊断设置和其他资源可以在我们的Azure 资源参考文档的监视器>洞察>节点中找到。
后续步骤

