Azure SignalR 服务是一项 Azure 服务,可帮助开发者轻松生成具有实时功能的 Web 应用程序。
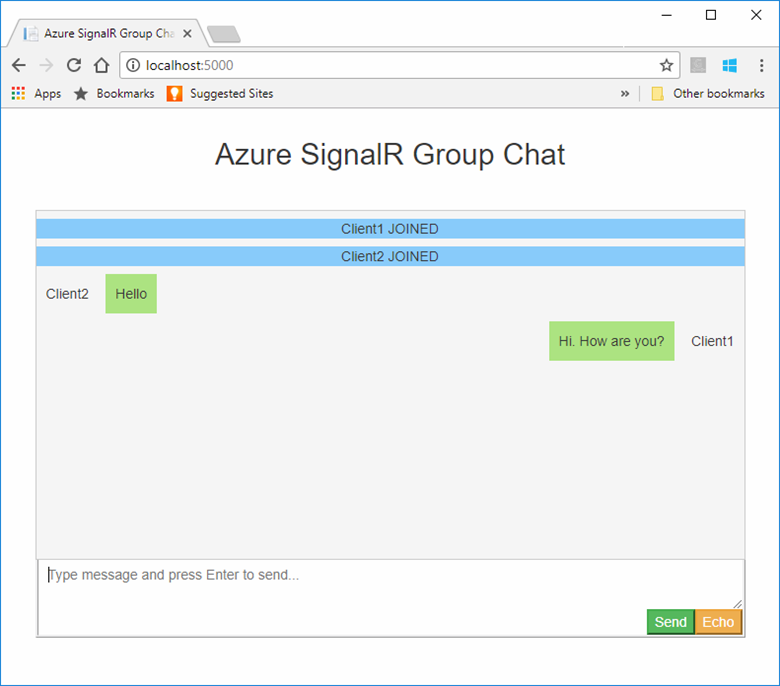
本文介绍如何开始使用 Azure SignalR 服务。 在本快速入门中,你将通过使用 ASP.NET Core Web 应用创建一个聊天应用程序。 此应用将与 Azure SignalR 服务资源建立连接,以启用实时内容更新。 将在本地托管该 Web 应用程序并与多个浏览器客户端连接。 每个客户端都可以将内容更新推送到所有其他客户端。
可使用任何代码编辑器来完成本快速入门中的步骤。 一个选项是适用于 Windows、macOS 和 Linux 平台的 Visual Studio Code。
本教程所用代码可在 AzureSignalR-samples GitHub 存储库下载。 可以遵循创建 SignalR 服务脚本来创建本快速入门中所用的 Azure 资源。
重要
本文中出现的原始连接字符串仅用于演示目的。
连接字符串包括应用程序访问 Azure SignalR 服务所需的授权信息。 连接字符串中的访问密钥类似于服务的根密码。 在生产环境中,请始终保护访问密钥。 使用 Azure 密钥保管库安全地管理和轮换密钥,使用 Microsoft Entra ID 保护连接字符串,并使用 Microsoft Entra ID 授权访问。
避免将访问密钥分发给其他用户、对其进行硬编码或将其以纯文本形式保存在其他人可以访问的任何位置。 如果你认为访问密钥可能已泄露,请轮换密钥。
准备好开始了吗?
先决条件
- 安装最新的 .NET Core SDK。
- 下载或克隆 AzureSignalR-sample GitHub 存储库。
遇到问题? 请试用故障排除指南。
创建 Azure SignalR 资源
在本部分中,你将创建一个基本 Azure SignalR 实例来用于你的应用。 以下步骤使用 Azure 门户创建新实例,但你也可以使用 Azure CLI。 有关详细信息,请参阅 Azure SignalR 服务 CLI 参考中的 az signalr create 命令。
- 登录 Azure 门户。
- 在页面的左上角,选择“+ 创建资源” 。
- 在“创建资源”页上,在“搜索服务和市场”文本框中,输入“signalr”,然后从列表中选择“SignalR 服务”。
- 在“SignalR 服务”页上,选择“创建”。
- 在“基本信息”选项卡上,输入新 SignalR 服务实例的基本信息。 输入以下值:
| 字段 | 建议的值 | 描述 |
|---|---|---|
| 订阅 | 选择订阅 | 选择要用于创建新的 SignalR 服务实例的订阅。 |
| 资源组 | 创建一个名为 SignalRTestResources 的资源组 | 为 SignalR 资源选择或创建资源组。 对于本教程,创建新的资源组比使用现有资源组更为合适。 若要在完成本教程后释放资源,请删除资源组。 删除资源组还会删除属于该组的所有资源。 此操作不能撤消。 删除资源组之前,请确保它不包含你希望保留的资源。 有关详细信息,请参阅 Using resource groups to manage your Azure resources(使用资源组管理 Azure 资源)。 |
| 资源名称 | testsignalr | 输入用于 SignalR 资源的唯一资源名称。 如果你的区域中已使用了 testsignalr,请添加一个数字或字符,以将名称设为唯一。 该名称必须是包含 1 到 63 个字符的字符串,只能包含数字、字母和连字符 ( -) 字符。 该名称的开头或末尾不能是连字符字符,并且连续的连字符字符无效。 |
| 区域 | 选择你的区域 | 为新的 SignalR 服务实例选择合适的区域。 Azure SignalR 服务当前并非在所有区域中都可用。 有关详细信息,请参阅 Azure SignalR 服务区域可用性。 |
| 定价层 | 选择“更改”,然后选择“免费(仅限开发/测试)”。 选择“选择”以确认你选择的定价层。 | Azure SignalR 服务有三个定价层:免费、标准和高级。 教程使用的是免费层,除非在先决条件中另行说明。 若要详细了解各个层级之间的功能差异以及定价,请参阅 Azure SignalR 服务定价 |
| 服务模式 | 选择适当的服务模式 | 在 Web 应用中托管 SignalR 中心逻辑并使用 SignalR 服务作为代理时,请使用“默认”。 使用无服务器技术(如 Azure Functions)托管 SignalR 中心逻辑时,请使用“无服务器”。 “经典”模式仅用于向后兼容,不建议使用。 有关详细信息,请参阅 Azure SignalR 服务中的服务模式。 |
对于 SignalR 教程,你不需要更改“网络”和“标记”选项卡上的设置。
- 选择“基本信息”选项卡底部的“查看 + 创建”按钮。
- 在“查看 + 创建”选项卡上检查各个值,然后选择“创建”。 部署需要几分钟时间才能完成。
- 在部署完成后,选择“转到资源组”按钮。
- 在 SignalR 资源页面上,从左侧菜单中选择“设置”下的“密钥”。
- 复制主密钥的连接字符串。 在本教程中,稍后你将需要使用此连接字符串来配置你的应用。
创建一个 ASP.NET Core Web 应用
在本部分,你将使用 .NET Core命令行接口 (CLI) 创建一个 ASP.NET Core MVC Web 应用项目。 通过 Visual Studio 使用 .NET Core CLI 的优点是,它可用于 Windows、macOS 和 Linux 平台。
为项目创建一个文件夹。 本快速入门使用 chattest 文件夹。
在新文件夹中,运行以下命令以创建项目:
dotnet new web
向项目添加机密管理器
在本部分,你要将机密管理器工具添加到项目。 机密管理器工具存储敏感数据,以用于项目树外部的开发工作。 此方法有助于防止意外共享源代码中的应用机密。
在文件夹中,通过运行以下命令进行初始化
UserSecretsId:dotnet user-secrets init向机密管理器添加名为“Azure: SignalR:ConnectionString”的机密 。
本文中出现的原始连接字符串仅用于演示目的。 在生产环境中,请始终保护访问密钥。 使用 Azure 密钥保管库安全地管理和轮换密钥,使用 Microsoft Entra ID 保护连接字符串,并使用 Microsoft Entra ID 授权访问。
此机密将包含用于访问 SignalR 服务资源的连接字符串。 Azure:SignalR:ConnectionString 是 SignalR 查找的用于建立连接的默认配置密钥。 将以下命令中的值替换为 SignalR 服务资源的连接字符串。
必须在
csproj文件所在的同一目录中运行此命令。dotnet user-secrets set Azure:SignalR:ConnectionString "<Your connection string>"机密管理器仅用于在本地托管 Web 应用时对其进行测试。 后一篇教程会介绍如何将聊天 Web 应用部署到 Azure。 将 Web 应用部署到 Azure 后,你将使用应用程序设置,而不是使用机密管理器存储连接字符串。
此机密使用配置 API 进行访问。 在所有支持的平台上,冒号 (:) 可以在配置 API 的配置名称中使用。 请参阅按环境进行的配置。
将 Azure SignalR 添加到 Web 应用
通过运行以下命令,添加对
Microsoft.Azure.SignalRNuGet 包的引用:dotnet add package Microsoft.Azure.SignalR打开 Program.cs 并将代码更新为以下内容,它将调用 和
AddSignalR()方法以使用 Azure SignalR 服务:var builder = WebApplication.CreateBuilder(args); builder.Services.AddSignalR().AddAzureSignalR(); var app = builder.Build(); app.UseDefaultFiles(); app.UseRouting(); app.UseStaticFiles(); app.MapHub<ChatSampleHub>("/chat"); app.Run();不向
AddAzureSignalR()传递参数意味着使用默认配置密钥作为 SignalR 服务资源连接字符串。 默认配置密钥为 Azure:SignalR:ConnectionString。 它还使用我们将在下一节中创建的ChatSampleHub。
添加集线器类
在 SignalR 中,集线器是核心组件,用于公开一组可由客户端调用的方法。 本部分通过两种方法定义集线器类:
-
BroadcastMessage设置用户帐户 :此方法向所有客户端广播消息。 -
Echo设置用户帐户 :此方法将消息发送回调用方。
这两个方法都使用 ASP.NET Core SignalR SDK 提供的 Clients 接口。 使用此接口可以访问所有已连接的客户端,因此你可将内容推送到客户端。
在项目目录中,添加名为“Hub”的新文件夹 。 将名为 ChatSampleHub.cs 的新中心代码文件添加到新文件夹。
将以下代码添加到 ChatSampleHub.cs 以定义中心类,然后保存该文件。
using Microsoft.AspNetCore.SignalR;

public class ChatSampleHub : Hub
{
    public Task BroadcastMessage(string name, string message) =>
        Clients.All.SendAsync("broadcastMessage", name, message);

    public Task Echo(string name, string message) =>
        Clients.Client(Context.ConnectionId)
                .SendAsync("echo", name, $"{message} (echo from server)");
}
添加 Web 应用的客户端接口
此聊天室应用的客户端用户界面由 wwwroot 目录中名为 index.html 的文件中的 HTML 和 JavaScript 组成。
从示例存储库的 wwwroot 文件夹复制 css/site.css 文件 。 将项目的 css/site.css 替换为复制的内容。
在名为 index.html 的 wwwroot 目录中创建新文件,将以下 HTML 复制并粘贴到新创建的文件中。
<!DOCTYPE html>
<html>
<head>
<meta http-equiv="Cache-Control" content="no-cache, no-store, must-revalidate" />
<meta name="viewport" content="width=device-width">
<meta http-equiv="Pragma" content="no-cache" />
<meta http-equiv="Expires" content="0" />
<link href="https://cdn.jsdelivr.net/npm/bootstrap@3.3.7/dist/css/bootstrap.min.css" rel="stylesheet" />
<link href="css/site.css" rel="stylesheet" />
<title>Azure SignalR Group Chat</title>
</head>
<body>
<h2 class="text-center" style="margin-top: 0; padding-top: 30px; padding-bottom: 30px;">Azure SignalR Group Chat</h2>
<div class="container" style="height: calc(100% - 110px);">
<div id="messages" style="background-color: whitesmoke; "></div>
<div style="width: 100%; border-left-style: ridge; border-right-style: ridge;">
<textarea id="message" style="width: 100%; padding: 5px 10px; border-style: hidden;"
placeholder="Type message and press Enter to send..."></textarea>
</div>
<div style="overflow: auto; border-style: ridge; border-top-style: hidden;">
<button class="btn-warning pull-right" id="echo">Echo</button>
<button class="btn-success pull-right" id="sendmessage">Send</button>
</div>
</div>
<div class="modal alert alert-danger fade" id="myModal" tabindex="-1" role="dialog" aria-labelledby="myModalLabel">
<div class="modal-dialog" role="document">
<div class="modal-content">
<div class="modal-header">
<div>Connection Error...</div>
<div><strong style="font-size: 1.5em;">Hit Refresh/F5</strong> to rejoin. ;)</div>
</div>
</div>
</div>
</div>
<!--Reference the SignalR library. -->
<script src="https://cdnjs.cloudflare.com/ajax/libs/microsoft-signalr/6.0.1/signalr.js"></script>
<!--Add script to update the page and send messages.-->
<script type="text/javascript">
document.addEventListener("DOMContentLoaded", function () {
function getUserName() {
function generateRandomName() {
return Math.random().toString(36).substring(2, 10);
}
// Get the user name and store it to prepend to messages.
var username = generateRandomName();
var promptMessage = "Enter your name:";
do {
username = prompt(promptMessage, username);
if (!username || username.startsWith("_") || username.indexOf("<") > -1 || username.indexOf(">") > -1) {
username = "";
promptMessage = "Invalid input. Enter your name:";
}
} while (!username)
return username;
}
username = getUserName();
// Set initial focus to message input box.
var messageInput = document.getElementById("message");
messageInput.focus();
function createMessageEntry(encodedName, encodedMsg) {
var entry = document.createElement("div");
entry.classList.add("message-entry");
if (encodedName === "_SYSTEM_") {
entry.innerHTML = encodedMsg;
entry.classList.add("text-center");
entry.classList.add("system-message");
} else if (encodedName === "_BROADCAST_") {
entry.classList.add("text-center");
entry.innerHTML = `<div class="text-center broadcast-message">${encodedMsg}</div>`;
} else if (encodedName === username) {
entry.innerHTML = `<div class="message-avatar pull-right">${encodedName}</div>` +
`<div class="message-content pull-right">${encodedMsg}<div>`;
} else {
entry.innerHTML = `<div class="message-avatar pull-left">${encodedName}</div>` +
`<div class="message-content pull-left">${encodedMsg}<div>`;
}
return entry;
}
function appendMessage(encodedName, encodedMsg) {
var messageEntry = createMessageEntry(encodedName, encodedMsg);
var messageBox = document.getElementById("messages");
messageBox.appendChild(messageEntry);
messageBox.scrollTop = messageBox.scrollHeight;
}
function bindConnectionMessage(connection) {
var messageCallback = function (name, message) {
if (!message) return;
// Html encode display name and message.
var encodedName = name;
var encodedMsg = message.replace(/&/g, "&").replace(/</g, "<").replace(/>/g, ">");
appendMessage(encodedName, encodedMsg);
};
// Create a function that the hub can call to broadcast messages.
connection.on("broadcastMessage", messageCallback);
connection.on("echo", messageCallback);
connection.onclose(onConnectionError);
}
function onConnected(connection) {
console.log("connection started");
connection.send("broadcastMessage", "_SYSTEM_", username + " JOINED");
document.getElementById("sendmessage").addEventListener("click", function (event) {
// Call the broadcastMessage method on the hub.
if (messageInput.value) {
connection.send("broadcastMessage", username, messageInput.value)
.catch((e) => appendMessage("_BROADCAST_", e.message));
}
// Clear text box and reset focus for next comment.
messageInput.value = "";
messageInput.focus();
event.preventDefault();
});
document.getElementById("message").addEventListener("keypress", function (event) {
if (event.keyCode === 13) {
event.preventDefault();
document.getElementById("sendmessage").click();
return false;
}
});
document.getElementById("echo").addEventListener("click", function (event) {
// Call the echo method on the hub.
connection.send("echo", username, messageInput.value);
// Clear text box and reset focus for next comment.
messageInput.value = "";
messageInput.focus();
event.preventDefault();
});
}
function onConnectionError(error) {
if (error && error.message) {
console.error(error.message);
}
var modal = document.getElementById("myModal");
modal.classList.add("in");
modal.style = "display: block;";
}
var connection = new signalR.HubConnectionBuilder()
.withUrl("/chat")
.build();
bindConnectionMessage(connection);
connection.start()
.then(function () {
onConnected(connection);
})
.catch(function (error) {
console.error(error.message);
});
});
</script>
</body>
</html>
index.html 中的代码调用 HubConnectionBuilder.build(),以便与 Azure SignalR 资源建立 HTTP 连接。
如果连接成功,则会将该连接传递到 bindConnectionMessage,这会向客户端添加传入内容推送的事件处理程序。
HubConnection.start() 启动与中心之间的通信。 然后,onConnected() 添加按钮事件处理程序。 这些处理程序使用连接,让此客户端将内容更新推送到所有连接的客户端。
在本地生成并运行应用
运行以下命令,在本地运行 Web 应用:
dotnet run应用将在本地托管,其输出包含 localhost URL,例如,如下所示:
Building...
info: Microsoft.Hosting.Lifetime[14]
      Now listening on: http://localhost:5000
info: Microsoft.Hosting.Lifetime[0]
      Application started. Press Ctrl+C to shut down.
info: Microsoft.Hosting.Lifetime[0]
      Hosting environment: Development
打开两个浏览器窗口。 在每个浏览器中,转到输出窗口中显示的 localhost URL,例如 http://localhost:5000/,如上面的输出窗口所示。 系统会提示你输入名称。 输入两个客户端的客户端名称,然后使用“发送”按钮测试能否在两个客户端之间推送消息内容 。
清理资源
如果你想要继续学习下一篇教程,可以保留本快速入门中创建的资源,以便重复使用。
如果已完成快速入门示例应用程序,请删除本快速入门中创建的 Azure 资源,以免产生费用。
重要
删除资源组是不可逆的操作,会同时删除该组中包含的所有资源。 请确保不要意外删除错误的资源组或资源。 如果在包含要保留的资源的现有资源组中创建了本示例中的资源,可从其边栏选项卡中逐个删除这些资源,而不要删除资源组。
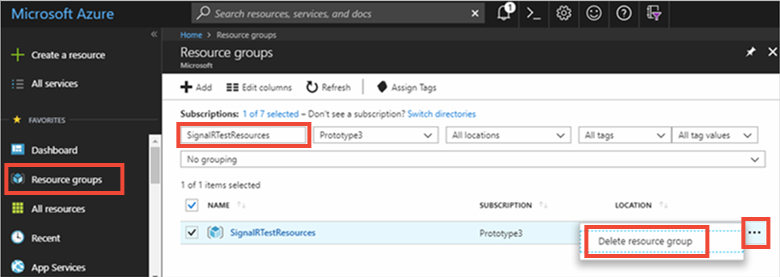
登录到 Azure 门户,然后选择“资源组”。
在“按名称筛选”文本框中键入资源组的名称 。 本快速入门的说明使用了名为“SignalRTestResources”的资源组 。 在结果列表中的资源组上选择省略号 (“...”),然后选择“删除资源组”。
系统会要求确认是否删除资源组。 重新键入资源组的名称进行确认,然后选择“删除” 。
片刻之后,将会删除该资源组及其所有资源。
遇到问题? 请试用故障排除指南。
后续步骤
在本快速入门中,你已创建一个新的 Azure SignalR 服务资源。 然后,将此资源与 ASP.NET Core Web 应用配合使用,以将内容更新实时推送到多个连接的客户端。 若要详细了解如何使用 Azure SignalR 服务,请继续学习有关身份验证的演示教程。