适用对象:
![]() Mongodb
Mongodb
重要
你是否正在寻找一种数据库解决方案,以应对需要高扩展性、99.999% 可用性服务级别协议(SLA)、即时自动扩展和跨多个区域的自动故障转移的场景? 请考虑使用 Azure Cosmos DB for NoSQL。
本教程演示在 Azure Cosmos DB 中存储数据时如何使用 Mongoose 框架。 本演练使用适用于 MongoDB 的 Azure Cosmos DB API。 不熟悉该接口的读者应知道,Mongoose 是 Node.js 中适用于 MongoDB 的对象建模框架,提供简单直接的、基于架构的解决方案来为应用程序数据建模。
Cosmos DB 是世纪互联提供的多区域分布式多模型数据库服务。 可快速创建和查询文档、键/值和图形数据库,所有这些都受益于 Cosmos DB 核心的多区域分布和水平缩放功能。
先决条件
如果没有 Azure 订阅,可在开始前创建一个试用帐户。
可以创建一个 Azure Cosmos DB 免费层帐户,你将在帐户中获得前 1000 RU/s 的免费吞吐量和 25 GB 的免费存储。 还可以使用 URI 为
Node.js 版本 v0.10.29 或更高版本。
创建 Azure Cosmos DB 帐户
让我们创建一个 Azure Cosmos DB 帐户。 如果已经有想要使用的帐户,可以直接跳到“设置 Node.js 应用程序”。 如果使用 Azure Cosmos DB 仿真器,请遵循 Azure Cosmos DB 仿真器中的步骤设置该仿真器,并直接跳到“设置 Node.js 应用程序”。
在新浏览器窗口中,登录到 Azure 门户。
在左侧菜单中,选择“创建资源”。
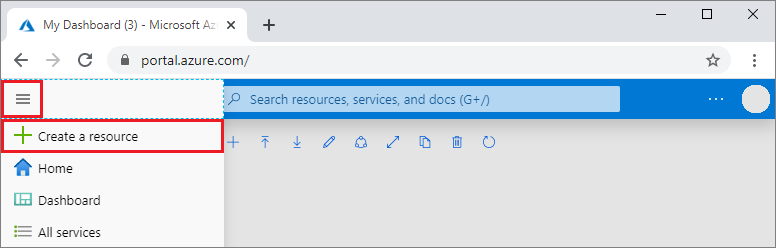
在“新建”页上,选择“数据库”>“Azure Cosmos DB”。
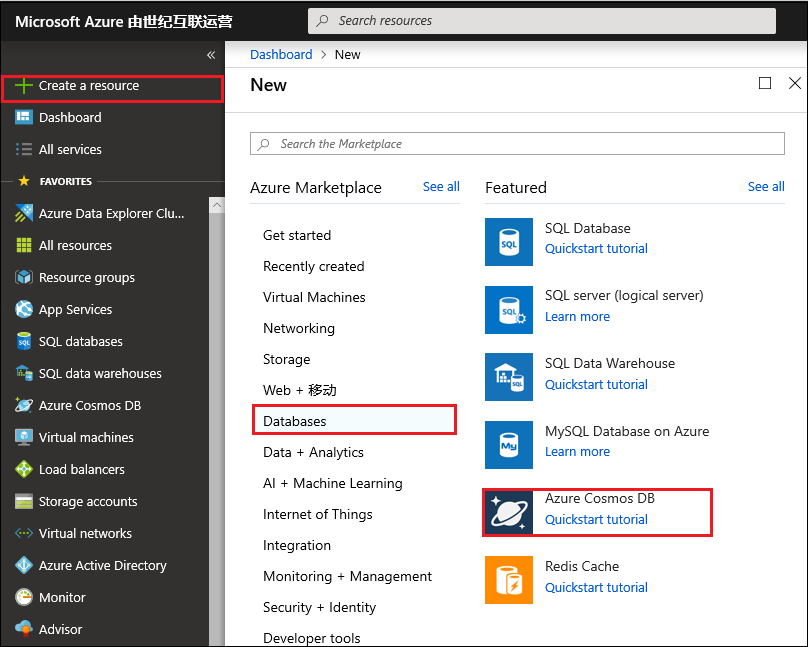
在“Azure Cosmos DB”页上,选择“创建”。
在“创建 Azure Cosmos DB 帐户”页中,输入新 Azure Cosmos DB 帐户的设置。
设置 值 说明 订阅 订阅名称 选择要用于此 Azure Cosmos DB 帐户的 Azure 订阅。 资源组 资源组名称 选择一个资源组,或者选择“新建”,然后输入新资源组的唯一名称。 帐户名 输入唯一的名称 输入标识此 Azure Cosmos DB 帐户的唯一名称。 帐户 URI 将是您的唯一帐户名称后附加“mongo.cosmos.azure.cn”。
帐户名称只能使用小写字母、数字及连字符 (-),必须为 3 到 44 个字符长。位置 离用户最近的区域 选择用于托管 Azure Cosmos DB 帐户的地理位置。 使用离用户最近的位置,使他们能够以最快的速度访问数据。 容量模式 预配吞吐量或无服务器 选择“预配吞吐量”以在预配吞吐量模式下创建帐户。 选择“无服务器”以在无服务器模式下创建帐户。
注意:无服务器帐户仅支持 API for MongoDB 版本 4.2、4.0 和 3.6。 选择版本 3.2 将强制帐户处于配置的吞吐量模式。应用 Azure Cosmos DB 免费层折扣 “应用”或“不应用” 使用 Azure Cosmos DB 免费层,可以在帐户中免费获取前 1000 RU/秒和 25 GB 的存储空间。 了解有关免费层的更多信息。 版本 选择所需的服务器版本 Azure Cosmos DB for MongoDB 与服务器版本 4.2、4.0、3.6 和 3.2 兼容。 创建帐户后,可以 升级或降级 帐户。 注意
每个 Azure 订阅可以拥有最多一个免费的 Azure Cosmos DB 帐户,并且你必须在创建帐户时选择加入。 如果未看到应用免费层折扣的选项,这意味着订阅中的另一个帐户已启用免费层。

在“全局分发”选项卡中,配置以下详细信息。 对于本快速入门,可以保留默认值:
设置 值 说明 异地冗余 禁用 通过将你的区域与某个配对区域进行配对来启用或禁用帐户的多区域分发。 稍后可以将更多区域添加到帐户。 多区域写入 禁用 借助多区域写入功能,可以利用全中国的数据库和容器的预配吞吐量。 注意
如果选择 “无服务器 ”作为 容量模式,则以下选项不可用:
- 应用免费层折扣
- 异地冗余
- 多区域写入
(可选)可以在以下选项卡中配置其他详细信息:
选择“查看 + 创建”。
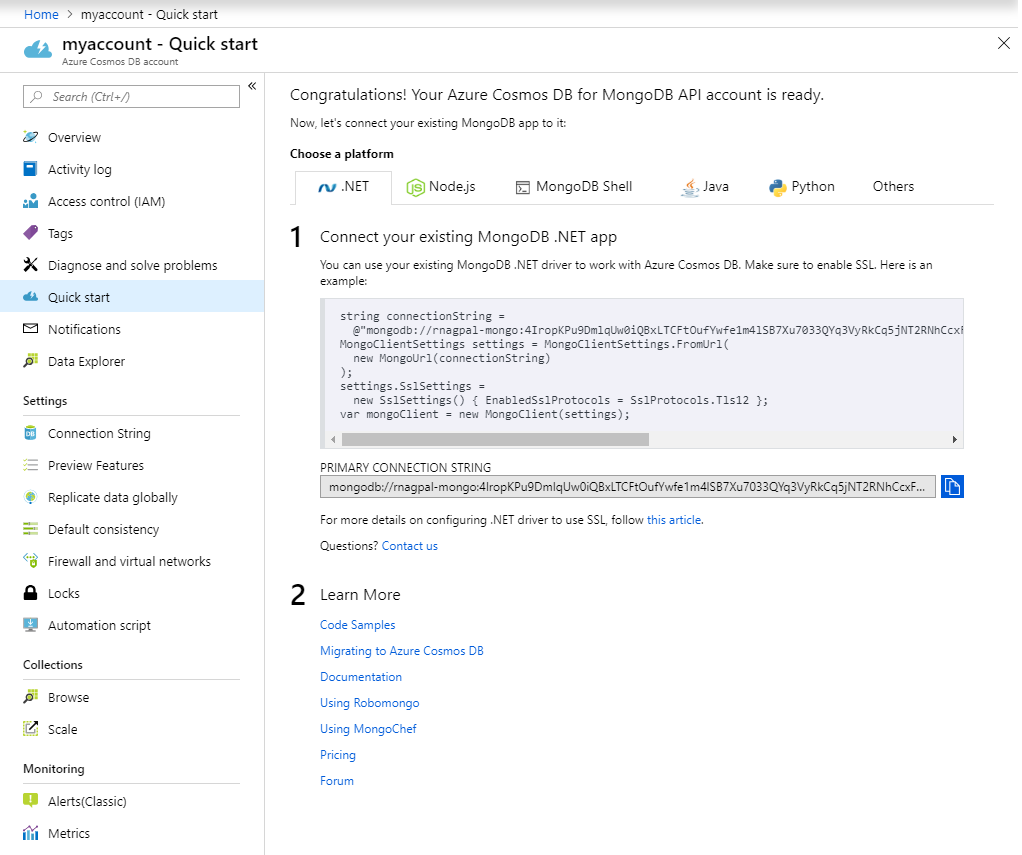
创建帐户需要几分钟时间。 等待门户中显示“祝贺你! Azure Cosmos DB for MongoDB 帐户已准备就绪”页面。
创建数据库
在此应用程序中,我们将介绍在 Azure Cosmos DB 中创建集合的两种方法:
将每个对象模型存储在一个单独的集合中:建议创建具有专用吞吐量的数据库。 使用此容量模型会更为经济高效。

将所有对象模型存储在单个 Azure Cosmos DB 集合中:如果希望将所有模型存储在单个集合中,只需在不选择“预配吞吐量”选项的情况下创建新数据库即可。 使用此容量模型时,将为每个对象模型创建每个具有自己的吞吐容量的集合。
创建数据库后,将在下面的 COSMOSDB_DBNAME 环境变量中使用此名称。
设置 Node.js 应用程序
注意
如果只想演练示例代码而不是设置应用程序本身,请克隆本教程使用的示例,并在 Azure Cosmos DB 上生成 Node.js Mongoose 应用程序。
若要在所选的文件夹中创建 Node.js 应用程序,请在 node 命令提示符下运行以下命令。
npm init回答以下问题,然后即可开始创建项目。
将一个新文件添加到该文件夹,并将此文件命名为
index.js。使用一个
npm install选项安装所需的包:- Mongoose:
npm install mongoose --save
注意
有关哪个版本的 mongoose 与 API for MongoDB 服务器版本兼容的详细信息,请参阅 Mongoose 兼容性。
Dotenv(若要从 .env 文件加载机密):
npm install dotenv --save注意
--save标志将依赖项添加到 package.json 文件。
- Mongoose:
导入
index.js文件中的依赖项。var mongoose = require('mongoose'); var env = require('dotenv').config(); //Use the .env file to load the variables将 Azure Cosmos DB 连接字符串和 Azure Cosmos DB 名称添加到
.env文件。 将占位符 {cosmos-account-name} 和 {dbname} 替换为你自己的 Azure Cosmos DB 帐户名称和数据库名称,不要带大括号符号。// You can get the following connection details from the Azure portal. You can find the details on the Connection string pane of your Azure Cosmos DB account. COSMOSDB_USER = "<Azure Cosmos DB account's user name, usually the database account name>" COSMOSDB_PASSWORD = "<Azure Cosmos DB account password, this is one of the keys specified in your account>" COSMOSDB_DBNAME = "<Azure Cosmos DB database name>" COSMOSDB_HOST= "<Azure Cosmos DB Host name>" COSMOSDB_PORT=10255将以下代码添加到 index.js 末尾,以使用 Mongoose 框架连接到 Azure Cosmos DB。
mongoose.connect("mongodb://"+process.env.COSMOSDB_HOST+":"+process.env.COSMOSDB_PORT+"/"+process.env.COSMOSDB_DBNAME+"?ssl=true& replicaSet=globaldb", {
   auth: {
     username: process.env.COSMOSDB_USER,
     password: process.env.COSMOSDB_PASSWORD
   },
   useNewUrlParser: true,
   useUnifiedTopology: true,
   retryWrites: false
})
.then(() => console.log('Connection to CosmosDB successful'))
.catch((err) => console.error(err));
注意
环境变量在此通过使用
dotenvnpm 包的 process.env.{variableName} 加载。连接到 Azure Cosmos DB 后,可以在 Mongoose 中立即开始设置对象模型。
将 Mongoose 与 Azure Cosmos DB 配合使用的最佳做法
对于你创建的每个模型,Mongoose 会创建新的集合。 解决此问题的最好方法是使用前面讨论的数据库级吞吐量选项。 若要使用单个集合,需要使用 Mongoose 鉴别器。 鉴别器是架构继承机制。 在同一个底层 MongoDB 集合上,您可以创建多个具有重叠模式的模型。
可将各种数据模型存储在同一集合中,然后在查询时使用筛选子句,只提取所需的数据。 让我们来看看每个模型。
每个对象模型对应一个集合
本部分探讨如何使用 Azure Cosmos DB 的用于 MongoDB 的 API 实现此目的。 此方法是我们建议的方法,因为它可以控制成本和容量。 因此,数据库上的请求单位数量不取决于对象模型的数量。 这是 Mongoose 的默认操作模型,因此,你可能熟悉此模型。
再次打开
index.js。为“Family”创建架构定义。
const Family = mongoose.model('Family', new mongoose.Schema({
    lastName: String,
    parents: [{
        familyName: String,
        firstName: String,
        gender: String
    }],
    children: [{
        familyName: String,
        firstName: String,
        gender: String,
        grade: Number
    }],
    pets:[{
        givenName: String
    }],
    address: {
        country: String,
        state: String,
        city: String
    }
}));
为“Family”创建对象。
const family = new Family({
    lastName: "Volum",
    parents: [
        { firstName: "Thomas" },
        { firstName: "Mary Kay" }
    ],
    children: [
        { firstName: "Ryan", gender: "male", grade: 8 },
        { firstName: "Patrick", gender: "male", grade: 7 }
    ],
    pets: [
        { givenName: "Buddy" }
    ],
    address: { country: "USA", state: "WA", city: "Seattle" }
});
最后,将对象保存到 Azure Cosmos DB。 这会在幕后创建一个集合。
family.save((err, saveFamily) => {
    console.log(JSON.stringify(saveFamily));
});
现在,我们创建另一个架构和对象。 这一次,我们为有可能引起家庭兴趣的“度假胜地”创建一个计划。
就像上次一样,我们再来创建方案。
const VacationDestinations = mongoose.model('VacationDestinations', new mongoose.Schema({
 name: String,
 country: String
}));
创建示例对象(可将多个对象添加到此架构)并将其保存。
const vacaySpot = new VacationDestinations({
 name: "Honolulu",
 country: "USA"
});

vacaySpot.save((err, saveVacay) => {
 console.log(JSON.stringify(saveVacay));
});
现在,请转到 Azure 门户,可以看到 Azure Cosmos DB 中创建了两个集合。

最后,我们从 Azure Cosmos DB 读取数据。 由于我们使用的是默认 Mongoose 操作模型,读取操作与 Mongoose 的其他读取操作相同。
Family.find({ 'children.gender' : "male"}, function(err, foundFamily){
    foundFamily.forEach(fam => console.log("Found Family: " + JSON.stringify(fam)));
});
使用 Mongoose 鉴别器在单个集合中存储数据
在此方法中,我们使用 Mongoose 鉴别器来帮助优化每个集合的成本。 使用鉴别器可以定义区分的“键”,使用该键可以存储、区分和筛选不同的对象模型。
我们将在此处创建一个基对象模型、定义区分键,并将“Family”和“VacationDestinations”作为扩展添加到基模型。
让我们设置基本配置并定义鉴别器键。
const baseConfig = {
    discriminatorKey: "_type", //If you've got a lot of different data types, you could also consider setting up a secondary index here.
    collection: "alldata"   //Name of the Common Collection
};
接下来,定义通用对象模型
const commonModel = mongoose.model('Common', new mongoose.Schema({}, baseConfig));我们现在定义“Family”模型。 请注意,我们使用的是
commonModel.discriminator而不是mongoose.model。 此外,我们还要将基本配置添加到 mongoose 架构。 因此,此处的 discriminatorKey 是FamilyType。const Family_common = commonModel.discriminator('FamilyType', new mongoose.Schema({ lastName: String, parents: [{ familyName: String, firstName: String, gender: String }], children: [{ familyName: String, firstName: String, gender: String, grade: Number }], pets:[{ givenName: String }], address: { country: String, state: String, city: String } }, baseConfig));同样,让我们添加另一个架构,这一次是为“VacationDestinations”添加的。 此处的 DiscriminatorKey 是
VacationDestinationsType。const Vacation_common = commonModel.discriminator('VacationDestinationsType', new mongoose.Schema({ name: String, country: String }, baseConfig));最后,创建模型的对象并将其保存。
将对象添加到“Family”模型。
const family_common = new Family_common({
 lastName: "Volum",
 parents: [
     { firstName: "Thomas" },
     { firstName: "Mary Kay" }
 ],
 children: [
     { firstName: "Ryan", gender: "male", grade: 8 },
     { firstName: "Patrick", gender: "male", grade: 7 }
 ],
 pets: [
     { givenName: "Buddy" }
 ],
 address: { country: "USA", state: "WA", city: "Seattle" }
});

family_common.save((err, saveFamily) => {
 console.log("Saved: " + JSON.stringify(saveFamily));
});
接下来,将对象添加到“VacationDestinations”模型,并将其保存。
const vacay_common = new Vacation_common({
 name: "Honolulu",
 country: "USA"
});

vacay_common.save((err, saveVacay) => {
 console.log("Saved: " + JSON.stringify(saveVacay));
});
现在,如果返回到 Azure 门户,可以看到只有一个名为
alldata的集合,其中包含“Family”和“VacationDestinations”数据。
另请注意,每个对象有另一个名为
__type的属性,可帮助区分两个不同的对象模型。最后,读取存储在 Azure Cosmos DB 中的数据。 Mongoose 会负责根据模型筛选数据。 因此,在读取数据时,无需执行其他任何操作。 只需指定模型(在本例中为
Family_common),Mongoose 就会根据“DiscriminatorKey”处理筛选。Family_common.find({ 'children.gender' : "male"}, function(err, foundFamily){ foundFamily.forEach(fam => console.log("Found Family (using discriminator): " + JSON.stringify(fam))); });
可以看到,Mongoose 鉴别器的用法非常简单。 因此,如果你的某个应用使用 Mongoose 框架,可以根据本教程所述方法,让该应用程序使用 Azure Cosmos DB API for MongoDB 启动并运行,无需做出过多的更改。
清理资源
执行完应用和 Azure Cosmos DB 帐户的操作以后,可以删除所创建的 Azure 资源,以免产生更多费用。 若要删除资源,请执行以下操作:
在 Azure 门户的“搜索”栏中,搜索并选择“资源组”。
从列表中选择为本快速入门创建的资源组。
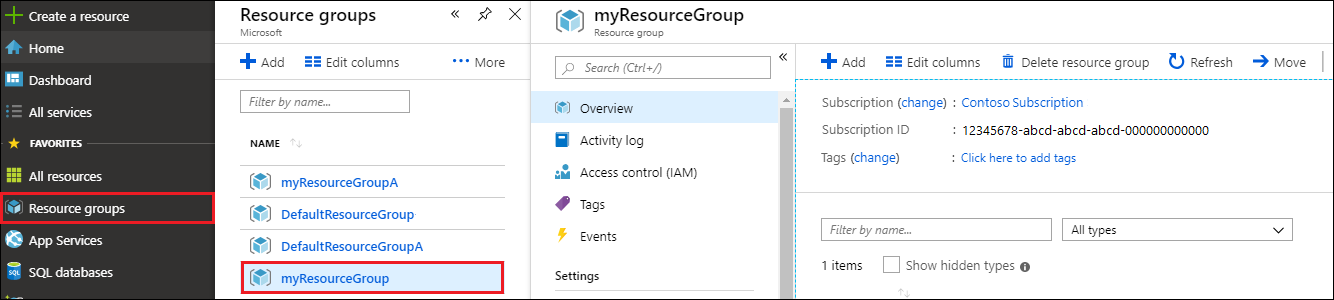
在资源组“概览”页上,选择“删除资源组”。
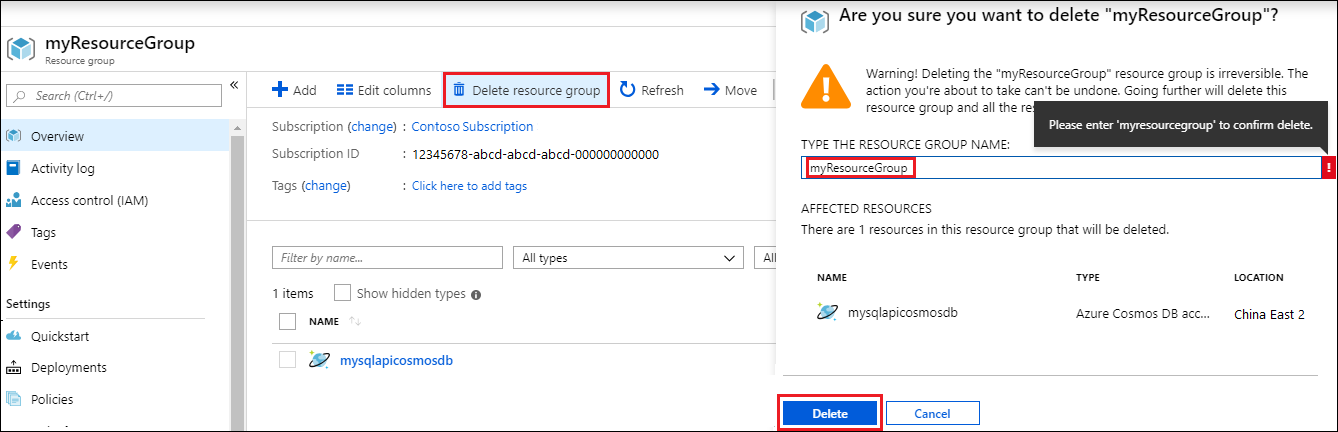
在下一窗口中输入要删除的资源组的名称,然后选择“删除”。
后续步骤
- 了解如何将 Studio 3T 与 Azure Cosmos DB 的用于 MongoDB 的 API 配合使用。
- 了解如何将 Robo 3T 与 Azure Cosmos DB 的用于 MongoDB 的 API 配合使用。
- 通过 Azure Cosmos DB 的用于 MongoDB 的 API 来浏览 MongoDB 示例。
- 正在尝试为迁移到 Azure Cosmos DB 进行容量计划? 可以使用有关现有数据库群集的信息进行容量规划。
- 如果只知道现有数据库群集中的 vCore 和服务器数量,请阅读使用 vCore 或 vCPU 估算请求单位
- 若知道当前数据库工作负载的典型请求速率,请阅读使用 Azure Cosmos DB 容量计划工具估算请求单位