适用于: Azure 数据工厂
  Azure Synapse Analytics
此快速入门介绍了如何使用 .NET SDK 创建一个 Azure 数据工厂。 在此数据工厂中创建的管道会将数据从 Azure Blob 存储中的一个文件夹复制到另一个文件夹。 有关如何使用 Azure 数据工厂转换数据的教程,请参阅教程:使用 Spark 转换数据。
先决条件
Azure 订阅
如果没有 Azure 订阅,请在开始前创建一个试用订阅。
Azure 角色
若要创建数据工厂实例,用于登录到 Azure 的用户帐户必须属于参与者或所有者角色,或者是 Azure 订阅的管理员。 若要查看你在订阅中拥有的权限,请转到 Azure 门户,在右上角选择你的用户名,然后选择“...” 图标以显示更多选项,然后选择“我的权限” 。 如果可以访问多个订阅,请选择相应的订阅。
若要为数据工厂创建和管理子资源(包括数据集、链接服务、管道、触发器和集成运行时),以下要求适用:
- 若要在 Azure 门户中创建和管理子资源,你必须属于资源组级别或更高级别的数据工厂参与者角色。
- 若要使用 PowerShell 或 SDK 创建和管理子资源,资源级别或更高级别的参与者角色已足够。
有关如何将用户添加到角色的示例说明,请参阅添加角色一文。
有关详细信息,请参阅以下文章:
Azure 存储帐户
在本快速入门中,使用常规用途的 Azure 存储帐户(具体的说就是 Blob 存储)作为源 和目标 数据存储。 如果没有常规用途的 Azure 存储帐户,请参阅创建存储帐户创建一个。
获取存储帐户名称
在本快速入门中,将需要 Azure 存储帐户的名称。 以下过程提供的步骤用于获取存储帐户的名称:
- 在 Web 浏览器中,转到 Azure 门户并使用你的 Azure 用户名和密码登录。
- 从 Azure 门户菜单中,选择“所有服务”,然后选择“存储”“存储帐户” 。 此外,也可以在任何页面中搜索和选择“存储帐户” 。
- 在“存储帐户”页中,筛选你的存储帐户(如果需要),然后选择它 。
此外,也可以在任何页面中搜索和选择“存储帐户” 。
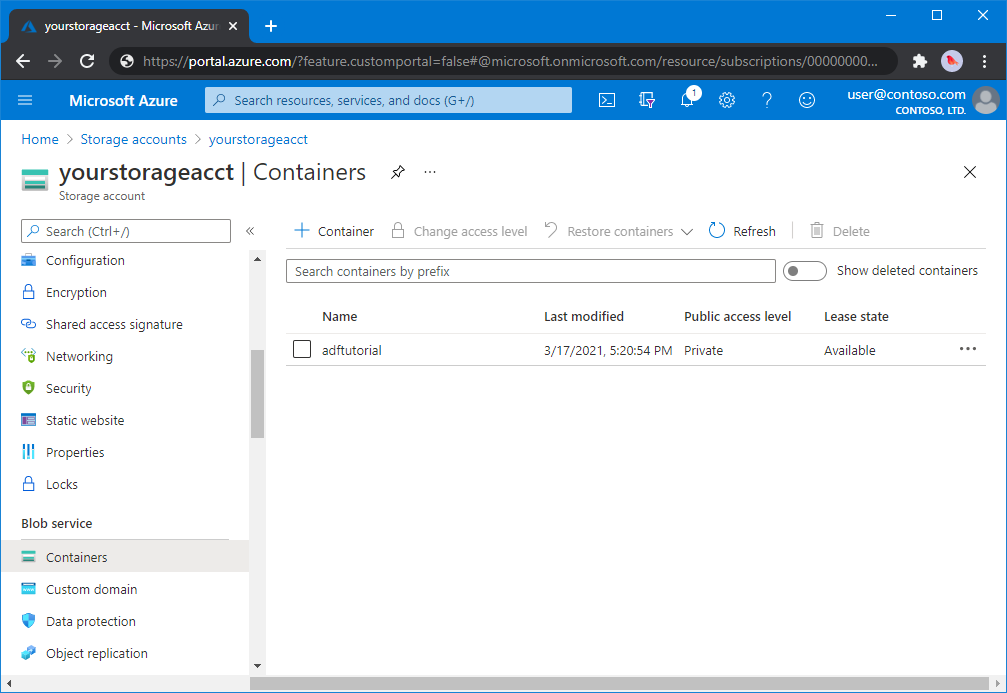
创建 Blob 容器
本部分介绍如何在 Azure Blob 存储中创建名为 adftutorial 的 Blob 容器。
在“存储帐户”页上,选择“概述”“容器”。>
在“<帐户名称>”“容器”页的工具栏中,选择“容器” - 。
在“新建容器” 对话框中,输入 adftutorial 作为名称,然后选择“确定” 。 “<帐户名称>”“容器”页已更新为在容器列表中包含“adftutorial” - 。
为 Blob 容器添加输入文件夹和文件
在此部分中,在创建的容器中创建名为“input”的文件夹,再将示例文件上传到 input 文件夹。 在开始之前,打开文本编辑器(如记事本),并创建包含以下内容的名为“emp.txt”的文件 :
John, Doe
Jane, Doe
将此文件保存在 C:\ADFv2QuickStartPSH 文件夹中 。 (如果此文件夹不存在,则创建它。)然后返回到 Azure 门户并执行以下步骤:
在上次离开的“<Account name>”“容器”页中,选择已更新的容器列表中的“adftutorial” - 。
- 如果关闭了窗口或转到其他页,请再次登录到 Azure 门户。
- 从 Azure 门户菜单中,选择“所有服务”,然后选择“存储”“存储帐户” 。 此外,也可以在任何页面中搜索和选择“存储帐户” 。
- 选择您的存储帐户,然后选择容器>adftutorial。
在“adftutorial”容器页面的工具栏上,选择“上传” 。
在“上传 Blob”页面中,选择“文件”框,然后浏览到 emp.txt 文件并进行选择。
展开“高级”标题。 此页现在显示如下内容:
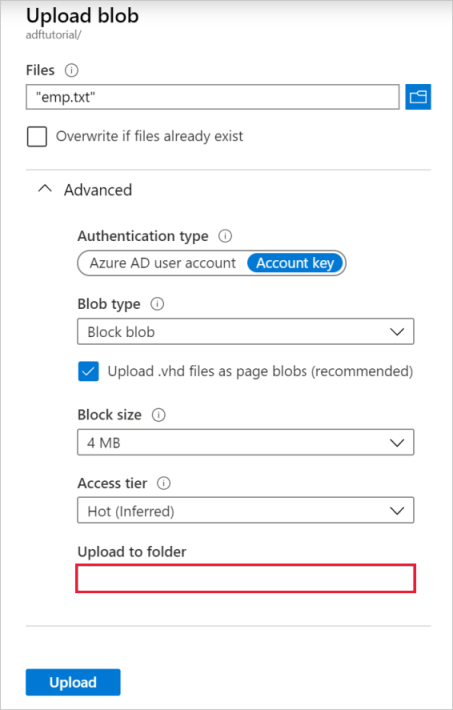
在“上传到文件夹”框中,输入“输入”。
选择“上传”按钮。 应该会在列表中看到 emp.txt 文件和上传状态。
选择关闭图标(X)以关闭上传 Blob页面。
让“adftutorial”容器页面保持打开状态 。 在本快速入门结束时可以使用它来验证输出。
Visual Studio
本文中的演练使用 Visual Studio 2019。 Visual Studio 2013、2015 或 2017 的过程略有不同。
在 Microsoft Entra ID 中创建应用程序
从“如何:使用门户创建可访问资源的 Microsoft Entra 应用程序和服务主体”中的各部分开始,按照说明执行以下任务:
- 在创建 Microsoft Entra 应用程序中,创建一个应用程序来表示要在本教程中创建的 .NET 应用程序。 对于登录 URL,可以提供虚拟 URL,如本文中所示 (
https://contoso.org/exampleapp)。 - 在获取用于登录的值中,获取应用程序 ID 和租户 ID,并记下这些值,稍后要在本教程中使用它们 。
- 在证书与机密中,获取身份验证密钥,并记此值,稍后要在本教程中使用它。
- 在将应用程序分配给角色中,在订阅级别将应用程序分配到“参与者”角色,让该应用程序可以在订阅中创建数据工厂。
创建 Visual Studio 项目
接下来,在 Visual Studio 中创建 C# 控制台应用程序:
- 启动 Visual Studio。
- 在“开始”窗口中,选择“创建新项目”“控制台应用(.NET Framework)” 。 需要 .NET 4.5.2 或更高版本。
- 在“项目名称”中,输入 ADFv2QuickStart 。
- 选择“创建”来创建项目。
安装 NuGet 包
选择 工具>NuGet 包管理器>包管理器控制台。
在“包管理器控制台”窗格中,运行以下命令来安装包。 有关详细信息,请参阅 Azure.ResourceManager.DataFactory NuGet 包。
Install-Package Azure.ResourceManager.DataFactory -IncludePrerelease
Install-Package Azure.Identity
创建数据工厂
打开 Program.cs 并包含以下语句,以添加对命名空间的引用。
using Azure;
using Azure.Core;
using Azure.Core.Expressions.DataFactory;
using Azure.Identity;
using Azure.ResourceManager;
using Azure.ResourceManager.DataFactory;
using Azure.ResourceManager.DataFactory.Models;
using Azure.ResourceManager.Resources;
using System;
using System.Collections.Generic;
将以下代码添加到 Main 方法以设置变量。 将占位符替换为自己的值。 若要查看目前提供数据工厂的 Azure 区域的列表,请在以下页面上选择感兴趣的区域,然后展开“分析”以找到“数据工厂”:可用产品(按区域)。 数据工厂使用的数据存储(Azure 存储、Azure SQL 数据库等)和计算资源(HDInsight 等)可以位于其他区域中。
// Set variables
string tenantID = "<your tenant ID>";
string applicationId = "<your application ID>";
string authenticationKey = "<your authentication key for the application>";
string subscriptionId = "<your subscription ID where the data factory resides>";
string resourceGroup = "<your resource group where the data factory resides>";
string region = "<the location of your resource group>";
string dataFactoryName =
    "<specify the name of data factory to create. It must be globally unique.>";
string storageAccountName = "<your storage account name to copy data>";
string storageKey = "<your storage account key>";
// specify the container and input folder from which all files
// need to be copied to the output folder.
string inputBlobContainer = "<blob container to copy data from, e.g. containername>";
string inputBlobPath = "<path to existing blob(s) to copy data from, e.g. inputdir/file>";
//specify the contains and output folder where the files are copied
string outputBlobContainer = "<blob container to copy data from, e.g. containername>";
string outputBlobPath = "<the blob path to copy data to, e.g. outputdir/file>";

// name of the Azure Storage linked service, blob dataset, and the pipeline
string storageLinkedServiceName = "AzureStorageLinkedService";
string blobDatasetName = "BlobDataset";
string pipelineName = "Adfv2QuickStartPipeline";
向 Main 方法中添加用于创建数据工厂的以下代码。
ArmClient armClient = new ArmClient(
    new ClientSecretCredential(tenantID, applicationId, authenticationKey, new TokenCredentialOptions
    {
        AuthorityHost = AzureAuthorityHosts.AzureChina
    }),
    subscriptionId,
    new ArmClientOptions { Environment = ArmEnvironment.AzureChina }
);

ResourceIdentifier resourceIdentifier = SubscriptionResource.CreateResourceIdentifier(subscriptionId);
SubscriptionResource subscriptionResource = armClient.GetSubscriptionResource(resourceIdentifier);

Console.WriteLine("Get an existing resource group " + resourceGroupName + "...");
var resourceGroupOperation = subscriptionResource.GetResourceGroups().Get(resourceGroupName);
ResourceGroupResource resourceGroupResource = resourceGroupOperation.Value;

Console.WriteLine("Create a data factory " + dataFactoryName + "...");
DataFactoryData dataFactoryData = new DataFactoryData(AzureLocation.ChinaEast2);
var dataFactoryOperation = resourceGroupResource.GetDataFactories().CreateOrUpdate(WaitUntil.Completed, dataFactoryName, dataFactoryData);
Console.WriteLine(dataFactoryOperation.WaitForCompletionResponse().Content);

// Get the data factory resource
DataFactoryResource dataFactoryResource = dataFactoryOperation.Value;
创建链接服务
在 Main 方法中添加用于创建 Azure 存储链接服务的以下代码。
可在数据工厂中创建链接服务,将数据存储和计算服务链接到数据工厂。 在此快速入门中,只需创建一个 Azure Blob 存储链接服务,用于复制源和接收器存储。在示例中,此服务名为“AzureBlobStorageLinkedService”。
// Create an Azure Storage linked service
Console.WriteLine("Create a linked service " + storageLinkedServiceName + "...");
AzureBlobStorageLinkedService azureBlobStorage = new AzureBlobStorageLinkedService()
{
    ConnectionString = azureBlobStorageConnectionString
};

DataFactoryLinkedServiceData linkedServiceData = new DataFactoryLinkedServiceData(azureBlobStorage);

var linkedServiceOperation = dataFactoryResource.GetDataFactoryLinkedServices().CreateOrUpdate(WaitUntil.Completed, storageLinkedServiceName, linkedServiceData);
Console.WriteLine(linkedServiceOperation.WaitForCompletionResponse().Content);
创建数据集
向 Main 方法中添加用于创建带分隔符的文本数据集的以下代码。
定义一个数据集来表示要从源复制到接收器的数据。 在此示例中,此带分隔符的文本数据集引用在上一步中创建的 Azure Blob 存储链接服务。 此数据集采用两个参数,其值在使用此数据集的活动中设置。 这两个参数用来构造“container”和“folderPath”,这些项指向数据的驻留/存储位置。
// Create an Azure Blob dataset
DataFactoryLinkedServiceReference linkedServiceReference = new DataFactoryLinkedServiceReference(DataFactoryLinkedServiceReferenceType.LinkedServiceReference, storageLinkedServiceName);
DelimitedTextDataset delimitedTextDataset = new DelimitedTextDataset(linkedServiceReference)
{
    DataLocation = new AzureBlobStorageLocation
    {
        Container = DataFactoryElement<string>.FromExpression("@dataset().container"),
        FileName = DataFactoryElement<string>.FromExpression("@dataset().path")
    },
    Parameters =
    {
        new KeyValuePair<string, EntityParameterSpecification>("container",new EntityParameterSpecification(EntityParameterType.String)),
        new KeyValuePair<string, EntityParameterSpecification>("path",new EntityParameterSpecification(EntityParameterType.String))
    },
    FirstRowAsHeader = false,
    QuoteChar = "\"",
    EscapeChar = "\\",
    ColumnDelimiter = ","
};

DataFactoryDatasetData datasetData = new DataFactoryDatasetData(delimitedTextDataset);

var datasetOperation = dataFactoryResource.GetDataFactoryDatasets().CreateOrUpdate(WaitUntil.Completed, blobDatasetName, datasetData);
Console.WriteLine(datasetOperation.WaitForCompletionResponse().Content);
创建管道
向 Main 方法中添加用于创建包含复制活动的管道的以下代码。
在此示例中,此管道包含一个活动并采用四个参数:输入 Blob 容器和路径,以及输出 Blob 容器和路径。 这些参数的值是在触发/运行管道时设置的。 复制活动引用在上一步中创建的同一 blob 数据集作为输入和输出。 当该数据集用作输入数据集时,即指定了输入容器和路径。 并且,当该数据集用作输出数据集时,即指定了输出容器和路径。
// Create a pipeline with a copy activity
Console.WriteLine("Creating pipeline " + pipelineName + "...");
DataFactoryPipelineData pipelineData = new DataFactoryPipelineData()
{
    Parameters =
    {
        new KeyValuePair<string, EntityParameterSpecification>("inputContainer",new EntityParameterSpecification(EntityParameterType.String)),
        new KeyValuePair<string, EntityParameterSpecification>("inputPath",new EntityParameterSpecification(EntityParameterType.String)),
        new KeyValuePair<string, EntityParameterSpecification>("outputContainer",new EntityParameterSpecification(EntityParameterType.String)),
        new KeyValuePair<string, EntityParameterSpecification>("outputPath",new EntityParameterSpecification(EntityParameterType.String))
    },
    Activities =
    {
        new CopyActivity("CopyFromBlobToBlob",new DataFactoryBlobSource(),new DataFactoryBlobSink())
        {
            Inputs =
            {
                new DatasetReference(DatasetReferenceType.DatasetReference,blobDatasetName)
                {
                    Parameters =
                    {
                        new KeyValuePair<string, BinaryData>("container", BinaryData.FromString("\"@pipeline().parameters.inputContainer\"")),
                        new KeyValuePair<string, BinaryData>("path", BinaryData.FromString("\"@pipeline().parameters.inputPath\""))
                    }
                }
            },
            Outputs =
            {
                new DatasetReference(DatasetReferenceType.DatasetReference,blobDatasetName)
                {
                    Parameters =
                    {
                        new KeyValuePair<string, BinaryData>("container", BinaryData.FromString("\"@pipeline().parameters.outputContainer\"")),
                        new KeyValuePair<string, BinaryData>("path", BinaryData.FromString("\"@pipeline().parameters.outputPath\""))
                    }
                }
            }
        }
    }
};

var pipelineOperation = dataFactoryResource.GetDataFactoryPipelines().CreateOrUpdate(WaitUntil.Completed, pipelineName, pipelineData);
Console.WriteLine(pipelineOperation.WaitForCompletionResponse().Content);
创建管道运行
在 Main 方法中添加用于触发管道运行的以下代码。
此代码还设置 inputContainer、inputPath、outputContainer 和 outputPath 参数的值,这些值是使用源和接收器 Blob 路径的实际值在管道中指定的值。
// Create a pipeline run
Console.WriteLine("Creating pipeline run...");
Dictionary<string, BinaryData> parameters = new Dictionary<string, BinaryData>()
{
    { "inputContainer",BinaryData.FromObjectAsJson(inputBlobContainer) },
    { "inputPath",BinaryData.FromObjectAsJson(inputBlobPath) },
    { "outputContainer",BinaryData.FromObjectAsJson(outputBlobContainer) },
    { "outputPath",BinaryData.FromObjectAsJson(outputBlobPath) }
};

var pipelineResource = dataFactoryResource.GetDataFactoryPipeline(pipelineName);
var runResponse = pipelineResource.Value.CreateRun(parameters);
Console.WriteLine("Pipeline run ID: " + runResponse.Value.RunId);
监视管道运行
在 Main 方法中添加以下代码用于持续检查状态,直到它完成数据复制为止。
// Monitor the pipeline run
Console.WriteLine("Checking pipeline run status...");
DataFactoryPipelineRunInfo pipelineRun;
while (true)
{
    pipelineRun = dataFactoryResource.GetPipelineRun(runResponse.Value.RunId.ToString());
    Console.WriteLine("Status: " + pipelineRun.Status);
    if (pipelineRun.Status == "InProgress" || pipelineRun.Status == "Queued")
        System.Threading.Thread.Sleep(15000);
    else
        break;
}
在 Main 方法中添加以下代码用于检索复制活动运行详细信息,例如,读取/写入的数据大小。
// Check the copy activity run details
Console.WriteLine("Checking copy activity run details...");

var queryResponse = dataFactoryResource.GetActivityRun(pipelineRun.RunId.ToString(),
    new RunFilterContent(DateTime.UtcNow.AddMinutes(-10), DateTime.UtcNow.AddMinutes(10)));

var enumerator = queryResponse.GetEnumerator();
enumerator.MoveNext();

if (pipelineRun.Status == "Succeeded")
    Console.WriteLine(enumerator.Current.Output);
else
    Console.WriteLine(enumerator.Current.Error);
Console.WriteLine("\nPress any key to exit...");
Console.ReadKey();
运行代码
生成并启动应用程序,然后验证管道执行。
控制台会输出数据工厂、链接服务、数据集、管道和管道运行的创建进度。 然后,检查管道运行状态。 请等待,直至看到包含数据读取/写入大小的复制活动运行详细信息。 然后,使用 Azure 存储资源管理器等工具检查 Blob 是否已根据变量中的指定从“inputBlobPath”复制到“outputBlobPath”。
示例输出
Create a data factory quickstart-adf...
{
  "name": "quickstart-adf",
  "type": "Microsoft.DataFactory/factories",
  "properties": {
    "provisioningState": "Succeeded",
    "version": "2018-06-01"
  },
  "location": "chinaeast2"
}
Create a linked service AzureBlobStorage...
{
  "name": "AzureBlobStorage",
  "type": "Microsoft.DataFactory/factories/linkedservices",
  "properties": {
    "type": "AzureBlobStorage",
    "typeProperties": {
      "connectionString": "DefaultEndpointsProtocol=https;AccountName=<storageAccountName>;",
      "encryptedCredential": "<encryptedCredential>"
    }
  }
}
Creating dataset BlobDelimitedDataset...
{
  "name": "BlobDelimitedDataset",
  "type": "Microsoft.DataFactory/factories/datasets",
  "properties": {
    "type": "DelimitedText",
    "linkedServiceName": {
      "type": "LinkedServiceReference",
      "referenceName": "AzureBlobStorage"
    },
    "parameters": {
      "container": {
        "type": "String"
      },
      "path": {
        "type": "String"
      }
    },
    "typeProperties": {
      "location": {
        "container": {
          "type": "Expression",
          "value": "@dataset().container"
        },
        "type": "AzureBlobStorageLocation",
        "fileName": {
          "type": "Expression",
          "value": "@dataset().path"
        }
      },
      "columnDelimiter": ",",
      "quoteChar": "\"",
      "escapeChar": "\\",
      "firstRowAsHeader": false
    }
  }
}
Creating pipeline Adfv2QuickStartPipeline...
{
  "properties": {
    "activities": [
      {
        "inputs": [
          {
            "type": "DatasetReference",
            "referenceName": "BlobDelimitedDataset",
            "parameters": {
              "container": "@pipeline().parameters.inputContainer",
              "path": "@pipeline().parameters.inputPath"
            }
          }
        ],
        "outputs": [
          {
            "type": "DatasetReference",
            "referenceName": "BlobDelimitedDataset",
            "parameters": {
              "container": "@pipeline().parameters.outputContainer",
              "path": "@pipeline().parameters.outputPath"
            }
          }
        ],
        "name": "CopyFromBlobToBlob",
        "type": "Copy",
        "typeProperties": {
          "source": {
            "type": "BlobSource"
          },
          "sink": {
            "type": "BlobSink"
          }
        }
      }
    ],
    "parameters": {
      "inputContainer": {
        "type": "String"
      },
      "inputPath": {
        "type": "String"
      },
      "outputContainer": {
        "type": "String"
      },
      "outputPath": {
        "type": "String"
      }
    }
  }
}
Creating pipeline run...
Pipeline run ID: 3aa26ffc-5bee-4db9-8bac-ccbc2d7b51c1
Checking pipeline run status...
Status: InProgress
Status: Succeeded
Checking copy activity run details...
{
  "dataRead": 1048,
  "dataWritten": 1048,
  "filesRead": 1,
  "filesWritten": 1,
  "sourcePeakConnections": 1,
  "sinkPeakConnections": 1,
  "copyDuration": 8,
  "throughput": 1.048,
  "errors": [],
  "effectiveIntegrationRuntime": "AutoResolveIntegrationRuntime (China East 2)",
  "usedDataIntegrationUnits": 4,
  "billingReference": {
    "activityType": "DataMovement",
    "billableDuration": [
      {
        "meterType": "AzureIR",
        "duration": 0.06666666666666667,
        "unit": "DIUHours"
      }
    ],
    "totalBillableDuration": [
      {
        "meterType": "AzureIR",
        "duration": 0.06666666666666667,
        "unit": "DIUHours"
      }
    ]
  },
  "usedParallelCopies": 1,
  "executionDetails": [
    {
      "source": {
        "type": "AzureBlobStorage"
      },
      "sink": {
        "type": "AzureBlobStorage"
      },
      "status": "Succeeded",
      "start": "2023-12-15T10:25:33.9991558Z",
      "duration": 8,
      "usedDataIntegrationUnits": 4,
      "usedParallelCopies": 1,
      "profile": {
        "queue": {
          "status": "Completed",
          "duration": 5
        },
        "transfer": {
          "status": "Completed",
          "duration": 1,
          "details": {
            "listingSource": {
              "type": "AzureBlobStorage",
              "workingDuration": 0
            },
            "readingFromSource": {
              "type": "AzureBlobStorage",
              "workingDuration": 0
            },
            "writingToSink": {
              "type": "AzureBlobStorage",
              "workingDuration": 0
            }
          }
        }
      },
      "detailedDurations": {
        "queuingDuration": 5,
        "transferDuration": 1
      }
    }
  ],
  "dataConsistencyVerification": {
    "VerificationResult": "NotVerified"
  }
}

Press any key to exit...
验证输出
该数据管道会自动在 adftutorial Blob 容器中创建输出文件夹。 然后,将 emp.txt 文件从 input 文件夹复制到 output 文件夹。
- 在 Azure 门户中,在你在以上为 Blob 容器添加输入文件夹和文件部分中停留的 adftutorial 容器页上,选择“刷新”以查看输出文件夹。
- 在文件夹列表中,选择output。
- 确认 emp.txt 已复制到 output 文件夹。
清理资源
若要以编程方式删除数据工厂,请向程序中添加以下代码行:
Console.WriteLine("Deleting the data factory");
dataFactoryResource.Delete(WaitUntil.Completed);
后续步骤
此示例中的管道将数据从 Azure Blob 存储中的一个位置复制到另一个位置。 完成相关教程来了解如何在更多方案中使用数据工厂。