可以配置事件中心,以便发送到事件中心的数据在 Azure 存储帐户或 Azure Data Lake Storage Gen 1 或 Gen 2 中捕获。 本文介绍如何编写 Python 代码,以将事件发送到事件中心并从 Azure Blob 存储读取捕获的数据。 有关此功能的详细信息,请参阅 事件中心捕获功能概述。
本快速入门使用 Azure Python SDK 演示捕获功能。 sender.py 应用以 JSON 格式将模拟环境遥测发送到事件中心。 事件中心配置为使用捕获功能批量将此数据写入 Blob 存储。 capturereader.py 应用读取这些 blob 并为每个设备创建附加文件。 然后,应用将数据写入 CSV 文件。
在本快速入门中,请执行以下操作:
- 在 Azure 门户中创建 Azure Blob 存储帐户和容器。
- 使用 Azure 门户创建事件中心命名空间。
- 创建启用了捕获功能的事件中心,并将其连接到存储帐户。
- 使用 Python 脚本将数据发送到事件中心。
- 使用另一个 Python 脚本对事件中心捕获功能的文件进行读取和处理。
先决条件
安装并更新 pip 的 Python 3.8 或更高版本。
一份 Azure 订阅。 如果没有订阅,请在开始之前 创建一个试用订阅 。
活动的 Event Hubs 命名空间和事件中心。 在命名空间中创建事件中心命名空间和事件中心。 记录事件中心命名空间的名称、事件中心的名称和命名空间的主访问密钥。 若要获取访问密钥,请参阅 “获取事件中心”连接字符串。 默认密钥名称为 RootManageSharedAccessKey。 对于此快速入门,只需使用一个主键。 不需要连接字符串。
Azure 存储帐户、存储帐户中的 Blob 容器和存储帐户的连接字符串。 如果没有这些项,请执行以下步骤:
请务必记录连接字符串和容器名称,供稍后在本快速入门中使用。
为事件中心启用捕获功能
为事件中心启用捕获功能。 为此,请按照 使用 Azure 门户启用事件中心捕获中的说明进行操作。 选择在上一步中创建的存储帐户和 Blob 容器。 为输出事件序列化格式选择 Avro。
创建 Python 脚本以将事件发送到事件中心
在本部分中,将创建一个 Python 脚本,用于将 200 个事件(10 台设备 * 20 个事件)发送到事件中心。 这些事件是 JSON 格式发送的示例环境读取。
打开喜欢的 Python 编辑器,例如 Visual Studio Code。
创建名为 sender.py 的脚本。
将以下代码粘贴到 sender.py。
import time
import os
import uuid
import datetime
import random
import json

from azure.eventhub import EventHubProducerClient, EventData

# This script simulates the production of events for 10 devices.
devices = []
for x in range(0, 10):
    devices.append(str(uuid.uuid4()))

# Create a producer client to produce and publish events to the event hub.
producer = EventHubProducerClient.from_connection_string(conn_str="EVENT HUBS NAMESPACE CONNECTION STRING", eventhub_name="EVENT HUB NAME")

for y in range(0,20):    # For each device, produce 20 events.
    event_data_batch = producer.create_batch() # Create a batch. You will add events to the batch later.
    for dev in devices:
        # Create a dummy reading.
    reading = {
            'id': dev,
            'timestamp': str(datetime.datetime.utcnow()),
            'uv': random.random(),
            'temperature': random.randint(70, 100),
            'humidity': random.randint(70, 100)
        }
        s = json.dumps(reading) # Convert the reading into a JSON string.
        event_data_batch.add(EventData(s)) # Add event data to the batch.
    producer.send_batch(event_data_batch) # Send the batch of events to the event hub.

# Close the producer.
producer.close()
替换脚本中的以下值:
- 将
EVENT HUBS NAMESPACE CONNECTION STRING替换为事件中心命名空间的连接字符串。 - 将
EVENT HUB NAME替换为事件中心的名称。
- 将
运行脚本以将事件发送到事件中心。
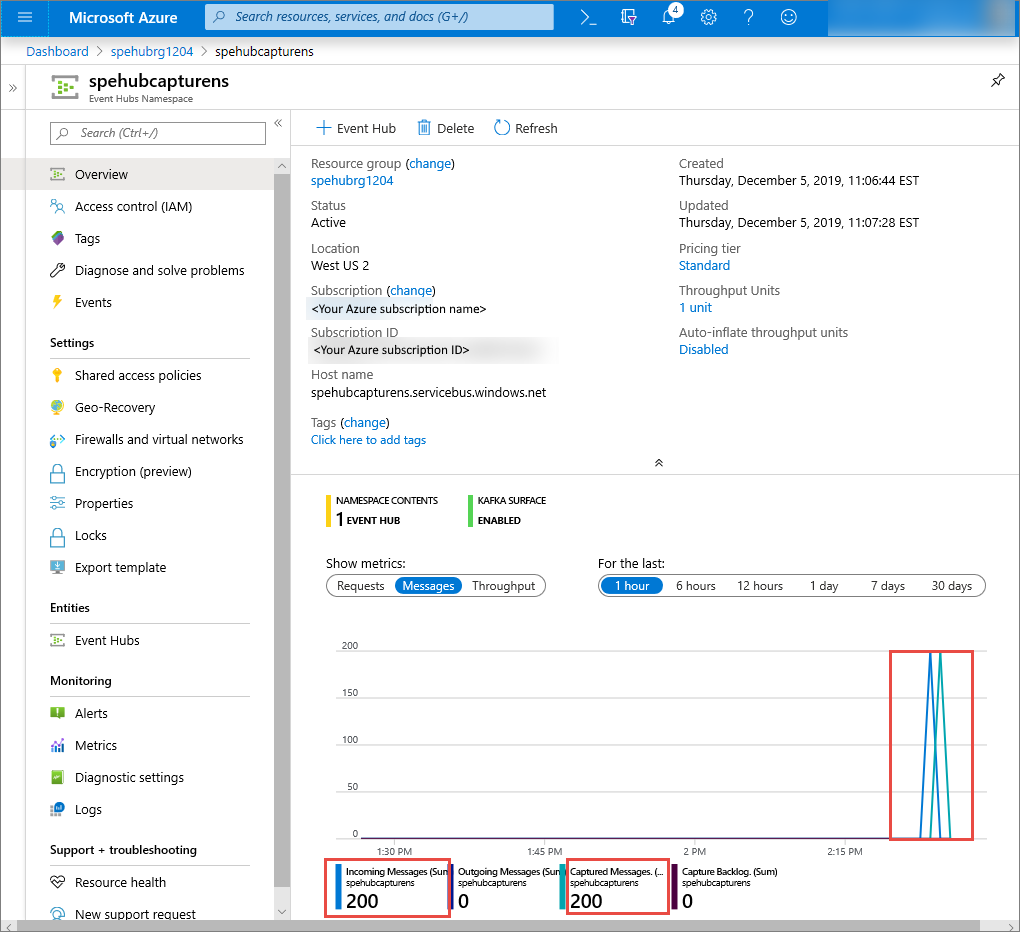
在 Azure 门户中,可以验证事件中心是否已收到消息。 切换到指标部分中的消息视图。 刷新页面以更新图表。 页面可能需要几秒钟时间才能显示已收到消息。

创建 Python 脚本以读取捕获文件
在此示例中,捕获的数据存储在 Azure Blob 存储中。 本部分中的脚本从 Azure 存储帐户读取捕获的数据文件,并生成 CSV 文件供你轻松打开和查看。 应用程序当前工作目录中会显示 10 个文件。 这些文件包含 10 台设备的环境读数。
在 Python 编辑器中,创建名为 capturereader.py 的脚本。 此脚本读取捕获的文件,并为每个设备创建一个文件,以便仅为该设备写入数据。
将以下代码粘贴到 capturereader.py。
import os
import string
import json
import uuid
import avro.schema

from azure.storage.blob import ContainerClient, BlobClient
from avro.datafile import DataFileReader, DataFileWriter
from avro.io import DatumReader, DatumWriter

def processBlob2(filename):
    reader = DataFileReader(open(filename, 'rb'), DatumReader())
    dict = {}
    for reading in reader:
        parsed_json = json.loads(reading["Body"])
        if not 'id' in parsed_json:
            return
        if not parsed_json['id'] in dict:
            list = []
            dict[parsed_json['id']] = list
        else:
            list = dict[parsed_json['id']]
            list.append(parsed_json)
    reader.close()
    for device in dict.keys():
        filename = os.getcwd() + '\\' + str(device) + '.csv'
        deviceFile = open(filename, "a")
        for r in dict[device]:
            deviceFile.write(", ".join([str(r[x]) for x in r.keys()])+'\n')

def startProcessing():
    print('Processor started using path: ' + os.getcwd())
    # Create a blob container client.
    container = ContainerClient.from_connection_string("AZURE STORAGE CONNECTION STRING", container_name="BLOB CONTAINER NAME")
    blob_list = container.list_blobs() # List all the blobs in the container.
    for blob in blob_list:
        # Content_length == 508 is an empty file, so process only content_length > 508 (skip empty files).
        if blob.size > 508:
            print('Downloaded a non empty blob: ' + blob.name)
            # Create a blob client for the blob.
            blob_client = ContainerClient.get_blob_client(container, blob=blob.name)
            # Construct a file name based on the blob name.
            cleanName = str.replace(blob.name, '/', '_')
            cleanName = os.getcwd() + '\\' + cleanName
            with open(cleanName, "wb+") as my_file: # Open the file to write. Create it if it doesn't exist.
                my_file.write(blob_client.download_blob().readall()) # Write blob contents into the file.
            processBlob2(cleanName) # Convert the file into a CSV file.
            os.remove(cleanName) # Remove the original downloaded file.
            # Delete the blob from the container after it's read.
            container.delete_blob(blob.name)

startProcessing()
将
AZURE STORAGE CONNECTION STRING替换为您 Azure 存储帐户的连接字符串。 在本快速入门中创建的容器名称是捕获。 如果为容器使用了其他名称,请将 捕获 替换为存储帐户中容器的名称。
运行脚本
打开路径中具有 Python 的命令提示符,然后运行以下命令以安装 Python 必备包:
pip install azure-storage-blob
pip install azure-eventhub
pip install avro-python3
将目录更改为 保存 sender.py 和 capturereader.py 的目录,然后运行以下命令:
此命令启动一个新的 Python 进程来运行发送方。
等待几分钟,让捕获运行,然后在原始命令窗口中输入以下命令:
此捕获处理器使用本地目录从存储帐户和容器下载所有 Blob。 它处理不为空的文件,并将结果作为 CSV 文件写入本地目录。