在本快速入门中,我们在 Windows 计算机上创建一台模拟 IoT 设备。 此模拟设备包含用作硬件安全模块 (HSM) 的 TPM 模拟器。 我们使用设备预配服务 (DPS) 的单个注册,通过设备示例 Node.js 代码将此模拟设备连接到 IoT 中心。
先决条件
- 熟悉预配概念。
- 完成通过 Azure 门户设置 IoT 中心设备预配服务。
- 具有活动订阅的 Azure 帐户。 试用订阅。
- Node.js v4.0+。
- Git。
注意
初始的设备孪生状态配置仅在 IoT 中心的标准层中提供。 有关基本和标准 IoT 中心层的详细信息,请参阅如何选择合适的 IoT 中心层。
准备环境
请确保已在计算机上安装 Node.js v4.0 或更高版本。
确保在计算机上安装
git并将其添加到可供命令窗口访问的环境变量。 请参阅软件自由保护组织提供的 Git 客户端工具,了解要安装的最新版git工具,其中包括 Git Bash,这是一个命令行应用,可以用来与本地 Git 存储库交互。
模拟 TPM 设备
打开命令提示符或 Git Bash。 克隆
azure-utpm-cGitHub 存储库:git clone https://github.com/Azure/azure-utpm-c.git --recursive导航到 GitHub 根文件夹,运行 TPM 模拟器。 该模拟器通过套接字在端口 2321 和 2322 上进行侦听。 请勿关闭此命令窗口;本快速入门指南自始至终都需让该模拟器保持运行状态:
.\azure-utpm-c\tools\tpm_simulator\Simulator.exe新建名为 registerdevice 的空文件夹。 在 registerdevice 文件夹的命令提示符处,使用以下命令创建 package.json 文件。 确保回答
npm提问的所有问题,或者接受默认设置(如果适合):npm init安装以下前提包:
npm install node-gyp -g
npm install ffi -g
注意
安装上述包时存在一些已知问题。 若要解决这些问题,请使用命令提示符在“以管理员身份运行”模式下运行
npm install --global --production windows-build-tools,在将路径替换为已安装版本后运行SET VCTargetsPath=C:\Program Files (x86)\MSBuild\Microsoft.Cpp\v4.0\V140,然后重新运行上述安装命令。安装以下包,其中包含在注册过程中使用过的组件:
适用于 TPM 的安全客户端:
azure-iot-security-tpm设备的传输,用于连接到设备预配服务:
azure-iot-provisioning-device-http或azure-iot-provisioning-device-amqp将要使用传输的客户端和安全客户端:
azure-iot-provisioning-device注册设备以后,即可使用常用的 IoT 中心设备客户端包通过在注册过程中提供的凭据来连接设备。 将需要以下项:
设备客户端:
azure-iot-device一个传输:
azure-iot-device-amqp、azure-iot-device-mqtt、azure-iot-device-http中的任一项已安装的安全客户端:
azure-iot-security-tpm注意
下面的示例使用
azure-iot-provisioning-device-http和azure-iot-device-mqtt传输。可以在 registerdevice 文件夹中的命令提示符处运行以下命令,一次性安装所有这些包:
npm install --save azure-iot-device azure-iot-device-mqtt azure-iot-security-tpm azure-iot-provisioning-device-http azure-iot-provisioning-device
在 registerdevice 文件夹中,使用文本编辑器创建新的 ExtractDevice.js 文件。
在 ExtractDevice.js 文件的开头添加以下
require语句:'use strict'; var tpmSecurity = require('azure-iot-security-tpm'); var tssJs = require("tss.js"); var myTpm = new tpmSecurity.TpmSecurityClient(undefined, new tssJs.Tpm(true));添加以下函数以实现该方法:
myTpm.getEndorsementKey(function(err, endorsementKey) {
  if (err) {
    console.log('The error returned from get key is: ' + err);
  } else {
    console.log('the endorsement key is: ' + endorsementKey.toString('base64'));
    myTpm.getRegistrationId((getRegistrationIdError, registrationId) => {
      if (getRegistrationIdError) {
        console.log('The error returned from get registration id is: ' + getRegistrationIdError);
      } else {
        console.log('The Registration Id is: ' + registrationId);
        process.exit();
      }
    });
  }
});
保存并关闭 ExtractDevice.js 文件。 运行示例:
node ExtractDevice.js输出窗口会显示进行设备注册所需的“认可密钥”和“注册 ID” 。 记下这些值。
创建设备条目
Azure IoT 设备预配服务支持两类注册:
本文演示单个注册。
登录到 Azure 门户,选择左侧菜单上的“所有资源”按钮,打开设备预配服务 。
在“设备预配服务”菜单中,选择“管理注册”。 选择“个人注册”选项卡,然后选择顶部的“添加个人注册”按钮 。
在“添加注册”面板中,输入以下信息:
选择“TPM” 作为标识证明机制。
使用你之前记下的值输入 TPM 设备的“注册 ID”和“认可密钥” 。
选择与预配服务链接的 IoT 中心。
(可选)可以提供以下信息:
- 输入唯一“设备 ID” 。 为设备命名时,请确保避免使用敏感数据。 如果选择不提供此项,则系统将改用注册 ID 来标识设备。
- 使用设备所需的初始配置更新“初始设备孪生状态” 。
完成后,按“保存”按钮。
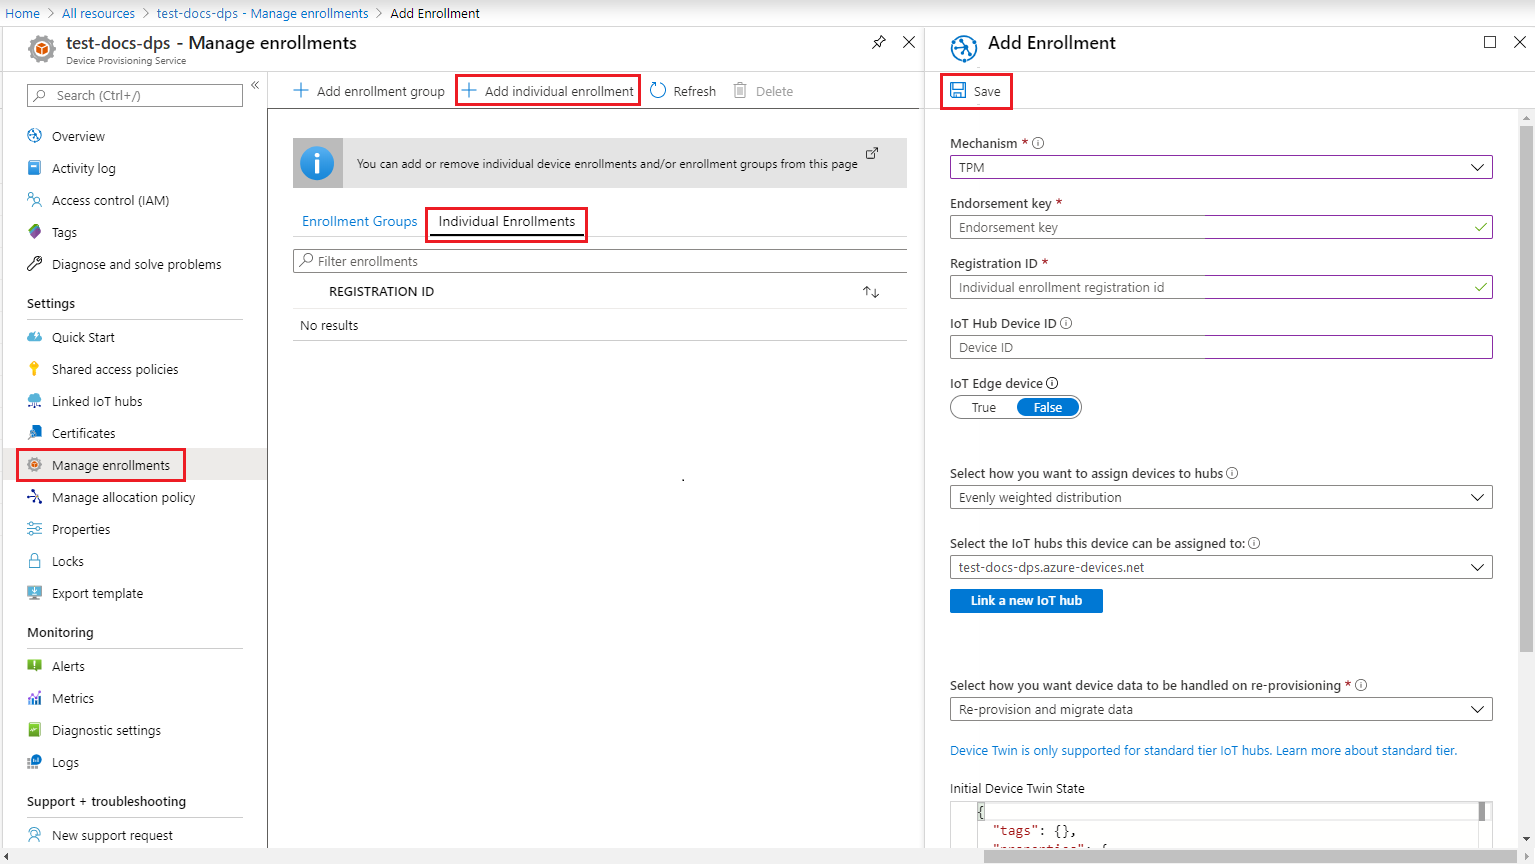
成功注册以后,设备的“注册 ID”显示在“单个注册”选项卡下的列表中。
注册设备
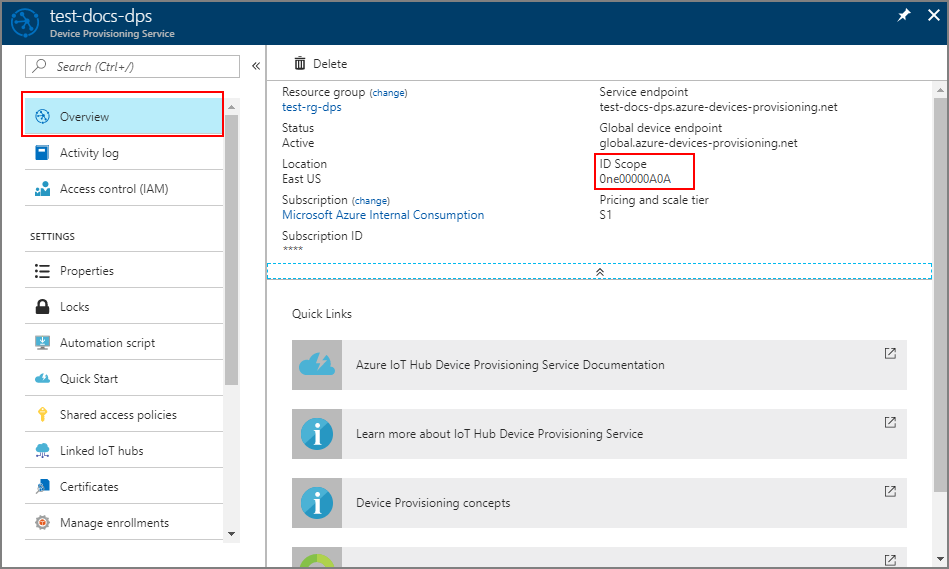
在 Azure 门户中,选择设备预配服务的“概览”边栏选项卡,记下“全局设备终结点”和“ID 范围”的值。
在 registerdevice 文件夹中,使用文本编辑器创建新的 RegisterDevice.js 文件。
在 RegisterDevice.js 文件的开头添加以下
require语句:'use strict'; var ProvisioningTransport = require('azure-iot-provisioning-device-http').Http; var iotHubTransport = require('azure-iot-device-mqtt').Mqtt; var Client = require('azure-iot-device').Client; var Message = require('azure-iot-device').Message; var tpmSecurity = require('azure-iot-security-tpm'); var ProvisioningDeviceClient = require('azure-iot-provisioning-device').ProvisioningDeviceClient;注意
用于 Node.js 的 Azure IoT SDK 支持其他协议,例如 AMQP、AMQP WS、MQTT WS。 有关更多示例,请参阅 Device Provisioning Service SDK for Node.js samples(用于 Node.js 的设备预配服务 SDK 示例)。
添加 globalDeviceEndpoint 和 idScope 变量,使用它们创建 ProvisioningDeviceClient 实例。 将 {globalDeviceEndpoint} 和 {idScope} 替换为 步骤 1 中的“全局设备终结点”和“ID 范围”的值:
var provisioningHost = '{globalDeviceEndpoint}';
var idScope = '{idScope}';

var tssJs = require("tss.js");
var securityClient = new tpmSecurity.TpmSecurityClient('', new tssJs.Tpm(true));
// if using non-simulated device, replace the above line with following:
//var securityClient = new tpmSecurity.TpmSecurityClient();

var provisioningClient = ProvisioningDeviceClient.create(provisioningHost, idScope, new ProvisioningTransport(), securityClient);
添加以下函数,实现设备上的方法:
provisioningClient.register(function(err, result) {
  if (err) {
    console.log("error registering device: " + err);
  } else {
    console.log('registration succeeded');
    console.log('assigned hub=' + result.registrationState.assignedHub);
    console.log('deviceId=' + result.registrationState.deviceId);
    var tpmAuthenticationProvider = tpmSecurity.TpmAuthenticationProvider.fromTpmSecurityClient(result.registrationState.deviceId, result.registrationState.assignedHub, securityClient);
    var hubClient = Client.fromAuthenticationProvider(tpmAuthenticationProvider, iotHubTransport);

    var connectCallback = function (err) {
      if (err) {
        console.error('Could not connect: ' + err.message);
      } else {
        console.log('Client connected');
        var message = new Message('Hello world');
        hubClient.sendEvent(message, printResultFor('send'));
      }
    };

    hubClient.open(connectCallback);

    function printResultFor(op) {
      return function printResult(err, res) {
        if (err) console.log(op + ' error: ' + err.toString());
        if (res) console.log(op + ' status: ' + res.constructor.name);
        process.exit(1);
      };
    }
  }
});
保存并关闭 RegisterDevice.js 文件。 运行示例:
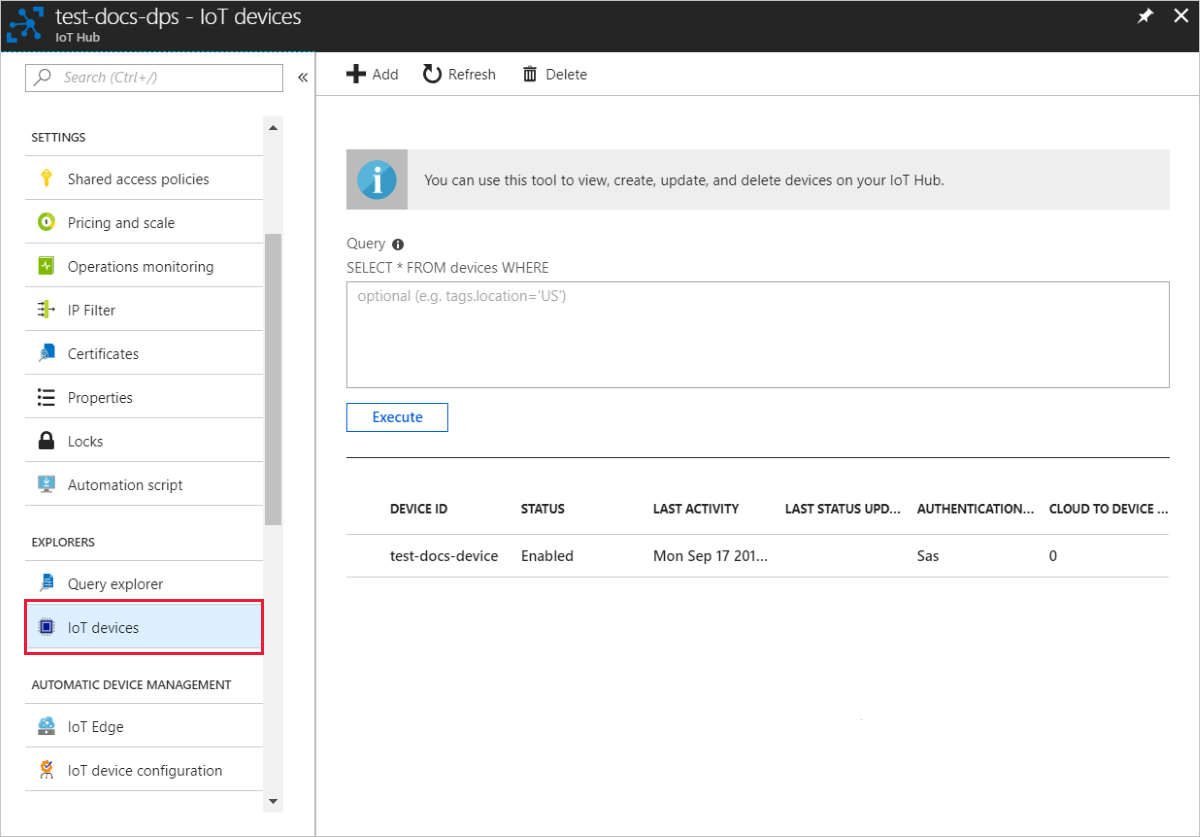
node RegisterDevice.js请注意相关消息,这些消息模拟设备启动后连接到设备预配服务以获取 IoT 中心信息的情况。 将模拟设备成功预配到与预配服务链接的 IoT 中心以后,设备 ID 会显示在该中心的“IoT 设备”边栏选项卡上 。
如果从设备的注册项中的默认值更改了“初始设备孪生状态”,则它会从中心拉取所需的孪生状态,并执行相应的操作。 有关详细信息,请参阅了解并在 IoT 中心内使用设备孪生
清理资源
如果打算继续使用和探索设备客户端示例,请勿清理在本快速入门中创建的资源。 如果不打算继续学习,请按以下步骤删除本快速入门中创建的所有资源。
- 关闭计算机上的设备客户端示例输出窗口。
- 关闭计算机上的 TPM 模拟器窗口。
- 在 Azure 门户的左侧菜单中选择“所有资源”,然后选择设备预配服务。 打开服务的“管理注册”边栏选项卡,然后选择“单个注册”选项卡 。选中在本快速入门中注册的设备的“注册 ID”旁边的复选框,然后按窗格顶部的“删除”按钮。
- 在 Azure 门户的左侧菜单中选择“所有资源”,然后选择 IoT 中心 。 打开中心的“IoT 设备”边栏选项卡,选中在本快速入门中注册的设备的“设备 ID”旁边的复选框,然后按窗格顶部的“删除”按钮。
后续步骤
在本快速入门中,你已在计算机上创建 TPM 模拟设备,并已使用 IoT 中心设备预配服务将其预配到 IoT 中心。 若要了解如何以编程方式注册 TPM 设备,请继续阅读快速入门中关于 TPM 设备的编程注册内容。