在此快速入门中,你将使用 Azure 资源管理器模板(ARM 模板)创建 IoT 中心、Azure 存储帐户和路由,从而将来自 IoT 中心的消息路由到存储区。 该中心经过配置,这样,如果发送到该中心的消息满足路由条件,会自动路由到存储帐户。 在本快速入门教程时,你可以打开该存储帐户并查看发送的消息。
Azure 资源管理器模板是定义项目基础结构和配置的 JavaScript 对象表示法 (JSON) 文件。 模板使用声明性语法。 你可以在不编写用于创建部署的编程命令序列的情况下,描述预期部署。
如果你的环境满足先决条件,并且你熟悉如何使用 ARM 模板,请选择“部署到 Azure”按钮。 模板将在 Azure 门户中打开。

先决条件
- 如果没有 Azure 订阅,请在开始前创建一个试用版订阅。
查看模板
本快速入门中使用的模板称为 101-iothub-auto-route-messages,来自 Azure 快速入门模板。
该模板中定义了两个 Azure 资源:
- Microsoft.Storage/storageAccounts:具有容器的存储帐户。
- Microsoft.Devices/IotHubs:具有终结点和路由的 IoT 中心,其中该终结点指向存储容器,该路由将筛选后的消息发送到该终结点。
{
  "$schema": "https://schema.management.azure.com/schemas/2019-04-01/deploymentTemplate.json#",
  "contentVersion": "1.0.0.0",
  "metadata": {
    "_generator": {
      "name": "bicep",
      "version": "0.26.54.24096",
      "templateHash": "1111741482289134864"
    }
  },
  "parameters": {
    "projectName": {
      "type": "string",
      "defaultValue": "contoso",
      "minLength": 1,
      "maxLength": 11,
      "metadata": {
        "description": "Define the project name or prefix for all objects."
      }
    },
    "location": {
      "type": "string",
      "defaultValue": "[resourceGroup().location]",
      "metadata": {
        "description": "The datacenter to use for the deployment."
      }
    },
    "skuName": {
      "type": "string",
      "defaultValue": "S1",
      "metadata": {
        "description": "The SKU to use for the IoT Hub."
      }
    },
    "skuUnits": {
      "type": "int",
      "defaultValue": 1,
      "metadata": {
        "description": "The number of IoT Hub units."
      }
    },
    "d2cPartitions": {
      "type": "int",
      "defaultValue": 4,
      "metadata": {
        "description": "Partitions used for the event stream."
      }
    }
  },
  "variables": {
    "iotHubName": "[format('{0}Hub{1}', parameters('projectName'), uniqueString(resourceGroup().id))]",
    "storageAccountName": "[format('{0}{1}', toLower(parameters('projectName')), uniqueString(resourceGroup().id))]",
    "storageEndpoint": "[format('{0}StorageEndpont', parameters('projectName'))]",
    "storageContainerName": "[format('{0}results', toLower(parameters('projectName')))]"
  },
  "resources": [
    {
      "type": "Microsoft.Storage/storageAccounts",
      "apiVersion": "2023-01-01",
      "name": "[variables('storageAccountName')]",
      "location": "[parameters('location')]",
      "sku": {
        "name": "Standard_LRS"
      },
      "kind": "Storage",
      "properties": {
        "allowBlobPublicAccess": false,
        "minimumTlsVersion": "TLS1_2",
        "supportsHttpsTrafficOnly": true
      }
    },
    {
      "type": "Microsoft.Storage/storageAccounts/blobServices/containers",
      "apiVersion": "2023-01-01",
      "name": "[format('{0}/default/{1}', variables('storageAccountName'), variables('storageContainerName'))]",
      "properties": {
        "publicAccess": "None"
      },
      "dependsOn": [
        "[resourceId('Microsoft.Storage/storageAccounts', variables('storageAccountName'))]"
      ]
    },
    {
      "type": "Microsoft.Devices/IotHubs",
      "apiVersion": "2023-06-30",
      "name": "[variables('iotHubName')]",
      "location": "[parameters('location')]",
      "sku": {
        "name": "[parameters('skuName')]",
        "capacity": "[parameters('skuUnits')]"
      },
      "properties": {
        "eventHubEndpoints": {
          "events": {
            "retentionTimeInDays": 1,
            "partitionCount": "[parameters('d2cPartitions')]"
          }
        },
        "routing": {
          "endpoints": {
            "storageContainers": [
              {
                "connectionString": "[format('DefaultEndpointsProtocol=https;AccountName={0};EndpointSuffix={1};AccountKey={2}', variables('storageAccountName'), environment().suffixes.storage, listKeys(resourceId('Microsoft.Storage/storageAccounts', variables('storageAccountName')), '2023-01-01').keys[0].value)]",
                "containerName": "[variables('storageContainerName')]",
                "fileNameFormat": "{iothub}/{partition}/{YYYY}/{MM}/{DD}/{HH}/{mm}",
                "batchFrequencyInSeconds": 100,
                "maxChunkSizeInBytes": 104857600,
                "encoding": "JSON",
                "name": "[variables('storageEndpoint')]"
              }
            ]
          },
          "routes": [
            {
              "name": "ContosoStorageRoute",
              "source": "DeviceMessages",
              "condition": "level=\"storage\"",
              "endpointNames": [
                "[variables('storageEndpoint')]"
              ],
              "isEnabled": true
            }
          ],
          "fallbackRoute": {
            "name": "$fallback",
            "source": "DeviceMessages",
            "condition": "true",
            "endpointNames": [
              "events"
            ],
            "isEnabled": true
          }
        },
        "messagingEndpoints": {
          "fileNotifications": {
            "lockDurationAsIso8601": "PT1M",
            "ttlAsIso8601": "PT1H",
            "maxDeliveryCount": 10
          }
        },
        "enableFileUploadNotifications": false,
        "cloudToDevice": {
          "maxDeliveryCount": 10,
          "defaultTtlAsIso8601": "PT1H",
          "feedback": {
            "lockDurationAsIso8601": "PT1M",
            "ttlAsIso8601": "PT1H",
            "maxDeliveryCount": 10
          }
        }
      },
      "dependsOn": [
        "[resourceId('Microsoft.Storage/storageAccounts', variables('storageAccountName'))]"
      ]
    }
  ],
  "outputs": {
    "name": {
      "type": "string",
      "value": "[variables('iotHubName')]"
    },
    "resourceId": {
      "type": "string",
      "value": "[resourceId('Microsoft.Devices/IotHubs', variables('iotHubName'))]"
    },
    "resourceGroupName": {
      "type": "string",
      "value": "[resourceGroup().name]"
    },
    "location": {
      "type": "string",
      "value": "[parameters('location')]"
    }
  }
}
部署模板
本部分提供 ARM 模板的部署步骤。
通过部署 ARM 模板创建资源。
发送设备到云的消息
在本部分中,你将在新的 IoT 中心注册设备,然后将来自该设备的消息发送到 IoT 中心。 如果消息包含消息属性 level=storage,模板在 IoT 中心配置的路由仅将消息发送到存储区。 为了测试此路由条件按预期工作,我们将发送一些具有该属性的消息,有些消息没有。
提示
为了方便起见,本快速入门使用 Azure CLI 模拟设备。 有关发送具有消息属性的设备到云消息进行路由的代码示例,请参阅 Azure IoT SDK for .NET 中的 HubRoutingSample。
检索模板为你创建的 IoT 中心的名称。
如果使用了上一部分中的默认命令,则资源是在 ContosoResourceGrp 资源组中创建的。 如果使用了其他资源组,请更新以下命令来进行匹配。
az iot hub list --resource-group ContosoResourceGrp --output table从输出中复制 IoT 中心的名称。 它应格式化为
contosoHub{randomidentifier}将设备添加到中心。
az iot hub device-identity create --device-id contosoDevice --hub-name {YourIoTHubName}模拟设备并发送设备到云的消息。
--data参数让我们能够设置消息正文。az iot device simulate \ --device-id contosoDevice \ --hub-name {YourIoTHubName} \ --data "This message won't be routed."模拟器发送 100 条消息,然后断开连接。 对于本快速入门,无需等待所有 100 条消息。
发送设备到云的消息以路由到存储区。
--properties参数让我们能够向默认消息添加消息、应用程序或系统属性。 在本快速入门中,IoT 中心内的路由会查找包含消息属性level=storage的消息。az iot device simulate \ --device-id contosoDevice \ --hub-name {YourIoTHubName} \ --properties level=storage \ --data "This message will be routed to storage."
查看已部署的资源
登录到 Azure 门户并选择“资源组”,然后选择存储帐户。
向下钻取到存储帐户,直到找到文件。
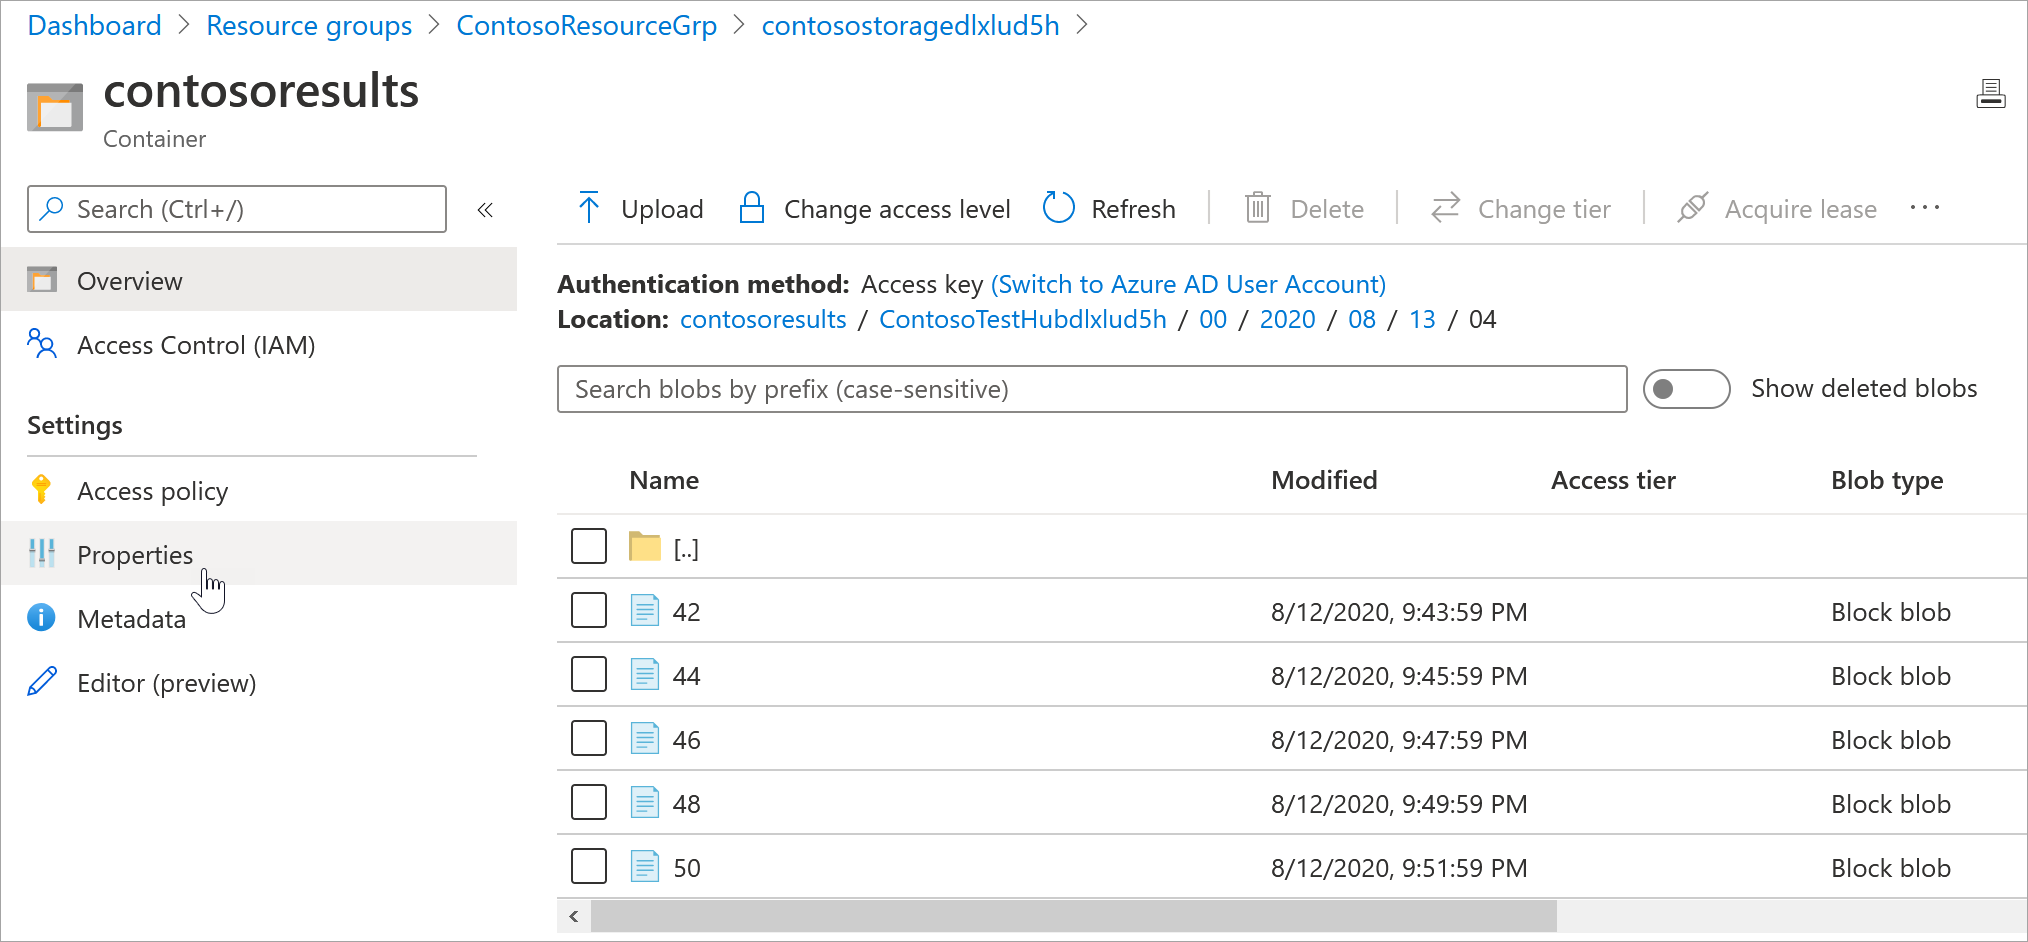
选择其中一个文件并选择“下载”,将文件下载到你稍后可以找到的位置。 它有一个数值名称,例如 47。 在末尾添加“.txt”,然后双击文件打开它。
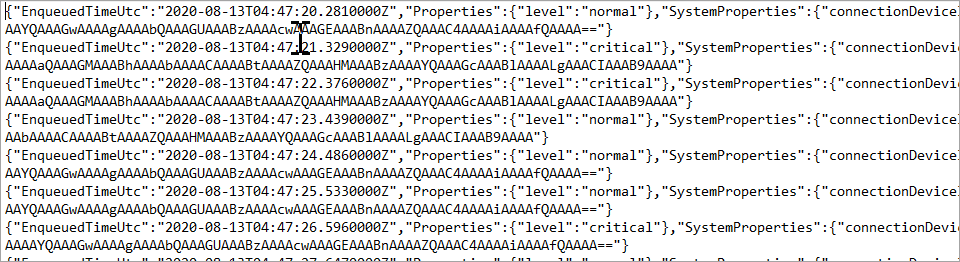
打开文件时,每一行对应一条不同的消息;每条消息的正文都进行了加密。 必须这样才能对消息正文执行查询。
注意
这些消息以 UTF-32 和 base64 编码。 如果读回消息,必须由 base64 和 utf-32 对其进行解码,以便以 ASCII 格式进行读取。 如果你感兴趣,可以使用路由教程中的 ReadOneRowFromFile 方法从其中某个消息文件对其进行读取,并将其解码为 ASCII。 ReadOneRowFromFile 位于你为此快速入门解压缩的 IoT C# SDK 存储库中。 下面是该文件夹顶部的路径:./iothub/device/samples/getting started/RoutingTutorial/SimulatedDevice/Program.cs。 将布尔值
readTheFile设置为 true,并将路径硬编码到磁盘上的文件,然后打开并翻译文件中的第一行。
在快速入门中,你部署了一个 ARM 模板来创建 IoT 中心和存储帐户,然后运行程序来向中心发送消息。 这些消息根据其消息属性进行路由,并存储在可查看它们的存储帐户中。
清理资源
若要删除此快速入门期间添加的资源,请登录到 Azure 门户。 选择“资源组”,然后查找用于此快速入门的资源组。 选择资源组,然后选择“删除”。 删除组时,会一并删除组中的所有资源。