在此快速入门中,你将使用 Bicep 创建 IoT 中心、Azure 存储帐户和路由,从而将来自 IoT 中心的消息路由到存储区。 该中心经过配置,这样,如果发送到该中心的消息满足路由条件,会自动路由到存储帐户。 在本快速入门教程时,你可以打开该存储帐户并查看发送的消息。
Bicep 是一种特定于域的语言 (DSL),使用声明性语法来部署 Azure 资源。 它提供简明的语法、可靠的类型安全性以及对代码重用的支持。 Bicep 会针对你的 Azure 基础结构即代码解决方案提供最佳创作体验。
先决条件
如果还没有 Azure 订阅,可以在开始前创建一个 Azure 帐户。
查阅 Bicep 文件
本快速入门中使用的 Bicep 文件称为 101-iothub-auto-route-messages,来自 Azure 快速入门模板。
该 Bicep 文件中定义了两个 Azure 资源:
- Microsoft.Storage/storageAccounts:具有容器的存储帐户。
- Microsoft.Devices/IotHubs:具有终结点和路由的 IoT 中心,其中该终结点指向存储容器,该路由将筛选后的消息发送到该终结点。
@description('Define the project name or prefix for all objects.')
@minLength(1)
@maxLength(11)
param projectName string = 'contoso'

@description('The datacenter to use for the deployment.')
param location string = resourceGroup().location

@description('The SKU to use for the IoT Hub.')
param skuName string = 'S1'

@description('The number of IoT Hub units.')
param skuUnits int = 1

@description('Partitions used for the event stream.')
param d2cPartitions int = 4

var iotHubName = '${projectName}Hub${uniqueString(resourceGroup().id)}'
var storageAccountName = '${toLower(projectName)}${uniqueString(resourceGroup().id)}'
var storageEndpoint = '${projectName}StorageEndpont'
var storageContainerName = '${toLower(projectName)}results'

resource storageAccount 'Microsoft.Storage/storageAccounts@2023-01-01' = {
  name: storageAccountName
  location: location
  sku: {
    name: 'Standard_LRS'
  }
  kind: 'Storage'
  properties: {
    allowBlobPublicAccess: false
    minimumTlsVersion: 'TLS1_2'
    supportsHttpsTrafficOnly: true
  }
}

resource container 'Microsoft.Storage/storageAccounts/blobServices/containers@2023-01-01' = {
  name: '${storageAccountName}/default/${storageContainerName}'
  properties: {
    publicAccess: 'None'
  }
  dependsOn: [
    storageAccount
  ]
}

resource IoTHub 'Microsoft.Devices/IotHubs@2023-06-30' = {
  name: iotHubName
  location: location
  sku: {
    name: skuName
    capacity: skuUnits
  }
  properties: {
    eventHubEndpoints: {
      events: {
        retentionTimeInDays: 1
        partitionCount: d2cPartitions
      }
    }
    routing: {
      endpoints: {
        storageContainers: [
          {
            connectionString: 'DefaultEndpointsProtocol=https;AccountName=${storageAccountName};EndpointSuffix=${environment().suffixes.storage};AccountKey=${storageAccount.listKeys().keys[0].value}'
            containerName: storageContainerName
            fileNameFormat: '{iothub}/{partition}/{YYYY}/{MM}/{DD}/{HH}/{mm}'
            batchFrequencyInSeconds: 100
            maxChunkSizeInBytes: 104857600
            encoding: 'JSON'
            name: storageEndpoint
          }
        ]
      }
      routes: [
        {
          name: 'ContosoStorageRoute'
          source: 'DeviceMessages'
          condition: 'level="storage"'
          endpointNames: [
            storageEndpoint
          ]
          isEnabled: true
        }
      ]
      fallbackRoute: {
        name: '$fallback'
        source: 'DeviceMessages'
        condition: 'true'
        endpointNames: [
          'events'
        ]
        isEnabled: true
      }
    }
    messagingEndpoints: {
      fileNotifications: {
        lockDurationAsIso8601: 'PT1M'
        ttlAsIso8601: 'PT1H'
        maxDeliveryCount: 10
      }
    }
    enableFileUploadNotifications: false
    cloudToDevice: {
      maxDeliveryCount: 10
      defaultTtlAsIso8601: 'PT1H'
      feedback: {
        lockDurationAsIso8601: 'PT1M'
        ttlAsIso8601: 'PT1H'
        maxDeliveryCount: 10
      }
    }
  }
}

output name string = IoTHub.name
output resourceId string = IoTHub.id
output resourceGroupName string = resourceGroup().name
output location string = location
部署 Bicep 文件
本部分提供 Bicep 文件的部署步骤。
从 Azure 快速入门模板存储库下载 main.bicep 文件。
通过使用 Azure CLI 部署 Bicep 文件来创建资源。
az group create --name ContosoResourceGrp --location chinanorth3
az deployment group create --resource-group exampleRG --template-file main.bicep
部署需要数分钟才能完成。 部署完成后,应会看到详细描述已部署资源的输出。
发送设备到云的消息
在本部分中,你将在新的 IoT 中心注册设备,然后将来自该设备的消息发送到 IoT 中心。 如果消息包含消息属性 level=storage,Bicep 文件在 IoT 中心配置的路由仅将消息发送到存储区。 为了测试此路由条件是否按预期工作,我们将发送一些包含此属性和一些没有此书信的消息。
提示
为了方便起见,本快速入门使用 Azure CLI 模拟设备。 有关发送具有消息属性的设备到云消息进行路由的代码示例,请参阅 Azure IoT SDK for .NET 中的 HubRoutingSample。
检索模板为你创建的 IoT 中心的名称。
如果使用了上一部分中的默认命令,则资源是在 ContosoResourceGrp 资源组中创建的。 如果使用了其他资源组,请更新以下命令来进行匹配。
az iot hub list --resource-group ContosoResourceGrp --output table从输出中复制 IoT 中心的名称。 它应格式化为
contosoHub{randomidentifier}将设备添加到中心。
az iot hub device-identity create --device-id contosoDevice --hub-name {YourIoTHubName}模拟设备并发送设备到云的消息。
--data参数让我们能够设置消息正文。az iot device simulate \ --device-id contosoDevice \ --hub-name {YourIoTHubName} \ --data "This message won't be routed."模拟器发送 100 条消息,然后断开连接。 对于本快速入门,无需等待所有 100 条消息。
发送设备到云的消息以路由到存储区。
--properties参数让我们能够向默认消息添加消息、应用程序或系统属性。 在本快速入门中,IoT 中心内的路由会查找包含消息属性level=storage的消息。az iot device simulate \ --device-id contosoDevice \ --hub-name {YourIoTHubName} \ --properties level=storage \ --data "This message will be routed to storage."
查看路由消息
登录到 Azure 门户,选择资源组,然后选择存储帐户。
向下钻取到存储帐户,直到找到文件。
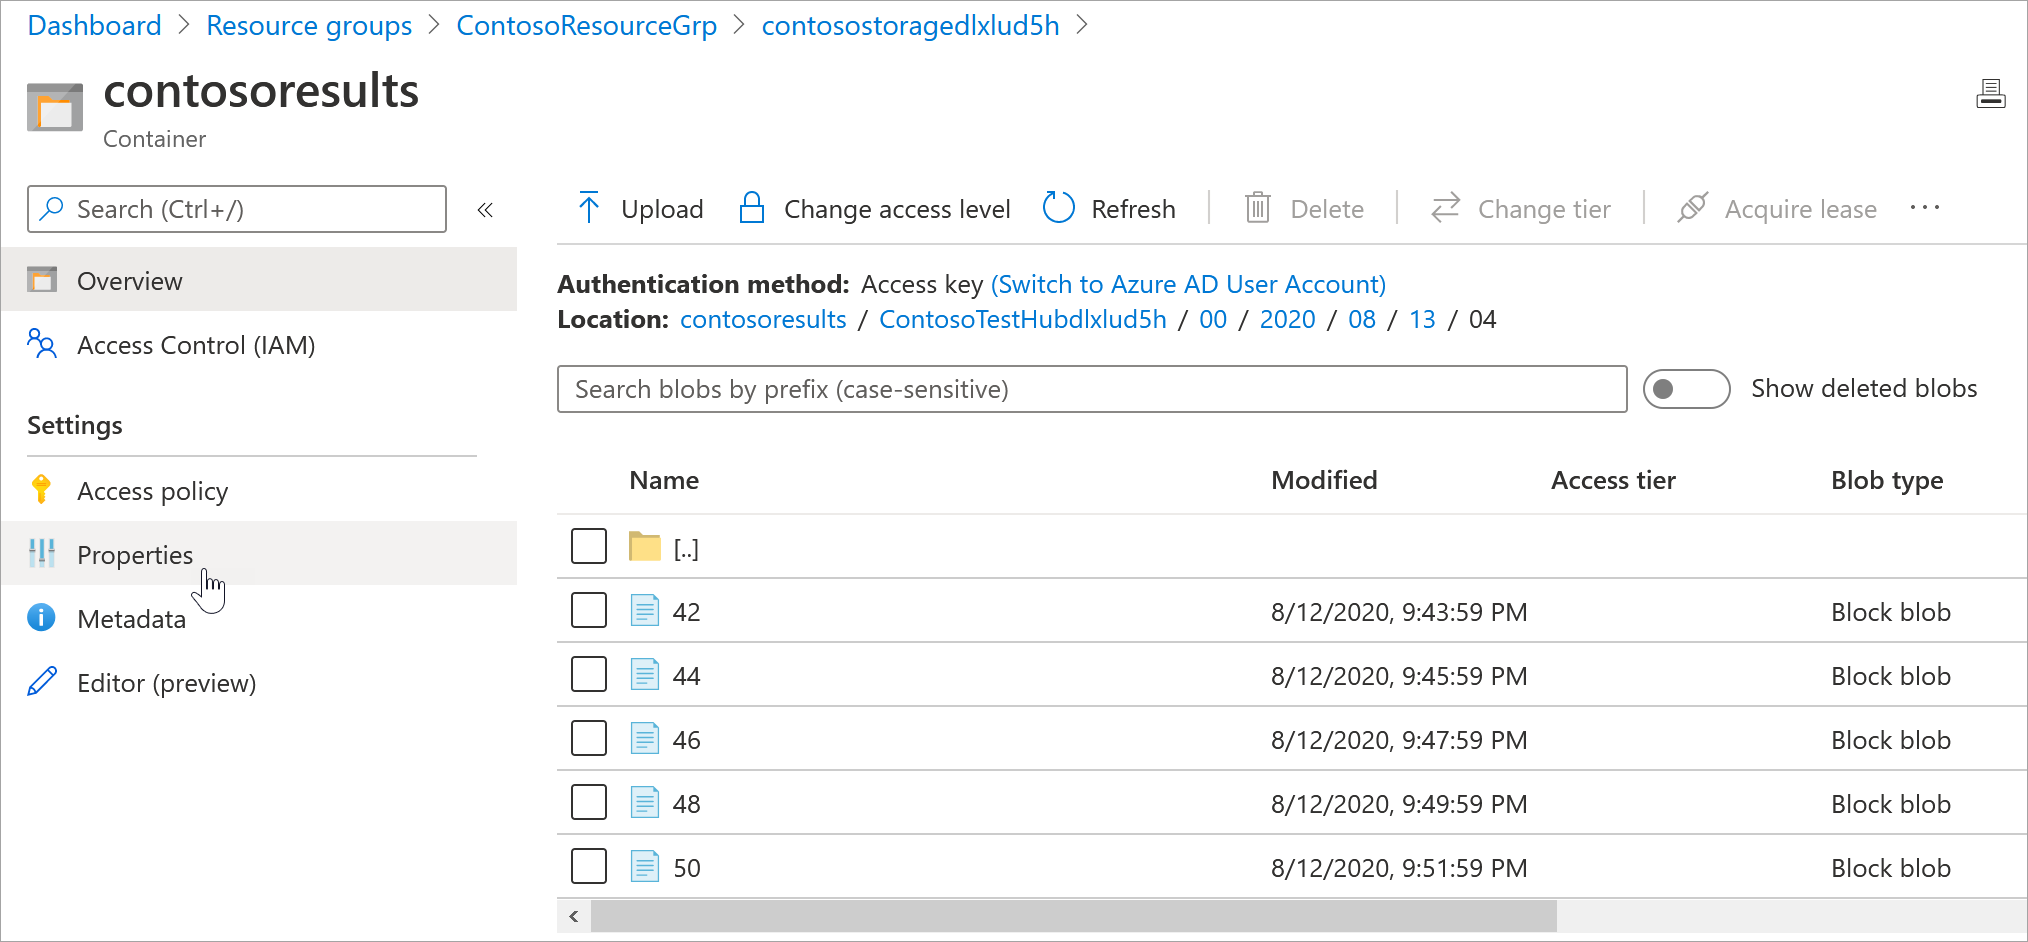
选择其中一个文件并选择“下载”,将文件下载到你稍后可以找到的位置。 它有一个数值名称,例如 47。 在末尾添加“.txt”,然后双击文件打开它。
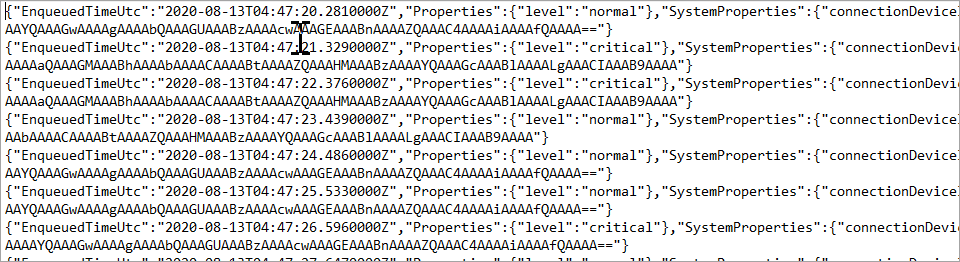
打开文件时,每一行对应一条不同的消息。 每条消息的正文都进行了加密。 必须这样才能对消息正文执行查询。
注意
这些消息以 UTF-8 和 base64 编码。 如果读回消息,必须由 base64 和 utf-8 对其进行解码,以便以 ASCII 格式进行读取。 如果你感兴趣,可以使用路由教程中的 ReadOneRowFromFile 方法从其中某个消息文件对其进行读取,并将其解码为 ASCII。 ReadOneRowFromFile 位于你为此快速入门解压缩的 IoT C# SDK 存储库中。 以下是从该文件夹顶层开始的路径:./iothub/device/samples/how to guides/HubRoutingSample/Program.cs 将布尔
readTheFile设置为 true,并对磁盘上的文件路径进行硬编码,此操作会打开并转换文件的第一行。
在快速入门中,你部署了一个 Bicep 文件来创建 IoT 中心和存储帐户,然后运行程序来向中心发送消息。 这些消息根据其消息属性进行路由,并存储在可查看它们的存储帐户中。
清理资源
当你不再需要所创建的资源时,请删除资源组。
az group delete --name exampleRG