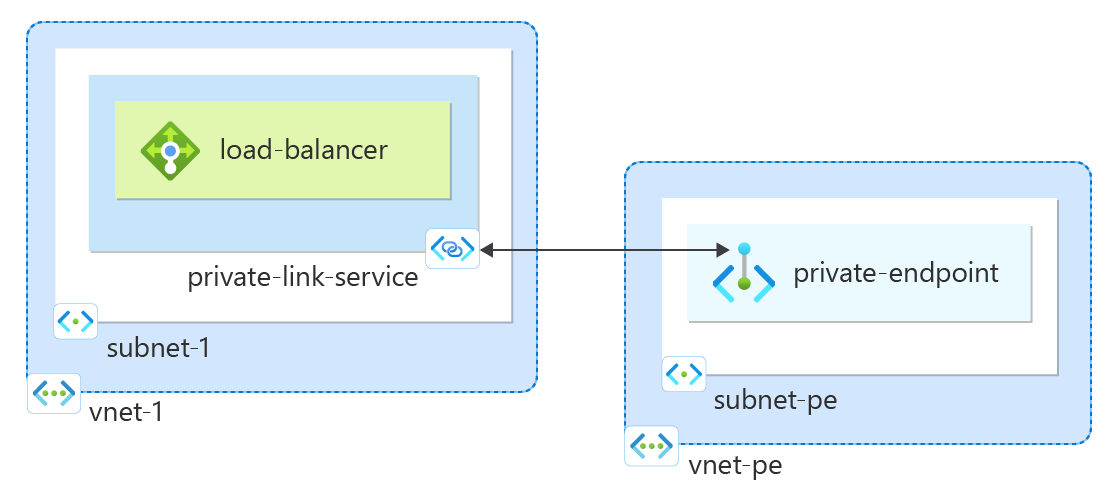
开始创建引用你的服务的专用链接服务。 向专用链接授予对 Azure 标准负载均衡器后面部署的服务或资源的访问权限。 服务的用户具有从其虚拟网络进行专用访问的权限。
先决条件
具有活动订阅的 Azure 帐户。 创建试用版订阅。
Azure PowerShell。
可在本地安装 Azure PowerShell 来运行 cmdlet。 本文中的示例需要版本 5.4.1 或更高版本的 Azure PowerShell 模块。 运行
Get-Module -ListAvailable Az来查找已安装的版本。 如果需要升级,请参阅更新 Azure PowerShell 模块。如要在本地运行 PowerShell,请运行
Connect-AzAccount -Environment AzureChinaCloud以连接到 Azure。
创建资源组
Azure 资源组是在其中部署和管理 Azure 资源的逻辑容器。
使用 New-AzResourceGroup 创建资源组:
New-AzResourceGroup -Name 'test-rg' -Location 'chinaeast2'
创建内部负载均衡器
在本部分中,创建一个虚拟网络和一个内部 Azure 负载均衡器。
虚拟网络
在本部分,创建虚拟网络和子网来托管访问专用链接服务的负载均衡器。
- 使用 New-AzVirtualNetwork 创建虚拟网络。
## Create backend subnet config ##
$subnet = @{
    Name = 'subnet-1'
    AddressPrefix = '10.0.0.0/24'
}
$subnetConfig = New-AzVirtualNetworkSubnetConfig @subnet

## Create the virtual network ##
$net = @{
    Name = 'vnet-1'
    ResourceGroupName = 'test-rg'
    Location = 'chinaeast2'
    AddressPrefix = '10.0.0.0/16'
    Subnet = $subnetConfig
}
$vnet = New-AzVirtualNetwork @net
创建标准负载均衡器
本部分详细介绍如何创建和配置负载均衡器的以下组件:
使用 New-AzLoadBalancerFrontendIpConfig 为前端 IP 池创建前端 IP。 此 IP 在负载均衡器上接收传入流量
使用 New-AzLoadBalancerBackendAddressPoolConfig 为负载均衡器前端发送的流量创建后端地址池。 此池是后端虚拟机部署到的位置。
使用 Add-AzLoadBalancerProbeConfig 创建运行状况探测,用于确定后端 VM 实例的运行状况。
使用 Add-AzLoadBalancerRuleConfig 创建负载均衡器规则,用于定义将流量分配给 VM 的方式。
使用 New-AzLoadBalancer 创建公共负载均衡器。
## Place virtual network created in previous step into a variable. ##
$vnet = Get-AzVirtualNetwork -Name 'vnet-1' -ResourceGroupName 'test-rg'

## Create load balancer frontend configuration and place in variable. ##
$lbip = @{
    Name = 'frontend'
    PrivateIpAddress = '10.0.0.4'
    SubnetId = $vnet.subnets[0].Id
}
$feip = New-AzLoadBalancerFrontendIpConfig @lbip

## Create backend address pool configuration and place in variable. ##
$bepool = New-AzLoadBalancerBackendAddressPoolConfig -Name 'backend-pool'

## Create the health probe and place in variable. ##
$probe = @{
    Name = 'health-probe'
    Protocol = 'http'
    Port = '80'
    IntervalInSeconds = '360'
    ProbeCount = '5'
    RequestPath = '/'
}
$healthprobe = New-AzLoadBalancerProbeConfig @probe

## Create the load balancer rule and place in variable. ##
$lbrule = @{
    Name = 'http-rule'
    Protocol = 'tcp'
    FrontendPort = '80'
    BackendPort = '80'
    IdleTimeoutInMinutes = '15'
    FrontendIpConfiguration = $feip
    BackendAddressPool = $bePool
}
$rule = New-AzLoadBalancerRuleConfig @lbrule -EnableTcpReset

## Create the load balancer resource. ##
$loadbalancer = @{
    ResourceGroupName = 'test-rg'
    Name = 'load-balancer'
    Location = 'chinaeast2'
    Sku = 'Standard'
    FrontendIpConfiguration = $feip
    BackendAddressPool = $bePool
    LoadBalancingRule = $rule
    Probe = $healthprobe
}
New-AzLoadBalancer @loadbalancer
禁用网络策略
在虚拟网络中创建专用链接服务之前,必须禁用设置 privateLinkServiceNetworkPolicies。
- 使用 Set-AzVirtualNetwork 禁用网络策略。
## Place the subnet name into a variable. ##
$subnet = 'subnet-1'

## Place the virtual network configuration into a variable. ##
$net = @{
    Name = 'vnet-1'
    ResourceGroupName = 'test-rg'
}
$vnet = Get-AzVirtualNetwork @net

## Set the policy as disabled on the virtual network. ##
($vnet | Select -ExpandProperty subnets | Where-Object {$_.Name -eq $subnet}).privateLinkServiceNetworkPolicies = "Disabled"

## Save the configuration changes to the virtual network. ##
$vnet | Set-AzVirtualNetwork
创建专用链接服务
在本部分中,创建一项专用链接服务来使用上一步中创建的标准 Azure 负载均衡器。
通过 New-AzPrivateLinkServiceIpConfig 创建专用链接服务 IP 配置。
通过 New-AzPrivateLinkService 创建专用链接服务。
## Place the virtual network into a variable. ##
$vnet = Get-AzVirtualNetwork -Name 'vnet-1' -ResourceGroupName 'test-rg'

## Create the IP configuration for the private link service. ##
$ipsettings = @{
    Name = 'ipconfig-1'
    PrivateIpAddress = '10.0.0.5'
    Subnet = $vnet.subnets[0]
}
$ipconfig = New-AzPrivateLinkServiceIpConfig @ipsettings

## Place the load balancer frontend configuration into a variable. ##
$par = @{
    Name = 'load-balancer'
    ResourceGroupName = 'test-rg'
}
$fe = Get-AzLoadBalancer @par | Get-AzLoadBalancerFrontendIpConfig

## Create the private link service for the load balancer. ##
$privlinksettings = @{
    Name = 'private-link-service'
    ResourceGroupName = 'test-rg'
    Location = 'chinaeast2'
    LoadBalancerFrontendIpConfiguration = $fe
    IpConfiguration = $ipconfig
}
New-AzPrivateLinkService @privlinksettings
专用链接服务已创建,可接收流量。 若要查看流量流,请在标准负载均衡器后面配置应用程序。
创建专用终结点
在本部分中,你将专用链接服务映射到专用终结点。 虚拟网络包含用于专用链接服务的专用终结点。 此虚拟网络包含将访问专用链接服务的资源。
创建专用终结点虚拟网络
- 使用 New-AzVirtualNetwork 创建虚拟网络。
## Create backend subnet config ##
$subnet = @{
    Name = 'subnet-pe'
    AddressPrefix = '10.1.0.0/24'
}
$subnetConfig = New-AzVirtualNetworkSubnetConfig @subnet

## Create the virtual network ##
$net = @{
    Name = 'vnet-pe'
    ResourceGroupName = 'test-rg'
    Location = 'chinaeast2'
    AddressPrefix = '10.1.0.0/16'
    Subnet = $subnetConfig
}
$vnetpe = New-AzVirtualNetwork @net
创建终结点和连接
使用 Get-AzPrivateLinkService 将之前创建的专用链接服务的配置置于变量中供以后使用。
使用 New-AzPrivateLinkServiceConnection 创建连接配置。
使用 New-AzPrivateEndpoint 创建终结点。
## Place the private link service configuration into variable. ##
$par1 = @{
    Name = 'private-link-service'
    ResourceGroupName = 'test-rg'
}
$pls = Get-AzPrivateLinkService @par1

## Create the private link configuration and place in variable. ##
$par2 = @{
    Name = 'connection-1'
    PrivateLinkServiceId = $pls.Id
}
$plsConnection = New-AzPrivateLinkServiceConnection @par2

## Place the virtual network into a variable. ##
$par3 = @{
    Name = 'vnet-pe'
    ResourceGroupName = 'test-rg'
}
$vnetpe = Get-AzVirtualNetwork @par3

## Create private endpoint ##
$par4 = @{
    Name = 'private-endpoint'
    ResourceGroupName = 'test-rg'
    Location = 'chinaeast2'
    Subnet = $vnetpe.subnets[0]
    PrivateLinkServiceConnection = $plsConnection
}
New-AzPrivateEndpoint @par4 -ByManualRequest
批准专用终结点连接
本部分将批准在前面步骤中创建的连接。
- 使用 Approve-AzPrivateEndpointConnection 批准连接。
## Place the private link service configuration into variable. ##
$par1 = @{
    Name = 'private-link-service'
    ResourceGroupName = 'test-rg'
}
$pls = Get-AzPrivateLinkService @par1

$par2 = @{
    Name = $pls.PrivateEndpointConnections[0].Name
    ServiceName = 'private-link-service'
    ResourceGroupName = 'test-rg'
    Description = 'Approved'
    PrivateLinkResourceType = 'Microsoft.Network/privateLinkServices'
}
Approve-AzPrivateEndpointConnection @par2
专用终结点的 IP 地址
在本部分,你将找到与负载均衡器和专用链接服务对应的专用终结点的 IP 地址。
- 使用 Get-AzPrivateEndpoint 检索 IP 地址。
## Get private endpoint and the IP address and place in a variable for display. ##
$par1 = @{
    Name = 'private-endpoint'
    ResourceGroupName = 'test-rg'
    ExpandResource = 'networkinterfaces'
}
$pe = Get-AzPrivateEndpoint @par1

## Display the IP address by expanding the variable. ##
$pe.NetworkInterfaces[0].IpConfigurations[0].PrivateIpAddress
❯ $pe.NetworkInterfaces[0].IpConfigurations[0].PrivateIpAddress
10.1.0.4
清理资源
如果不再需要资源组、负载均衡器和剩余资源,可以使用 Remove-AzResourceGroup 命令将其删除。
Remove-AzResourceGroup -Name 'test-rg'
后续步骤
在本快速入门中,请执行以下操作:
创建了虚拟网络和内部 Azure 负载均衡器。
创建了专用链接服务
若要详细了解 Azure 专用终结点,请继续学习:
