针对Azure进行开发很容易使用Visual Studio和.NET的免费Azure SDK。 本教程指导你完成创建使用本地环境中运行的多个Azure资源的应用程序的步骤。
你将了解以下内容:
- 如何通过单次下载和安装来启用你的电脑进行 Azure 开发。
- 如何使用Visual Studio为Azure进行开发。
- 如何使用 Web Role 和 Worker Role 在 Azure 中创建多层次应用程序。
- 如何使用“Service Bus”队列在层之间通信。
注意
若要完成本教程,需要一个Azure帐户。 可以注册免费试用版。
在本教程中,你将在Azure云服务中生成并运行多层应用程序。 前端是 ASP.NET MVC Web 角色,后端是使用Service Bus队列的辅助角色。 您可以创建一个相同的多层应用程序,其中前端作为 Web 项目开发,并部署到 Azure 网站,而不是云服务。 还可以试用 .NET 本地/云混合云应用程序教程。
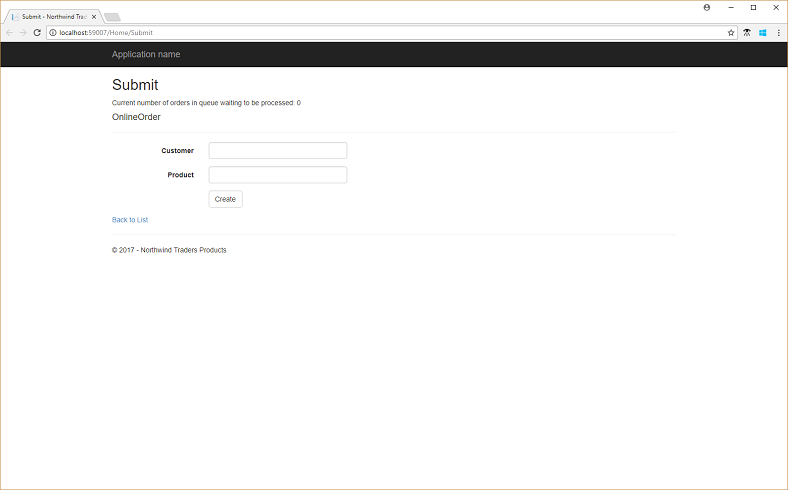
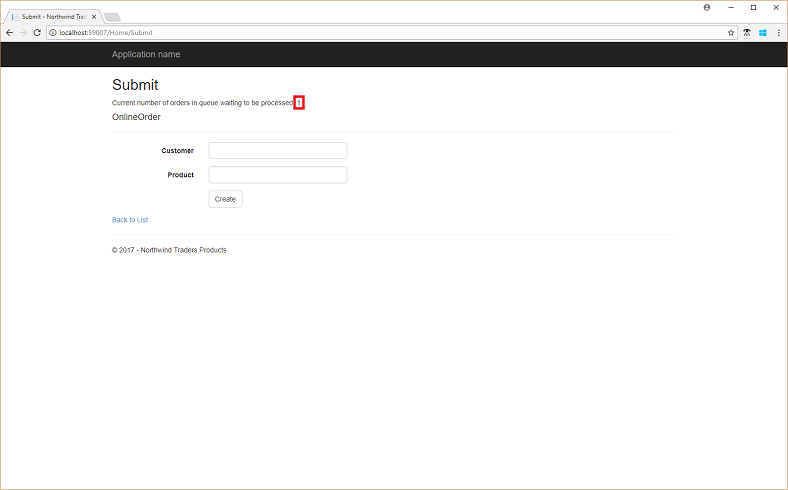
以下屏幕截图显示已完成的应用程序。
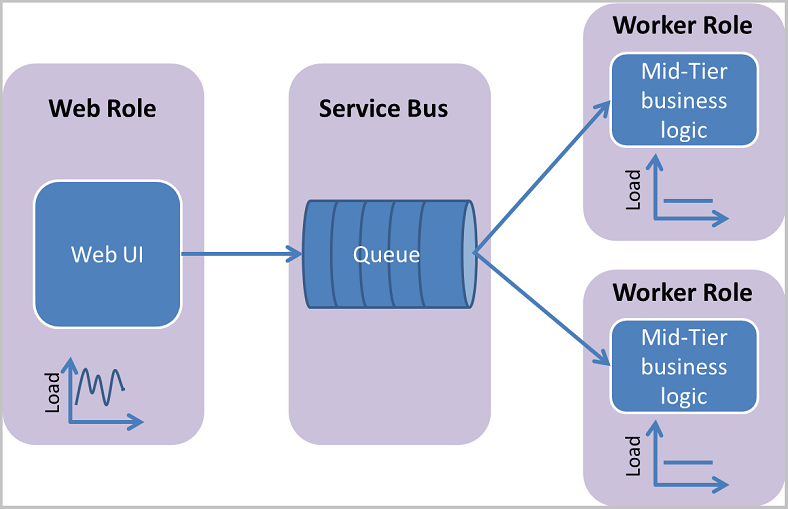
方案概述:角色间通信
若要提交订单进行处理,以 Web 角色运行的前端 UI 组件必须与在辅助角色中运行的中间层业务逻辑进行交互。 此示例使用Service Bus消息传送来用于层之间的通信。
使用 web 层和中间层之间的Service Bus消息传送将分离这两个组件。 与直接消息传送(即 TCP 或 HTTP)相比,Web 层不会直接连接到中间层;而是将工作单元(作为消息)推送到Service Bus,从而可靠地保留它们,直到中间层准备好使用和处理它们。
Service Bus提供了两个实体来支持中转消息传送:队列和主题。 通过队列,发送到队列的每个消息均由一个接收方接收。 主题支持发布/订阅模式,在该模式中,每个已发布消息都将提供给在该主题中注册的订阅。 每个订阅都以逻辑方式保留自己的消息队列。 此外,还可以使用筛选规则配置订阅,这些规则可将传递给订阅队列的消息集限制为符合筛选条件的消息集。 以下示例使用Service Bus队列。
与直接消息传送相比,此通信机制具有多项优势:
临时解耦 使用异步消息传送模式时,创建方和使用方不需要在同一时间联机。 Service Bus可靠地存储消息,直到使用方准备好接收消息。 这会允许分布式应用程序的组件断开连接,例如,为进行维护而自动断开,或因组件故障断开连接,而不会影响系统的整体性能。 此外,使用方应用程序可能只需在一天的特定时段内联机。
负载平衡。 在许多应用程序中,系统负载随时间而变化,而每个工作单元所需的处理时间通常为常量。 使用队列在消息生产者与消费者之间作为中介,意味着只需要将消费者应用程序(工作程序)预配为适应平均负载,而不是最大负载。 队列深度将随传入负载的变化而加大和减小。 这直接在满足应用负载所需的基础设施数量方面节省了资金。
负载均衡。 随着负载增加,可添加更多的工作进程以从队列中读取。 每条消息仅由一个工作进程处理。 另外,此基于拉取的负载均衡可以最优化地使用工作机器,即使这些工作机器的处理能力不同,因为它们会以其自身的最大速率拉取消息。 此模式通常称为 使用者竞争 模式。
以下各节讨论了实现此体系结构的代码。
先决条件
本教程将使用Microsoft Entra身份验证来创建 ServiceBusClient 和 ServiceBusAdministrationClient 对象。 你还将使用 DefaultAzureCredential,要使用的话,需要执行以下步骤以在开发环境中本地测试应用程序。
- 在 Microsoft Entra ID 中注册应用程序。
-
将应用程序添加到
Service Bus Data Owner角色。 - 设置
AZURE-CLIENT-ID、AZURE-TENANT-ID和AZURE-CLIENT-SECRET环境变量。 请参阅这篇文章,了解相关说明。
有关 Service Bus 内置角色的列表,请参阅 Service Bus 的 Azure 内置角色。
创建命名空间
第一步是创建命名空间 并获取该命名空间的共享访问签名 (SAS) 密钥。 命名空间为通过Service Bus公开的每个应用程序提供应用程序边界。 创建命名空间后,系统将生成一个 SAS 密钥。 命名空间名称和 SAS 密钥的组合提供用于Service Bus对应用程序的访问权限进行身份验证的凭据。
在 Azure 门户中创建命名空间
若要开始在Azure中使用Service Bus消息传送实体,请创建名称在Azure中唯一的命名空间。 命名空间为应用程序中Service Bus资源(如队列和主题)提供范围容器。
创建命名空间:
登录到 Azure 门户。
从左上角选择浮出控件菜单,然后转到“ 所有服务 ”页。
在左侧导航栏上,选择 “集成”。
向下滚动到 Messaging services,将鼠标悬停在 Service Bus 上,然后选择 Create。
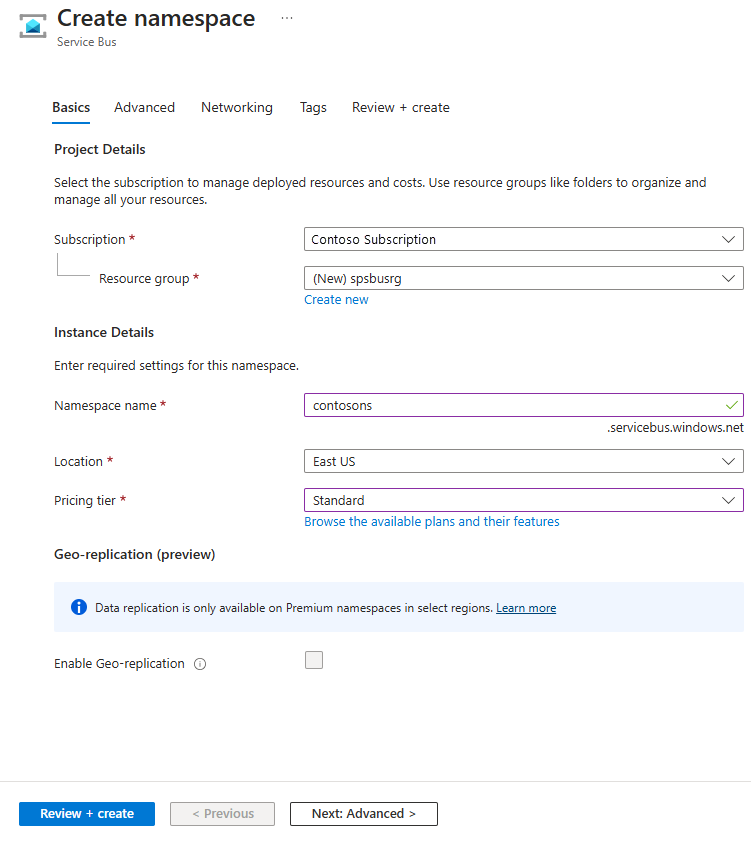
屏幕截图显示选择“创建资源”、“集成”,然后在菜单中选择“服务总线”。 在“创建命名空间”页的“基本信息”选项卡中,执行以下步骤:
对于Subscription,请选择要用来创建命名空间的 Azure 订阅。
对于资源组,选择现有资源组或创建新的资源组。
输入符合以下命名约定的 命名空间名称 :
- 名称在Azure中必须唯一。 系统会立即检查该名称是否可用。
- 名称长度最少为 6 个字符,最多为 50 个字符。
- 名称只能包含字母、数字和连字符
-。 - 名称必须以字母开头,并且必须以字母或数字结尾。
- 名称不以
-sb或-mgmt结尾。
对于 “位置”,请选择要托管命名空间的区域。
对于“定价层”,请选择命名空间的定价层(“基本”、“标准”或“高级”)。 对于本快速入门,请选择“标准”。
如果选择 高级 层,可以为命名空间启用 异地复制 。 异地复制功能可确保命名空间的元数据和数据从主要区域持续复制到一个或多个次要区域。
重要
若要使用主题和订阅,请选择“标准”或“高级”。 基本定价层不支持主题和订阅。
如果选择了“高级”定价层,请指定“消息传送单元”数。 高级层在 CPU 和内存级别提供资源隔离,使每个工作负荷在隔离的环境中运行。 此资源容器称为 消息传送单元。 高级命名空间至少具有一个消息传送单元。 可以为每个Service Bus高级命名空间选择 1、2、4、8 或 16 个消息传送单元。 有关详细信息,请参阅Service Bus高级消息传送层。
在页面底部选择查看 + 创建。
在 “审阅 + 创建 ”页上,查看设置,然后选择“ 创建”。
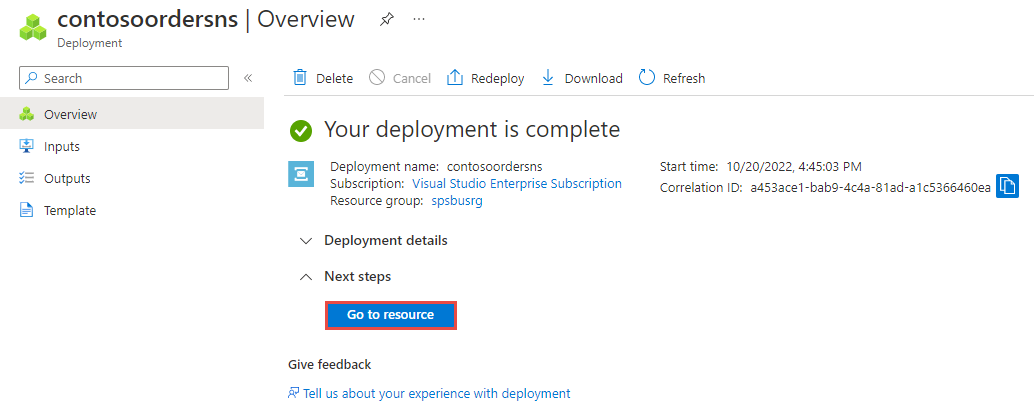
部署资源成功后,在部署页上选择 “转到资源 ”。
将会看到服务总线命名空间的主页。
Screenshot 显示 Service Bus 命名空间已创建的主页。


获取命名空间连接字符串(Azure 门户)
创建新命名空间会自动生成初始共享访问签名 (SAS) 策略。 该策略包括主密钥和辅助密钥,以及主连接字符串和辅助连接字符串,这些都授予对命名空间所有方面的完全控制权。 有关如何为常规发送方和接收方创建具有更多约束权限的规则的详细信息,请参阅 Service Bus身份验证和授权。
客户端可以使用connection string连接到Service Bus命名空间。 若要复制命名空间的主连接字符串,请执行以下步骤:
在Service Bus命名空间页上,展开Settings,然后选择共享访问策略。
在“共享访问策略”页,选择“RootManageSharedAccessKey” 。
在 SAS 策略:RootManageSharedAccessKey 窗口中,选择 主连接字符串旁边的复制按钮。 此操作会将连接字符串复制到剪贴板供以后使用。 将此值粘贴到记事本或其他某个临时位置。
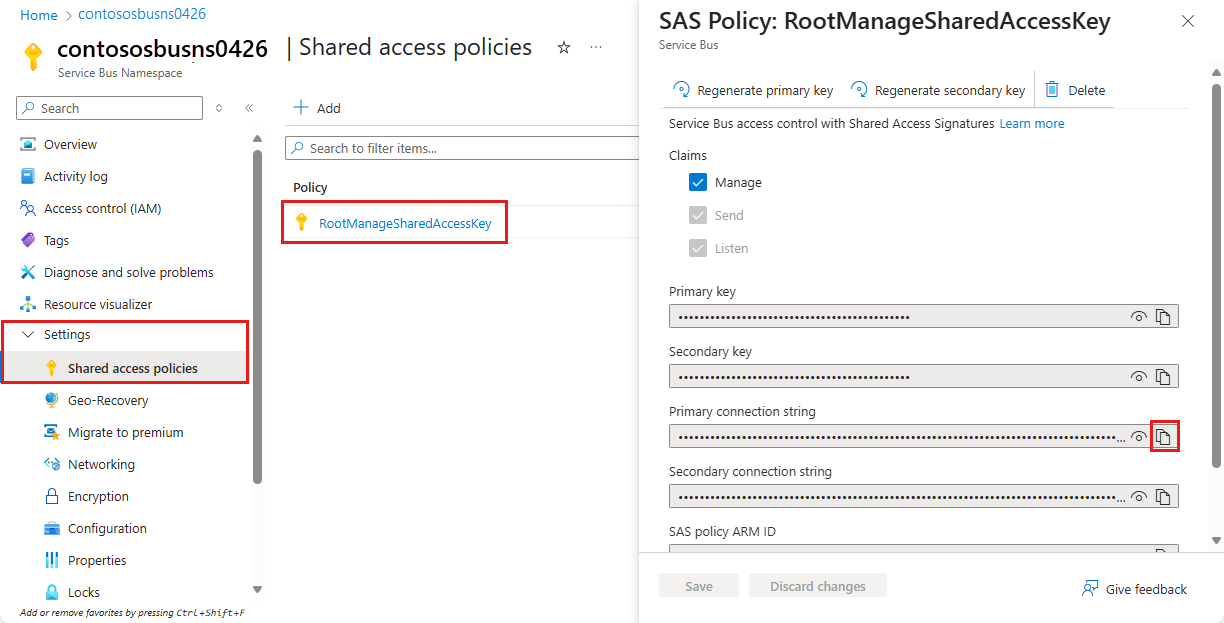
可以使用此页面复制主密钥、辅助密钥、主连接字符串和辅助连接字符串。

创建 Web 角色
在本节中,您将构建应用程序的前端。 首先,将创建应用程序显示的各种页面。 之后,添加将项提交到Service Bus队列的代码,并显示有关队列的状态信息。
创建项目
使用管理员权限,启动Visual Studio:右键单击Visual Studio程序图标,然后选择以管理员身份运行。 本文稍后讨论的Azure计算模拟器要求Visual Studio以管理员权限启动。
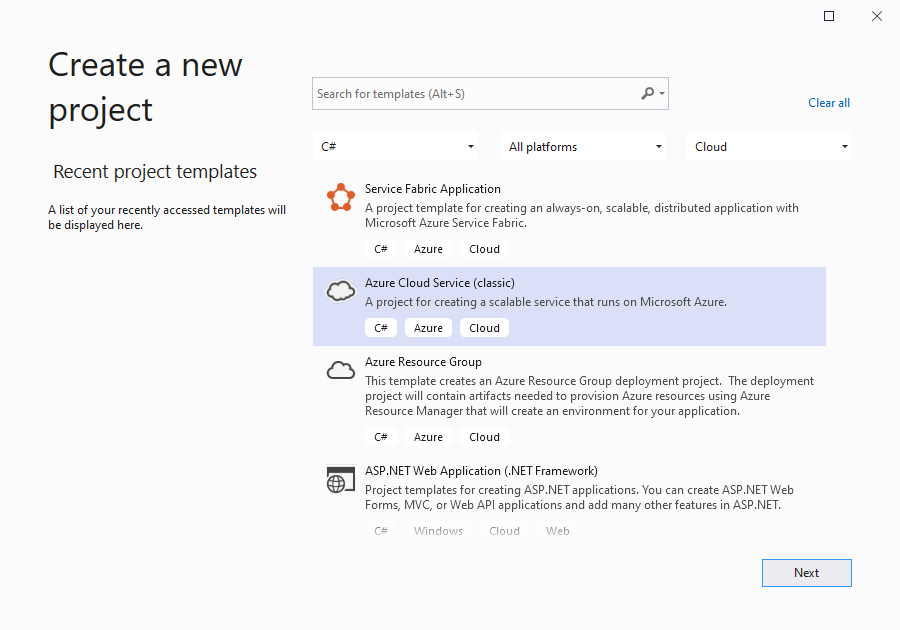
在 Visual Studio 的 File 菜单上,选择 New,然后选择 Project。
在“模板”页上执行以下步骤:
选择“C#”作为编程语言。
选择“云”作为项目类型。
选择Azure云服务。
选择“下一步”。
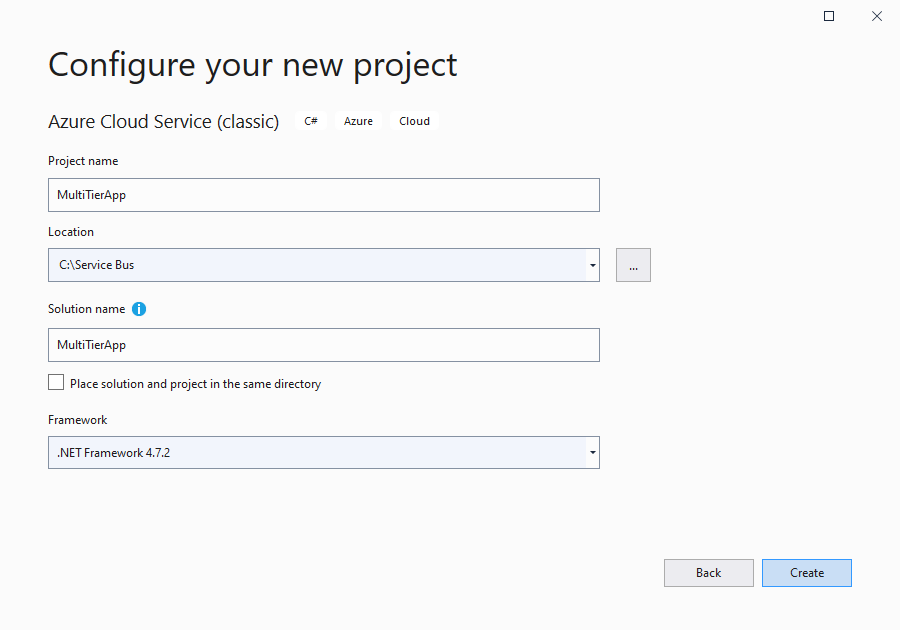
将项目命名为 MultiTierApp,选择项目的位置,然后选择“创建”。
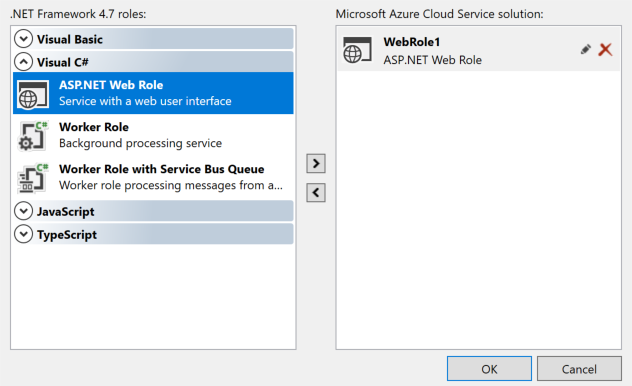
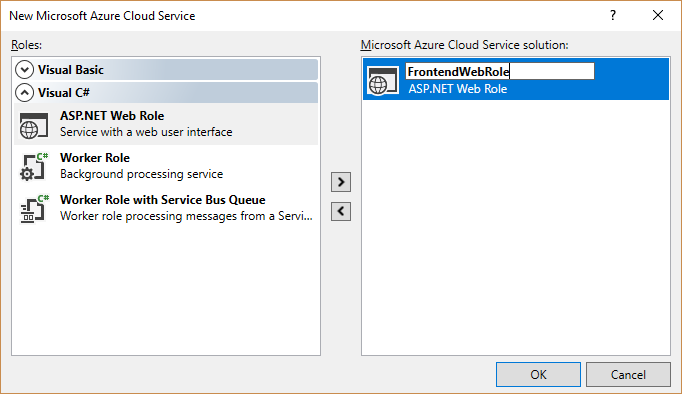
在 Roles 页上,双击 ASP.NET Web 角色,然后选择 OK。
将鼠标悬停在 WebRole1 下Azure云服务解决方案,选择铅笔图标,并将 Web 角色重命名为 FrontendWebRole。 然后选择“ 确定”。 (请确保输入“frontend”,而不是“FrontEnd”,其中“e”要小写。)
在 创建新的 ASP.NET Web 应用程序对话框中,选择 MVC,然后选择 Create。

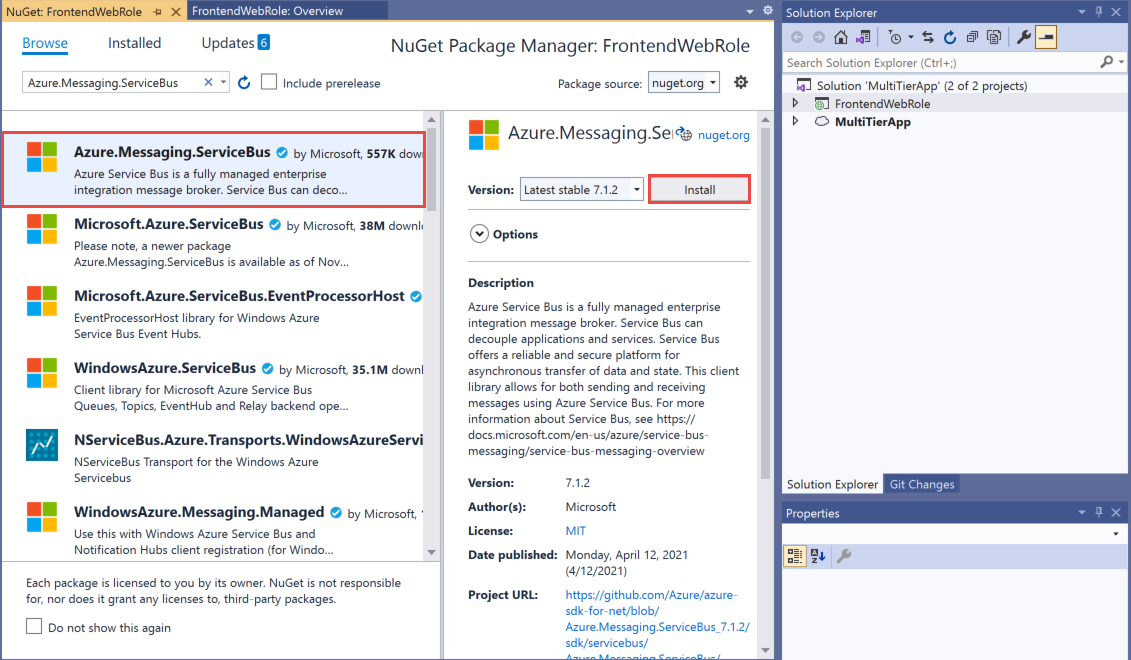
在 Solution Explorer 中,在 FrontendWebRole 项目中,右键单击 References,然后选择 Manage NuGet Packages。
选择 Browse 选项卡,然后搜索 Azure。Messaging.ServiceBus。 选择 Azure。Messaging.ServiceBus 包,选择 Install,然后接受使用条款。
请注意,现已引用所需的客户端程序集并已添加部分新代码文件。
按照相同的步骤将
Azure.IdentityNuGet 包添加到项目。在 Solution Explorer 中, 展开 FrontendWebRole,右键单击 Models 并选择 Add,然后选择 Class。 在“名称”框中,键入名称“OnlineOrder.cs”。 然后选择“添加”。
为 Web 角色编写代码
在本部分,将创建应用程序显示的各种页面。
在Visual Studio中的OnlineOrder.cs文件中,将现有命名空间定义替换为以下代码:
namespace FrontendWebRole.Models
{
    public class OnlineOrder
    {
        public string Customer { get; set; }
        public string Product { get; set; }
    }
}
在 Solution Explorer 中,双击 Controllers\HomeController.cs。 在文件顶部添加以下 using 语句,以包含刚创建的模型的命名空间以及Service Bus。
 using FrontendWebRole.Models;
 using Azure.Messaging.ServiceBus;
此外,在Visual Studio的 HomeController.cs 文件中,将现有命名空间定义替换为以下代码。 此代码包含处理项目提交到队列的方法。
namespace FrontendWebRole.Controllers
{
    public class HomeController : Controller
    {
        public ActionResult Index()
        {
            // Simply redirect to Submit, since Submit will serve as the
            // front page of this application.
            return RedirectToAction("Submit");
        }

        public ActionResult About()
        {
            return View();
        }

        // GET: /Home/Submit.
        // Controller method for a view you will create for the submission
        // form.
        public ActionResult Submit()
        {
            // Will put code for displaying queue message count here.

            return View();
        }

        // POST: /Home/Submit.
        // Controller method for handling submissions from the submission
        // form.
        [HttpPost]
        // Attribute to help prevent cross-site scripting attacks and
        // cross-site request forgery.
        [ValidateAntiForgeryToken]
        public ActionResult Submit(OnlineOrder order)
        {
            if (ModelState.IsValid)
            {
                // Will put code for submitting to queue here.

                return RedirectToAction("Submit");
            }
            else
            {
                return View(order);
            }
        }
    }
}
在“生成”菜单中,选择“生成解决方案”以测试工作的准确性。
现在,为前面创建的
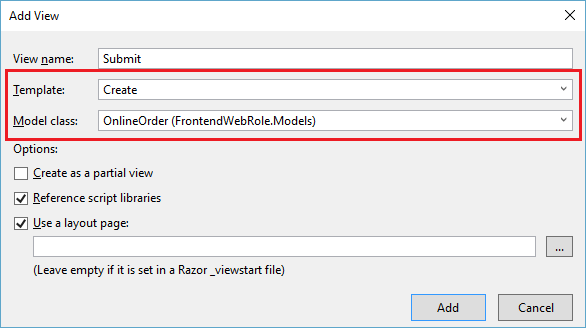
Submit()方法创建视图。 在Submit()文件中的Submit()方法(不带任何参数的 的重载函数)中右键单击,然后选择“添加视图”。在“添加已搭建基架的新项”对话框中,选择“添加”。
在“添加视图”对话框中,执行以下步骤:
在“模板”列表中,选择“创建”。
在“模型类”列表中,选择“OnlineOrder”类。
选择 并添加。
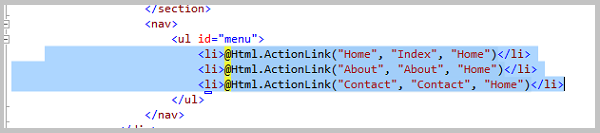
现在,请更改应用程序的显示名称。 在 Solution Explorer 中,双击 Views\Shared\_Layout.cshtml 文件,在Visual Studio编辑器中打开该文件。
将所有出现的 My ASP.NET Application 替换为 Northwind Traders Products。
删除“Home”、“About”和“Contact”链接。 删除突出显示的代码:
最后,修改提交页以包含有关队列的一些信息。 在 Solution Explorer 中,双击 Views\Home\Submit.cshtml 文件,在Visual Studio编辑器中将其打开。
<h2>Submit</h2>后面添加以下行。ViewBag.MessageCount当前为空。 稍后你将填充它。<p>Current number of orders in queue waiting to be processed: @ViewBag.MessageCount</p>现在,你已实现了 UI。 可以按 F5 运行应用程序并确认其按预期方式运行。
编写代码以将项目提交到服务总线队列
现在,添加代码以将项提交到队列。 首先,创建包含Service Bus队列连接信息的类。 然后,从 Global.aspx.cs 文件中初始化连接。 最后,更新之前在HomeController.cs中创建的提交代码,以实际将项目提交到Service Bus队列。
在 Solution Explorer 中,右键单击 FrontendWebRole (右键单击项目而不是角色)。 依次选择“添加”、“类”。
将类命名为 QueueConnector.cs。 选择“添加”,以创建此类。
现在,添加代码以封装连接信息,并初始化到服务总线队列的连接。 将 QueueConnector.cs 的全部内容替换为以下代码,并输入先前从 Azure 门户获取的
your Service Bus namespace(命名空间名称)和yourKey(即 主密钥)的值。using System; using System.Collections.Generic; using System.Linq; using System.Web; using System.Threading.Tasks; using Azure.Messaging.ServiceBus; using Azure.Messaging.ServiceBus.Administration; namespace FrontendWebRole { public static class QueueConnector { // object to send messages to a Service Bus queue internal static ServiceBusSender SBSender; // object to create a queue and get runtime properties (like message count) of queue internal static ServiceBusAdministrationClient SBAdminClient; // Fully qualified Service Bus namespace private const string FullyQualifiedNamespace = "<SERVICE BUS NAMESPACE NAME>.servicebus.chinacloudapi.cn"; // The name of your queue. internal const string QueueName = "OrdersQueue"; public static async Task Initialize() { // Create a Service Bus client that you can use to send or receive messages ServiceBusClient SBClient = new ServiceBusClient(FullyQualifiedNamespace, new DefaultAzureCredential()); // Create a Service Bus admin client to create queue if it doesn't exist or to get message count SBAdminClient = new ServiceBusAdministrationClient(FullyQualifiedNamespace, new DefaultAzureCredential()); // create the OrdersQueue if it doesn't exist already if (!(await SBAdminClient.QueueExistsAsync(QueueName))) { await SBAdminClient.CreateQueueAsync(QueueName); } // create a sender for the queue SBSender = SBClient.CreateSender(QueueName); } } }现在,请确保 Initialize 方法会被调用。 在 Solution Explorer 中,双击 Global.asax\Global.asax.cs。
在 Application_Start 方法的末尾添加以下代码行。
FrontendWebRole.QueueConnector.Initialize().Wait();最后,更新之前创建的 Web 代码以便将项提交到队列。 在 Solution Explorer 中,双击 Controllers\HomeController.cs。
更新
Submit()方法(不包含任何参数的重载),如下所示,获取队列的消息计数。public ActionResult Submit() { QueueRuntimeProperties properties = QueueConnector.adminClient.GetQueueRuntimePropertiesAsync(QueueConnector.queueName).Result; ViewBag.MessageCount = properties.ActiveMessageCount; return View(); }更新
Submit(OnlineOrder order)方法(包含一个参数的重载),如下所示,将订单信息提交到队列。public ActionResult Submit(OnlineOrder order) { if (ModelState.IsValid) { // create a message var message = new ServiceBusMessage(new BinaryData(order)); // send the message to the queue QueueConnector.sbSender.SendMessageAsync(message); return RedirectToAction("Submit"); } else { return View(order); } }现在,可以重新运行应用程序。 每次提交订单时,消息计数都会增大。
创建工作角色
你现在将创建用于处理订单提交的工作角色。 此示例将 Worker Role 与 Service Bus Queue Visual Studio 项目模板配合使用。 已从门户中获取所需的凭据。
请确保已将Visual Studio连接到Azure帐户。
在 Visual Studio 中,在
Solution Explorer 右键单击 <Roles 文件夹下的 MultiTierApp 文件夹。选择“添加”,然后选择“新建辅助角色项目”。 此时会显示“添加新角色项目”对话框。
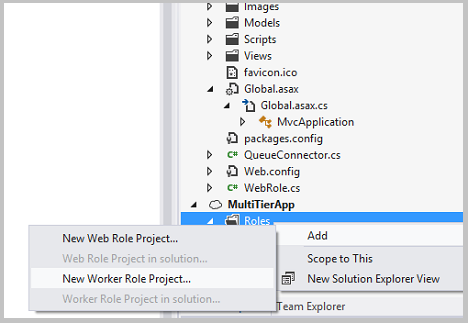
在“添加新角色项目”对话框中,选择“辅助角色”。 不要选择Worker Role with Service Bus Queue,因为它生成使用旧版 Service Bus SDK 的代码。
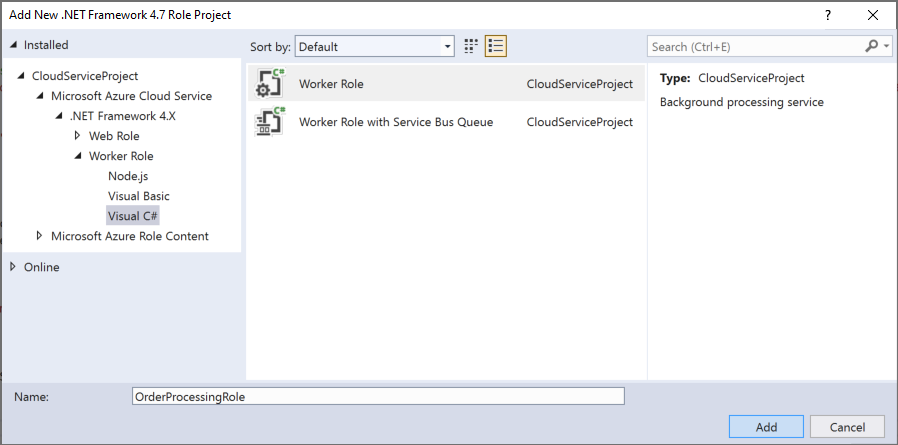
在“名称”框中,将项目命名为“OrderProcessingRole”。 然后选择“添加”。
在 Solution Explorer 中,右键单击 OrderProcessingRole 项目,然后选择 Manage NuGet Packages。
选择 Browse 选项卡,然后搜索 Azure。Messaging.ServiceBus。 选择 Azure。Messaging.ServiceBus 包,选择 Install,然后接受使用条款。
按照相同的步骤将
Azure.IdentityNuGet 包添加到项目。从队列中处理订单时,创建一个 OnlineOrder 类来表示这些订单。 可以重用已创建的类。 在 Solution Explorer 中,右键单击 OrderProcessingRole 类(右键单击类图标,而不是角色)。 选择“添加”,然后选择“现有项”。
浏览到 FrontendWebRole\Models 的子文件夹,然后双击“OnlineOrder.cs”以将其添加到此项目中。
将以下
using语句添加到 OrderProcessingRole 项目中的 WorkerRole.cs 文件。using FrontendWebRole.Models; using Azure.Messaging.ServiceBus; using Azure.Messaging.ServiceBus.Administration;在 WorkerRole.cs 中,添加以下属性。
重要
对作为先决条件的一部分记录的命名空间使用connection string。
    // Fully qualified Service Bus namespace
    private const string FullyQualifiedNamespace = "<SERVICE BUS NAMESPACE NAME>.servicebus.chinacloudapi.cn";

    // The name of your queue.
    private const string QueueName = "OrdersQueue";

    // Service Bus Receiver object to receive messages message the specific queue
    private ServiceBusReceiver SBReceiver;
更新
OnStart方法以创建ServiceBusClient对象,然后更新ServiceBusReceiver对象以接收来自OrdersQueue的消息。public override bool OnStart() { // Create a Service Bus client that you can use to send or receive messages ServiceBusClient SBClient = new ServiceBusClient(FullyQualifiedNamespace, new DefaultAzureCredential()); CreateQueue(QueueName).Wait(); // create a receiver that we can use to receive the message SBReceiver = SBClient.CreateReceiver(QueueName); return base.OnStart(); } private async Task CreateQueue(string queueName) { // Create a Service Bus admin client to create queue if it doesn't exist or to get message count ServiceBusAdministrationClient SBAdminClient = new ServiceBusAdministrationClient(FullyQualifiedNamespace, new DefaultAzureCredential()); // create the OrdersQueue if it doesn't exist already if (!(await SBAdminClient.QueueExistsAsync(queueName))) { await SBAdminClient.CreateQueueAsync(queueName); } }更新
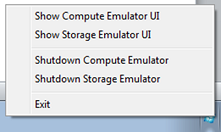
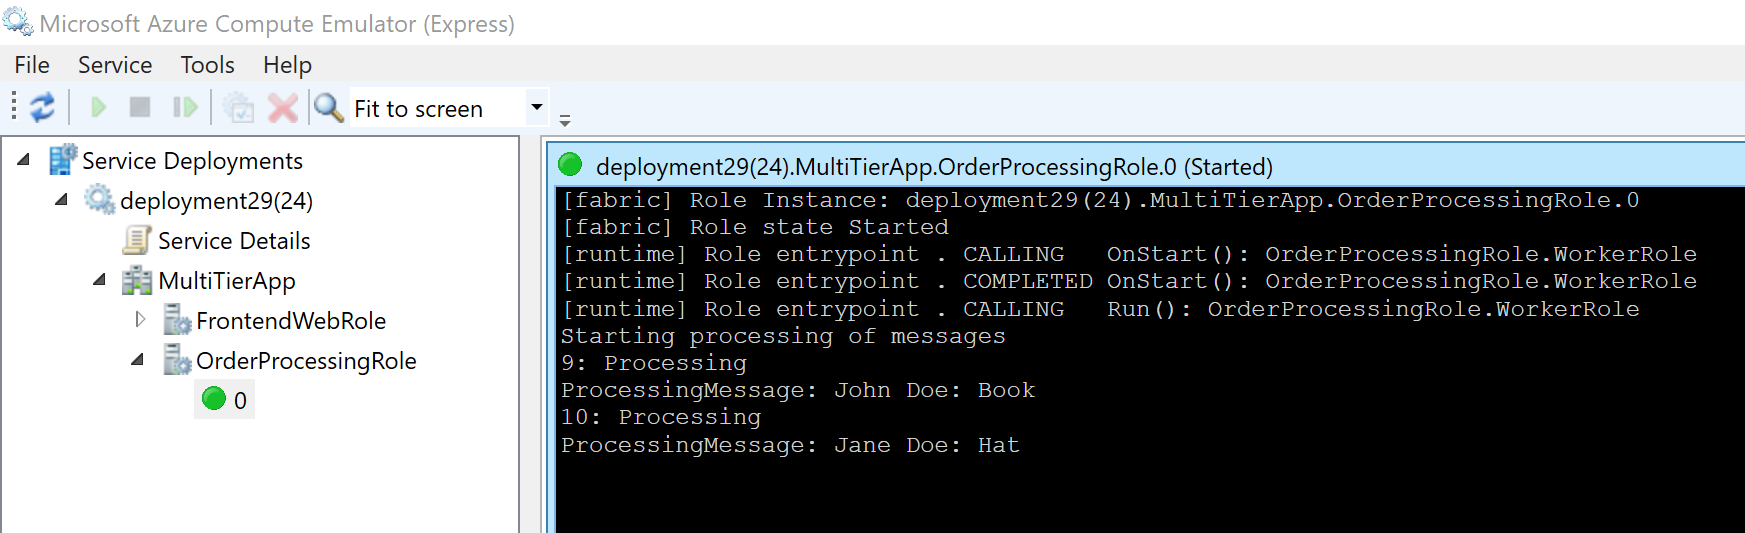
RunAsync方法以包含用于接收消息的代码。private async Task RunAsync(CancellationToken cancellationToken) { // TODO: Replace the following with your own logic. while (!cancellationToken.IsCancellationRequested) { // receive message from the queue ServiceBusReceivedMessage receivedMessage = await SBReceiver.ReceiveMessageAsync(); if (receivedMessage != null) { Trace.WriteLine("Processing", receivedMessage.SequenceNumber.ToString()); // view the message as an OnlineOrder OnlineOrder order = receivedMessage.Body.ToObjectFromJson<OnlineOrder>(); Trace.WriteLine(order.Customer + ": " + order.Product, "ProcessingMessage"); // complete message so that it's removed from the queue await SBReceiver.CompleteMessageAsync(receivedMessage); } } }已完成申请。 可以通过右键单击 Solution Explorer 中的 MultiTierApp 项目,选择 Set 作为启动项目,然后按 F5 来测试完整应用程序。 消息计数不会递增,因为工作角色会处理队列中的项并将其标记为完成。 可以通过查看 Azure 计算模拟器 UI 来查看工作角色的跟踪输出。 可通过右击任务栏的通知区域中的模拟器图标并选择“显示计算模拟器 UI”来执行此操作。
后续步骤
若要了解有关Service Bus的详细信息,请参阅以下资源: