本教程是一个系列中的第一部分。 在本教程中,了解如何创建具有 ASP.NET Core Web API 前端和有状态后端服务来存储数据的 Azure Service Fabric 应用程序。 完成后,你将拥有一个投票应用程序,其中包含 ASP.NET Core Web 前端,用于将投票结果保存到群集的有状态后端服务中。
本系列教程需要 Windows 开发人员计算机。 如果不想手动创建投票应用程序,可以下载已完成应用程序的源代码,跳到大致了解投票示例应用程序。 还可查看本教程的视频演练。

本教程介绍如何执行下列操作:
- 创建 ASP.NET Core Web API 服务作为有状态可靠服务
- 创建 ASP.NET Core Web 应用程序服务作为无状态 Web 服务
- 使用反向代理与有状态服务通信
本教程系列介绍如何:
- 构建 .NET Service Fabric 应用程序(本教程)
- 将应用程序部署到远程群集
- 向 ASP.NET Core 前端服务添加 HTTPS 终结点
- 使用 Azure Pipelines 配置 CI/CD
- 设置监视和诊断应用程序
先决条件
在开始学习本教程之前:
- 如果没有 Azure 订阅,请创建一个试用版版订阅。
- 安装 Visual Studio 2019 版本 15.5 或更高版本,包括 Azure 开发工作负载以及 ASP.NET 和 Web 开发工作负载。
- 安装 Service Fabric SDK。
创建 ASP.NET Web API 服务作为可靠服务
首先,使用 ASP.NET Core 创建投票应用程序的 Web 前端。 ASP.NET Core 是轻量跨平台的 Web 开发框架,可用于创建新式 Web UI 和 Web API。
若要全面了解 ASP.NET Core 如何与 Service Fabric 集成,强烈建议查看 Service Fabric Reliable Services 中的 ASP.NET Core 一文。 现可按照本指南快速入门。 若要了解有关 ASP.NET Core 的详细信息,请参阅 ASP.NET Core 文档。
创建服务:
使用“以管理员身份运行”选项打开 Visual Studio。
选择“文件”“新建”>“项目”,创建一个新项目。>
在“创建新项目”中,选择“云”“Service Fabric 应用程序”。> 选择下一步。
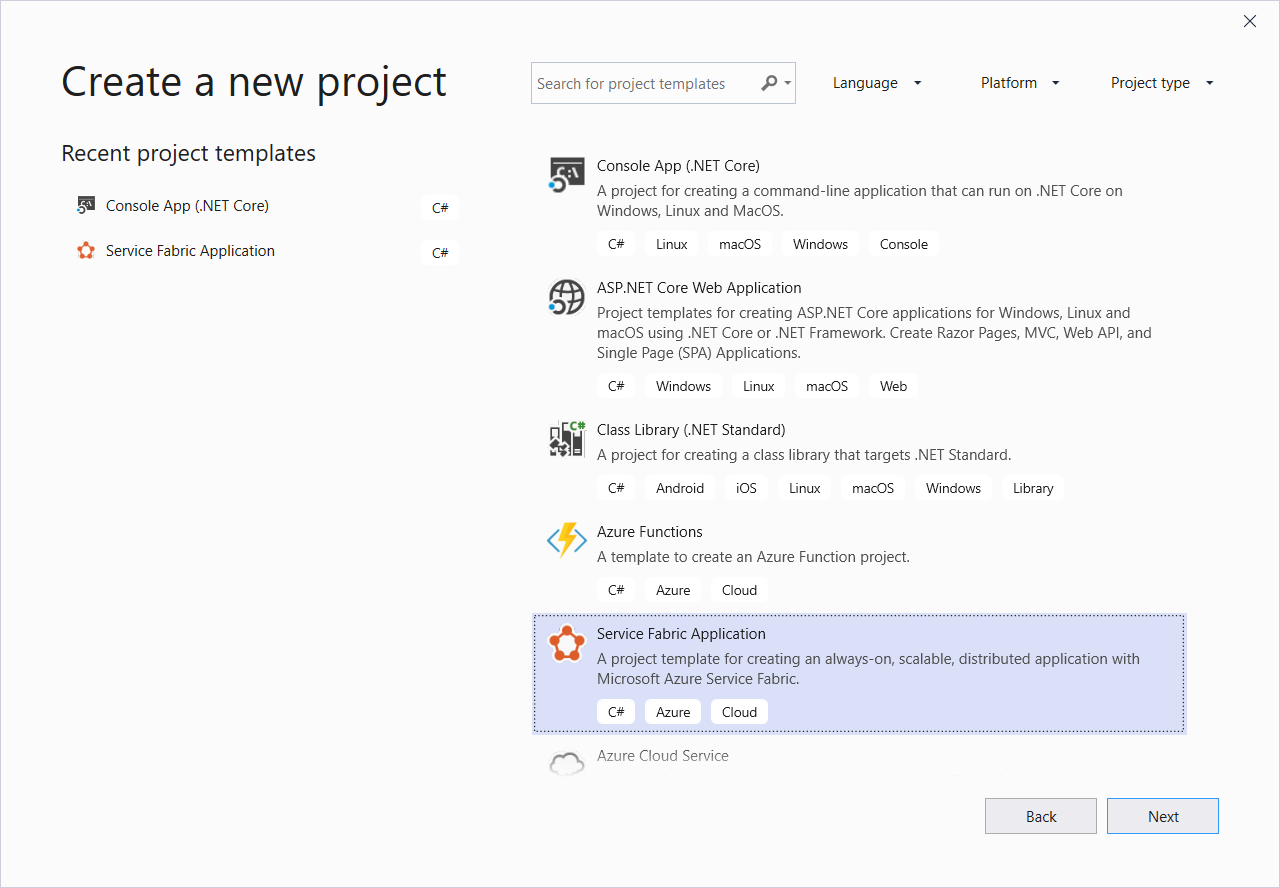
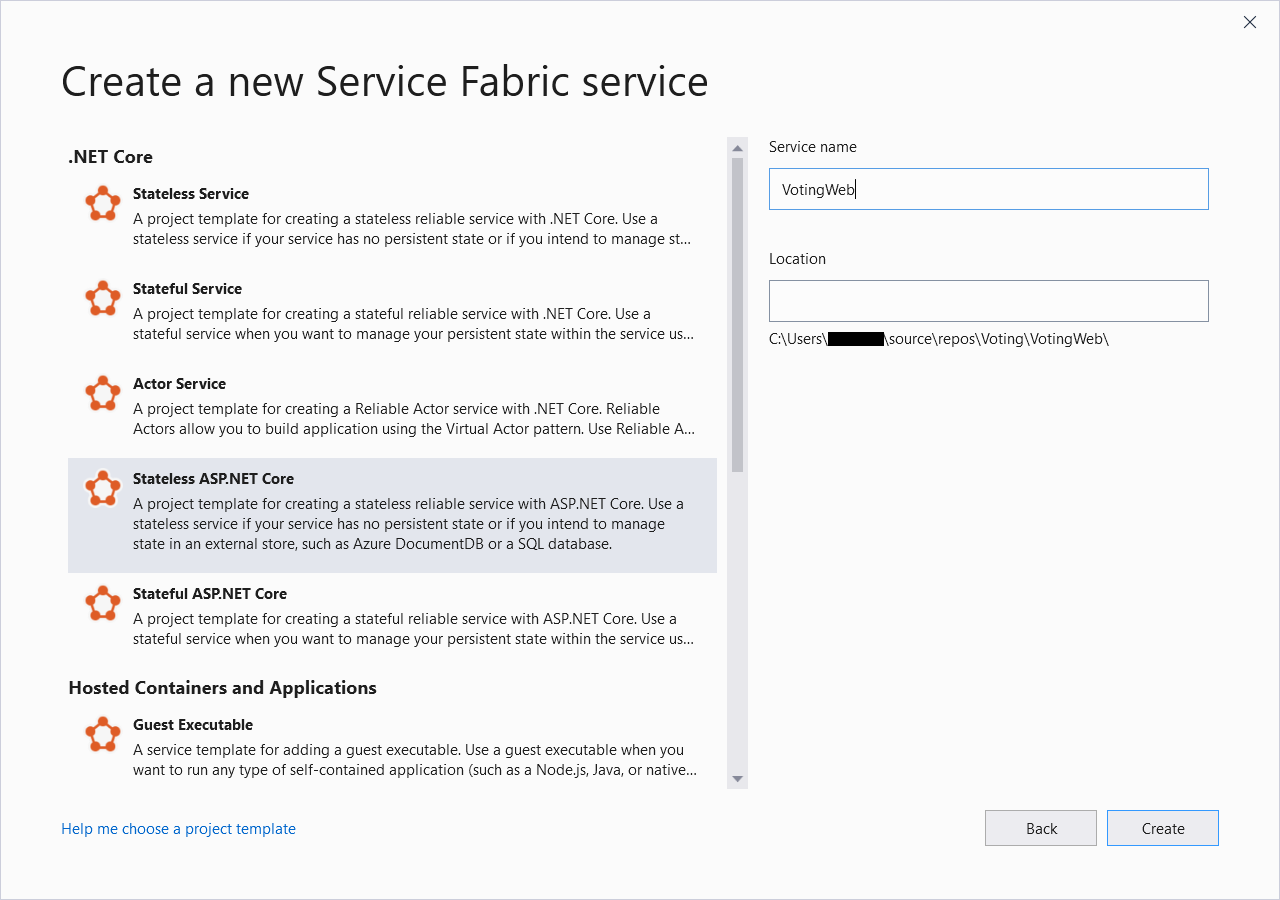
为新的项目类型选择“无状态 ASP.NET Core”,将服务命名为 VotingWeb,然后选择“创建”。
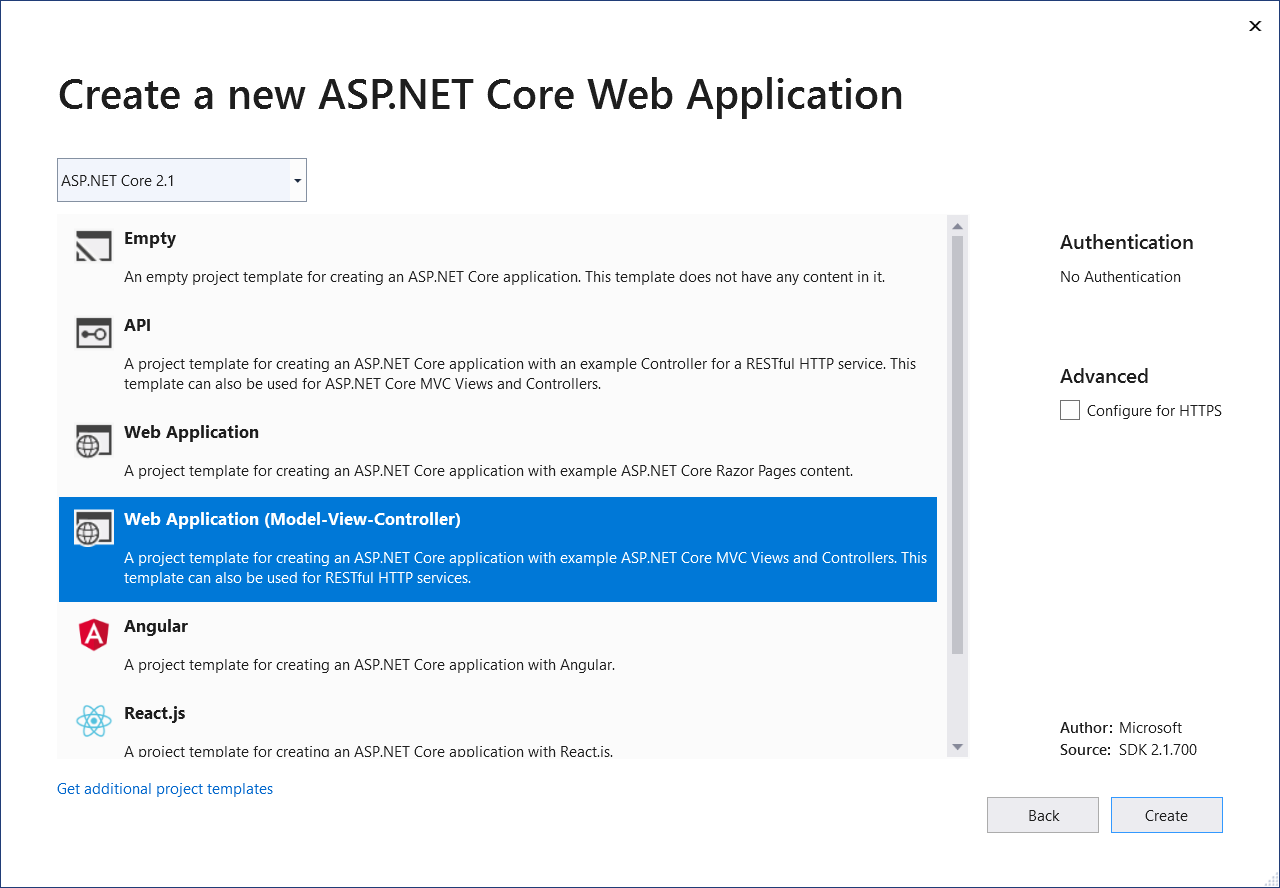
下一个窗格会显示一组 ASP.NET Core 项目模板。 对于本教程,请选择“Web 应用程序(模型-视图-控制器)”,然后单击“创建”。
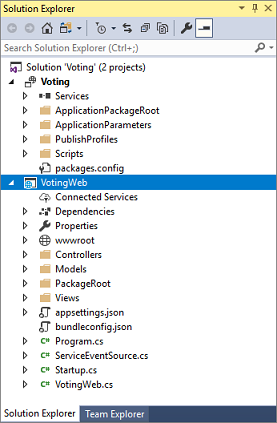
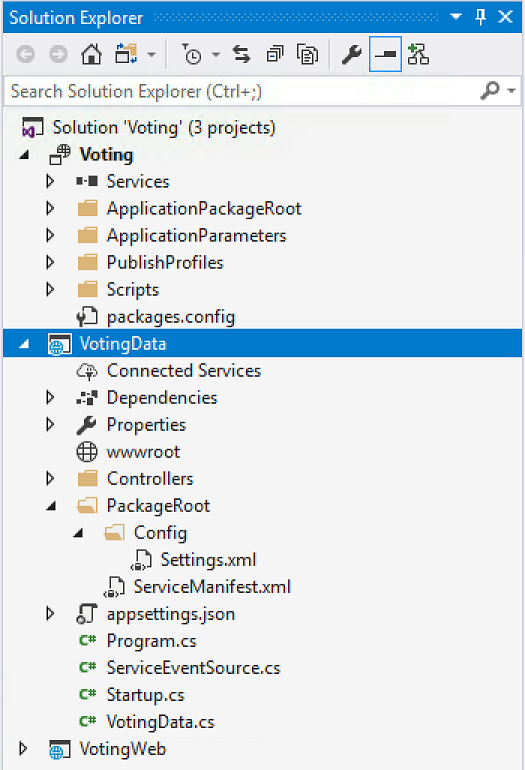
Visual Studio 会创建应用程序和服务项目,并在 Visual Studio 解决方案资源管理器中显示它们:
更新 site.js 文件
转到 wwwroot/js/site.js 并打开该文件。 将文件内容替换为“主页”视图所用的以下 JavaScript,然后保存更改。
var app = angular.module('VotingApp', ['ui.bootstrap']);
app.run(function () { });

app.controller('VotingAppController', ['$rootScope', '$scope', '$http', '$timeout', function ($rootScope, $scope, $http, $timeout) {

    $scope.refresh = function () {
        $http.get('api/Votes?c=' + new Date().getTime())
            .then(function (data, status) {
                $scope.votes = data;
            }, function (data, status) {
                $scope.votes = undefined;
            });
    };

    $scope.remove = function (item) {
        $http.delete('api/Votes/' + item)
            .then(function (data, status) {
                $scope.refresh();
            })
    };

    $scope.add = function (item) {
        var fd = new FormData();
        fd.append('item', item);
        $http.put('api/Votes/' + item, fd, {
            transformRequest: angular.identity,
            headers: { 'Content-Type': undefined }
        })
            .then(function (data, status) {
                $scope.refresh();
                $scope.item = undefined;
            })
    };
}]);
更新 Index.cshtml 文件
转到 Views/Home/Index.cshtml 并打开该文件。 此文件具有特定于主控制器的视图。 将其内容替换为以下代码,然后保存所做更改。
@{
    ViewData["Title"] = "Service Fabric Voting Sample";
}

<div ng-controller="VotingAppController" ng-init="refresh()">
    <div class="container-fluid">
        <div class="row">
            <div class="col-xs-8 col-xs-offset-2 text-center">
                <h2>Service Fabric Voting Sample</h2>
            </div>
        </div>

        <div class="row">
            <div class="col-xs-8 col-xs-offset-2">
                <form class="col-xs-12 center-block">
                    <div class="col-xs-6 form-group">
                        <input id="txtAdd" type="text" class="form-control" placeholder="Add voting option" ng-model="item"/>
                    </div>
                    <button id="btnAdd" class="btn btn-default" ng-click="add(item)">
                        <span class="glyphicon glyphicon-plus" aria-hidden="true"></span>
                        Add
                    </button>
                </form>
            </div>
        </div>

        <hr/>

        <div class="row">
            <div class="col-xs-8 col-xs-offset-2">
                <div class="row">
                    <div class="col-xs-4">
                        Click to vote
                    </div>
                </div>
                <div class="row top-buffer" ng-repeat="vote in votes.data">
                    <div class="col-xs-8">
                        <button class="btn btn-success text-left btn-block" ng-click="add(vote.Key)">
                            <span class="pull-left">
                                {{vote.key}}
                            </span>
                            <span class="badge pull-right">
                                {{vote.value}} Votes
                            </span>
                        </button>
                    </div>
                    <div class="col-xs-4">
                        <button class="btn btn-danger pull-right btn-block" ng-click="remove(vote.Key)">
                            <span class="glyphicon glyphicon-remove" aria-hidden="true"></span>
                            Remove
                        </button>
                    </div>
                </div>
            </div>
        </div>
    </div>
</div>
更新 _Layout.cshtml 文件
转到 Views/Shared/_Layout.cshtml 并打开该文件。 此文件具有 ASP.NET 应用的默认布局。 将其内容替换为以下代码,然后保存所做更改。
<!DOCTYPE html>
<html ng-app="VotingApp" xmlns:ng="https://angularjs.org">
<head>
    <meta charset="utf-8"/>
    <meta name="viewport" content="width=device-width, initial-scale=1.0"/>
    <title>@ViewData["Title"]</title>

    <link href="~/lib/bootstrap/dist/css/bootstrap.css" rel="stylesheet"/>
    <link href="~/css/site.css" rel="stylesheet"/>

</head>
<body>
<div class="container body-content">
    @RenderBody()
</div>

<script src="~/lib/jquery/dist/jquery.js"></script>
<script src="~/lib/bootstrap/dist/js/bootstrap.js"></script>
<script src="https://cdnjs.cloudflare.com/ajax/libs/angular.js/1.7.2/angular.min.js"></script>
<script src="https://cdnjs.cloudflare.com/ajax/libs/angular-ui-bootstrap/2.5.0/ui-bootstrap-tpls.js"></script>
<script src="~/js/site.js"></script>

@RenderSection("Scripts", required: false)
</body>
</html>
更新 VotingWeb.cs 文件
打开 VotingWeb.cs 文件。 该文件使用 WebListener Web 服务器在无状态服务内创建 ASP.NET Core WebHost。
在文件的开头,添加 using System.Net.Http; 指令。
将 CreateServiceInstanceListeners() 函数替换为以下代码,然后保存所做更改。
protected override IEnumerable<ServiceInstanceListener> CreateServiceInstanceListeners()
{
    return new ServiceInstanceListener[]
    {
        new ServiceInstanceListener(
            serviceContext =>
                new KestrelCommunicationListener(
                    serviceContext,
                    "ServiceEndpoint",
                    (url, listener) =>
                    {
                        ServiceEventSource.Current.ServiceMessage(serviceContext, $"Starting Kestrel on {url}");

                        return new WebHostBuilder()
                            .UseKestrel()
                            .ConfigureServices(
                                services => services
                                    .AddSingleton<HttpClient>(new HttpClient())
                                    .AddSingleton<FabricClient>(new FabricClient())
                                    .AddSingleton<StatelessServiceContext>(serviceContext))
                            .UseContentRoot(Directory.GetCurrentDirectory())
                            .UseStartup<Startup>()
                            .UseServiceFabricIntegration(listener, ServiceFabricIntegrationOptions.None)
                            .UseUrls(url)
                            .Build();
                    }))
    };
}
接下来,在 GetVotingDataServiceName 后面添加以下 CreateServiceInstanceListeners() 方法,然后保存所做更改。
GetVotingDataServiceName 在投票时返回服务名称。
internal static Uri GetVotingDataServiceName(ServiceContext context)
{
    return new Uri($"{context.CodePackageActivationContext.ApplicationName}/VotingData");
}
添加 VotesController.cs 文件
添加控制器以定义投票操作。 右键单击 Controllers 文件夹,然后选择“添加”“新建项”“Visual C#”>“ASP.NET Core”“类”。>>> 将文件命名为 VotesController.cs,然后选择“添加”。
将 VotesController.cs 文件内容替换为以下代码,然后保存所做更改。 稍后在执行更新 VotesController.cs 文件时将会修改此文件,以读取和写入来自后端服务的投票数据。 现在,控制器会将静态字符串数据返回到视图中。
namespace VotingWeb.Controllers
{
    using System;
    using System.Collections.Generic;
    using System.Fabric;
    using System.Fabric.Query;
    using System.Linq;
    using System.Net.Http;
    using System.Net.Http.Headers;
    using System.Text;
    using System.Threading.Tasks;
    using Microsoft.AspNetCore.Mvc;
    using Newtonsoft.Json;

    [Produces("application/json")]
    [Route("api/Votes")]
    public class VotesController : Controller
    {
        private readonly HttpClient httpClient;

        public VotesController(HttpClient httpClient)
        {
            this.httpClient = httpClient;
        }

        // GET: api/Votes
        [HttpGet]
        public async Task<IActionResult> Get()
        {
            List<KeyValuePair<string, int>> votes= new List<KeyValuePair<string, int>>();
            votes.Add(new KeyValuePair<string, int>("Pizza", 3));
            votes.Add(new KeyValuePair<string, int>("Ice cream", 4));

            return Json(votes);
        }
     }
}
配置侦听端口
创建 VotingWeb 前端服务后,Visual Studio 会随机选择服务侦听的端口。 VotingWeb 服务充当此应用程序的前端并接受外部流量。 在此部分中,将该服务绑定到固定且已知的端口。 服务清单声明服务终结点。
在解决方案资源管理器中,打开 VotingWeb/PackageRoot/ServiceManifest.xml。 在 Resources 部分中,找到 Endpoint 元素,然后将 Port 值更改为 8080。
若要在本地部署和运行应用程序,应用程序侦听端口必须为打开状态且在你的计算机上可用。
<Resources>
    <Endpoints>
      <!-- This endpoint is used by the communication listener to obtain the port on which to
           listen. Please note that if your service is partitioned, this port is shared with
           replicas of different partitions that are placed in your code. -->
      <Endpoint Protocol="http" Name="ServiceEndpoint" Type="Input" Port="8080" />
    </Endpoints>
  </Resources>
接下来,更新投票项目中的 Application URL 属性值,使 Web 浏览器在调试应用程序时打开到正确的端口。 在解决方案资源管理器中,选择投票项目,然后将 属性更新为 Application URL。8080
在本地部署并运行“Voting”应用程序
现在可以运行投票应用程序来调试它。 在 Visual Studio 中,选择 F5 在调试模式下将应用程序部署到本地 Service Fabric 群集。 如果以前未使用“以管理员身份运行”选项打开 Visual Studio,则应用程序会失败。
注意
首次在本地运行和部署应用程序时,Visual Studio 会创建用于调试的本地 Service Fabric 群集。 创建群集的过程可能需要一些时间。 群集创建状态显示在 Visual Studio 输出窗口中。
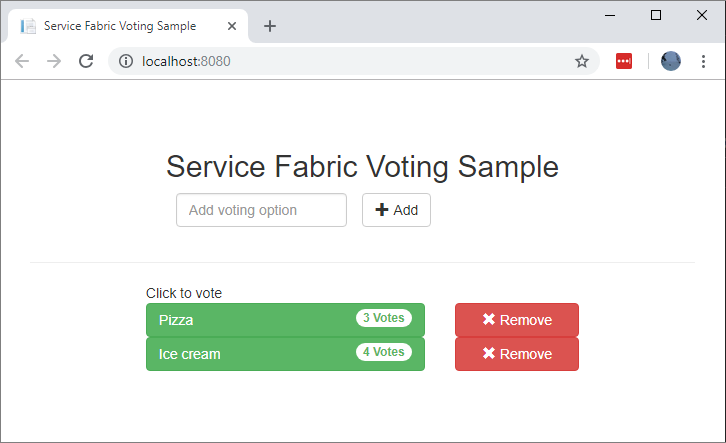
将投票应用程序部署到本地 Service Fabric 群集后,Web 应用会在浏览器标签页中自动打开,如下所示。它如以下示例所示:
若要停止调试应用程序,请返回到 Visual Studio 并选择 Shift+F5。
向应用程序添加有状态后端服务
现在,ASP.NET Web API 服务正在应用程序中运行,请添加有状态可靠服务以在应用程序中存储某些数据。
可借助 Service Fabric 使用可靠集合直接在服务内以一致、可靠的方式存储数据。 可靠集合是一组高度可用的可靠集合类,具有 C# 集合使用经验的用户都很熟悉它们。
若要创建一个服务用于在可靠集合中存储计数器值,请执行以下操作:
在解决方案资源管理器中,右键单击投票应用程序项目中的“服务”,然后选择“添加”“新建 Service Fabric 服务”。>
在“新建 Service Fabric 服务”对话框中,选择“有状态 ASP.NET Core”,将服务命名为 VotingData,然后选择“确定”。
创建服务项目后,应用程序中会有两个服务。 随着继续生成应用程序,可采用相同的方式添加更多服务。 可以单独对每个服务进行版本控制和升级。
下一个窗格会显示一组 ASP.NET Core 项目模板。 对于本教程,请选择“API”。
Visual Studio 会创建 VotingData 服务项目,并在解决方案资源管理器中显示:
添加 VoteDataController.cs 文件
在 VotingData 项目中,右键单击 Controllers 文件夹,然后选择“添加”“新建项”“类”。>> 将文件命名为 VoteDataController.cs,然后选择“添加”。 将文件内容替换为以下代码,然后保存所做更改。
namespace VotingData.Controllers
{
    using System.Collections.Generic;
    using System.Threading;
    using System.Threading.Tasks;
    using Microsoft.AspNetCore.Mvc;
    using Microsoft.ServiceFabric.Data;
    using Microsoft.ServiceFabric.Data.Collections;

    [Route("api/[controller]")]
    public class VoteDataController : Controller
    {
        private readonly IReliableStateManager stateManager;

        public VoteDataController(IReliableStateManager stateManager)
        {
            this.stateManager = stateManager;
        }

        // GET api/VoteData
        [HttpGet]
        public async Task<IActionResult> Get()
        {
            CancellationToken ct = new CancellationToken();

            IReliableDictionary<string, int> votesDictionary = await this.stateManager.GetOrAddAsync<IReliableDictionary<string, int>>("counts");

            using (ITransaction tx = this.stateManager.CreateTransaction())
            {
                Microsoft.ServiceFabric.Data.IAsyncEnumerable<KeyValuePair<string, int>> list = await votesDictionary.CreateEnumerableAsync(tx);

                Microsoft.ServiceFabric.Data.IAsyncEnumerator<KeyValuePair<string, int>> enumerator = list.GetAsyncEnumerator();

                List<KeyValuePair<string, int>> result = new List<KeyValuePair<string, int>>();

                while (await enumerator.MoveNextAsync(ct))
                {
                    result.Add(enumerator.Current);
                }

                return this.Json(result);
            }
        }

        // PUT api/VoteData/name
        [HttpPut("{name}")]
        public async Task<IActionResult> Put(string name)
        {
            IReliableDictionary<string, int> votesDictionary = await this.stateManager.GetOrAddAsync<IReliableDictionary<string, int>>("counts");

            using (ITransaction tx = this.stateManager.CreateTransaction())
            {
                await votesDictionary.AddOrUpdateAsync(tx, name, 1, (key, oldvalue) => oldvalue + 1);
                await tx.CommitAsync();
            }

            return new OkResult();
        }

        // DELETE api/VoteData/name
        [HttpDelete("{name}")]
        public async Task<IActionResult> Delete(string name)
        {
            IReliableDictionary<string, int> votesDictionary = await this.stateManager.GetOrAddAsync<IReliableDictionary<string, int>>("counts");

            using (ITransaction tx = this.stateManager.CreateTransaction())
            {
                if (await votesDictionary.ContainsKeyAsync(tx, name))
                {
                    await votesDictionary.TryRemoveAsync(tx, name);
                    await tx.CommitAsync();
                    return new OkResult();
                }
                else
                {
                    return new NotFoundResult();
                }
            }
        }
    }
}
连接服务
在此部分中,将连接两个服务。 使前端 Web 应用程序从后端服务获取投票信息,然后在应用中设置信息。
在与可靠服务通信的方式上,Service Fabric 提供了完全的灵活性。 在单个应用程序中,可能有可通过 TCP/IP、HTTP REST API 或 WebSocket 协议访问的服务。 有关可用选项和相关权衡取舍的背景信息,请参阅与服务通信。
本教程使用 ASP.NET Core Web API 和 Service Fabric 反向代理,以便 VotingWeb 前端 Web 服务能够与后端 VotingData 服务通信。 默认情况下,反向代理配置为使用端口 19081。 反向代理端口是在设置群集的 Azure 资源管理器模板中设置的。 若要确定使用哪个端口,请在 Microsoft.ServiceFabric/clusters 资源中搜索群集模板:
"nodeTypes": [
          {
            ...
            "httpGatewayEndpointPort": "[variables('nt0fabricHttpGatewayPort')]",
            "isPrimary": true,
            "vmInstanceCount": "[parameters('nt0InstanceCount')]",
            "reverseProxyEndpointPort": "[parameters('SFReverseProxyPort')]"
          }
        ],
若要查找在本地开发群集中使用的反向代理端口,请查看本地 Service Fabric 群集清单中的 HttpApplicationGatewayEndpoint 元素:
- 若要打开 打开 Service Fabric Explorer 工具,请打开浏览器窗口请转到
http://localhost:19080。 - 选择“群集”“清单”。>
- 记下
HttpApplicationGatewayEndpoint元素端口。 默认情况下,该端口为 19081。 如果不是 19081,请更改 VotesController.cs 代码的GetProxyAddress方法中的端口,如下一部分所述。
更新 VotesController.cs 文件
在 VotingWeb 项目中,打开 Controllers/VotesController.cs 文件。 将 VotesController 类定义内容替换为以下代码,然后保存所做更改。 如果在上述步骤中找到的反向代理端口不是 19081,请将 GetProxyAddress 方法中的端口从 19081 更改为所发现的端口。
public class VotesController : Controller
{
    private readonly HttpClient httpClient;
    private readonly FabricClient fabricClient;
    private readonly StatelessServiceContext serviceContext;

    public VotesController(HttpClient httpClient, StatelessServiceContext context, FabricClient fabricClient)
    {
        this.fabricClient = fabricClient;
        this.httpClient = httpClient;
        this.serviceContext = context;
    }

    // GET: api/Votes
    [HttpGet("")]
    public async Task<IActionResult> Get()
    {
        Uri serviceName = VotingWeb.GetVotingDataServiceName(this.serviceContext);
        Uri proxyAddress = this.GetProxyAddress(serviceName);

        ServicePartitionList partitions = await this.fabricClient.QueryManager.GetPartitionListAsync(serviceName);

        List<KeyValuePair<string, int>> result = new List<KeyValuePair<string, int>>();

        foreach (Partition partition in partitions)
        {
            string proxyUrl =
                $"{proxyAddress}/api/VoteData?PartitionKey={((Int64RangePartitionInformation) partition.PartitionInformation).LowKey}&PartitionKind=Int64Range";

            using (HttpResponseMessage response = await this.httpClient.GetAsync(proxyUrl))
            {
                if (response.StatusCode != System.Net.HttpStatusCode.OK)
                {
                    continue;
                }

                result.AddRange(JsonConvert.DeserializeObject<List<KeyValuePair<string, int>>>(await response.Content.ReadAsStringAsync()));
            }
        }

        return this.Json(result);
    }

    // PUT: api/Votes/name
    [HttpPut("{name}")]
    public async Task<IActionResult> Put(string name)
    {
        Uri serviceName = VotingWeb.GetVotingDataServiceName(this.serviceContext);
        Uri proxyAddress = this.GetProxyAddress(serviceName);
        long partitionKey = this.GetPartitionKey(name);
        string proxyUrl = $"{proxyAddress}/api/VoteData/{name}?PartitionKey={partitionKey}&PartitionKind=Int64Range";

        StringContent putContent = new StringContent($"{{ 'name' : '{name}' }}", Encoding.UTF8, "application/json");
        putContent.Headers.ContentType = new MediaTypeHeaderValue("application/json");

        using (HttpResponseMessage response = await this.httpClient.PutAsync(proxyUrl, putContent))
        {
            return new ContentResult()
            {
                StatusCode = (int) response.StatusCode,
                Content = await response.Content.ReadAsStringAsync()
            };
        }
    }

    // DELETE: api/Votes/name
    [HttpDelete("{name}")]
    public async Task<IActionResult> Delete(string name)
    {
        Uri serviceName = VotingWeb.GetVotingDataServiceName(this.serviceContext);
        Uri proxyAddress = this.GetProxyAddress(serviceName);
        long partitionKey = this.GetPartitionKey(name);
        string proxyUrl = $"{proxyAddress}/api/VoteData/{name}?PartitionKey={partitionKey}&PartitionKind=Int64Range";

        using (HttpResponseMessage response = await this.httpClient.DeleteAsync(proxyUrl))
        {
            if (response.StatusCode != System.Net.HttpStatusCode.OK)
            {
                return this.StatusCode((int) response.StatusCode);
            }
        }

        return new OkResult();
    }

    /// <summary>
    /// Constructs a reverse proxy URL for a given service.
    /// Example: http://localhost:19081/VotingApplication/VotingData/
    /// </summary>
    /// <param name="serviceName"></param>
    /// <returns></returns>
    private Uri GetProxyAddress(Uri serviceName)
    {
        return new Uri($"http://localhost:19081{serviceName.AbsolutePath}");
    }

    /// <summary>
    /// Creates a partition key from the given name.
    /// Uses the zero-based numeric position in the alphabet of the first letter of the name (0-25).
    /// </summary>
    /// <param name="name"></param>
    /// <returns></returns>
    private long GetPartitionKey(string name)
    {
        return Char.ToUpper(name.First()) - 'A';
    }
}
大致了解投票示例应用程序
投票应用程序由以下两个服务组成:
- Web 前端服务 (VotingWeb):一项 ASP.NET Core Web 前端服务,它为网页提供服务,并公开用于与后端服务进行通信的 Web API。
- 后端服务 (VotingData):一项 ASP.NET Core Web 服务,它公开用于将投票结果存储在可靠字典中的 API(其中该字典保存在磁盘上)。
在应用程序中投票时,将会发生以下事件:
JavaScript 文件将投票请求作为 HTTP PUT 请求发送给 Web 前端服务中的 Web API。
Web 前端服务使用代理定位并将 HTTP PUT 请求转发给后端服务。
后端服务采用传入请求,并将更新后的结果存储在可靠字典中。 该字典将复制到群集中的多个节点,并保存在磁盘上。 应用程序的所有数据都存储在群集中,因此无需使用数据库。
在 Visual Studio 中进行调试
在 Visual Studio 中调试应用程序时,使用的是本地 Service Fabric 开发群集。 可以根据自己的方案调整调试体验。
在此应用程序中,使用可靠字典将数据存储到后端服务中。 停止调试程序时,Visual Studio 会默认删除应用程序。 删除应用程序后,后端服务中的数据也会随之一起删除。 若要跨调试会话保留数据,可以在 Visual Studio 中更改“应用程序调试模式” (“Voting” 项目属性)。
若要查看代码中发生了什么,请完成以下步骤:
打开 VotingWeb\VotesController.cs 文件,并在 Web API 的 方法中设置断点(第 72 行)。
Put打开 VotingData\VoteDataController.cs 文件,并在 Web API 的 方法中设置断点(第 54 行)。
Put选择 F5,在调试模式下启动应用程序。
返回到浏览器,然后选择投票选项或添加新的投票选项。 命中 Web 前端 API 控制器中的第一个断点。
浏览器中的 JavaScript 将请求发送到前端服务中的 Web API 控制器:
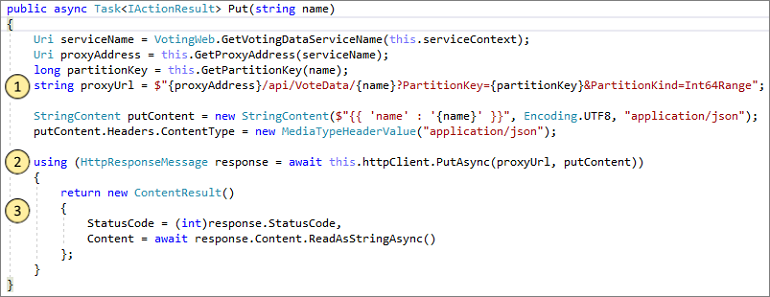
- 首先,为后端服务构建反向代理的的 URL。 (1)
- 然后,将 HTTP PUT 请求发送到反向代理。 (2)
- 最后,将来自后端服务的响应返回到客户端。 (3)
选择 F5 以继续操作。
此时,你在后端服务中的断点处:
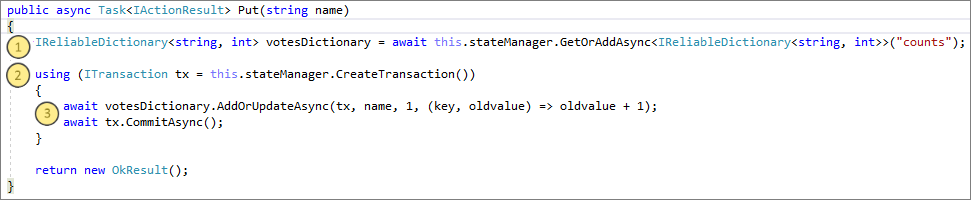
- 在方法的第一行中,使用
stateManager获取或添加名为counts的可靠字典。 (1) - 在可靠字典中具有值的所有交互都需要事务。 此
using语句会创建该事务。 (2) - 在事务中,更新投票选项的相关键值并提交操作。
commit方法返回时,数据在字典中更新。 然后,它会复制到群集中的其他节点。 数据现在安全地存储在群集中,并且后端服务可以故障转移到其他节点,同时数据仍然可用。 (3)
- 在方法的第一行中,使用
选择 F5 以继续操作。
若要停止调试会话,请选择 Shift+F5。